
Popular categories
Looking for a yarn?


Comments / Questions (97)
![]() Christiane Boos wrote:
Christiane Boos wrote:
Hallo, kann ich die Ärmel auch verlängern? Ich hätte gerne Ärmel bis ca. Ellenbogen. Oder stricke ich einfach den Ärmelteil länger? Danke, Christiane
24.06.2022 - 14:56DROPS Design answered:
Liebe Frau Boos, vielleicht könnte Ihnen dieses Modell damit inspirieren. Viel Spaß beim stricken!
27.06.2022 - 07:51
![]() Anita wrote:
Anita wrote:
Hello Jeanette,Doing XL. On Line 17 from top, of your pattern, I do not understand: slip sts on a new stich holder,*** How many?*** & slip sts from 1st stch holder back on the needle 38. Not clearly explained!!!
04.09.2021 - 23:16DROPS Design answered:
Dear Anita, you slip all of the sts you have been working now on a new stitch holder and then you slip back to the needle the 38 stitches you had in the first stitch holder. Happy knitting!
05.09.2021 - 17:12
![]() Giulia wrote:
Giulia wrote:
Ho ricevuto la sua risposta, io ho già fatto altri lavori coi Ferri accorciati, ma non capisco le misure , come faccio ad avere cm 7,5 dalla parte del collo che è la parte dei ferri accorciati e quindi viene lavorata di più e avere 20,5 cm nella parte bassa che è la parte che ho lavorato di meno , non mi tornano queste misure .Dovrei avere meno cm nella parte bassa rispetto alla parte vicino al collo, spero di essermi spiegata meglio, grazie
22.04.2021 - 07:40DROPS Design answered:
Buonasera Giulia, prosegua con la lavorazione, e piano piano si chiarirà la direzione del lavoro. Buon lavoro!
24.04.2021 - 21:57
![]() Giulia wrote:
Giulia wrote:
Non capisco abbastanza all’inizio, dopo aver eseguito i ferri accorciati, io ho taglia L , dove dice fino a quando il lavoro misura 7,5 cm in alto vicino al collo e 20,5 cm in basso . I cm vengono misurati come ? Poi se dalla parte del collo in alto ho 7,5 cm come faccio ad avere in basso 20,5 cm ? Mi può rispondere abbastanza in fretta e magari farmi uno schema perché non riesco a continuare , la ringrazio infinitamente , perche voglio anche capire bene
21.04.2021 - 21:21DROPS Design answered:
Buonasera Giulia, le misure diverse sono dovute al fatto che si lavorano i ferri accorciati, per cui si lavora solo su una parte delle maglie e non su tutte le maglie presenti sul ferro. Buon lavoro!
21.04.2021 - 22:57
![]() Hanneke Goumare wrote:
Hanneke Goumare wrote:
Ik wil graag dit model voor mijn dochger breien maar ook voor haar dochtertje in maat 104. Hoe bereken ik het patroon voor maat 104? I would like to knit this patern for my daughter in size M and for her daughter in size 104 - childrensize. How can I convert the patern in this small size?
23.03.2021 - 22:27DROPS Design answered:
Dag Hanneke,
Dit patroon is er alleen in damesmaten. Het is voor ons helaas niet mogelijk om een patroon aan te passen naar persoonlijke wensen. Wellicht kun je een patroon vinden uit onze selectie kinderpatronen en die eventueel aanpassen om bijvoorbeeld zonder mouwen te breien en met een korter lijf.
26.03.2021 - 16:00
![]() Brigitte wrote:
Brigitte wrote:
Gibt es diese Anleitung auch auf Deutsch?
12.03.2021 - 13:53DROPS Design answered:
Liebe Brigitte, alle unsere Modellen sind auch auf Deutsch erhältlick; klicken Sie auf das Dropsdown-Menü unter dem Foto und so wählen Sie Ihre Sprache. Viel Spaß beim stricken!
15.03.2021 - 09:53
![]() Marion wrote:
Marion wrote:
Thank you for your earlier help. I've now reached the part where I need to slip stitches onto a new stitch holder and to slip stitches from first stitch holder back onto needle and to continue knitting garter stitch. Do I start with new yarn on the 32 stitches from the stitch holder (I'm making the second size) or do I continue with the working yarn which will make circle for the sleeve? - I can't see how this would work though.
13.10.2019 - 16:00Marion answered:
I've continued knitting and now I've added all stitches back onto the needle the shape is now clear.
13.10.2019 - 19:55
![]() Marion wrote:
Marion wrote:
Help please - I am ready to slip stitches onto a stitch holder but I am confused as my working yarn is at the bottom end of the row and so I will not have the yarn to continue knitting the shortened rows. Do I need to join in new working yarn? Or do I knit the stitches before slipping them onto the stitch holder so the yarn is in the middle ready to knit the shortened rows?
11.10.2019 - 23:39DROPS Design answered:
Dear Marion, it would be simpler (as less ends to weave in) to knit the stitches before you slip them on a stitch-holder, or a piece of yarn. Happy Knitting!
12.10.2019 - 01:20
![]() Annette wrote:
Annette wrote:
Hallo Liebes Drops-Team, ich verstehe nicht, wie ich oben 2 Reihen und unten 6 Reihen stricken kann. Bei meinen Versuchen wächst nur die obere Hälfte mit den verkürzten Reihen und unten wächst die Strickarbeit nicht. Was mache ich falsch ? Vielen Dank und liebe Grüße Annette
28.10.2018 - 12:43DROPS Design answered:
Liebe Annette, bein den verkürzten Reihen stricken Sie: 2 Reihe über die Maschen bis zur 1. Markierung, 2 Reihe über die Maschen bis zur 2. Markierung und 2 Reihen über alle Maschen = Sie haben 6 Reihen über die ersten Maschen (= rechten Seite) und nur 2 Reihen über die letzten Maschen (= linken Seite) gestrickt. Diese 6 Reihe so wiederholen, Strickstück wächst mehr auf der rechten Seite (untere Kante der Jacke) als auf den linken Seite (obere Kante = am Hals). Viel Spaß beim stricken!
29.10.2018 - 08:25
![]() Abbie wrote:
Abbie wrote:
I have completed my first set of short rows and I’m rady to put my stitches on a stitch holder. Which is the top and which is the bottom? I’m not visualizing the sweater yet? And am I supposed to move my markers to new spots now, after I place my stitches on the stitch holder? Thanks for any help given!
19.10.2017 - 22:35DROPS Design answered:
Dear Abbie, the bottom of the jacket is towards the longest side (where piece measures 16-23.5 cm, see size) and the top side is towards 1st makrer, where piece measures approx. 6-8.5 cm on the top towards neckline. Short rows are also worked on the sleeve cap, but there will be now only 17-19 sts before 1st marker. Happy knitting!
20.10.2017 - 09:11
|
|
Helena#helenavest |
|
|
|
|
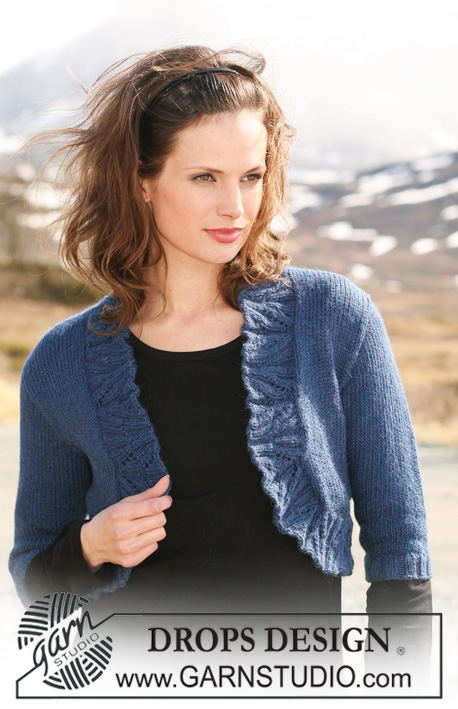
Short DROPS jacket with short sleeves knitted from side to side in 2 threads ”Alpaca”. Size XS - XXL.
DROPS 117-43 |
|
|
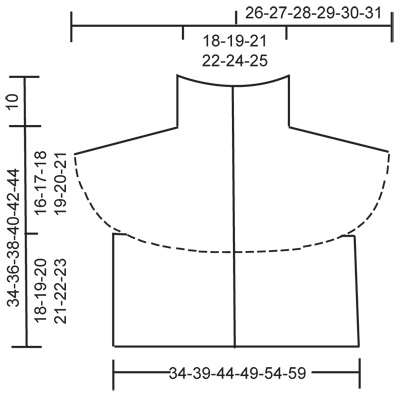
SHORTENED ROWS: * Work row to first marker, turn, tighten thread and work return row, work row to second marker, turn, tighten thread and work return row, work all sts, turn and work return row *, repeat from *-*. 1 repeat = 2 rows at the top and 6 rows at the bottom. ---------------------------------------------------------- JACKET: Worked back and forth on needle from the left side, in garter st, i.e. K all rows. Cast on 75-78-82-85-88-92 sts on needle size 5 mm with 1 thread of each colour. K 4 rows on all sts (first row = RS). Insert 2 markers in piece from RS as follows: First marker: after 47-49-52-54-56-59 sts Second marker: after a total of 57-60-64-67-70-74 sts = 18 sts after the last marker = collar. Continue with SHORTENED ROWS – see above – until piece measures 6-6.5-7-7.5-8-8.5 cm at the top (= by neck) and approx 16-17.5-19-20.5-22-23.5 cm at bottom. Insert a marker at the top by neck – NOW MEASURE PIECE FROM HERE! Slip the bottom 30-32-34-36-38-40 sts on a stitch holder = 45-46-48-49-50-52 sts left on needle for sleeve. Continue with shortened rows as before (but now there are only 17-17-18-18-18-19 sts before first marker) until piece measures approx 7-7.5-8-8.5-9-9.5 cm from marker by neck and approx 21-22.5-24-25.5-27-28.5 cm at bottom (= over sleeve). Slip sts on a new stitch holder and slip sts from the first stitch holder back on needle = 30-32-34-36-38-40 sts. Work garter st back and forth on these sts for 4-6-8-10-12-14 cm. Now slip all sts back on needle = 75-78-82-85-88-92 sts. Move marker from top of neck to where you are now, and now measure piece from here! Work shortened rows as before until piece measures approx 10-11-12-13-14-15 cm from marker by neck and approx 30-33-36-39-42-45 cm at bottom. Move marker from top of neck to where you are now, and now measure piece from here! Slip the bottom 30-32-34-36-38-40 sts on a stitch holder = 45-46-48-49-50-52 sts left on needle for sleeve. Continue with shortened rows as before until piece measures approx 7-7.5-8-8.5-9-9.5 cm from marker by neck and approx 21-22.5-24-25.5-27-28.5 cm at the bottom (= over sleeve). Slip sts on a new stitch holder and slip sts from the previous stitch holder back on needle = 30-32-34-36-38-40 sts. Work garter st back and forth on these sts for 4-6-8-10-12-14 cm. Now slip all sts back on the same needle = 75-78-82-85-88-92 sts. Move marker from top of neck to where you are now, and now measure piece from here! Continue with shortened rows on all sts until piece measures approx 5-5.5-6-6.5-7-7.5 cm from marker by neck and approx 15-16.5-18-19.5-21-22.5 cm at bottom. On next row from RS make 3 buttonholes as follows: * K9, K2 tog, 1 YO *, repeat from *-* a total of 3 times, K remaining sts on row. Work 3 rows garter st on all sts and cast off loosely. ASSEMBLY: Sew on buttons. |
|
 |
|
Have you finished this pattern?Tag your pictures with #dropspattern #helenavest or submit them to the #dropsfan gallery. Do you need help with this pattern?You'll find 13 tutorial videos, a Comments/Questions area and more by visiting the pattern on garnstudio.com. © 1982-2026 DROPS Design A/S. We reserve all rights. This document, including all its sub-sections, has copyrights. Read more about what you can do with our patterns at the bottom of each pattern on our site. |


With over 40 years in knitting and crochet design, DROPS Design offers one of the most extensive collections of free patterns on the internet - translated to 17 languages. As of today we count 325 catalogues and 12298 patterns translated into English (UK/cm).
We work hard to bring you the best knitting and crochet have to offer, inspiration and advice as well as great quality yarns at incredible prices! Would you like to use our patterns for other than personal use? You can read what you are allowed to do in the Copyright text at the bottom of all our patterns. Happy crafting!
Post a comment to pattern DROPS 117-43
We would love to hear what you have to say about this pattern!
If you want to leave a question, please make sure you select the correct category in the form below, to speed up the answering process. Required fields are marked *.