
Popular categories
Looking for a yarn?


Comments / Questions (43)
![]() Nora wrote:
Nora wrote:
I am having difficulty understanding the instructions for "textured pattern". I don't understand what it means by "worked on all stitches not included in M.2".
20.02.2014 - 05:51DROPS Design answered:
Dear Nora, all sts not included in M.2 will be crocheted either with sc when sc are crocheted in M.2 and with tr when shells are worked in M.2. Happy crocheting!
20.02.2014 - 08:41
![]() PETIT wrote:
PETIT wrote:
Bonjour, Je suis parvenue effectivement à réaliser cet ouvrage avec le point structuré mais je cale encore à l'étape juste après les augmentations. En effet, mon travail est décalé par rapport aux rangs précédents. Pourriez-vous m'apporter un éclairage. d'avance merci pour vos précieux conseils.
28.11.2013 - 19:36DROPS Design answered:
Bonjour Mme Petit, les augmentations se font sur les rangs de ms entre les coquilles: 2 ms dans la 1ère m de M.2 (sauf dans le 1er rapport) et 2 ms dans la dernière ms de M2 (sauf dans le dernier rapport) = on a 2 m en plus entre chaque coquille. Bon crochet!
29.11.2013 - 09:16
![]() Petit wrote:
Petit wrote:
Bonjour, j'ai du mal comprendre une étape car j'ai beaucoup de coquilles (et ce que j'obtiens au bout de 4 rangs ne rend pas du tout ce que la photo présente. Je ne comprends pas le point structuré. Auriez-vous quelques conseils à me prodiguer ? D'avance merci !
06.11.2013 - 08:07DROPS Design answered:
Bonjour Mme Petit, le point structuré est la partie à crocheter entre les coquilles, en fonction des points de la coquille, c'est à dire, soit en ms, soit en B soit en DB. 1 coquille dans M1=* 1ms, sauter 1 m, 1 coquille dans la m suiv, sauter 1 ms, 1 ms*,répétez de*-* 7ou 8 fois (cf taille). Bon crochet!
06.11.2013 - 09:53
![]() Beaugeois Anouk wrote:
Beaugeois Anouk wrote:
Bonjour, je suis novice en crochet et je crois que je me suis lancée dans un modèle un peu trop compliqué pour moi! Je ne comprends pas bien les explications de ce modèle, entre autre je ne sais pas ce que c'est que le point structuré, je ne comprends pas ce que je dois faire. Merci de votre aide et bon week-end. Anouk Beaugeois
21.04.2013 - 12:16DROPS Design answered:
Bonjour Mme Beaugeois, le point structuré se situe entre les rapports des diagrammes à répéter et se tricote en fonction du diagramme soit en ms soit en DB. Bon crochet !
23.04.2013 - 15:19
![]() Mevr. Bakker wrote:
Mevr. Bakker wrote:
Heel leuk patroon,maar zou u deze voor mij ook kunnen uitschrijven? Deze wil mijn moeder graag maken, en zij begrijpt het ook niet
18.01.2013 - 13:15DROPS Design answered:
Wij kunnen het patroon niet verder uitschrijven per toer. Volg de beschrijving + teltekeningen. En raadpleeg de video's voor de verschillende steken. Of ga langs je winkel voor persoonlijke ondersteuning.
18.01.2013 - 13:24
![]() Castel wrote:
Castel wrote:
J' adore mais je cherche un modèle en laine fine vaporeux
11.11.2012 - 16:16
![]() Ellen wrote:
Ellen wrote:
I have found a pattern today and I'm in love. I have a question with this pattern. After the 1st M.1 rapport is completed, I do have the 74 sts at completion. Then it says to continue next with M.2 5 times and have 144 sts. In the 1st M.1, is there suppose to be the increases on that sc row? Or does it start with the M.2 sc row? The photo looks like it has 4 tr sts on the 1st rapport of the M.2. I'm a little confused! Please, if you can answer me quickly….I am working on it now. Thank you!
28.10.2012 - 05:19DROPS Design answered:
Dear Ellen, you have to increase on all sc rows in M2, pattern have been edited to make it more clear. Happy Crocheting !
14.11.2012 - 09:04Drops Design wrote:
Hi Jenny, These are the names of the charts that you find at the bottom of the page. Pattern also say "Shell pattern: See diagram M.1 to M.3."
04.11.2011 - 17:58Jenny Charles wrote:
I can't find any other way to ask what I don't understand! What is the meaning of M.1, M.2 and M.3 in this pattern? I can't find an explanation. Would really appreciate someinsight. Many thanks!
04.11.2011 - 06:51
![]() Jacqueline wrote:
Jacqueline wrote:
Merveilleux modèles félicitations
29.08.2008 - 09:52
|
||||||||||||||||
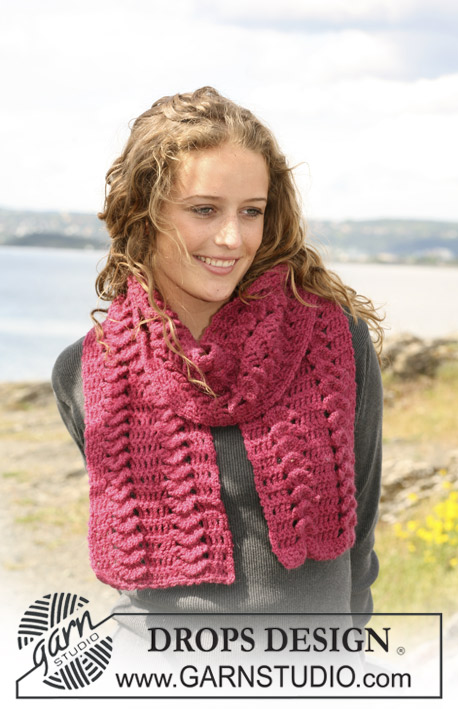
Shells on the Shore |
||||||||||||||||
|
|
||||||||||||||||
Crochet DROPS cape with shell pattern in ”Snow”. Size S - XL.
DROPS 110-9 |
||||||||||||||||
|
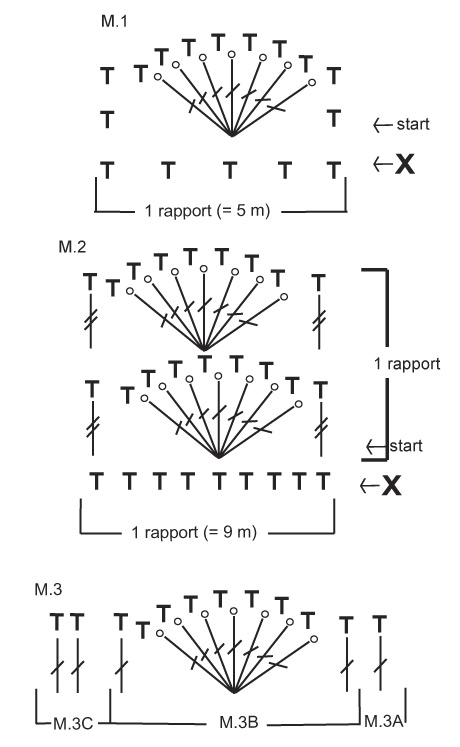
Crochet tip-1: Replace first dc on row with 1 ch. Replace first tr on row with 3 ch. Replace first dtr on row with 4 ch. Crochet tip-2: When working dc over dtr, crochet in dtr, but when working dc over shell with picots crochet between sts. Make sure the picot sits at the front of piece. Increasing tip: Inc 2 sts between each shell by working 2 dc in the first dtr/dc and the last dtr/dc in each repeat of M.2. Note! No inc towards mid front (i.e. do not inc at the beg of the first repeat of M.2 and at the end of the last repeat of M.2 on row). Shell pattern: See diagram M.1 to M.3. Textured pattern: Worked on all sts not included in M.2. The textured pattern follows the pattern in M.2, i.e. when working dc in M.2 work dc in textured pattern and when working shells in M.2 work dtr in textured pattern. Cape: Worked from top down, back and forth on needle towards mid front. Crochet 47-53 ch (includes 1 ch to turn with) on crochet hook size 8 mm with Snow. Work 1 dc in 2nd ch from hook and 1 dc in 3rd ch from hook, * skip 1 ch, 1 dc in each of the next 4 ch *, repeat from *-* until 4-5 ch remain, skip 1 ch and work 1 dc in each of the last 3-4 ch = 37-42 dc on row. Continue as follows from RS: See Crochet tip-1 and Textured pattern! 1 st in the first st, M.1 on the next 35-40 sts (7-8 repeats), 1 st in the last st on row. See Crochet tip-2! After 1 vertical repeat of M.1 (= 65-74 sts) continue in M.2. At the same time inc 2 sts between each of the 7-8 repeats on row of M.2, inc on dc-rows – see Increasing tip – a total of 5 times = 125-144 sts on row. Incorporate the inc sts in Textured pattern as you go along, i.e. no of sts between each repeat of M.2 increases. When all inc are complete continue as follows: 1 st in first st on row, * M.2 on the next 9 sts, 1 st in each of the next 10 sts *, repeat from *-* until 10 sts remain on row, M.2 on the next 9 sts and 1 st in the last st on row. After 9-10 vertical repeats of M.2 continue as follows: M.3A on the first st, * M.3B on the next 9 sts, M.3C on the next 10 sts *, repeat from *-* until 10 sts remain, M.3B on the next 9 sts and M.3A on the last st on row. See Crochet tip-2! After 1 vertical repeat of M.3 (2 rows) cut the thread. Front bands and neckline: Beg at the bottom of left front piece (1st row = WS). Crochet approx 100 to 120 dc with crochet hook size 8 mm and Snow up along left front piece, round neck and down along right front piece (make sure border isn’t too tight). Turn piece. Work 1 tr in each dc, at the same time make 2 buttonholes on right front piece, 1 approx 8 cm from neckline and 1 approx 1 cm from neckline by replacing 1 tr with 1 ch. On next row work 1 dc in each tr and in each ch for buttonhole. Sew on buttons. |
||||||||||||||||
Diagram explanations |
||||||||||||||||
|
||||||||||||||||
 |
||||||||||||||||
Have you finished this pattern?Tag your pictures with #dropspattern or submit them to the #dropsfan gallery. Do you need help with this pattern?You'll find 6 tutorial videos, a Comments/Questions area and more by visiting the pattern on garnstudio.com. © 1982-2026 DROPS Design A/S. We reserve all rights. This document, including all its sub-sections, has copyrights. Read more about what you can do with our patterns at the bottom of each pattern on our site. |
||||||||||||||||


With over 40 years in knitting and crochet design, DROPS Design offers one of the most extensive collections of free patterns on the internet - translated to 17 languages. As of today we count 325 catalogues and 12298 patterns translated into English (UK/cm).
We work hard to bring you the best knitting and crochet have to offer, inspiration and advice as well as great quality yarns at incredible prices! Would you like to use our patterns for other than personal use? You can read what you are allowed to do in the Copyright text at the bottom of all our patterns. Happy crafting!
Post a comment to pattern DROPS 110-9
We would love to hear what you have to say about this pattern!
If you want to leave a question, please make sure you select the correct category in the form below, to speed up the answering process. Required fields are marked *.