
Popular categories
Looking for a yarn?


Comments / Questions (59)
![]() Michelle wrote:
Michelle wrote:
Bonjour,je voudrais savoir avec I CORD et le point de cotes il y a deux mailles identiques cote à cote?ou bien ai-je mal compris?Merci
14.04.2026 - 14:31DROPS Design answered:
Bonjour Michelle, sur l'endroit, vous avez effectivement 1 m end de la bordure I-cord juste avant la m endroit de A.1, mais, sur l'envers, vous terminez par 1 m end de A.2 avant de glisser 1 m à l'env et de tricoter la dernière m à l'endroit. Sur l'envers, vous terminez A.1 par 1 m env, vous glissez 1 m à l'envers et vous tricotez la dernière m à l'endroit. Mettez bien des marqueurs si besoin pour bien distinguer les 6 m de A.1/A.2 et les 2 m I-Cord de chaque côté. Bon tricot!
14.04.2026 - 15:38
![]() Carina wrote:
Carina wrote:
Hej! När man stickar enligt mönster a1 och a2 så blir det ju bara en fortsättning på resåren! Skall det verkligen vara så? Omöjligt att få till en ribbkant före i-corden. Mvh Carina
30.03.2026 - 13:45
![]() Lyndal Edwards wrote:
Lyndal Edwards wrote:
Can anyone help explain exactly how I work the icord edging? I am completely baffled how to do it! Many thanks
12.03.2026 - 22:09DROPS Design answered:
Hi Lyndal, If you click on Videos at the top of the page, there is a video showing you how to work an I-cord edge. Regards, Drops Team.
13.03.2026 - 05:54
![]() Julia wrote:
Julia wrote:
I've just knitted this design. The i-cord cast-off at the neck is attractive but I have a significant issue in that I can only just get my head through (and I don't have a particularly large head). I think a larger needle size is required for the i-cord cast-off.
28.02.2026 - 11:16
![]() Elke Weihermüller wrote:
Elke Weihermüller wrote:
Ist es richtig, nach dem Bündchen zu Nadelstärke 4 wechseln und über eine Reihe gleichmäßig Maschen abnehmen und n i c h t zunehmen. Danke für die Antwort.
23.02.2026 - 16:49DROPS Design answered:
Liebe Elke, ja, das ist korrekt - das Bündchen soll - im Gegensatz zu früheren Zeiten - locker und fließend fallen, Sie sehen ja auf dem Foto, dass es den Pullunder unten nicht zusammenzieht. Viel Spaß beim Stricken!
23.02.2026 - 19:51
![]() Lisa wrote:
Lisa wrote:
Jeg kan simpelthen ikke få ribmønsteret til at passe ved ærmegabet når der skal strikkes rib over 9 masker mere i str. M. Jeg er begyndt så den 8. maske er en vrang fra retsiden, så der er en overgang til det glatte stykke. Når der så skal være 9 masker mere, slutter den 9. masker som en ret lige op ad det glatte stykke. Så skal det være sådan videre, er jeg nød til at lave en maske mere et sted. Kan ribben virkelig være rigtig der ved ærmegabet?
11.02.2026 - 20:37DROPS Design answered:
Hei Lisa. Oppskriften er oversendt til Design avd. for en dobbeltsjekk. mvh DROPS Design
16.02.2026 - 09:27
![]() Lisa wrote:
Lisa wrote:
Jeg forstår ikke slutningen på 1. pind af i-cord kanten i ribben. Der står man skal strikke til der er 8 masker tilbage, strik 6 masker i A.2, tag 1 maske løst af, strik 1 maske ret. Hvordan skal man strikke pinden når man vender arb. ? Hvordan strikker man nr. 2 maske der blev taget løs af? Jeg ville strikke pinden ud, og på næste pind tage den 1. m løst af med tråden foran. Sidste m strikkes ret og tages løs af på næste p. Så får man en pæn kant.
05.02.2026 - 21:38DROPS Design answered:
Hej Lisa. Maske nr 2 strikker du ret när du har vänt arbetet, Se gärna denna video, här visar vi hur du strikker en i-cord kant. Mvh DROPS Design
06.02.2026 - 13:25
![]() Bente wrote:
Bente wrote:
Hvor stor en ease skal man regne i forhold til størrelse?
02.02.2026 - 16:40DROPS Design answered:
Hej Bente, lige under størrelserne finder du en knap hvor der står: Hvilken størrelse skal jeg vælge? Her guider vi dig til hvordan du finder din størrelse :)
04.02.2026 - 13:35
![]() Jette wrote:
Jette wrote:
Hvis jeg laver icordkanten som der står, så bliver kanten i perlestrik, hvad går galt?
28.01.2026 - 21:32DROPS Design answered:
Hej Jette, du skal strikke ret over ret og vrang over vrang :)
29.01.2026 - 09:13
![]() Nathalie A wrote:
Nathalie A wrote:
Bonjour, peut-on tricoter ce modèle avec des fils du groupe A ? Merci pour votre reponse
14.01.2026 - 18:16DROPS Design answered:
Bonjour Nathalie A., pas vraiment car vous n'aurez pas la bonne tension, ou alors une texture plus serrée. Retrouvez tous les modèles équivalents avec une laine du groupe de fils A (avec 1 fil ou plus) ici. Bon tricot!
15.01.2026 - 10:24
|
|||||||
Blue Night Vest#bluenightvest |
|||||||
 |
 |
||||||
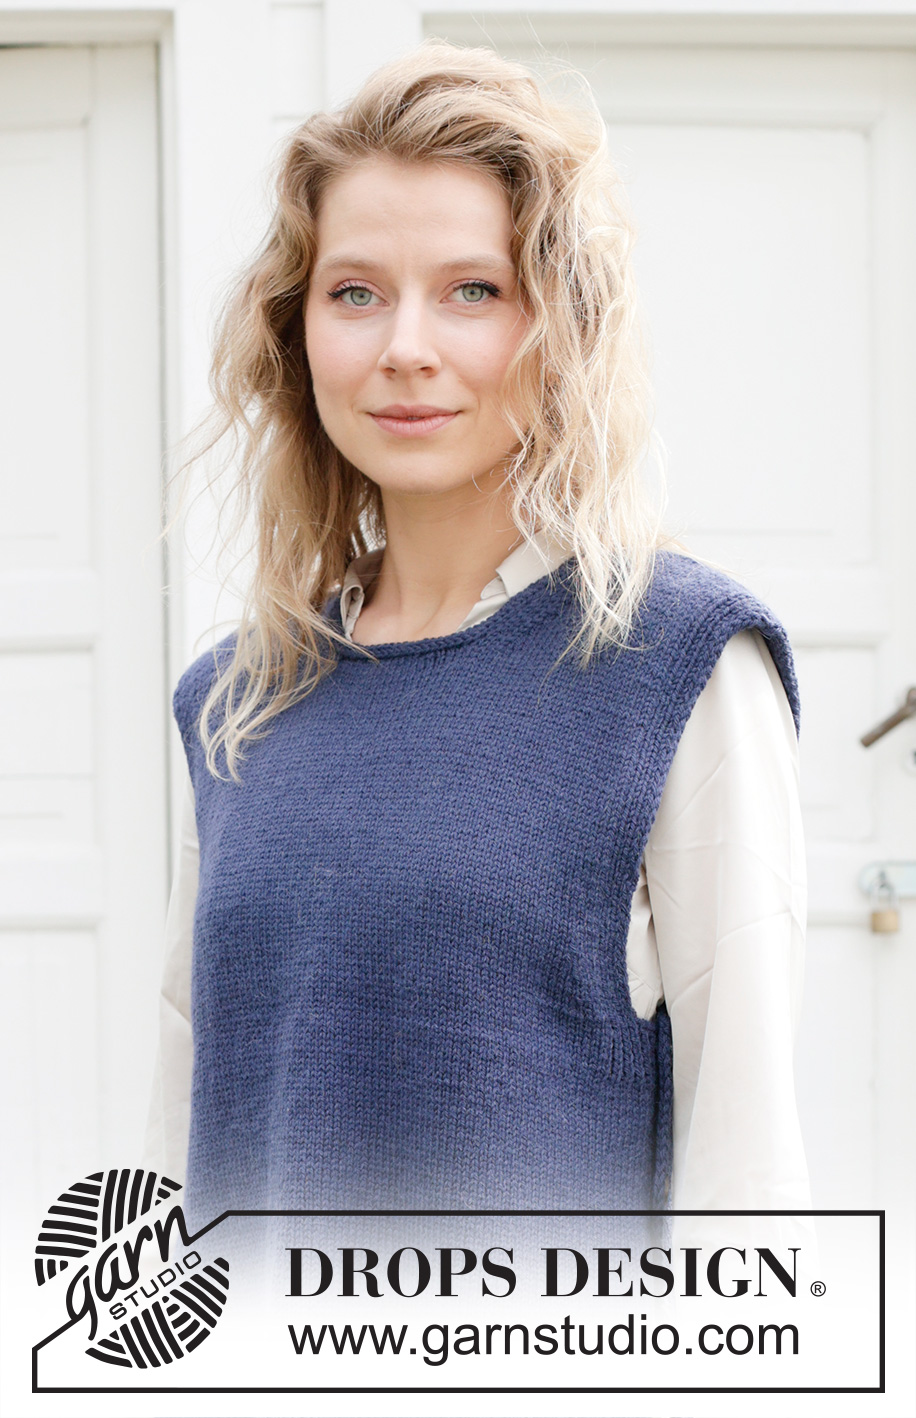
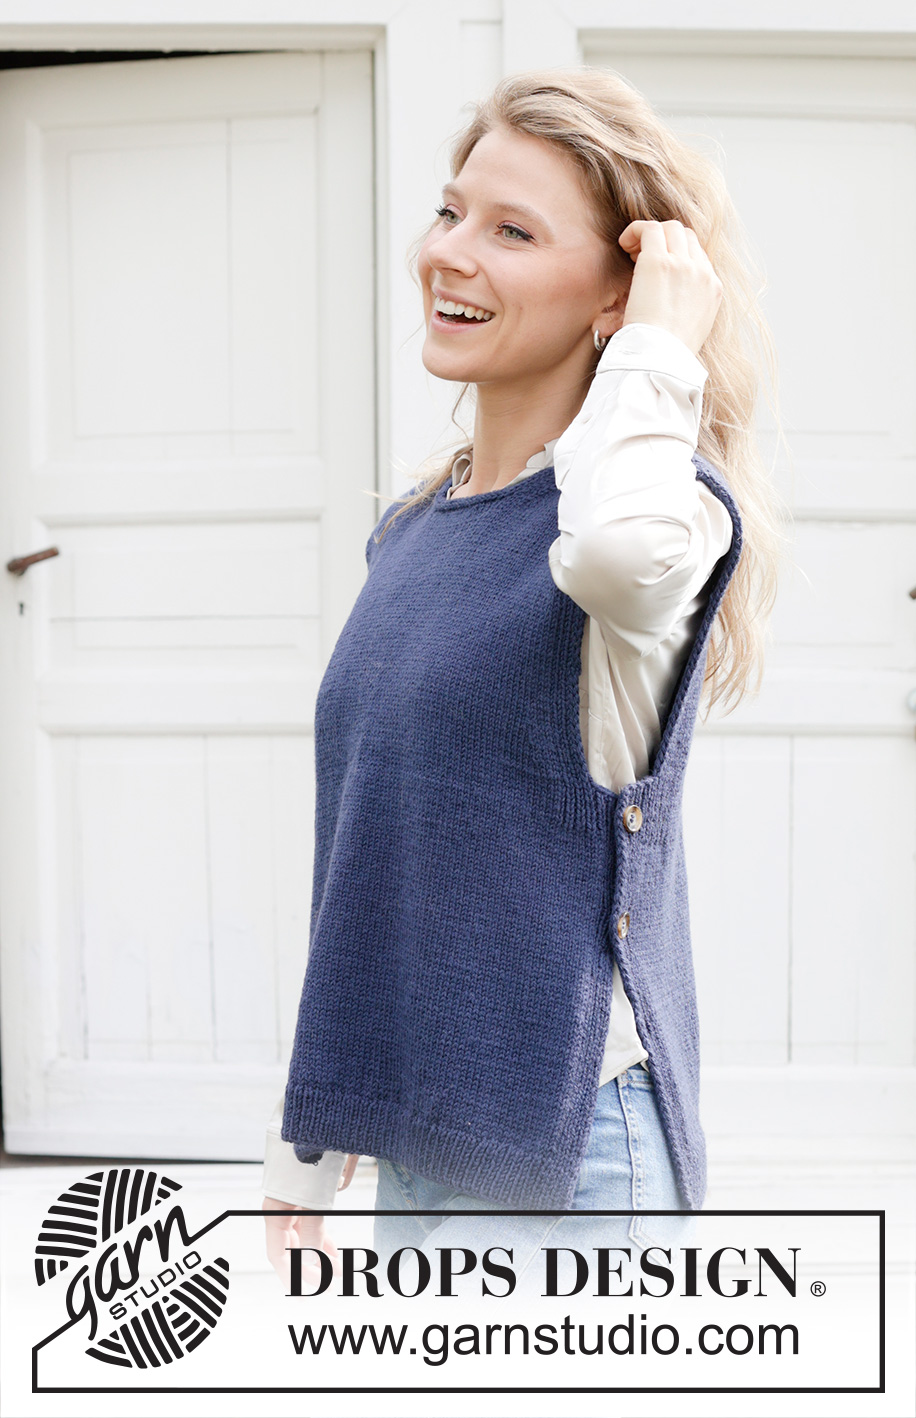
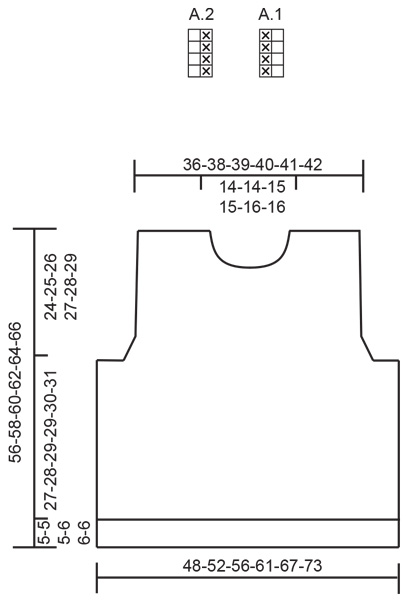
Knitted vest in DROPS Lima. The piece is worked bottom up with round neck, split in sides and I-cord. Sizes S - XXXL.
DROPS 254-34 |
|||||||
|
------------------------------------------------------- EXPLANATIONS FOR THE PATTERN: ------------------------------------------------------- PATTERN: See diagrams A.1 and A.2. The diagrams show the pattern from the right side. EDGE WITH I-CORD: BEGINNING OF ROW: Slip 1 stitch purl-wise with the strand in front, knit 1, work 6 stitches A.1. END OF ROW: Work until there are 8 stitches left on the row, work 6 stitches A.2, slip 1 stitch purl-wise with the strand in front, knit 1. DECREASE TIP-1 (for armholes): All decreases worked from right side! BEGINNING OF ROW: Work the first 10 stitches as before, slip 1 stitch purl-wise with the strand in front, knit 1, pass the slipped stitch over the knitted stitch (= 1 stitch decreased). END OF ROW: Work until there are 12 stitches left on the row, knit 2 together (= 1 stitch decreased), work to end of row as before. DECREASE TIP-2 (for neckline): All decreases worked from right side! BEGINNING OF ROW: Work the first 3 stitches as before, slip 1 stitch purl-wise with the strand in front, knit 1, pass the slipped stitch over the knitted stitch (= 1 stitch decreased). END OF ROW: Work until there are 5 stitches left on the row, knit 2 together (= 1 stitch decreased), knit 3. CAST OFF WITH I-CORD: Cast 3 stitches on to the right needle from the right side. Do not turn. Slip the 3 stitches onto the left needle, so the strand is 3 stitches in on the needle (the strand tightens when working to form a small tube). ROW 1 (right side): Knit 2, knit 2 twisted together. Slip the 3 stitches on the right needle onto the left needle, knit 2, knit 2 twisted together. Do not turn. Repeat ROW 1 until there are 3 stitches left on the right needle. Slip these 3 stitches onto the left needle. Cast off. Sew a small stitch, joining the beginning and the end of the I-cord. ------------------------------------------------------- START THE PIECE HERE: ------------------------------------------------------- VEST - SHORT OVERVIEW OF THE PIECE: The piece is worked back and forth with circular needle, bottom up. The front and back pieces are worked separately, then sewn together at the shoulders. Decorative buttons are sewn onto each side. Stitches are knitted up around the neckline, then cast off with I-cord. FRONT PIECE: Cast on 117-127-137-149-163-177 stitches with circular needle size 3.5 mm and DROPS Lima. Work EDGE WITH I-CORD – read description above, rib (knit 1, purl 1) until there are 9 stitches left, knit 1 and work EDGE WITH I-CORD. Continue the rib and edges for 5-5-5-6-6-6 cm. Change to circular needle size 4 mm. From the right side, work the edge as before (8 stitches), work stocking stitch and decrease 9-11-13-13-15-17 stitches evenly over the next 101-111-121-133-147-161 stitches and work the edge as before (8 stitches) = 108-116-124-136-148-160 stitches. Continue back and forth with stocking stitches and 8 edge-stitches on each side. Remember to maintain the knitting tension. When the piece measures 28-29-30-31-32-33 cm, work in addition 9-9-11-15-19-23 ribbed stitches (= A.1/A.2) inside the 8 edge-stitches, giving an edge of 17-17-19-23-27-31 stitches on each side. When the piece measures 32-33-34-35-36-37 cm, start to work the armholes as follows: Cast off 9-9-11-15-19-23 stitches each side (now working EDGE WITH I-CORD over 8 stitches as before on each side to finished length). The continue decreasing for armholes as follows every 4th row – read DECREASE TIP-1: 1 stitch 3-5-6-7-8-9 times each side = 84-88-90-92-94-96 stitches. When the piece measures 48-50-51-53-54-56 cm, place the middle 18 stitches on a thread for the neckline and finish each shoulder separately. SHOULDERS: = 33-35-36-37-38-39 stitches. Read DECREASE TIP-2 and decrease for neck 1 stitch every 2nd row 6-6-7-7-8-8 times = 27-29-29-30-30-31 shoulder-stitches. Cast off when the piece measures 56-58-60-62-64-66 cm. BACK PIECE: Cast on 117-127-137-149-163-177 stitches with circular needle size 3.5 mm and DROPS Lima. Work EDGE WITH I-CORD, rib (purl 1, knit 1) until there are 8 stitches left, EDGE WITH I-CORD. Continue this rib and the edges for 5-5-5-6-6-6 cm. Change to circular needle size 4 mm and work as follows from the right side: Work the edge as before (8 stitches), stocking stitch and decrease 9-11-13-13-15-17 stitches evenly over the next 101-111-121-133-147-161 stitches and work the edge as before (8 stitches) = 108-116-124-136-148-160 stitches. Continue back and forth with stocking stitches and 8 edge-stitches on each side. When the piece measures 28-29-30-31-32-33 cm, work in addition 9-9-11-15-19-23 ribbed stitches (= A.1/A.2) inside the 8 edge-stitches, giving an edge of 17-17-19-23-27-31 stitches on each side. When the piece measures 32-33-34-35-36-37 cm, start to work the armholes as follows: Cast off 9-9-11-15-19-23 stitches each side (now working EDGE WITH I-CORD over 8 stitches as before on each side to finished length). The continue decreasing for armholes as follows every 4th row – remember DECREASE TIP-1: 1 stitch 3-5-6-7-8-9 times each side = 84-88-90-92-94-96 stitches. When the piece measures 52-54-56-58-60-62 cm, cast off the middle 26-26-28-28-30-30 stitches for the neckline and finish each shoulder separately. SHOULDERS: = 29-31-31-32-32-33 stitches. Remember DECREASE TIP-2 and decrease for neck 1 stitch every 2nd row 2 times = 27-29-29-30-30-31 shoulder-stitches. Cast off when the piece measures 56-58-60-62-64-66 cm. ASSEMBLY: Sew the shoulder seams. Sew 2 buttons onto each side of the vest; the edge stitches from the front piece are placed over the edge stitches from the back piece and the buttons sewn on through both layers. Position the top button 1 cm below the armhole and the bottom button 9-10 cm further down. NECKLINE: Using circular needle size 3.5 mm and DROPS Lima, start on one shoulder and knit up 84-84-90-90-96-96 stitches from the right side, (including the 18 stitches from the thread mid-front). CAST OFF WITH I-CORD– read description above. |
|||||||
Diagram explanations |
|||||||
|
|||||||
 |
|||||||
 |
|||||||
Have you finished this pattern?Tag your pictures with #dropspattern #bluenightvest or submit them to the #dropsfan gallery. Do you need help with this pattern?You'll find 20 tutorial videos, a Comments/Questions area and more by visiting the pattern on garnstudio.com. © 1982-2026 DROPS Design A/S. We reserve all rights. This document, including all its sub-sections, has copyrights. Read more about what you can do with our patterns at the bottom of each pattern on our site. |
|||||||


With over 40 years in knitting and crochet design, DROPS Design offers one of the most extensive collections of free patterns on the internet - translated to 17 languages. As of today we count 324 catalogues and 12290 patterns translated into English (UK/cm).
We work hard to bring you the best knitting and crochet have to offer, inspiration and advice as well as great quality yarns at incredible prices! Would you like to use our patterns for other than personal use? You can read what you are allowed to do in the Copyright text at the bottom of all our patterns. Happy crafting!
Post a comment to pattern DROPS 254-34
We would love to hear what you have to say about this pattern!
If you want to leave a question, please make sure you select the correct category in the form below, to speed up the answering process. Required fields are marked *.