
Popular categories
Looking for a yarn?


Comments / Questions (9)
![]() Maiju wrote:
Maiju wrote:
Taitaa olla KAVENNUSVINKKI 1 ja 2 väärin päin?
07.12.2025 - 10:00
![]() Susanne Daugaard wrote:
Susanne Daugaard wrote:
Hej tak for opskrift
14.10.2024 - 09:38
![]() Julia wrote:
Julia wrote:
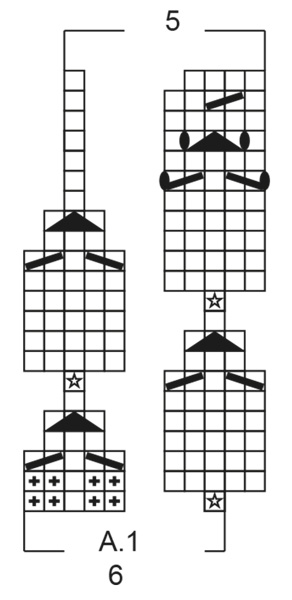
Laut Diagramm A1 werden 3x 5 Maschen in eine aufgenommen (drei Mal sind Sterne im Muster A1), aber im Foto sind ganz klar nur zwei zu sehen. Wenn ich es genau nach A1 stricke, bekomme ich auch eine "Raute" mehr und das Muster sieht insgesamt länger aus als auf dem Foto. Wie ist es richtig?
13.06.2024 - 23:56DROPS Design answered:
Liebe Julia, in diesem Video zeigen wir, wie man so ein Muster strickt, beachten Sie nur, daß diese Masche im Video 7 Mal (anstatt nur 5 Mal für die Socken) gestrickt wird, sonnst wird das Muster ziemlich gleich sein. Viel Spaß beim Stricken!
14.06.2024 - 07:42
![]() Katharina Bauer wrote:
Katharina Bauer wrote:
Habe mich in diese süßen Söckchen verliebt. Nach Anleitung stricken ist leider nicht mein Ding. Aber diese habe ich geschafft. Vielen, vielen Dank für das tolle Lochmuster. Werde gerne noch mal etwas nach Euren Anleitungen stricken. Alles Liebe Katharina
06.05.2024 - 13:38
![]() Guri Joranger wrote:
Guri Joranger wrote:
Hvor er diagram a 1?
11.08.2023 - 20:34DROPS Design answered:
Hei Guri, Diagrammene finner du på bunn av sida. God fornøyelse!
16.08.2023 - 06:49
![]() Κατερίνα Χαιρετάκη wrote:
Κατερίνα Χαιρετάκη wrote:
Hello, how am I going to make the star at the diagram?
28.06.2023 - 20:00DROPS Design answered:
Hi :) Just work as explained under 3rd symbol, so that you will increase 4 sts in the stitch with the star (there are now 5 sts on needle). In this video for a similar pattern, we show at time code 2:30 how to work 7 times 1 stitch in the same stitch, work the same way but only 5 times to increase only 4 sts. Happy knitting!
29.06.2023 - 12:45
![]() Marianne wrote:
Marianne wrote:
Hej Jeg har svært ved at forstå a.1 Det er 10 masker pr “pind” altså den første linje. Hvis den strikkes rundt, giver det 40 masker hvad med de sidste 2 (8) ? 🧐
09.12.2022 - 22:03DROPS Design answered:
Hei Marianne. Usikker på hva du mener med de siste 2 (8), hvilken str. strikker du? A.1 strikkes over 6 masker, men når du følger diagrammet vi maskeantallet minske og når du strikker siste omgang av A.1, består A.1 av 5 masker. mvh DROPS Design
12.12.2022 - 14:21
![]() Karen wrote:
Karen wrote:
Hi there I have a question regarding this part work rib (knit 1, purl 2) for 1-1-2 (2) cm. Does that mean I knit 1 and then I purl 2 together
31.08.2022 - 21:34DROPS Design answered:
Hi Karen, No, you knit 1, purl 2, knit 1, purl 2 to the end of the round, then repeat until you have reached the rib-length for your size. Happy knitting!
01.09.2022 - 06:44
![]() Ingrid wrote:
Ingrid wrote:
Kunt u in simpele bewoordingen uitleggen hoe ik dit patroon moet breien? Ik heb inmiddels 2 cm boordpatroon gebreid en moet nu beginnen aan patroon A.1.
09.05.2022 - 16:45DROPS Design answered:
Dag Ingrid,
Na de boord brei je A.1 in de rondte (dus je herhaalt A.1 steeds in de breedte over de hele toer, dan brei je de volgende toer van A.1 en zo verder. Je leest A.1 van rechts naar links en van onder naar boven.
10.05.2022 - 08:30
|
||||||||||||||||||||||
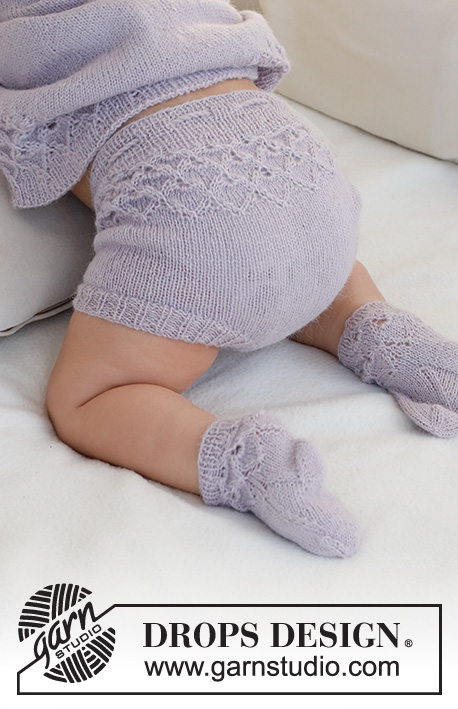
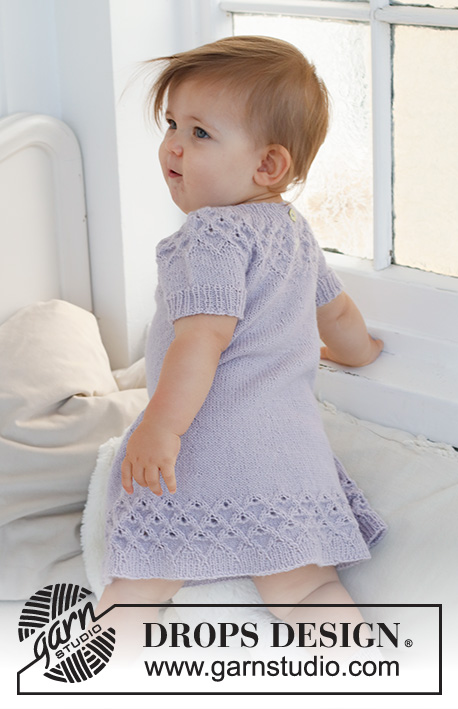
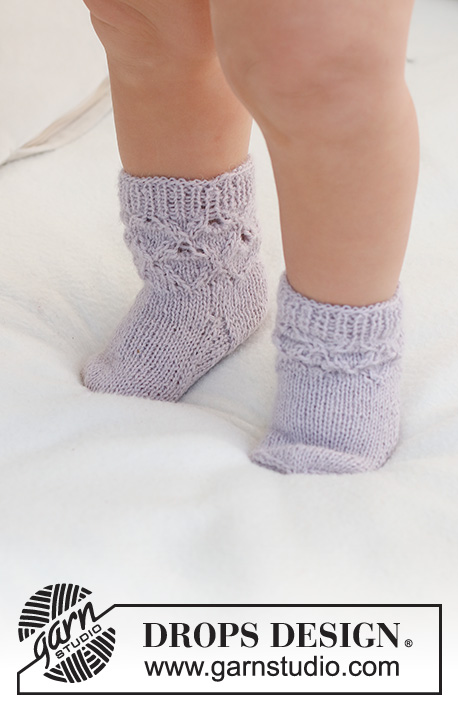
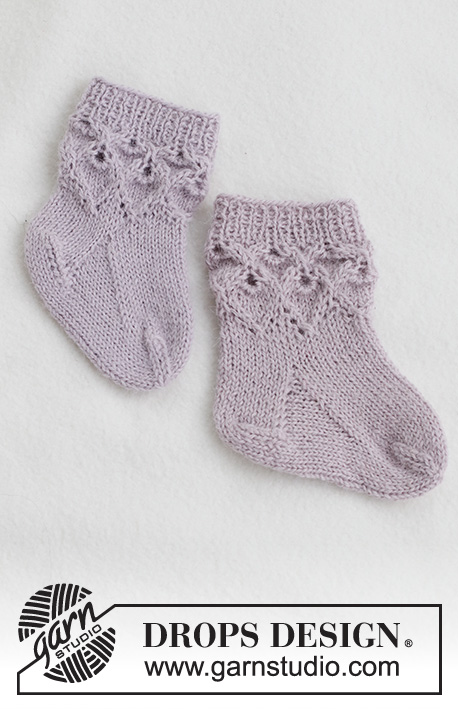
Bellflower Socks#bellflowersocks |
||||||||||||||||||||||
 |
 |
|||||||||||||||||||||
Knitted socks for babies in DROPS Alpaca. The piece is worked with lace pattern and rib. Sizes 1 month – 2 years.
DROPS Baby 43-12 |
||||||||||||||||||||||
|
------------------------------------------------------- EXPLANATIONS FOR THE PATTERN: ------------------------------------------------------- PATTERN: See diagram A.1. DECREASE TIP-1: Decrease before the marker: Start 2 stitches before the marker and knit 2 together. Decrease after the marker: Slip 1 stitch as if to knit, knit 1 and pass the slipped stitch over the knitted stitch. DECREASE TIP-2: Start 2 stitches before the marker, knit 2 together, slip 1 stitch as if to knit, knit 1 and pass the slipped stitch over the knitted stitch (= 2 stitches decreased). Repeat at the other marker. HEEL DECREASES: ROW 1 (= right side): Work until there are 6-6-6 (7) stitches left, slip 1 stitch as if to knit, knit 1 and pass the slipped stitch over the knitted stitch, turn the piece. ROW 2 (= wrong side): Work until there are 6-6-6 (7) stitches left, slip 1 stitch as if to purl, purl 1 and pass the slipped stitch over the purled stitch, turn the piece. ROW 3 (= right side): Work until there are 5-5-5 (6) stitches left, slip 1 stitch as if to knit, knit 1 and pass the slipped stitch over the knitted stitch, turn the piece. ROW 4 (= wrong side): Work until there are 5-5-5 (6) stitches left, slip 1 stitch as if to purl, purl 1 and pass the slipped stitch over the purled stitch, turn the piece. Continue to decrease like this, working until there is 1 stitch less each time before slipping a stitch and until there are 8-10-10 (10) stitches left on the needle. ------------------------------------------------------- START THE PIECE HERE: ------------------------------------------------------- SOCK – SHORT OVERVIEW OF THE PIECE: The piece is worked in the round with double pointed needles, top down. LEG: Cast on 42-48-48 (54) stitches with double pointed needles size 2.5 mm and DROPS Baby Merino. Knit 1 round, then work rib (knit 1, purl 2) for 1-1-2 (2) cm. Work A.1 over all stitches. REMEMBER THE KNITTING TENSION! When A.1 has been worked in height, there are 35-40-40 (45) stitches. The piece measures approx. 7-7-8 (8) cm. Continue with stocking stitch until the sock measures 7-8-9 (10) cm. HEEL AND FOOT: Keep the first 18-20-20 (22) stitches on the needle for a heel; place the other 17-20-20 (23) stitches on a thread (top of foot). Work stocking stitch back and forth over the heel stitches for 3½-4-4½ (5) cm – insert 1 marker in the middle of the last row – the foot is measured from this marker. Work HEEL DECREASES – read description above! After the heel decreases work as follows: Work stocking stitch over the 8-10-10 (10) heel stitches, knit up 9-10-12 (13) stitches along the one side of the heel, work stocking stitch over the 17-20-20 (23) stitches from the thread and increase 1-0-0 (1) stitch, knit up 9-10-12 (13) stitches along the other side of the heel = 44-50-54 (60) stitches. Insert 1 marker on each side of the 18-21-21 (24) stitches on top of the foot. Work to the middle of the heel – the round now starts here. Continue in the round with stocking stitch, AT THE SAME TIME on the first round decrease 1 stitch before the first marker and 1 stitch after the second marker – read DECREASE TIP-1. Decrease like this every 2nd round a total of 6-7-8 (9) times = 32-36-38 (42) stitches. Continue working until the foot measures 8-9-10 (12) cm from the marker on the heel. TOE: Insert 1 marker on each side with 16-18-19 (21) stitches both on top of and underneath the foot. Work stocking stitch. AT THE SAME TIME on the first round decrease on each side of both markers – read DECREASE TIP-2. Decrease like this every 2nd round a total of 3 times, then every round 3-4-5 (6) times = 8-8-6 (6) stitches. Cut the strand, pull it through the remaining stitches, tighten and fasten well. The foot measures approx. 11-12-13 (15) cm from the marker, measured under the foot. Work the other sock in the same way. |
||||||||||||||||||||||
Diagram explanations |
||||||||||||||||||||||
|
||||||||||||||||||||||
 |
||||||||||||||||||||||
Have you finished this pattern?Tag your pictures with #dropspattern #bellflowersocks or submit them to the #dropsfan gallery. Do you need help with this pattern?You'll find 19 tutorial videos, a Comments/Questions area and more by visiting the pattern on garnstudio.com. © 1982-2026 DROPS Design A/S. We reserve all rights. This document, including all its sub-sections, has copyrights. Read more about what you can do with our patterns at the bottom of each pattern on our site. |
||||||||||||||||||||||


With over 40 years in knitting and crochet design, DROPS Design offers one of the most extensive collections of free patterns on the internet - translated to 17 languages. As of today we count 324 catalogues and 12290 patterns translated into English (UK/cm).
We work hard to bring you the best knitting and crochet have to offer, inspiration and advice as well as great quality yarns at incredible prices! Would you like to use our patterns for other than personal use? You can read what you are allowed to do in the Copyright text at the bottom of all our patterns. Happy crafting!
Post a comment to pattern DROPS Baby 43-12
We would love to hear what you have to say about this pattern!
If you want to leave a question, please make sure you select the correct category in the form below, to speed up the answering process. Required fields are marked *.