
Popular categories
Looking for a yarn?


Comments / Questions (11)
![]() Silvana wrote:
Silvana wrote:
Hello again, if I use a different cast on method which looks “ok” on the right side then perhaps I can skip the step I mentioned in my previous question and continue working on the right side of the work until the end ?
27.09.2024 - 21:40DROPS Design answered:
Dear Silvana, yes, you can skip it, in that case. Happy knitting!
29.09.2024 - 20:11
![]() Silvana wrote:
Silvana wrote:
Hello, i don't understand the instructions for the hat “turn piece so that right side….and work in the opposite direction” ….if the first 14cm are knitted in rib 1/1 it should look the same on both sides of the work… shouldn't it ?
19.09.2024 - 22:31DROPS Design answered:
Dear Silvana, the first part of piece will be turn so that the previous "inside" will be the right side of piece and reversed - see also this video. As you cast on stitches with the continental method, you will have a different look on both RS and WS reason why we work like this. Happy knititng!
20.09.2024 - 08:48
![]() Hilde wrote:
Hilde wrote:
Guten Morgen, ich bin total begeistert von dieser Anleitung, das gibt so eine wunderschöne Mütze so dass ich bereits eine zweite stricke. Die Anleitung ist gut zu verstehen und es geht wirklich schnell von der Hand. Das ist meine absolute Lieblingsmütze geworden. Machen sie weiter solche gut zu strickende Anleitungen.👍Lg Hilde Schulze
20.01.2024 - 08:50
![]() Maria Kassalia wrote:
Maria Kassalia wrote:
Hallo liebes team können sie mir das erklären Die Arbeit von rechts auf links wenden, sodass also nun die Vorderseite zur Rückseite wird, jetzt wird in die entgegengesetzte Richtung weitergestrickt (auf diese Weise kommt die Vorderseite des unteren Randes wieder nach vorne, wenn der untere Rand nach oben umgeschlagen wird).Vielen Dank
22.02.2022 - 21:36DROPS Design answered:
Liebe Frau Kassalia, also am Anfang stricken Sie in Runden von der Vorderseite vom unteren Rand gesehen; dann muss man in die andere Seite/Richtung stricken, weil der untere Rand umgeschlagen wird, die Arbeit wird dann von der Rückseite vom Rand bzw die Vorderseite der Mütze weitergestrickt. Viel Spaß beim stricken!
23.02.2022 - 08:24
![]() Rise wrote:
Rise wrote:
Hej! Har strikket trøjen Beloved med Nepal garn. Der skulle jeg strikke med p. 5,5. Nu ønsker jeg at strikke huen Pearl Essense også med Nepal, men her skal jeg strikke ret/vrang omslag med p. 3 og resten af huen med p. 4. Hvorfor denne forskel på trøje og hue, når garnet er det samme?? Mange tak for svar og i øvrigt virkeligt lækre garnkvaliteter og spændende opskrifter.
22.01.2022 - 20:36DROPS Design answered:
Hei Rise. Når man strikker luen er det nok tenkt at den skal være litt mer kompakt enn en genser, slik at luen bedre beskytter mot vær og vind. Mvh DROPS Design
25.01.2022 - 09:53
![]() Solveig Bredkjær Pedersen wrote:
Solveig Bredkjær Pedersen wrote:
Tak for svaret på mit sidste spørgsmål vedr model 214-27 men nyt spørgsmål skal ret være over ret og vrang over vrang
25.11.2021 - 11:13DROPS Design answered:
Hej Solveig, ja du kan se i diagrammet at de 2 vrangmasker ligger lige over hinanden :)
25.11.2021 - 15:37
![]() Solveig Bredkjær Pedersen wrote:
Solveig Bredkjær Pedersen wrote:
Drops 214-27 jeg kan ikke strække diagrammet ud fra opskriften, vil i være søde at skrive hvordan det strikkes Venlig hilsen Solveig
23.11.2021 - 20:08DROPS Design answered:
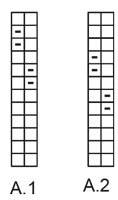
Hej Solveig, Huen strikkes rundt, du starter nederst i diagrammet. A.1 har du 6 pinde i ret og på pind 7 strikker du 1vr, 1r, 1vr, 1r osv det gør du også på pind 8, så en hel pind ret igen og pind 10 og 11 strikker du 1r, 1vr, 1r, 1vr osv. Sæt gerne et mærke i overgangen, så du ved hvilken maske du skal starte med :)
24.11.2021 - 10:10
![]() Ingalill Jansson wrote:
Ingalill Jansson wrote:
Jag är ledsen men bilden av mössan kommer inte med när man skriver ut första sidan och inte senare heller Jag har försökt 2 ggr.
06.04.2021 - 16:44
![]() Ingalill Jansson wrote:
Ingalill Jansson wrote:
Varför kan man inte få ut bilden av mössan när man skriver ut mönstret ?
06.04.2021 - 13:47DROPS Design answered:
Hej Ingalill, jo det får du, klik på "skriv ut-knappen" til højre for billedet, øverst til højre på siden du får op klikker du på "skriv ut mönster" :)
06.04.2021 - 14:03
![]() Linea wrote:
Linea wrote:
Mistenker at det er en feil i oppskriften. På forklaringene til diagrammet er det bare skrevet rett. Regner med firkanten med stripe skal være vrang?
20.11.2020 - 22:26DROPS Design answered:
Hej Linea. Du har helt rätt, tack för info detta har nu rättats. Mvh DROPS Design
23.11.2020 - 08:57
|
|||||||
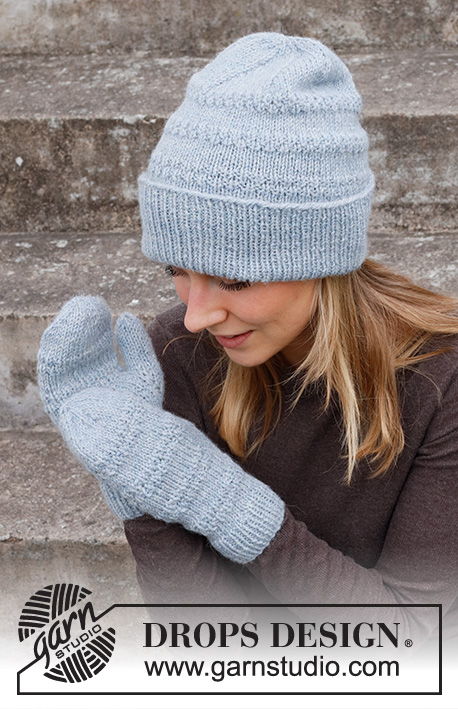
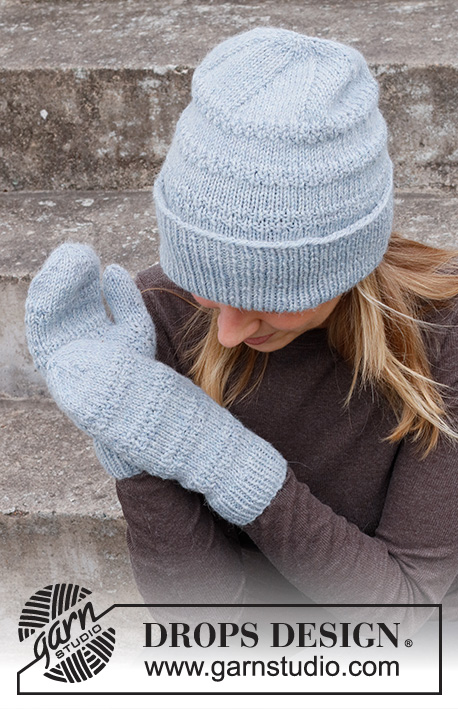
Pearl Essence#pearlessenceset |
|||||||
 |
 |
||||||
Knitted mittens and hat with textured pattern in DROPS Nepal.
DROPS 214-27 |
|||||||
|
------------------------------------------------------- EXPLANATION FOR THE PATTERN: ------------------------------------------------------- PATTERN: Hat: See diagram A.1. Mittens: See diagram A.2. DECREASE TIP-1 (evenly): To calculate how to decrease evenly, use the total number of stitches on row (e.g. 108 stitches) and divide stitches by number of decreases to be done (e.g. 28) = 3.9. In this example decrease by knitting approx. every 3rd and 4th stitch together. DECREASE TIP-2 (applies to mittens): Decrease as follows (begin 3 stitches before marker): Knit 2 together, knit 2 (marker is in the middle of these 2 stitches), slip 1 stitch knitwise, knit 1, pass slipped stitch over. Repeat at the other marker (= 4 stitches decreased on round). INCREASE TIP (applies to mittens): Increase 1 stitch by making 1 yarn over, on next round knit yarn over twisted to avoid holes. ------------------------------------------------------- START THE PIECE HERE: ------------------------------------------------------- HAT - SHORT OVERVIEW OF THE PIECE: Worked in the round on circular needle, bottom up. Switch to double pointed needles when needed. HAT: Cast on 108-120 stitches on a short circular needle size 3 mm with Nepal. Knit 1 round. Then work rib (knit 1/purl 1) in the round for 14 cm. Knit 1 round while decreasing 24-28 stitches evenly - read DECREASE TIP-1 = 84-92 stitches. Switch to a short circular needle size 4 mm. Turn piece so that right side of piece is on the inside of hat, and work in opposite direction (so that right side of folding edge is outwards when folded up when hat is finished). Work A.1 in the round. REMEMBER THE KNITTING TENSION! When A.1 has been worked 3 times vertically, piece measures approx. 28 cm from cast-on edge. Now knit 1 round while at the same time decreasing 0-1 stitches evenly = 84-91 stitches. Insert 7 markers 12-13 stitches apart. On next round decrease 1 stitch before each marker, decrease by knitting 2 stitches together. Decrease like this every other round 8 times in total = 28-35 stitches. Work 1 round where all stitches are knitted together 2 by 2 = 14-18 stitches. Knit 1 round. Work 1 round where all stitches are knitted together 2 by 2 = 7-9 stitches. Cut the yarn and pull it through the remaining stitches, tighten together and fasten. Hat measures approx. 29 cm with 7 cm fold at the bottom. ------------------------------------------------------- MITTENS - SHORT OVERVIEW OF THE PIECE: Worked in the round on double pointed needles. LEFT MITTEN: Cast on 40-44 stitches on circular needle size 3 mm with Nepal and knit 1 round. Then work rib = knit 1/purl 1. When rib measures 4 cm, knit 1 round while decreasing 4 stitches evenly = 36-40 stitches. Switch to double pointed needles size 4 mm. Now work pattern A.2 over all stitches. REMEMBER THE KNITTING TENSION! When piece measures 9 cm, increase 1 stitch on each side of first stitch on round for thumb (= 2 stitches increased) - read INCREASE TIP! Repeat increase on each side of the increased stitches every other round 5 times in total = 46-50 stitches. Work the new stitches for thumb in stocking stitch. When increases are done, slip the 11 thumb stitches on 1 stitch holder. Continue with A.2, AT THE SAME TIME cast on 1 new stitch behind thumb on next round = 36-40 stitches. Continue until piece measures 23-24 cm (try the mitten on, approx. 4 cm remain until finished measurements), continue with stocking stitch. Insert 1 marker at beginning of round and 1 marker after 18-20 stitches. Now decrease 1 stitch on each side of both markers (= 4 stitches decreased) - Read DECREASE TIP-2. Decrease like this on every other round 3 times and then on every round 4 times in total = 8-12 stitches. On next round knit all stitches together 2 by 2 = 4-6 stitches. Cut the yarn and pull it through the remaining stitches, tighten together and fasten. THUMB: Slip the 11 thumb stitches back on double pointed needles size 4 mm. Pick in addition up 4-5 stitches behind thumb = 15-16 stitches. Work in stocking stitch until the thumb itself measures approx. 4½-5 cm (try on the mitten, approx. ½ cm remains until finished measurements). Knit 2 rounds AT THE SAME TIME knit all stitches together 2 by 2 on both rounds. Cut the yarn and pull it through the remaining stitches, tighten together and fasten. RIGHT MITTEN: Cast on and work as left but increase for thumb on each side of the 18th-20th stitch on round. |
|||||||
Diagram explanations |
|||||||
|
|||||||
 |
|||||||
Have you finished this pattern?Tag your pictures with #dropspattern #pearlessenceset or submit them to the #dropsfan gallery. Do you need help with this pattern?You'll find 22 tutorial videos, a Comments/Questions area and more by visiting the pattern on garnstudio.com. © 1982-2026 DROPS Design A/S. We reserve all rights. This document, including all its sub-sections, has copyrights. Read more about what you can do with our patterns at the bottom of each pattern on our site. |
|||||||


With over 40 years in knitting and crochet design, DROPS Design offers one of the most extensive collections of free patterns on the internet - translated to 17 languages. As of today we count 324 catalogues and 12290 patterns translated into English (UK/cm). 12290
We work hard to bring you the best knitting and crochet have to offer, inspiration and advice as well as great quality yarns at incredible prices! Would you like to use our patterns for other than personal use? You can read what you are allowed to do in the Copyright text at the bottom of all our patterns. Happy crafting!
Post a comment to pattern DROPS 214-27
We would love to hear what you have to say about this pattern!
If you want to leave a question, please make sure you select the correct category in the form below, to speed up the answering process. Required fields are marked *.