
Popular categories
Looking for a yarn?


Comments / Questions (2)
![]() Erling Andersen wrote:
Erling Andersen wrote:
Har i mulighed for at vise mig hvordan man hækler en vest str.54 med løkker
17.01.2019 - 18:01
![]() Anni Andersen wrote:
Anni Andersen wrote:
Kan i hjælpe mig med en hæklet vest med løkker, str. 54
17.01.2019 - 17:47DROPS Design answered:
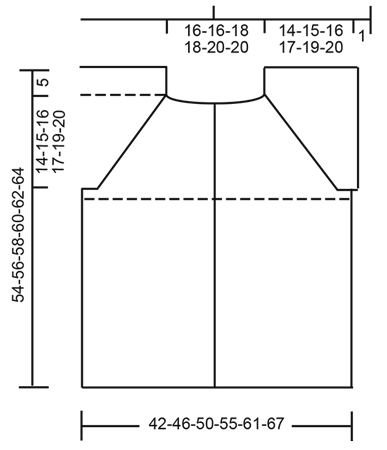
Hei Anni. Nederst ser du en målskisse med alle plaggets mål i de forskjellige størrelsene. Dette skal hjelpe deg med å velge riktig størrelse. God fornøyelse
23.01.2019 - 15:11
|
|||||||||||||||||||
Sweet Indigo Vest |
|||||||||||||||||||
|
|
|||||||||||||||||||
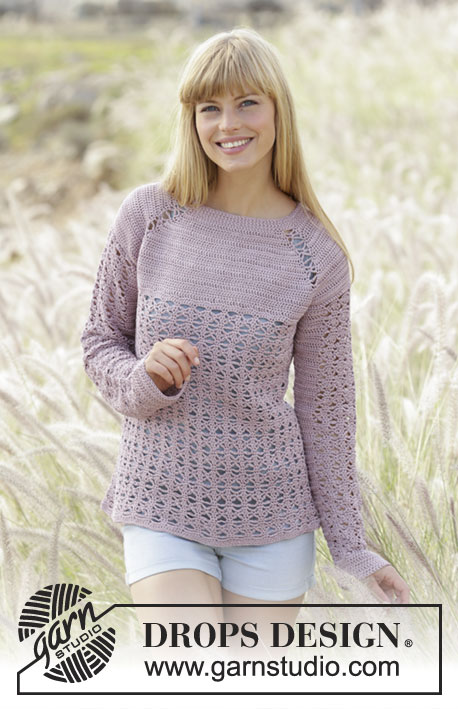
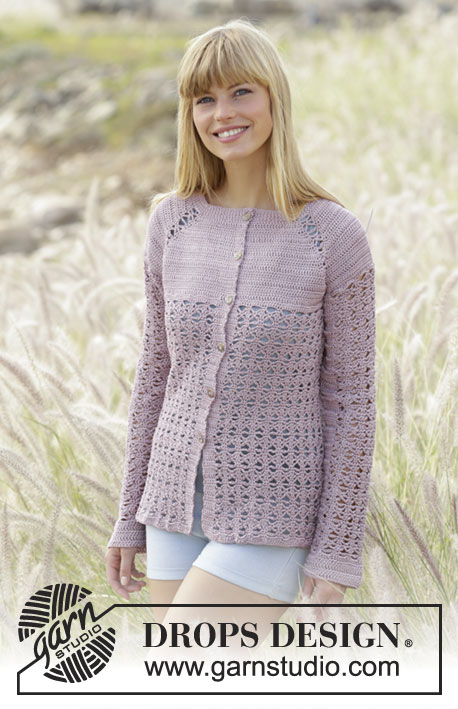
Crochet DROPS jacket with short sleeves, raglan and lace pattern in ”Cotton Viscose”. Size: S - XXXL.
DROPS Extra 0-1293 |
|||||||||||||||||||
|
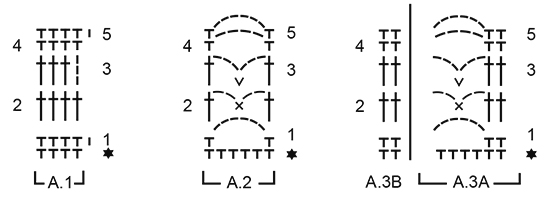
CROCHET INFO: Replace first tr at beg of every tr row with 3 ch. At beg of every dc row beg with 1 ch - this ch DOES NOT replace first dc. At the end of every row with dc or tr work last dc/tr in first dc or in 3rd ch from beg of previous row (depending on whether previous row was dc or tr). PATTERN: See diagrams A.1 to A.3. When rows 1-5 has been worked 1 time, repeat rows 2-5 onwards. INCREASE TIP: Inc 1 st by working 2 dc/tr in same st. DECREASE TIP: Work 1 dc/tr but wait with last YO and pull through (= 2 sts on hook), then work next dc/tr but on last pull through, pull YO through all sts on hook = 1 dc/tr dec. ----------------------------------------------------------- JACKET: The piece is worked top down. Worked back and forth from mid front. YOKE: Work 134-134-147-147-158-158 ch on hook size 3.5 mm with Cotton Viscose. Work first row as follows from WS: Work 1 dc in 2nd ch from hook - READ CROCHET INFO, * skip 1 ch, 1 dc in each of the next 3 ch *, repeat from *-* until 0-0-1-1-0-0 ch remains and finish with 1 dc in each of the last 0-0-1-1-0-0 ch = 100-100-110-110-118-118 dc (incl 4 dc in each side towards mid front for band). Work 1 row with 1 dc in every st from previous row. Work 1 row dc from WS while inc 24-24-22-22-22-22 dc evenly – READ INCREASE TIP = 124-124-132-132-140-140 dc on row – NOTE: Do not inc over the outermost 4 dc in each side. READ ALL OF THE FOLLOWING SECTION BEFORE CONTINUING AND REMEMBER THE CROCHET TENSION! Work next row as follows from RS: Work A.1 over the first 17-17-19-19-21-21 dc (the first 4 sts at beg of row = band), work 2 dc in each of the next 2 dc (= raglan inc), work A.2 over the next 6 sts (i.e. 1 dc in first dc, 6 ch, skip 4 dc, 1 dc in next dc) (= left front piece), work 2 dc in next st, 1 dc in each of the next 14 dc, 2 dc in next dc (= sleeve), A.2 over the next 6 dc, 2 dc in each of the next 2 dc, 1 dc in each of the next 26-26-30-30-34-34 dc, 2 dc in each of the next 2 dc (= back piece), A.2 over the next 6 dc, 2 dc in next dc, 1 dc in each of the next 14 dc, 2 dc in next dc (= sleeve), A.2 over the next 6 sts, 2 dc in each of the next 2 dc, 1 dc in each of the last 17-17-19-19-21-21 dc (= right front piece, the last 4 dc at the end of row = band), turn piece – NOTE: Count inc on this row with total no of raglan inc. Continue back and forth with A.1 over sleeves, front pieces and back piece (i.e. 2 rows tr, 2 rows dc) and A.2 in each transition between body and sleeves (when 1st-5th row have been worked 1 time, repeat 2nd-5th row). AT THE SAME TIME inc for raglan every row as follows - NOTE: Inc differently on body and sleeves: RAGLAN INC ON FRONT AND BACK PIECE: Inc 2 sts before/after A.2 on front and back piece by working 2 tr/dc in each of the last 2 dc/tr before/after A.2 on front and back piece. Repeat inc with 2 tr before/after A.2 (= 8 sts inc) on every row 3-6-6-11-13-18 times in total (incl first raglan inc). Then inc 1 st before/after A.2 by working 2 tr/dc in dc/tr before/after A.2 on front and back piece. Repeat inc with 1 st before/after A.2 (= 4 sts inc) on every row 16-15-17-13-13-10 times in total. RAGLAN INC ON SLEEVES: Inc 1 st after/before A.2 in each side on sleeves by working 2 tr/dc in tr/dc before/after A.2 on sleeves. Repeat inc with 1 st on every row 19-21-23-24-26-28 times in total (incl first raglan inc). TRANSITION FROM A.2 TO DC/TR: AT THE SAME TIME on last row with inc work 6 dc/tr over A.2 instead of A.2 in every transition between body and sleeves (adjust according to pattern A.1). After last inc, there are 288-316-340-368-400-436 sts on row. Work next row as follows from RS: Work 1 dc/tr as before in each of the first 44-49-53-59-65-72 sts (= left front piece), skip the next 60-64-68-70-74-78 sts (= sleeve), work 12 ch, work 1 dc/tr as before in each of the next 80-90-98-110-122-136 sts (= back piece), skip the next 60-64-68-70-74-78 sts (= sleeve), work 12 ch and work 1 dc/tr as before in each of the last 44-49-53-59-65-72 sts (= right front piece) = 192-212-228-252-276-304 sts on row. Then finish body and sleeves separately. BODY: Insert 1 marker on row – NOW MEASURE PIECE FROM HERE. Work 1 row dc/tr as before with 1 dc/tr in every st and 12 dc/tr around ch-space under each sleeve AT THE SAME TIME inc 22-20-22-22-22-24 sts evenly (do not inc over the outermost 4 sts in each side (= bands)) = 214-232-250-274-298-328 sts on row. Then work pattern according to diagram A.3 with 4 dc/tr in each side for bands, i.e. work as follows (1st row = dc from RS – if next row is from WS, cut the yarn and beg from RS): ROW 1: 1 ch, 1 dc in each of the next 4 sts (= band), * 1 dc in each of the next 2 dc, 6 ch, skip 4 sts *, repeat from *-* until 6 dc remain on row and finish with 1 dc in each of the last 6 dc (the last 4 sts = band), turn piece. ROW 2: 3 ch (= 1 tr), 1 tr in each of the next 5 sts, * 2 ch, 1 dc around ch-space, 2 ch, 1 tr in each of the next 2 dc *, repeat from *-* until 4 sts remain on row and finish with 1 tr in each of the last 4 sts, turn piece. ROW 3: 3 ch (= 1 tr), 1 tr in each of the next 3 tr, * 1 tr in each of the next 2 tr, 3 ch, 1 sl st in dc, 3 ch *, repeat from *-* until 6 tr remain on row and finish with 1 tr in each of the last 6 tr, turn piece. ROW 4: 1 ch, 1 dc in each of the first 6 tr, * 4 ch, 1 dc in each of the next 2 tr *, repeat from *-* until 4 tr remain on row, 1 dc in each of the last 4 tr, turn piece. ROW 5: 1 ch, 1 dc in each of the first 4 dc, * 1 dc in each of the next 2 dc, 6 ch *, repeat from *-* until 6 dc remain on row, finish with 1 dc in each of the next 6 dc. Continue pattern like this according to diagram A.3 (repeat rows 2-5 in diagram). When piece measures approx. 34-35-36-37-37-38 cm from under sleeve - finish after 4th or 5th row in pattern, work 1 row with tr, i.e. work 1 tr in every dc from previous row and 4 tr around every ch-space, turn piece and work 1 row dc with 1 dc in every tr. Cut the yarn, piece measures approx. 54-56-58-60-62-64 cm from shoulder and down. SLEEVE: = 60-64-68-70-74-78 sts. Work 6 loose ch, work 1 dc/tr in every st on sleeve as before and finish row with 8 ch, turn piece. Work 1 tr in 4th ch from hook (= 2 tr), work 1 tr in each of the next 4 ch, 1 tr in every tr from previous row AT THE SAME TIME dec 12 tr evenly and 1 tr in each of the 6 ch from beg of previous row = 60-64-68-70-74-78 tr on row. Fasten off. Work the other sleeve the same way. NECK EDGE: Work 1 dc in every dc from ch-row. NOTE: Do not work in ch not worked on first row = 100-100-110-110-118-118 dc. ASSEMBLY: Sew sleeve seams tog edge to edge in front loop of outermost sts. Sew the openings under the sleeves. Sew on buttons, top button approx. 2 cm from neck, then sew them on approx. 8 cm apart (button through tr on band). |
|||||||||||||||||||
Diagram explanations |
|||||||||||||||||||
|
|||||||||||||||||||
 |
|||||||||||||||||||
 |
|||||||||||||||||||
Have you finished this pattern?Tag your pictures with #dropspattern or submit them to the #dropsfan gallery. Do you need help with this pattern?You'll find 11 tutorial videos, a Comments/Questions area and more by visiting the pattern on garnstudio.com. © 1982-2026 DROPS Design A/S. We reserve all rights. This document, including all its sub-sections, has copyrights. Read more about what you can do with our patterns at the bottom of each pattern on our site. |
|||||||||||||||||||


With over 40 years in knitting and crochet design, DROPS Design offers one of the most extensive collections of free patterns on the internet - translated to 17 languages. As of today we count 324 catalogues and 12290 patterns translated into English (UK/cm). 12290
We work hard to bring you the best knitting and crochet have to offer, inspiration and advice as well as great quality yarns at incredible prices! Would you like to use our patterns for other than personal use? You can read what you are allowed to do in the Copyright text at the bottom of all our patterns. Happy crafting!
Post a comment to pattern DROPS Extra 0-1293
We would love to hear what you have to say about this pattern!
If you want to leave a question, please make sure you select the correct category in the form below, to speed up the answering process. Required fields are marked *.