
Popular categories
Looking for a yarn?


Comments / Questions (118)
![]() Willy Dijkstra wrote:
Willy Dijkstra wrote:
Ik heb het vestje met korte mouw gehaakt en het is erg leuk geworden.
21.05.2011 - 11:39Karin wrote:
Thanks very much for that, I had come to that conclusion in my head, but am glad to have it confirmed! I'm really looking forward to finishing it now! Karin (in Australia)
18.04.2010 - 15:53
![]() Drops Design wrote:
Drops Design wrote:
Karin, you inc at the end of the 3rd row which is left side, then at then end of 4th row wixh is an inc at the right side, then you work 2 rows without inc, then inc at the end of 3rd row again and then at the end of 4th again, continue like this until you have inc 4-5 times each side depending on size.
15.04.2010 - 18:22Karin wrote:
Hi, I have worked my way through the body of the pattern, but I am confused by the increase on the sleeves. Where it says "nc 1 ch-st bow at end of row on alternately right and left side of piece a total of 8-10 times alternately every 3 and 4 rows" - I am confused by the every 3 and 4 rows. How do I increase every 3 and 4 rows, or is this every 3 rows for the first sizing, and then every four rows for the second sizing? Thanks for your help. Karin
13.04.2010 - 16:33
![]() Drops Design wrote:
Drops Design wrote:
Die Arbeit wird nur geteilt. Es wird nicht für das Armloch abgenommen.
15.09.2008 - 11:19
![]() Karin Rieger wrote:
Karin Rieger wrote:
Guten Tag, bitte erklären Sie mir, wie die Abnahmen für die Armlöcher gemacht werden. Danke Karin
15.09.2008 - 11:03
![]() Sandy wrote:
Sandy wrote:
Forgot to be specific: go to the dictionary link and you'll find a nicely organized list of translations for several countries.
26.06.2008 - 23:54
![]() Sandy wrote:
Sandy wrote:
For U.S. users, I found a couple translations that might help (as well as UK-US terminology help here). luftm=chain st, fastm=single crochet (US), stav=double crochet (US). As for the bobble, I had trouble translating beyond "Sla a loop about(around) nalen (hook?)" and "repeat from *-* 3 times". It probably is the common bobble st. Nice patterns! Thank you for your gift to us!
26.06.2008 - 23:49
![]() DROPS Design wrote:
DROPS Design wrote:
The translations for the Diagrams for all Garnstudio patterns are included within the text of the Pattern itself. If you look you will find lines starting with an = sign. These are the translations, and they are given in the same vertical order as the chart symbols within the diagram.
11.06.2008 - 19:59
![]() Janet wrote:
Janet wrote:
I am starting Pattern 68-15 and under DIAGRAM, the instructions are not in English. Could you please explain what your symbols mean? Thank you!!!!
11.06.2008 - 19:55
|
|||||||||||||||||||||||||||||||||||||
Midnight Lace |
|||||||||||||||||||||||||||||||||||||
|
|
|||||||||||||||||||||||||||||||||||||
Crocheted Cardigan in DROPS Muskat. Piece is worked bottom up with lace pattern and flower pattern. Size M-L/XL.
DROPS 68-15 |
|||||||||||||||||||||||||||||||||||||
|
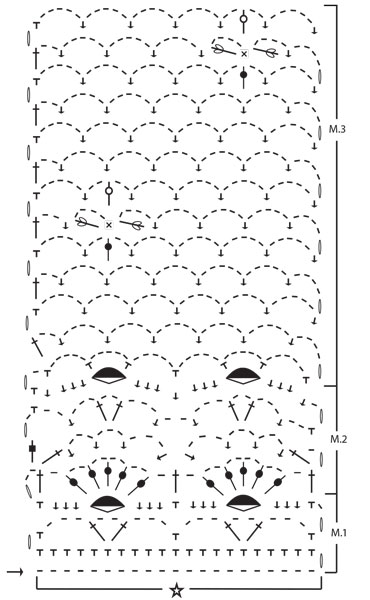
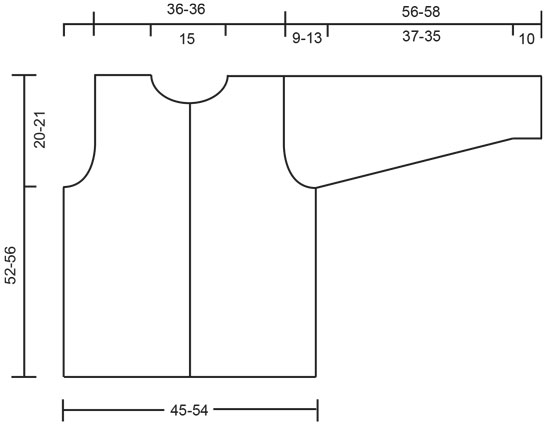
Tension: 1 diagram = approx. 9 cm in width. 12 rows of Pattern 2 = approx. 10 cm in height. Pattern: See chart. The pattern is seen from the right side. «1 rapport» = «1 repeat». Note: All measurements in pattern refer to the garment when held up or worn, because the pattern pulls in and lengthens. Body: Ch 201-241 loosely. Turn and crochet Pattern 1 once across row (10-12 repeats = 60-72 ch-st bows). Then crochet Pattern 2 on the next row and repeat a total of 5 times, the piece measures approx. 20 cm. Crochet Pattern 3. At the same time when the piece measures approx. 32-35 cm divide and crochet each part of Body separately. Each front = 2 repeats; back = 4 repeats, bind off 1-2 repeats at each side for armhole. Right front: Continue with Pattern 3 over 2 repeats starting at center front. When the piece measures approx. 42-46 cm adjust to finish after 1 flower) continue with Pattern 3 but do not make flowers. At the same time shape the neck as follows: Crochet until 2 ch-st bows remain at center front. Turn and crochet back. Then crochet over 1 less ch-st bow at neck edge of every other row 3 times. Continue to crochet in pattern until the piece measures 52-56 cm, fasten off. Left front: Crochet the same as right front, reversing all shaping. Back: Continue to crochet Pattern 3 until piece measures approx. 42-46 cm, then crochet the rest without flowers (as on front). When the piece measures approx. 49-53 cm crochet the next row as follows: 7 ch-st bows = shoulder, dc over the following 10 ch-st bows = neck (crochet 1 dc in every ch-st bow and 1 dc in every dc between bows), 7 ch-st bows = shoulder. Finish with 1 row of ch-st bows on each shoulder. The piece measures approx. 52-56 cm, fasten off. Sleeve: Ch 51-51 loosely. Turn and crochet Pattern 1 once across row (2.5 repeats = 15 ch-st bows), then crochet Pattern 2 twice, then continue in Pattern 3. When the piece measures approx. 10 cm inc 1 ch-st bow at end of row on alternately right and left side of piece a total of 8-10 times, inc at the end of every 3rd and 4th rows - make inc by ch 4, then 1 dc in the last sc from previous row = 23-25 ch-st bows on row. Continue until piece measures approx. 52-54 cm. Then crochet over 1 less ch-st bow at end of every row until the piece measures 56-58 cm, fasten off. Assembly: Crochet together shoulder seams as follows: * 1 dc in first ch-st bow on front, ch 1, 1 dc in first ch-st bow on back, ch 1 *, repeat from * - * on each shoulder. Crochet together the sleeve as follows from bottom edge: * 1 dc in one side, ch 2, 1 dc in *, repeat from * - * until approx. 5-9 cm remains. Crochet sleeves to Body in the same way as sleeves were crocheted together. Crochet 1 row dc along both button bands and around the neck - crochet snugly around the neck so that the neckline will not sag. Buttonhole loops: Make 3 buttonhole loops along right front. Start at top edge: * 1 dc, ch 3, fasten with 1 dc 1 cm below, sl st approx. 8-9 cm lower on band * repeat from * - * until there are 3 loops. Sew on buttons on left front. |
|||||||||||||||||||||||||||||||||||||
Diagram explanations |
|||||||||||||||||||||||||||||||||||||
|
|||||||||||||||||||||||||||||||||||||
 |
|||||||||||||||||||||||||||||||||||||
 |
|||||||||||||||||||||||||||||||||||||
Have you finished this pattern?Tag your pictures with #dropspattern or submit them to the #dropsfan gallery. Do you need help with this pattern?You'll find 7 tutorial videos, a Comments/Questions area and more by visiting the pattern on garnstudio.com. © 1982-2026 DROPS Design A/S. We reserve all rights. This document, including all its sub-sections, has copyrights. Read more about what you can do with our patterns at the bottom of each pattern on our site. |
|||||||||||||||||||||||||||||||||||||


With over 40 years in knitting and crochet design, DROPS Design offers one of the most extensive collections of free patterns on the internet - translated to 17 languages. As of today we count 325 catalogues and 12298 patterns translated into English (UK/cm). 12298
We work hard to bring you the best knitting and crochet have to offer, inspiration and advice as well as great quality yarns at incredible prices! Would you like to use our patterns for other than personal use? You can read what you are allowed to do in the Copyright text at the bottom of all our patterns. Happy crafting!
Post a comment to pattern DROPS 68-15
We would love to hear what you have to say about this pattern!
If you want to leave a question, please make sure you select the correct category in the form below, to speed up the answering process. Required fields are marked *.