
Popular categories
Looking for a yarn?


Comments / Questions (61)
![]() Gina Von Staden wrote:
Gina Von Staden wrote:
Danke vielmals. Alles Gute, bis zur nächsten dummen Frage. Gina
18.04.2016 - 10:15
![]() Gina Von Staden wrote:
Gina Von Staden wrote:
Meine Frage: Auf der Zeichnung sieht es so aus, als würde die Schalblende zum Schluss mit verkürzten Reihen gestrickt. In der Anleitung finde ich das aber nicht. Danke für Ihre Antwort. Ich finde Ihre Webpräsenz einfach super. Gina
17.04.2016 - 19:18DROPS Design answered:
Liebe Gina, die Abschrägung kommt nicht von verkürzten Reihen, sondern vom Abketten: "... Dann zu Beginn jeder Hin-R 2-2-2-0-0-0 x 5 M und 1-1-1-3-3-3 x 6 M abketten."
18.04.2016 - 09:02
![]() Hanne Gunnertoft Pedersen wrote:
Hanne Gunnertoft Pedersen wrote:
Har gået i min trøje hver dag, siden den blev færdig 😊
29.03.2016 - 20:14
![]() Hanne Gunnertoft Pedersen wrote:
Hanne Gunnertoft Pedersen wrote:
Er vildt glad for min trøje. Skulle lige vænne mig til st strikke i bouclegarnet, og monteringen var hæslig, da jeg ikke kunne se maskerne. Men er glad for den færdige trøje 😊
19.03.2016 - 20:38
![]() Anita Thon wrote:
Anita Thon wrote:
Beklager spørsmålet om stolpestrikking av jakken. Skulle har lest videre først. AWThon
17.01.2016 - 19:34
![]() Anita Thon wrote:
Anita Thon wrote:
Når en i begynnelden strikker stolpem 12 m 1 r/1 v og 3 m r og 3 v, må en da i slutten, på motsatt side ikke strikke disse 18 masker motsatt i rettningen? 3 v 3 r og 12 masker rille?
17.01.2016 - 18:13
![]() Jules wrote:
Jules wrote:
Wenn ich den Cardigan gern mit langen ärmeln stricken möchte, die etwas mehr anliegen, wie gehe ich dann am besten vor?
24.11.2015 - 20:53DROPS Design answered:
Die Armel werden ja direkt angestrickt. Es werden einmalig die M für die Ärmel angeschlagen. Wenn Sie sie länger machen möchten, können Sie mehr M anschlagen, allerdings bleiben die Ärmel dann gleich weit. Um sie enger anliegend zu machen, müssten Sie mit dem Anschlagen der M später beginnen, dadurch wird der Armausschnitt enger, und zudem die Ärmel-M in mehreren R anschlagen, damit der Ärmel nach unten hin enger wird. Das müssten Sie allerdings selbst austüfteln (orientieren Sie sich an der Maschenprobe bzw. an Ihrem bereits gestrickten Stück für das Errechnen der Armaussschnitthöhe), genauere Angaben können wir hier nicht liefern.
30.11.2015 - 13:12
![]() Eva wrote:
Eva wrote:
Denne jakken ser fin ut på bildet, men armene ble helt merkelige. Siden garnet er umulig å rekke opp gikk hele jakken i søpla. Jeg savner flere bilder av produktene deres, ikke bare rene "poseringsbilder", men rene bilder av hvordan produktene ser ut, da ville man ha unngått slike probler. Har nå skjønt at jeg må lese gjennom hele oppskriften før jeg starter.
01.11.2014 - 12:12Nalice wrote:
Eine Lauflänge von 75 m (Drops loves you 4)
21.02.2014 - 14:43
![]() Malu wrote:
Malu wrote:
So habe ich das auch verstanden, aber ich würde sagen, dann ist Ihre Berechnung in dem Tipp falsch?Garn Y hat eine Lauflänge von 50 m und 1020 :50 wären dann 20,4 = 21 Knäuel oder ???
21.02.2014 - 13:02DROPS Design answered:
Liebe Malu, Sie haben voll und ganz Recht, beim Beispiel in den FAQs hatte sich ein Fehler eingeschlichen. Das Beispiel gilt für 50g/150m, nicht für 50g/50m. Der Fehler wurde nun korrigiert. Danke für den Hinweis!
21.02.2014 - 16:27
|
|||||||
Snuggle#snugglecardigan |
|||||||
 |
 |
||||||
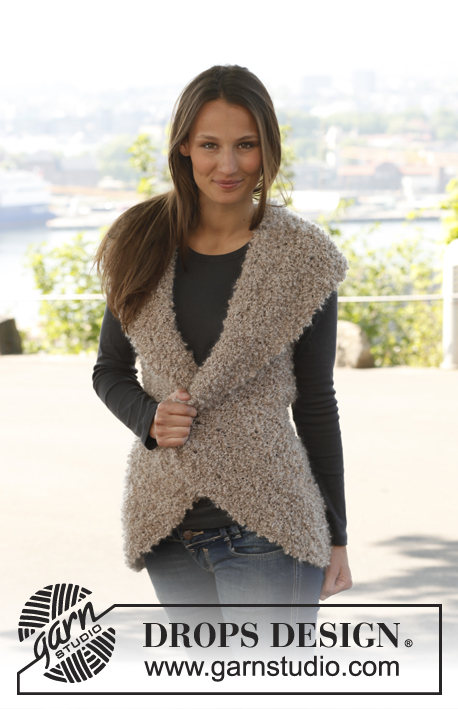
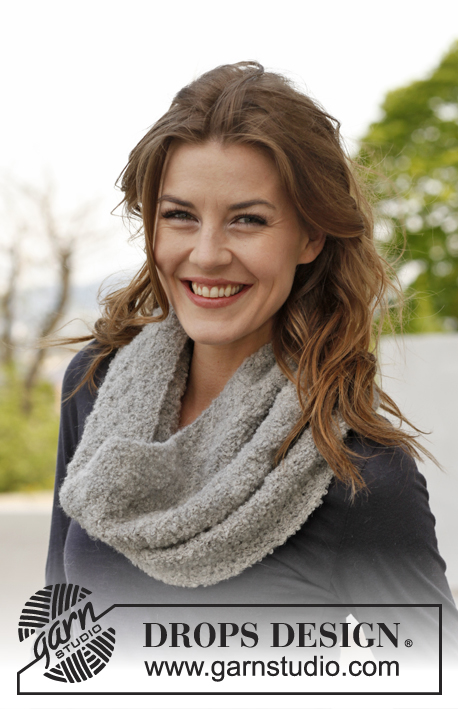
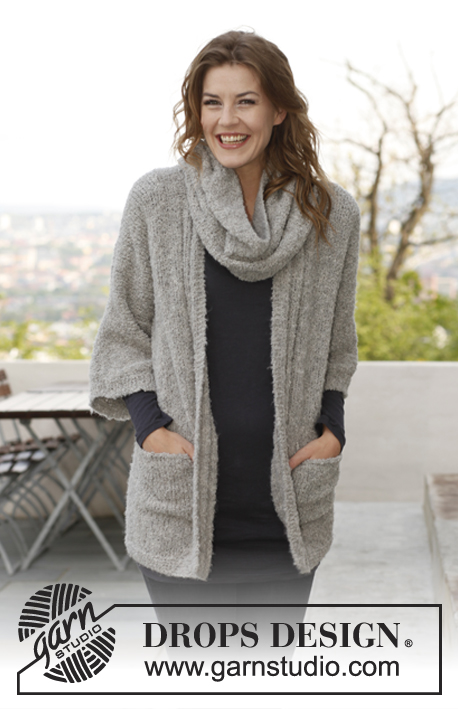
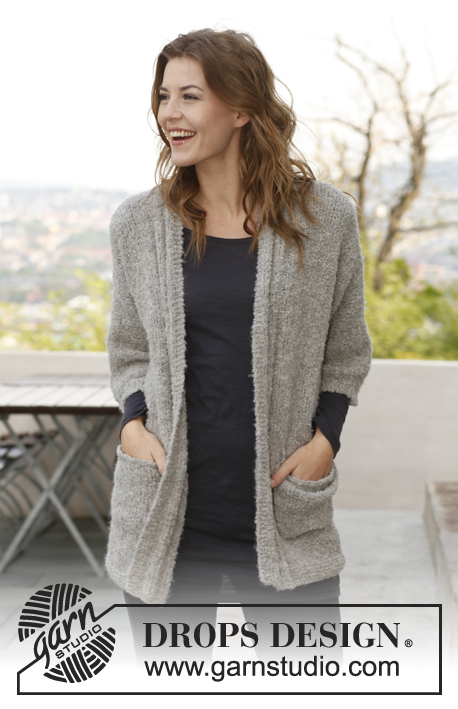
Set consists of: Knitted DROPS jacket and neck warmer in ”Alpaca Bouclé.” Size: S - XXXL.
DROPS 142-21 |
|||||||
|
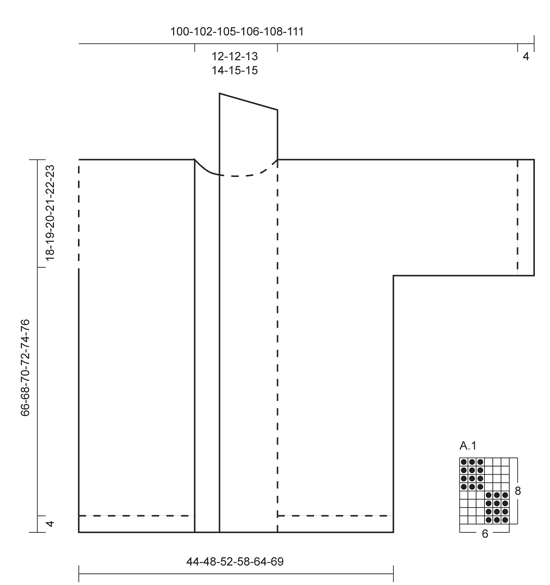
GARTER ST (back and forth on needle): K all rows. GARTER ST (in the round on needle): * K 1 round and P 1 round *, repeat from *-*. BAND STS: At beg of row from RS: Work 4-4-4-6-6-6 sts in garter st, * K 3, P 3 *, repeat from *-* 1 more time = 16-16-16-18-18-18 sts. At end of row from RS: Work * P 3, K 3 *, repeat from *-* 1 more time, 4-4-4-6-6-6 sts in garter st = 16-16-16-18-18-18 sts. From WS work the outermost 4-4-4-6-6-6 sts in garter st, and K over K and P over P over the other band sts. INCREASE TIP: Inc 1 st in each side as follows: K 1, make 1 YO, work until 1 st remains, make 1 YO, K 1. On next row work YO twisted to avoid holes. MEASURING TIP: Measure when piece is flat, it is important not to stretch the piece when measuring. PATTERN (applies to neck warmer): See diagram A-1, diagram shows all rows in 1 repetition of pattern. -------------------------------------------------------- BODY: Worked back and forth on circular needle from mid front. Cast on 160-176-186-208-226-246 sts on circular needle size 5 mm with Alpaca Bouclé. On 1st row (= RS) work as follows: Work BAND STS - read explanation above, work in GARTER ST - read explanation above - until 16-16-16-18-18-18 sts remain on row, work BAND STS. Continue in garter st over the middle sts and 16-16-16-18-18-18 band sts in each side for 4 cm. REMEMBER THE KNITTING TENSION! Then work in stocking st with 16-16-16-18-18-18 band sts in each side. When piece measures 48-49-50-51-52-53 cm, divide the piece 43-47-49-55-59-64 sts in from each side (= front piece, there are 74-82-88-98-108-118 sts on back piece), and finish each part separately. BACK PIECE: = 74-82-88-98-108-118 sts. Continue in stocking st - AT THE SAME TIME at end of the next 2 rows, cast on 48-46-45-41-38-35 new sts for sleeve in each side = 170-174-178-180-184-188 sts. Continue in stocking st - but work the outermost 6 sts in each side in garter st until finished measurements (= band on sleeve in each side). When piece measures 64-66-68-70-72-74 cm, cast off the middle 18-18-20-22-24-24 sts for neck and finish each shoulder separately. On next row from neck, cast off 1 st = 75-77-78-78-79-81 sts remain on shoulder. Loosely cast off all sts when piece measures 66-68-70-72-74-76 cm. NOTE: Make sure that the cast off edge is not too tight. LEFT FRONT PIECE: = 43-47-49-55-59-64 sts. Continue in stocking st and 16-16-16-18-18-18 band sts towards mid front - AT THE SAME TIME at end of next row from WS, cast on 48-46-45-41-38-35 new sts for sleeve = 91-93-94-96-97-99 sts. Continue in stocking st and band sts towards mid front but work the outermost 6 sts at beg of row seen from RS in garter st until finished measurements (= band on sleeve). When piece measures 66-68-70-72-74-76 cm, cast off on next row from RS the first 75-77-78-78-79-81 sts for shoulder = 16-16-16-18-18-18 band sts remain for collar. NOTE: Make sure that the cast off edge is not too tight. Continue to work over these band sts until collar measures 7-7-8-8-9-9 cm from the shoulder. Then cast off at beg of every row from RS as follows: Cast off 5 sts 2-2-2-0-0-0 times, 6 sts 1-1-1-3-3-3 times. RIGHT FRONT PIECE: Work as left front piece but reversed. ASSEMBLY: Sew shoulder and sleeve seams in front loop of outermost sts. Sew collar tog mid back and sew on to neck line at the back of neck. Sew seams under sleeves in front loop of outermost sts. POCKET: Worked back and forth on needle. Cast on 24-24-24-26-26-26 sts on circular needle size 5 mm with Alpaca Bouclé. Then work in stocking st. When piece measures 3 cm, inc 1 st in each side - READ INCREASE TIP. Repeat inc every 3 cm a total of 3 times = 30-30-30-32-32-32 sts. Cast off all sts when piece measures 16-16-16-17-17-17 cm. Sew pockets on to front piece, approx. 10-10-11-11-12-12 cm from cast on edge and 12 cm from mid front. NOTE: Right and left edge on pocket are sewn parallel with band mid front. -------------------------------------------------------- NECK WARMER: Worked in the round. Loosely cast on 120 sts on circular needle size 5 mm with Alpaca Bouclé. Work 4 rounds in GARTER ST - read explanation above. Then work A.1 in the round. When piece measures approx. 35 cm (finish with last row in pattern), work 4 rounds in garter st and loosely cast off all sts. NOTE: Make sure that the cast off edge is not too tight. |
|||||||
Diagram explanations |
|||||||
|
|||||||
 |
|||||||
Have you finished this pattern?Tag your pictures with #dropspattern #snugglecardigan or submit them to the #dropsfan gallery. Do you need help with this pattern?You'll find 7 tutorial videos, a Comments/Questions area and more by visiting the pattern on garnstudio.com. © 1982-2026 DROPS Design A/S. We reserve all rights. This document, including all its sub-sections, has copyrights. Read more about what you can do with our patterns at the bottom of each pattern on our site. |
|||||||


With over 40 years in knitting and crochet design, DROPS Design offers one of the most extensive collections of free patterns on the internet - translated to 17 languages. As of today we count 325 catalogues and 12298 patterns translated into English (UK/cm). 12298
We work hard to bring you the best knitting and crochet have to offer, inspiration and advice as well as great quality yarns at incredible prices! Would you like to use our patterns for other than personal use? You can read what you are allowed to do in the Copyright text at the bottom of all our patterns. Happy crafting!
Post a comment to pattern DROPS 142-21
We would love to hear what you have to say about this pattern!
If you want to leave a question, please make sure you select the correct category in the form below, to speed up the answering process. Required fields are marked *.