
Popular categories
Looking for a yarn?


Comments / Questions (131)
![]() Hilde wrote:
Hilde wrote:
Hvordan ser toppen ut bak? Skal stroppene ligge oppå hverendre midt bak? Hvor skal knapphullene være? Midt på de 6 «nyopplagde» maskene? Detburde absolutt ha vært bilde av hvorden denne ser ut bak! Umulig å forstå mønsteret.
26.03.2019 - 21:45DROPS Design answered:
Hei Hilde. Med unntak av at det er knappestolpe midt bak så er toppen lik foran og bak. Du feller av de første 24-25-26-27-28-29 maskene (fra midt bak og ut mot skulderen), så strikkes halve venstre skulderstropp. Videre felles 10-12-14-30-38-46 masker (= under ermet) og andre halvdelen av venstre skulderstropp strikkes (denne syes til første halvdel midt oppå skulderen). Så felles de midterste 42-44-46-48-50-52 maskene midt foran. Så strikkes begge halvdeler av høyre skulderstropp på samme måte som venstre, før du feller av de siste 24-25-26-27-28-29 maskene (halve bakstykket). Du har nå felt av like mange masker midt foran og midt bak. God fornøyelse
02.04.2019 - 14:23
![]() Irmgard Busetti wrote:
Irmgard Busetti wrote:
Wäre es möglich von diesem Modell eine Rückenansicht zu sehen? Habe ein bisschen Probleme und kann mir das hinten auch nicht so richtig vorstellen. Lg Busetti
01.08.2018 - 20:54DROPS Design answered:
Liebe Frau Busetti, wir haben leider keine Rückansicht. Nach 35-40 cm (siehe Größe) schlagen Sie 6 neuen Maschen am Ende der Reihe (= Blende) und stricken Sie krausrippen hin und zurück bis zur Ende (mit Knopflöchern auf der rechten Blende), dann werden die ersten 24-29 Maschen abgekettet und die erste Träger gestrickt. Die nächsten Maschem vom Top abketten (Armloch) und die Träger (Vorne) stricken, die nächsten Maschen vom mitte Vorne abketten, die 2. Träger (vorne) stricken, die Maschen für das 2. Armloch abketten, die 2. Träger (Rücken) stricken und die letzten M vom Top abketten. Viel Spaß beim stricken!
02.08.2018 - 09:08
![]() Yvonne wrote:
Yvonne wrote:
This pattern is adorable. I'm decent at knitting from patterns but not at altering them. Do you have any guidance, for this pattern, to increase the fitted bust size to approximately 58 inches? Also, the total yarn amounts that would be needed for the increase and approximately 4 inches in length. I appreciate any ideas.
11.07.2018 - 22:11DROPS Design answered:
Dear Yvonne, we are unfortunately not able to adjust every pattern to every individual request, but you are welcome to contact your DROPS store or a knitting forum for any individual assistance. Happy knitting!
12.07.2018 - 09:02
![]() Britta Tinghus wrote:
Britta Tinghus wrote:
Jeg synes det er meget svært at gennemskue h orden modellen set ud bagpå. Kunne der ikke lægges et billede op af den bagfra?
22.05.2018 - 16:39DROPS Design answered:
Hej Britta, det har vi desværre ikke, men toppen er ens foran og bagpå. God fornøjelse!
29.05.2018 - 13:43
![]() Britta Tinghus wrote:
Britta Tinghus wrote:
Jeg synes det er meget svært at gennemskue h orden modellen set ud bagpå. Kunne der ikke lægges et billede op af den bagfra?
22.05.2018 - 16:38
![]() Aud Kristiansen wrote:
Aud Kristiansen wrote:
Nydelig topp, men innviklet mønster å lese seg til, spesielt forklaringen til stroppene var vanskelig. Ender med å strikke de for seg selv og sy de på.
29.04.2018 - 16:25Heather wrote:
I believe the amount of off white for the size Medium is off. My guage swatches are exact for the wave pattern and the garter stitch, but I still ran out of off white Muskat....I don't even have enough to start the second part of the sleeves. My shirt now only has one side done :( I now have to place an order for 1 ball of off white...so annoying. Are the counts off?
12.02.2018 - 19:52DROPS Design answered:
Dear Heather sorry you are having problems with the yarn amount, however the amounts are correct. A number of knitters made this top and there were no problems. Hopefully you can still finish your top. Happy Knitting!
12.02.2018 - 21:29
![]() Heather Hicks wrote:
Heather Hicks wrote:
What do you mean when by this portion of the pattern. Continue with M.5 over the 1st 4 repetitions as before, work M.6 over the next 7 repetitions, continue with M.5 over the remaining 4 repetitions? You then state equals 2 rounds. Work M.3 over M.6, work the remaining repetitions in M.5. Then continue to repeat last 2 rounds. I think this means you work this row and the next row twice correct?
08.02.2018 - 20:41DROPS Design answered:
Dear Mrs Hicks, each diagram consists on 2 rows - you first work M.5x4, M.6x7 (increase 2 sts in each diagram), M.5x4 1 time in height (= 2 rows), then work M.5x4, M.3x7,M.5x4 and repeat these 2 rows until piece measures 36 cm in size M. Happy knitting!
09.02.2018 - 09:51
![]() Heather Hicks wrote:
Heather Hicks wrote:
I am confused as to what size to make. I have made a few tops from DROPS before. How much ease is there on the finished garments? I am a 34 inch bust, but if there is a lot of ease I would want to make a size down etc. I am torn between the Medium and the Large size.
06.02.2018 - 17:22DROPS Design answered:
Dear Mrs Hicks, compare the measurements from a similar top you have and like the shape to find out the matching size. It looks like with the size M it will be rather a negative ease (31.49" bust circumference) and with a size L rather positive (33.8"). Happy knitting!
07.02.2018 - 08:27
![]() Yvonne wrote:
Yvonne wrote:
Nu ben ik eindelijk een stukje op weg. Kunt u mij zeggen of ik M3 tot 18 cm moet breien of refereert dit naar de totale hoogte vanaf M1? Merci voor uw antwoord.
24.11.2017 - 14:40DROPS Design answered:
Hallo Yvonne, Met de 18 cm wordt de totale hoogte bedoeld.
27.11.2017 - 09:33
|
|||||||||||||||||||
Breaking Waves Top#breakingwavestop |
|||||||||||||||||||
 |
 |
||||||||||||||||||
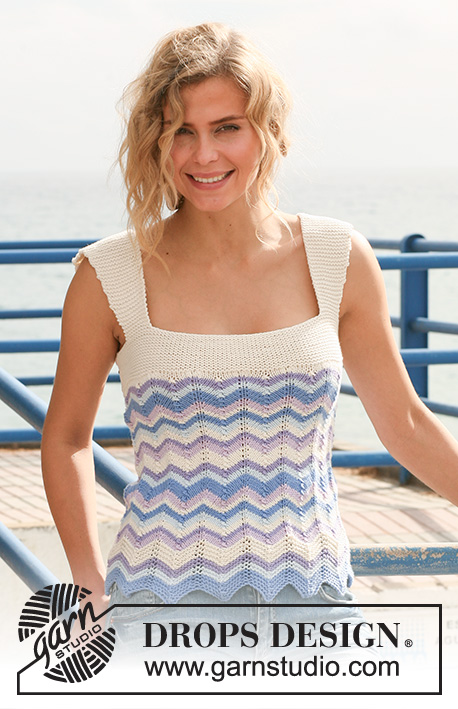
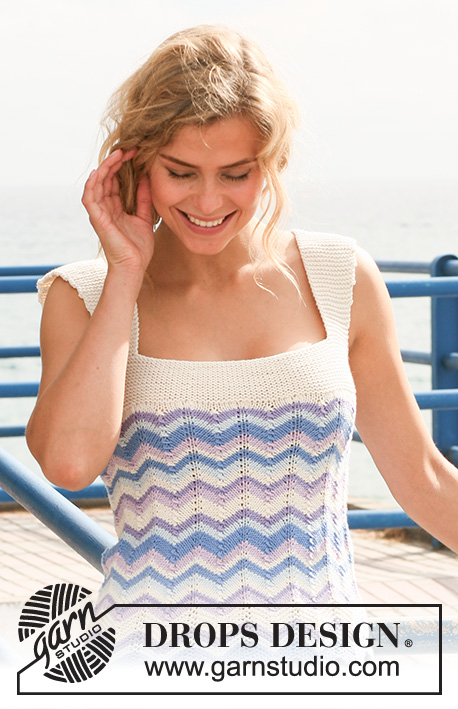
Knitted DROPS top with zigzag pattern and stripes in ”Muskat”. Size S-XXXL.
DROPS 128-3 |
|||||||||||||||||||
|
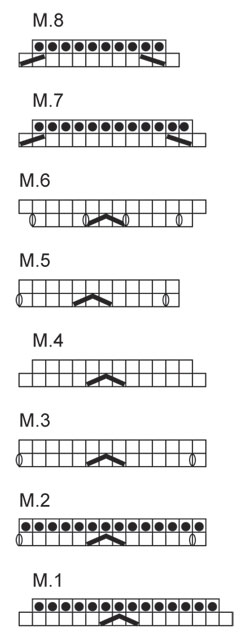
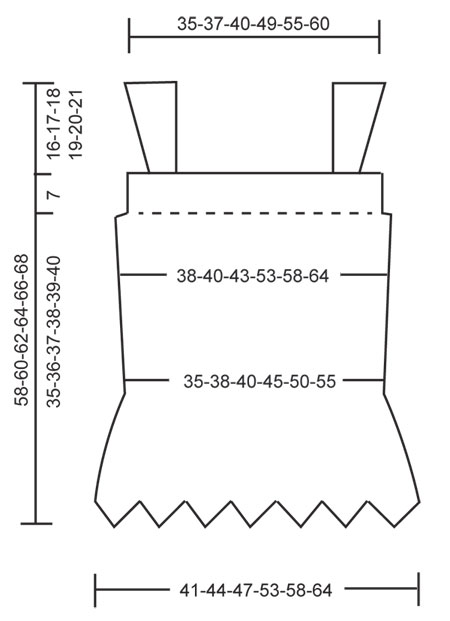
GARTER ST (in the round on circular needle): 1 ridge = 2 rounds * K 1 round and P 1 round *, repeat from *-*. GARTER ST (back and forth on needle): K all rows. PATTERN: See diagram M.1 - M.8. STRIPES IN RIDGES: (1 repetition of M.2 vertically = 1 ridge (2 rounds in garter st)) 3 ridges in light blue 2 ridges in ice blue 2 ridges in light blue purple 4 ridges in off white STRIPES IN STOCKING ST: 3 rounds in lilac 2 rounds in light blue purple 3 rounds in off white 3 rounds in ice blue 3 rounds in light blue 2 rounds in off white 3 rounds in lilac 5 rounds in light blue 3 rounds in ice blue 3 rounds in light blue purple 5 rounds in off white Repeat stripe repetition until anything else is stated. BUTTON HOLES: Cast off for button holes on right button band. 1 button hole = K tog 2nd and 3rd st from RS, then make 1 YO. -------------------------------------------------------- TOP: Worked in the round on circular needle. Cast on 224-240-256-288-320-352 sts on circular needle size 4 mm with light blue. Work M.1 over all sts - see PATTERN (= 14-15-16-18-20-22 repetitions). When M.1 has been worked 1 time vertically, there are 196-210-224-252-280-308 sts on needle. REMEMBER THE KNITTING TENSION! Continue with M.2 over M.1 AT THE SAME TIME work STRIPES IN RIDGES - see explanation above! Continue with M.3 over all sts AT THE SAME TIME work STRIPES IN STOCKING ST - see explanation above! When piece measures 18 cm (finish after one whole repetition of M.3 vertically), work M.4 over M.3. When M.4 has been worked 1 time vertically, there are 168-180-192-216-240-264 sts on needle. Continue with M.5 over M.4. When piece measures 23 cm, work as follows in the different sizes (start of round = mid back): SIZE S-L: Continue with M.5 over the first 4-4-4 repetitions as before, work M.6 over the next 6-7-8 repetitions, continue with M.5 over the remaining 4-4-4 repetitions as before (= 2 rounds) = 180-194-208 sts. Work M.3 over M.6, work the remaining repetitions in M.5 as before (= 2 rounds). Then continue to repeat the last 2 rounds of the pattern. SIZE XL-XXXL: Work M.6 over M.5. When M.6 has been worked 1 time vertically (= 2 rounds), there are 252-280-308 sts on needle. Then work M.3 over M.6 (= 2 rounds). Then continue to repeat the last 2 rounds of the pattern. ALL SIZES: When piece measures 35-36-37-38-39-40 cm, finish stripe pattern and zigzag pattern (after one whole repetition vertically). Switch to circular needle size 2.5 mm and off white. Then work as follows from start of round (= mid back): M.7 over all M.3 and M.8 over all M.5 = 152-164-176-216-240-264 sts. Work next round as follows: K 3 sts, turn and K 1 row from WS until the 3 sts mid back, then cast on 6 new sts at the end of row mid back for right button band = 158-170-182-222-246-270 sts. Continue in GARTER ST back and forth over all sts on the needle - see explanation above! When section in garter st measures 2 cm, cast off for first BUTTON HOLE - see explanation above! Repeat cast off for button hole when section in garter st measures 5 cm vertically. When section in garter st measures 7 cm vertically (the whole top now measures 42-43-44-45-46-47 cm), work next row from RS as follows: Cast off the first 24-25-26-27-28-29 sts on the needle. Then work half a shoulder strap back and forth over the next sts as follows: K 12-13-14-15-16-17 sts, turn and K back over the 12-13-14-15-16-17 sts, continue to K back and forth over these sts. AT THE SAME TIME when 4 rows in garter st (2 ridges) have been worked vertically, inc 1 st for wing sleeve by knitting 2 sts in last st from RS. Repeat inc every 8th row a total of 9-9-9-10-10-10 times = 21-22-23-25-26-27 sts. Cast off with K when strap measures 16-17-18-19-20-21 cm. Cast off the next 10-12-14-30-38-46 sts on the top (first armhole). Work half a shoulder strap over the next 12-13-14-15-16-17 sts, while AT THE SAME TIME inc for wing sleeve by knitting 2 sts in last st from WS. Cast off when strap measures 16-17-18-19-20-21 cm. Cast off the next 42-44-46-48-50-52 sts mid front of the top. Work half a shoulder strap over the next 12-13-14-15-16-17 sts (inc towards the side by knitting 2 sts in last st from RS). Cast off when strap measures 16-17-18-19-20-21 cm. Cast off the next 10-12-14-30-38-46 sts on the top (2nd armhole). Work half a shoulder strap over the next 12-13-14-15-16-17 sts (inc towards the side by knitting 2 sts in last st from WS). Cast off when strap measures 16-17-18-19-20-21 cm. Cast off the remaining 24-25-26-27-28-29 sts. Now piece measures approx. 58-60-62-64-66-68 cm. ASSEMBLY: Sew the shoulder seams. Sew cast on edge on right button band in front of the bottom of left button band with some stitches. Sew the buttons on to the left button band. |
|||||||||||||||||||
Diagram explanations |
|||||||||||||||||||
|
|||||||||||||||||||
 |
|||||||||||||||||||
 |
|||||||||||||||||||
Have you finished this pattern?Tag your pictures with #dropspattern #breakingwavestop or submit them to the #dropsfan gallery. Do you need help with this pattern?You'll find 19 tutorial videos, a Comments/Questions area and more by visiting the pattern on garnstudio.com. © 1982-2026 DROPS Design A/S. We reserve all rights. This document, including all its sub-sections, has copyrights. Read more about what you can do with our patterns at the bottom of each pattern on our site. |
|||||||||||||||||||


With over 40 years in knitting and crochet design, DROPS Design offers one of the most extensive collections of free patterns on the internet - translated to 17 languages. As of today we count 324 catalogues and 12290 patterns translated into English (UK/cm). 12290
We work hard to bring you the best knitting and crochet have to offer, inspiration and advice as well as great quality yarns at incredible prices! Would you like to use our patterns for other than personal use? You can read what you are allowed to do in the Copyright text at the bottom of all our patterns. Happy crafting!
Post a comment to pattern DROPS 128-3
We would love to hear what you have to say about this pattern!
If you want to leave a question, please make sure you select the correct category in the form below, to speed up the answering process. Required fields are marked *.