
Popular categories
Looking for a yarn?


Comments / Questions (67)
![]() Søs wrote:
Søs wrote:
Diagrammet er fra retsiden hvad strikker på på vrang siden
24.01.2020 - 10:46DROPS Design answered:
Hej Søs, du strikker hver 2.pind i diagrammet fra vrangen. Sørg for at ud- og indtagninger sker fra retsiden. En prik betyder at du strikker ret fra vrangsiden. Se også gerne vores video med bølgemønster nederst i opskriften :)
30.01.2020 - 09:27
![]() Louise wrote:
Louise wrote:
J'ai trouve la reponse a mon probleme, je ne faisas pas le nombre de jetes et de m. end demande? Merci bien quand meme.
16.10.2019 - 02:18DROPS Design answered:
Bonjour Louise, les marqueurs doivent toujours rester au même endroit, pour que vous ayez toujours 138 m pour le dos et 75 m pour chaque devant. Bon tricot!
17.10.2019 - 08:58
![]() Louise wrote:
Louise wrote:
Je tente de faire ce modele en taille XL. On doit placer un marqueur apres 75 m. Toutefois, le motif M1 se travaille sur 23 m. Apres avoir fait 1 motif complet, il me reste 1 m. avant le marqueur et le point suivant est 2 m end ensemble. Quoi faire avec le repere qui vient de changer de place. Merci a l'avance
15.10.2019 - 19:45
![]() REINE MARIE wrote:
REINE MARIE wrote:
PEUX T ON TRICOTER CE MODELE EN KARISMA
23.09.2019 - 15:19DROPS Design answered:
Bonjour Reine Marie, tout à fait, Karisma et Muskat appartiennent toutes deux au groupe B de nos fils à tricoter, rappelez-vous toutefois que lorsque les structures des fils sont différentes, le résultat pourra être également différent - utilisez notre convertisseur pour connaître la nouvelle quantité nécessaire. Bon tricot!
23.09.2019 - 15:24
![]() Ida wrote:
Ida wrote:
Sorry voor de onduidelijkheid. Ik brei maat S. Ik ben nu bezig met de mouwen, ik begin dan bij st nr 9 en als de hoogte bereikt is moet ik 5 en 4 st afkanten, toch? Dankje
10.08.2019 - 18:46DROPS Design answered:
Dag Ida,
Ja dat klopt, je begint bij steek nr 9 (dit is om uit te komen met het patroon t.o.v. de panden. en het afkanten klopt ook zoals je zegt.
11.08.2019 - 16:00
![]() Ida wrote:
Ida wrote:
Hello, mouw, maar s: Ik vraag me af waarom moet je met s9 beginnen . Wat is de reden?
01.08.2019 - 16:38DROPS Design answered:
Dag Ida,
Helaas begrijp ik je vraag niet helemaal. Wat bedoel je met s9? Bij linker mouw staat bovenaan dat je deze in maat S hetzelfde breit als de rechter mouw. Voor de andere maten staan de hoeveelheid steken die je afkant erbij en het eerte getal geldt dus voor maat M en niet maat S. Bedoel je dit?
10.08.2019 - 18:20
![]() Lis Mikkelsen wrote:
Lis Mikkelsen wrote:
Det er om ærmet. jeg forstå ikke helt hvad der mener nå der stå. " forsæt rundt med M1, startmed den 9,-1,-1,-11,-1,-1m i M1. " den sidst del er jeg ikke helt med nå der skal lukkes af. der stå "på næste omg. lukkes der 5-0-4-8-1-6 af i beg. af omg og 4-9-5-5-12-7 i slutning af omg." jeg strikke i str M om jeg skal gå ind og lukkes 0 og 9 af om det er sådan det skal forstås. hilsen Lis
29.07.2019 - 11:45DROPS Design answered:
Hei Lis. Du fortsetter altså rundt etter diagram M.1, og siden du strikker størrelse M begynner du på starten av diagrammet som vanlig (hadde du strikket feks str S hadde du skullet begynne på den 9. masken og strikket videre derfra). Og du har helt rett i at du skal felle av 9 masker på slutten av pinnen på siste pinne (og ingen masker på starten av pinnen). God fornøyelse
31.07.2019 - 14:45
![]() Nancy Heintzman wrote:
Nancy Heintzman wrote:
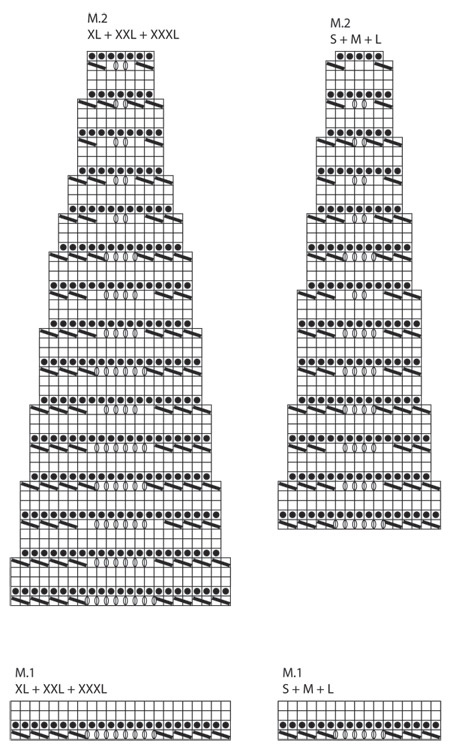
I am having a hard time reading the chart! I wish there were a written pattern of it, especially when it comes to the yoke. The regular feather and fan stitch pattern consists of 18 stitches but THIS one is only 17 stitches which offsets the 2nd repeat (row 5) oddly ending before the last 6 stitches with yo, K1 x5; yo, k2tog which is totally wrong according to the chart. Would you please check out the numbers here? Is anyone else having problems???
27.09.2018 - 17:19DROPS Design answered:
Dear Mrs Heintzman, on yoke you will work following diagram M.2 - in the first 3 sizes you will start M.2 over 17 sts in each repeat, then you will decrease sts in eah repeat = on 5th row you will work 6 dec but only 4 yarn overs = 2 sts will be decreased. Continue as shown in diagram, decreasing as shown and you will finish with only 5 sts in each repeat. Adding a marker between each repeat can help to check your number of sts on every row. Happy knitting!
28.09.2018 - 08:02
![]() Lise Widen Breiner wrote:
Lise Widen Breiner wrote:
Hej Har brug for hjælp. Kan ikke få mønstret i bærestykket til at passe i ærmene. Hvaf gør jeg? Det er størelse S. Mvh. Lise
28.01.2018 - 18:23DROPS Design answered:
Hej Lise, Det er utroligt svært at sige hvor det går galt... hvis det kun er et par masker som mangler eller er for meget, kan du evt tage dem ud /ind på første omgang med mønster. God fornøjelse!
30.01.2018 - 11:53
![]() Bep Broer - Vroegindeweij wrote:
Bep Broer - Vroegindeweij wrote:
Wat betekent in het telpatroon het "trapje"? Als het patroon 1 blokje naar binnen gaat, moet je dan 1 steek minderen? Ik kom nl. niet goed uit met mijn patroon.
06.11.2017 - 11:55DROPS Design answered:
Hallo Bep, In het telpatroon zitten minderen, deze zijn aagegeven met schuine strepen als symbool en je breit dan 2 recht samen. Daardoor zijn er op de volgende toer automatisch minder steken, waardoor er een 'trapje' ontstaat in de tekening. Je hoeft met dit trapje zelf dus niks te doen.
06.11.2017 - 12:38
|
|||||||||||||
Fairy Dust#fairydustcardigan |
|||||||||||||
 |
 |
||||||||||||
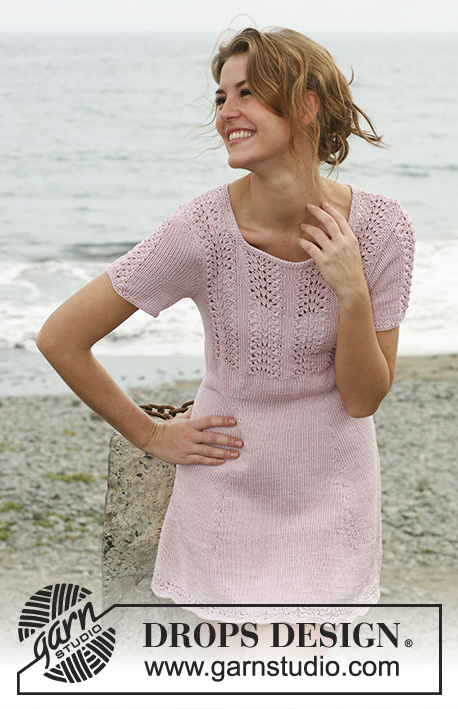
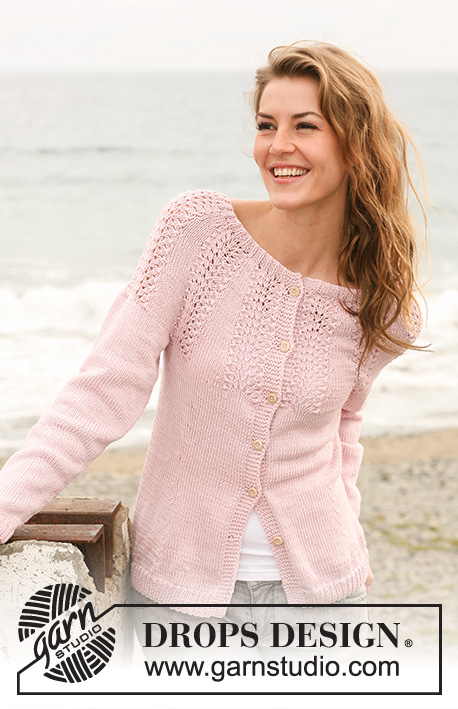
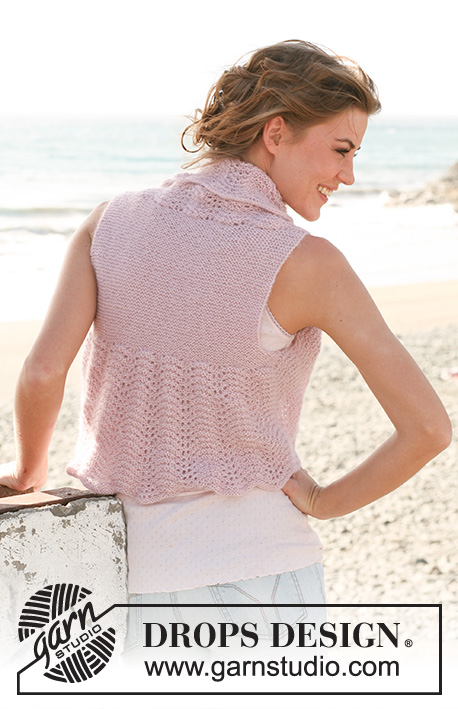
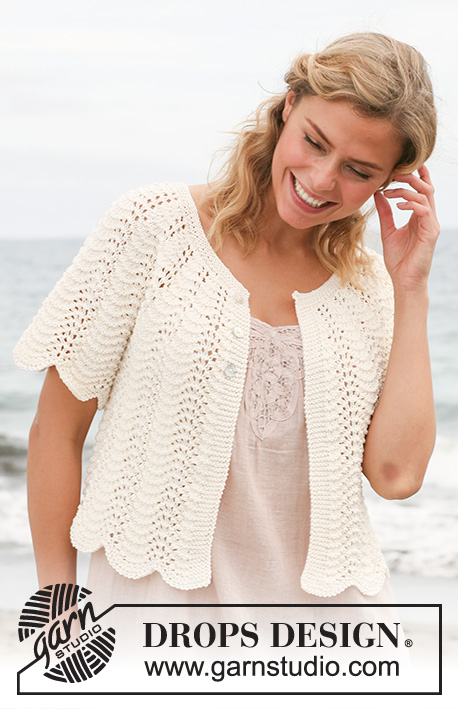
Knitted DROPS jacket with wavy pattern and round yoke in "Muskat". Size S - XXXL
DROPS 127-40 |
|||||||||||||
|
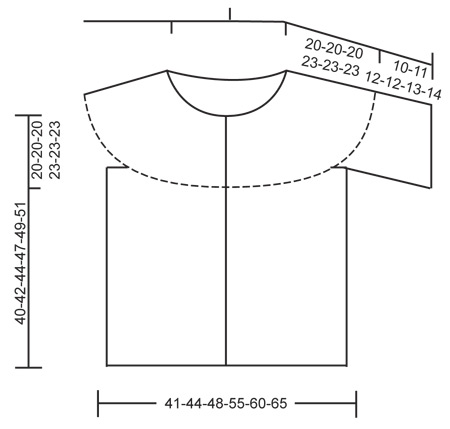
PATTERN: See diagram M.1 and M.2. The diagram shows the pattern from RS. See diagram for size! GARTER ST (in the round on double pointed needles/circular needle): *K 1 round and P 1 round*, repeat from *-*. BUTTON HOLES: Cast off for button holes on right front band. 1 button hole = cast off 3rd band st from edge. On next row cast on 1 new st over the cast off st. Cast off for button holes when piece measures: SIZE S: 22, 30 and 38 cm. SIZE M: 24, 32 and 40 cm. SIZE L: 26, 34 and 42 cm. SIZE XL: 27, 33, 39 and 45 cm. SIZE XXL: 29, 35, 41 and 47 cm. SIZE XXXL: 31, 37, 43 and 49 cm. --------------------------------------------------------- BODY: Worked back and forth on circular needle to make room for all the sts. Cast on 216-233-250-288-311-334 sts (incl 6 band sts each side) on 2 circular needles size 4 mm with Muskat (to avoid a tight cast on edge). Pull out one of the circular needles. K 4 rows over all sts. K the band sts on every row until finished measurements. Insert a marker in the piece after 57-61-65-75-81-86 sts each side (back piece = 102-111-120-138-149-162 sts). Continue to work M.1 (see diagram for size) with 6 band sts each side (1st row = from RS). Continue working like this until piece measures 20-22-24-24-26-28 cm (adjust so that 1 row of M.1 remain). On next row from WS, cast off 8-8-8-10-10-10 sts each side for armholes (= 4-4-4-5-5-5 sts each side of every marker) = 200-217-234-268-291-314 sts remain on needle. Put piece aside and knit the sleeves. RIGHT SLEEVE: Cast on 85-85-102-92-92-115 sts on 2 double pointed needle size 4 mm with Muskat (or cast on over 2 circular needles to make room for all the sts and distribute on double pointed needles afterwards). Pull out one of the needles. Work 4 rounds in Garter st - see explanation above - in the round. Insert a marker at beg of round (= mid under sleeve). Continue working in the round with M.1, beg with st no 9-1-1-11-1-1 in M.1. Continue working like this until piece measures approx. 10-11-12-12-13-14 cm (adjust so that 1 round of M.1 remain). On next round cast off 5-0-4-8-1-6 sts at beg of round and 4-9-5-5-12-7 sts at end of round = 76-76-93-79-79-102 sts. LEFT SLEEVE: S: Cast on and work as right sleeve. M-XXXL: Cast on and work as right sleeve, but cast off 9-5-5-12-7 sts i beg of round and 0-4-8-1-6 sts in the end of the round. YOKE: Slip sleeves on to same circular needle as body where armholes were cast off = 352-369-420-426-449-518 sts. Make sure to put the correct sleeve in matching hole to make pattern fit. Continue to work M.2 (see diagram for size) with 6 band sts each side. NOTE! REMEMBER TO CAST OFF FOR BUTTON HOLES - see explanation above. When M.2 has been worked vertically, 112-117-132-138-145-166 sts remain on needle. Switch to circular needle size 3 mm. K 6 rounds before loosely casting off. ASSEMBLY: Sew the openings under the sleeves tog. Sew on buttons. |
|||||||||||||
Diagram explanations |
|||||||||||||
|
|||||||||||||
 |
|||||||||||||
 |
|||||||||||||
Have you finished this pattern?Tag your pictures with #dropspattern #fairydustcardigan or submit them to the #dropsfan gallery. Do you need help with this pattern?You'll find 19 tutorial videos, a Comments/Questions area and more by visiting the pattern on garnstudio.com. © 1982-2026 DROPS Design A/S. We reserve all rights. This document, including all its sub-sections, has copyrights. Read more about what you can do with our patterns at the bottom of each pattern on our site. |
|||||||||||||


With over 40 years in knitting and crochet design, DROPS Design offers one of the most extensive collections of free patterns on the internet - translated to 17 languages. As of today we count 324 catalogues and 12290 patterns translated into English (UK/cm). 12290
We work hard to bring you the best knitting and crochet have to offer, inspiration and advice as well as great quality yarns at incredible prices! Would you like to use our patterns for other than personal use? You can read what you are allowed to do in the Copyright text at the bottom of all our patterns. Happy crafting!
Post a comment to pattern DROPS 127-40
We would love to hear what you have to say about this pattern!
If you want to leave a question, please make sure you select the correct category in the form below, to speed up the answering process. Required fields are marked *.