
Popular categories
Looking for a yarn?


Comments / Questions (4)
![]() Helene Rasmussen wrote:
Helene Rasmussen wrote:
Jeg skal lave opklippet løkkestrik og har set jeres måde at gøre det på men det er to forskellige instruktioner. Den ene strikkes løkkerne på vrangen og den anden på retten. Hvis det skal holde hvilken en skal jeg så tage? Jeg skal strikke ryggen af et pindsvin i ren bomuld. Der kan jeg nemlig ikke købe pelsgarn uden akryl eller uld,så jeg må lave det selv.. venligst Helene Rasmussen
23.10.2019 - 23:04DROPS Design answered:
Hej Helene, Der er flere måder at gøre det på. Lav en lille strikkeprøve og se hvilken metode du synes bedst om. God fornøjelse!
24.10.2019 - 14:58
![]() Helena wrote:
Helena wrote:
Kul vantar något till julklappar.
23.06.2010 - 01:08
![]() Cajito wrote:
Cajito wrote:
Napadite, doufam, ze trasne nejsou navayane, krasnou vlnu bych nerada strihala na kousky, ale jinak se mi to moc libi
13.06.2010 - 07:25
![]() Klara wrote:
Klara wrote:
Úžasné
11.06.2010 - 14:04
|
|
DROPS 125-18 |
|
|
|
|
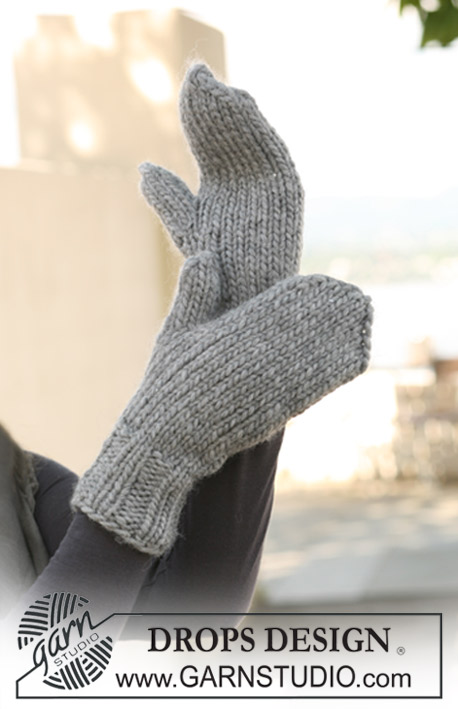
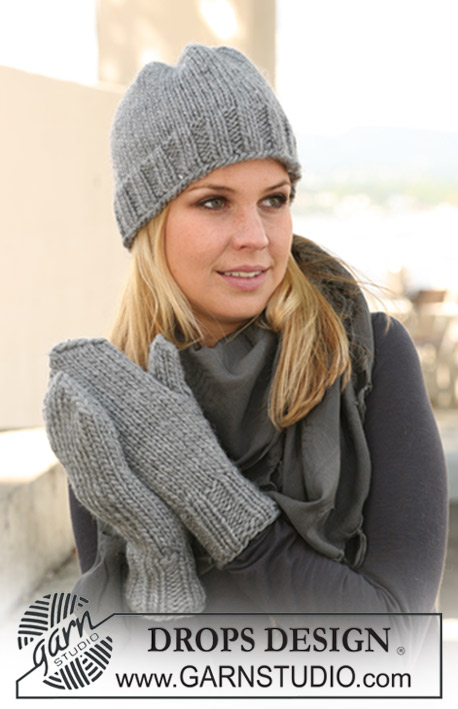
Set comprises: Knitted DROPS hat and mittens in loop knitting in ”Nepal”.
DROPS 125-18 |
|
|
HAT: LOOP KNITTING (back and forth on needle): Row 1 (= RS): * K 1 st but do not slip st off left needle. Place thread in front of piece between the needles. Twist thread round your left thumb clockwise and place it back between the needles behind the piece. K st on left needle again and lift it off left needle as usual = 2 sts on right needle. Slip the 2 sts back on left needle and K them tog *. Repeat from *-* in each st to end of row. Row 2 (= WS): K all sts. Repeat row 1 and 2. -------------------------------------------------------- HAT: Worked back and forth on needle and sewn tog afterwards. Cast on 52-56 sts on needle size 4.5 mm with 2 strands Nepal. K 1 row from WS, K 1 row from RS and K 1 row from WS. Now continue with 1 strand Nepal and LOOP KNITTING - see above - with 1 edge st each side. When piece measures 17-19 cm insert 5-6 markers in piece from WS. Insert the first marker after 11-10 sts and the next with 10-9 sts between each = 1 st after last marker. Continue with LOOP KNITTING, AT THE SAME TIME dec 1 st before each marker by K2 tog. Repeat the dec on every row from WS a total of 7 times = 17-14 sts. K2 tog across next row = 9-7 sts. Cut the thread and pull it through remaining sts, tighten and fasten. Sew hat tog inside 1 edge st. Cut open all loops, cut in the middle of the loop to make all ends equally long. -------------------------------------------------------- MITTENS: LOOP KNITTING (back and forth on needle): Row 1 (= RS): * K 1 st but do not slip st off left needle. Place thread in front of piece between the needles. Twist thread round your left thumb clockwise and place it back between the needles behind the piece. K st on left needle again and lift it off left needle as usual = 2 sts on right needle. Slip the 2 sts back on left needle and K them tog *. Repeat from *-* in each st to end of row. Row 2 (= WS): K all sts. Repeat row 1 and 2. LOOP KNITTING (in the round): Round 1: * K 1 st but do not slip st off the left needle. Place thread in front of piece between the needles. Twist thread round your left thumb clockwise and place it back between the needles behind the piece. K st on the left needle again and lift it off left needle as usual = 2 sts on right needle. Slip the 2 sts back on left needle and K them tog *. Repeat from *-* in each st across the round. Round 2 (= WS): P all sts. Repeat round 1 and 2. DECREASING TIP: Make all dec from WS. Dec 1 st in loop knitting by K2 tog. Dec 1 st in stocking st by P2 tog. -------------------------------------------------------- RIGHT MITTEN: Worked back and forth on needle. Cast on 38 sts (includes 1 edge st each side) on needle size 4 mm with Nepal. Work rib K2/P2 with 1 edge st each side. When rib measures approx 6 cm insert 1 marker in the 19th st as seen from RS (marks thumb). Change to needle size 4.5 mm. K next row from RS, AT THE SAME TIME dec 6 sts evenly before marker = 32 sts (= 12 sts before marker and 19 sts after marker). K 1 row from WS. Continue with LOOP KNITTING - see above – up to and incl st with marker (= 13 sts loop knitting) and in stocking st after st with marker (= 19 stocking st). AT THE SAME TIME on next row from RS inc for thumb gusset, inc 2 sts by making 1 YO each side of st with marker - to avoid a hole work YO into back of loop on next row. Work inc sts before st with marker in loop knitting and the inc sts after st with marker in stocking st. Repeat the inc on every other row a total of 4 times before marker and 5 times after marker = 10 thumb sts and 41 sts in total (NOTE! leave the marker in thumb). After the last inc slip thumb sts + 1 st each side (= 12 sts) on a stitch holder. Cast on 1 new st behind the thumb = 30 sts. Insert a marker in the new st. Continue with loop knitting up to and incl st with marker and in stocking st after st with marker. When piece measures approx 20 cm from cast on row dec 2 sts evenly before marker and 4 sts evenly after marker (= 6 dec) - See DECREASING TIP! Repeat this dec on every other row a total of 3 times = 12 sts left on needle. On next row from WS K2 tog across the row = 6 sts. K 1 row from RS, cut the thread and pull it through remaining sts, tighten and fasten. Sew mitten tog along the edge inside 1 edge st. THUMB: Worked in the round. Slip the 12 sts over thumb gusset back on needle pick up 1 st behind these = 13 sts. Now work LOOP KNITTING - see above - on 6 sts up to and incl st with marker and in stocking st on the 7 sts after st with marker. Continue until thumb measures approx 5 cm. Now K2 tog across next round = 7 sts. Cut the thread and pull it through remaining sts, tighten tog and fasten. LEFT MITTEN: Like right mitten but mirrored. i.e. insert a marker in the 20th st, dec 6 sts evenly after marker = 19 sts before marker worked in stocking st and 13 sts (includes st with marker) worked in loop knitting. Inc for thumb gusset 5 times before marker and 4 times after marker. |
|
Have you finished this pattern?Tag your pictures with #dropspattern or submit them to the #dropsfan gallery. Do you need help with this pattern?You'll find 14 tutorial videos, a Comments/Questions area and more by visiting the pattern on garnstudio.com. © 1982-2026 DROPS Design A/S. We reserve all rights. This document, including all its sub-sections, has copyrights. Read more about what you can do with our patterns at the bottom of each pattern on our site. |


With over 40 years in knitting and crochet design, DROPS Design offers one of the most extensive collections of free patterns on the internet - translated to 17 languages. As of today we count 324 catalogues and 12290 patterns translated into English (UK/cm). 12290
We work hard to bring you the best knitting and crochet have to offer, inspiration and advice as well as great quality yarns at incredible prices! Would you like to use our patterns for other than personal use? You can read what you are allowed to do in the Copyright text at the bottom of all our patterns. Happy crafting!
Post a comment to pattern DROPS 125-18
We would love to hear what you have to say about this pattern!
If you want to leave a question, please make sure you select the correct category in the form below, to speed up the answering process. Required fields are marked *.