
Popular categories
Looking for a yarn?


Comments / Questions (68)
![]() DROPS Design wrote:
DROPS Design wrote:
Hola Aida! Las dism que afectan el número total de pts montados (= 98-104-109 pts según la talla) son las que se hacen después del MP ( = un total de 36-32-23 pts dism). Las vtas cortas se trabajan sobre los últimos 50-56-61 pts, pero debido a las dism después del MP, estos 50-56-61 pts "con vueltas cortas" irán disminuyendo conforme avanzas. Después que todas las dism estén hechas, restan 62-72-86 pts antes de proceder al rem para la sisa, etc.
27.07.2011 - 03:09Aida Luppi wrote:
Escribi el 12.07.11.gracias por responder mi comentario .todavia tengo un problema con la delantera del modelo. sobre las disminuciones, entiendo que hay que disminuir despues de la nmarca antes de hacer las vueltas cortas , segunmas abajo dice que se dismuinuye tres puntos , si se disminuye cada vez antes de las v. cortas serian 4 veces , no me cuadra. muchas gracias por la ayuda .saludos.
26.07.2011 - 20:47
![]() DROPS Design wrote:
DROPS Design wrote:
Hola Aida! Hemos procedido a modificar la forma como se explican las instrucciones, para que te sea más fácil. Ciertamente suceden varias cosas a la vez en esta sección que mencionas, por lo que debes leer cuidadosamente todo el párrafo antes de proceder. Saludos afectuosos!
13.07.2011 - 03:28Aida Luppi wrote:
Tejer la delantera es muy dificil ,no esta clara la explicacion la he tejido 5 veces , podisn ser mejor las explicaciones .
12.07.2011 - 19:52Allison wrote:
OK, I have the turning part ok. But have the same problem as the German knitter mentions. Unfortunately my German isn'ty gfood enough for me to exactly understand how to knit mirrored, so I have the same number of plain knit "ridges" on each side piece, please explain in English or a Scandinavian language - helst dansk eller norsk. Tak! Allison
30.11.2010 - 21:31
![]() DROPS Design wrote:
DROPS Design wrote:
Hi Allison First time you turned when 2 sts remained. Next time you added 3 sts and turned when 5 sts rem, next time added another 3 sts and turned when 8 sts rem and so on, and this is how you continue by turning when 11, 14, 17, 20 sts rem until you are working on 3 sts only then you work 2 rows on all sts again.
29.11.2010 - 23:37Allison Berg wrote:
(NOTE! Next time these 8 rows are repeated work row until 14-14-16 sts remain on row 1 (not 2-2-4 sts) etc). Please help me with this part! I really don't understand, do I only knit until there are 14 stitches left on the lefthand needle? I have done this and seem to get a strange shape. I have found one pattern correction where this part about 14 stitches is not mentioned - which is the correct information?
25.11.2010 - 22:57
![]() DROPS Design DE wrote:
DROPS Design DE wrote:
"Spiegelverkehrt" bedeutet "gegengleich", also normalerweise das rechte und das linke Vorderteil (wie wenn man es spiegeln würde). Rechte Maschen bleiben re und linke li, aber der Schnitt wird gespiegelt, da man ja nicht zwei gleiche Teile stricken kann. Abnahmen am Anfang der Reihe sind dann Abnahmen am Ende der Reihe, bzw. am Anfang der Rückreihe - beim Armloch kann man das gut sehen.
02.08.2010 - 12:30
![]() ELLA wrote:
ELLA wrote:
Hallo ! Wie geht spiegelverkehrt ??? Alles einfach im Gegenteil ? Linke M werden zu rechte M ??? Kann das mal jemand aufschreiben ??? Das ist mir zu kompliziert !
02.08.2010 - 12:06
![]() Jacque wrote:
Jacque wrote:
This is simply gorgeous! I have to knit it!
23.07.2010 - 19:59
|
|||||||
Bamboo Breeze#bamboobreezevest |
|||||||
|
|
|||||||
DROPS waistcoat in garter st with shortened rows in ”Delight”. Size S to XXL.
DROPS 121-17 |
|||||||
|
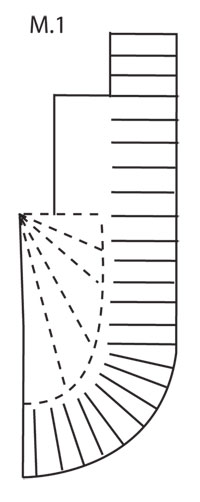
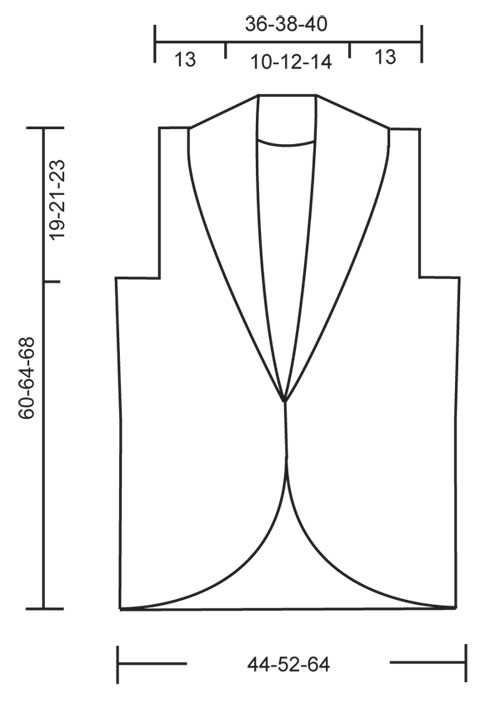
GARTER ST (back and forth on needle): K all rows. PATTERN: M.1 shows the shortened rows on front piece. -------------------------------------------------------- BACK PIECE: Worked from side to side on circular needle. Cast on 98-104-109 sts on circular needle size 3 mm with Delight. Work 4 rows GARTER ST – see above! Continue with shortened rows as follows with start from RS: * Work stocking st back and forth on 14 sts, stocking st back and forth on 28 sts, stocking st back and forth on 48 sts, stocking st back and forth on 28 sts, stocking st back and forth on 14 sts, K 8 rows back and forth on all sts *, repeat from *-*, 1 repeat = 8 rows at the top, 18 rows at the bottom. AT THE SAME TIME when you have worked 20-34-56 rows garter st on all sts (piece measures approx 4-7-12 cm measured where shortest) cast on 46-50-55 new sts at the end of row from RS for shoulder = 144-154-164 sts. REMEMBER THE KNITTING TENSION! Now measure piece from here. Continue in garter st and shortened rows in stocking st until piece measures 13 cm (= 8 repeats = 64 rows garter st). On next row from WS cast off the first 5 sts for neck = 139-149-159 sts. Continue in pattern. When piece measures 23-25-27 cm (10-12-14 cm from where sts were cast off for neck = 48-56-68 rows garter st = 6-7-8.5 repeats) cast on 5 new sts at the end of next row from RS = 144-154-164 sts. When piece measures 36-38-40 cm (same no of garter st rows before and after neck) cast off the first 46-50-55 sts from WS = 98-104-109 sts. Cast off the remaining sts after the same no of rows as on the other side (adjust to after a full repeat + 4 rows garter st on all sts, including shortened rows). RIGHT FRONT PIECE: Beg at the side and work towards front edge, then up towards shoulder and neck. Work shortened rows on sts towards front edge (A) and at the side (B) simultaneously. READ ALL OF THIS SECTION BEFORE CONTINUING! Cast on 98-104-109 sts on needle size 3 mm with Delight. Insert a marker after 48 sts – from RS. Work 4 rows garter st. Continue with shortened rows towards front edge as follows with start from RS: * Work stocking st back and forth on 14 sts, stocking st back and forth on 28 sts, stocking st back and forth on 48 sts, stocking st back and forth on 28 sts, stocking st back and forth on 14 sts, K 8 rows back and forth on all sts *, repeat from *-*. SEE M.1 – these are shortened rows A. AT THE SAME TIME when working the 8 rows back and forth on all sts: from RS K tog the first 2 sts after marker, and repeat the dec on every 2nd-4th-4th row a total of 36-32-23 times. AT THE SAME TIME when working the 8 rows back and forth on all sts, also work shortened rows to curve the front piece. Work shortened rows on the last 50-56-61 sts on needle (i.e. sts after marker) as follows: NOTE! Because of the dec after marker, the 50-56-61 sts with shortened rows will dec as you go along. Row 1/2: work row until 2-2-4 sts remain, turn piece and work return row. Row 3/4: work row until 5-5-7 sts remain, turn piece and work return row. Row 5/6: work row until 8-8-10 sts remain, turn piece and work return row. Row 7/8: work row until 11-11-13 sts remain, turn piece and work return row. For each time the 8 rows are K back and forth on all sts continue these shortened rows after marker by working on 3 sts less each time until 3 sts remain. (NOTE! Next time these 8 rows are repeated work row until 14-14-16 sts remain on row 1 (not 2-2-4 sts) etc). When only 3 sts remain work 2 rows on all sts after marker. There is now 1 repeat with shortened rows, repeat this repeat a total of 5 times. SEE M.1 – these are shortened rows B. NOW MEASURE PIECE FROM HERE! After all dec there are 62-72-86 sts left on needle. On next row from WS cast off 10-16-28 sts at beg of row for armhole = 52-56-58 sts. Continue with shortened rows as before on the first 48 sts, work remaining sts in garter st. When piece measures 19-21-23 cm cast off the first 31 sts from WS for shoulder = 21-25-27 sts left on collar. Continue with garter st and shortened rows in stocking st as before on these sts, until collar measures 7-8-9 cm where shortest. Cast off. LEFT FRONT PIECE: Like right front piece but mirrored. ASSEMBLY: Sew shoulder seams. Sew side seams. Sew collar tog mid back and sew to back piece. |
|||||||
Diagram explanations |
|||||||
|
|||||||
 |
|||||||
 |
|||||||
Have you finished this pattern?Tag your pictures with #dropspattern #bamboobreezevest or submit them to the #dropsfan gallery. Do you need help with this pattern?You'll find 20 tutorial videos, a Comments/Questions area and more by visiting the pattern on garnstudio.com. © 1982-2026 DROPS Design A/S. We reserve all rights. This document, including all its sub-sections, has copyrights. Read more about what you can do with our patterns at the bottom of each pattern on our site. |
|||||||


With over 40 years in knitting and crochet design, DROPS Design offers one of the most extensive collections of free patterns on the internet - translated to 17 languages. As of today we count 324 catalogues and 12290 patterns translated into English (UK/cm). 12290
We work hard to bring you the best knitting and crochet have to offer, inspiration and advice as well as great quality yarns at incredible prices! Would you like to use our patterns for other than personal use? You can read what you are allowed to do in the Copyright text at the bottom of all our patterns. Happy crafting!
Post a comment to pattern DROPS 121-17
We would love to hear what you have to say about this pattern!
If you want to leave a question, please make sure you select the correct category in the form below, to speed up the answering process. Required fields are marked *.