
Popular categories
Looking for a yarn?


Comments / Questions (81)
![]() Irina wrote:
Irina wrote:
Hallo liebes Team, Ich habe zwei Fragen: -Ich stricke Größe S , habe aber Befürchtung, dass die Ärmel mir zu lang werden. Das Maß 53cm ist von Handgelenk bis ......, wie kann ich es an meinen Arm anpassen. -ich verstehen nicht warum ich Faden abschneiden muss, ich kann doch auch ohne abzuschneiden Maschen aufnehmen. Vielen herzlichen Dank im Voraus. V.G
31.05.2020 - 19:09DROPS Design answered:
Liebe Irina, vergleichen Sie eine ähnliche Jacke, die Sie haben mit den Massen in der Maßskizze (lesen Sie mehr hier) und so können Sie anpassen. Der Faden wird nach einer Rückreihe abgeschnitten (Rechtes Vorder- & Rückenteil) und die nächste Reihe wird mit neuen Maschen anfangen + die nächste Hinreihe über die Maschen + neuen Maschen anschlagen damit alle Maschen gleichzeitig angeschlagen werden und so daß das Muster passt. Viel Spaß beim stricken!
02.06.2020 - 10:18
![]() Marzena wrote:
Marzena wrote:
Pięknie dziękuję! Zasługujecie na medal. Pozdrawiam
27.05.2020 - 20:32
![]() Marzena wrote:
Marzena wrote:
Witam! Mam ogromną prośbę o przetłumaczenie na język polski tego wzoru. Jest oryginalny i bardzo mi się podoba. Nie chciałabym popełnić błędów podczas pracy z powodu mojego tłumaczenia. Czekam niecierpliwie i pozdrawiam Marzena
26.05.2020 - 10:43DROPS Design answered:
Witaj Marzeno, tłumaczenie będzie dostępne jutro lub pojutrze:) Pozdrawiamy!
26.05.2020 - 14:32
![]() Christiane wrote:
Christiane wrote:
Si je ne veux pas faire le pull en commençant par les manches, comment je peux faire pour avoir le motif du rond, je peux commencer à part le rond du bas ? Comment faire, pour par après le rejoindre à la partie haute ? Je ferai la veste en travaillant du bas en haut, mais comment faire ? Ou je dos travailler sur le côté mais alors comment faire pour avoir les emmanchures ? J'aime ♥ énormément cette veste mais n'aime pas les manches sans forme. Merci Christiane
07.08.2019 - 10:33DROPS Design answered:
Bonjour Christiane, ce modèle ce tricote à partir des manches, puis on va monter des mailles/augmenter pour le le dos et le devant. Nous ne sommes malheureusement pas en mesure de pouvoir adapter chacun de nos modèles à chaque demande. Pour toute assistance complémentaire, merci de bien vouloir contacter votre magasin DROPS, même par mail ou téléphone. Bon tricot!
08.08.2019 - 10:18
![]() Françoise wrote:
Françoise wrote:
Merci pour votre réponse. Pour le devant gauche je commence par la manche ou par le devant gauche? bonne journée
09.04.2019 - 10:58DROPS Design answered:
Bonjour Françoise, le côté gauche va se faire de la même façon - en commençant par la manche également mais en sens inverse: le dos sera en début de rang sur l'endroit et le devant gauche en fin de rang sur l'endroit. Bon tricot!
09.04.2019 - 11:05
![]() Françoise wrote:
Françoise wrote:
Bonjour, Je viens de terminer le devant droit et relevées les mailles du dos et je ne comprends pas comment faire.Dois je tout de suite monter les mailles du devant ou est ce à la fin du dos je vous remercie de votre réponse et encore un énorme merci pour tout ces merveilleux modèles.Bonne soirée.
08.04.2019 - 19:23DROPS Design answered:
Bonjour Françoise, quand vous avez terminé le devant droit, reprenez les mailles en attente du dos et tricotez ces mailles comme avant jusqu'à ce que le dos mesure 21-34 cm (cf taille) = la moitié de la largeur du dos et rabattez les mailles. Vous assemblerez ensuite les 2 demi-dos entre eux au milieu dos. Bon tricot!
09.04.2019 - 09:58
![]() Agnes Boegman wrote:
Agnes Boegman wrote:
Mijn vorige vraag is beantwoord. Nu heb Ik nog een probleem n.l. als Ik in elke 5 toer moet minderen dan ben ik niet steeds aan de rechterkant van het voorpand om met de vermindering te beginnen. Heb Ik dit dan nog verkeerd begrepen?
13.02.2019 - 11:11DROPS Design answered:
Dag Agnes,
Daar heb je inderdaad gelijk aan. Je kunt dit oplossen door om en om op de 4e en 6e naald te minderen.
14.02.2019 - 14:03
![]() Agnes Boegman wrote:
Agnes Boegman wrote:
Voor het voorpand word gezegt" meerder tegelijkertijd elke 5 de naald in open ribbels als volgd" mijn vraag is, de open ribbel komt in elke 6de naald voor. Hoe moet Ik nu minderen?
03.02.2019 - 17:39DROPS Design answered:
Dag Agnes,
Met het open ribbelsteekpatroon wordt naald 1 t/m 6 bedoeld zoals bovenaan beschreven bij 'OPEN RIBBELST'. Je hoeft dus niet perse op de ribbel zelf van naald 6 te zitten voor het meerderen.
08.02.2019 - 17:15
![]() Ilka Bothmann wrote:
Ilka Bothmann wrote:
Hallo, ich habe die Jacke gestrickt. Nun rollt sie sich vorne hoch. Was kann ich dagegen machen? Sonst war die Anleitung toll und die Jacke ließ sich gut stricken.
16.01.2018 - 10:14DROPS Design answered:
Liebe Frau Bothmann, Sie können die Jacke mit Stecknadeln auf einer geeigneten Unterlage spannen, anfeuchten (z.B. mit einer Sprühflasche für Blumen) und trocknen lassen, danach entfernen Sie die Stecknadeln, dann sollte sich der Rand nicht mehr rollen. Viel Spaß beim stricken!
23.01.2018 - 08:48
![]() Joan wrote:
Joan wrote:
Hi, when doing the increases the pattern refers to "inc 1 st (work 2 sts in 1 st) inside 1 edge st at end of row . I am confused by the term "inside 1 edge st at edge of row". Does this mean increase in the stitch before the last stitch of the row? Thank you.
02.07.2017 - 17:37DROPS Design answered:
Dear Joan, "increase inside of the edge stitch" means at the end of the row, that you should knit until you have 2 stitches left at the end, knit 2 stitch into the next stitch and knit the edge stitch. (If inside the edge stitch would be at the beginning of the row, you should knit the edge stitch, then 2 stitch into the second stitch, and knit the rest of the row as it was set). I hope this helps. Happy Knitting!
03.07.2017 - 00:37
|
|
Racing Lanes#racinglanescardigan |
|
|
|
|
DROPS jacket with lace pattern knitted from side to side in ”Karisma”. Size S to XXXL.
DROPS 121-7 |
|
|
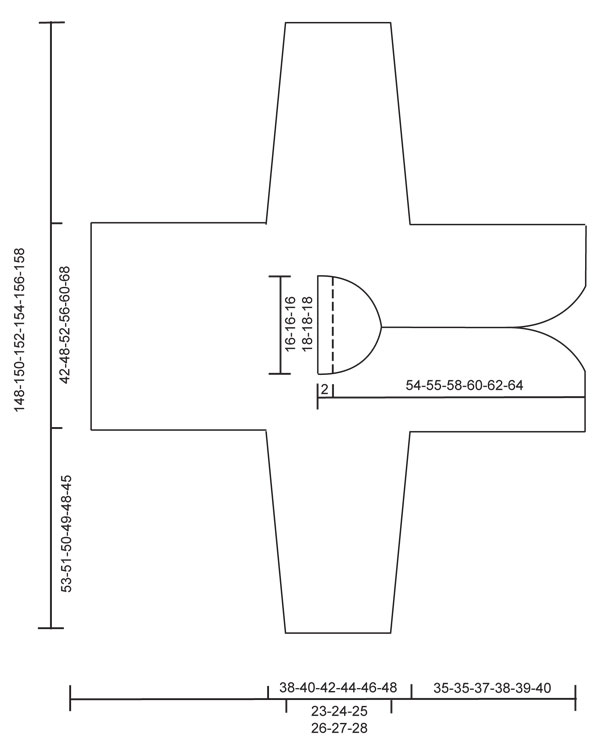
GARTER ST (back and forth on needle): K all rows. OPEN GARTER ST: Row 1 (= from RS): K Row 2 (= from WS): P Row 3: K Row 4: P Row 5: K Row 6: K -------------------------------------------------------- JACKET: Worked from side to side in two parts and sewn tog mid back afterwards. RIGHT FRONT AND BACK PIECE: Worked back and forth on circular needle. Beg at the bottom of sleeve. Cast on 50-52-54-56-58-60 sts (includes 1 edge st each side) on circular needle size 4 mm with Karisma. Work 4 rows GARTER ST – see above, then continue in OPEN GARTER ST - see above. When piece measures 10 cm inc 1 st each side, and repeat the inc on every 2.5-2-2-2-1.5-1.5 cm a total of 16-17-18-19-20-21 times = 82-86-90-94-98-102 sts. AT THE SAME TIME when piece measures 15 cm continue in stocking st. When piece measures 43-41-40-38-38-35 cm work open garter st again until finished measurements. When piece measures approx 53-51-50-49-48-45 cm - adjust to 5th row in the open garter st - dec 1 st each side (= edge st) = 80-84-88-92-96-100 sts. Cut the thread. Cast on 74-74-77-79-82-85 new sts at the end of row (= back piece), K 1 row from WS (= 6th row in the open garter st), at the end of this row cast on 29-25-23-21-19-13 new sts (= front piece) = 183-183-188-192-197-198 sts. NOW MEASURE PIECE FROM HERE!!! Continue with open garter st, but K the last 5 sts on needle (as seen from RS = bottom of back piece) on every row. AT THE SAME TIME on every 5th row in the open garter st inc as follows – from RS and at beg of row: READ ALL OF THIS SECTION BEFORE CONTINUING! FIRST INC: K 2-2-2-2-2-2, 1 YO, K remaining sts. On next row K YO and inc 1 st (work 2 sts in 1 st) inside 1 edge st at the end of row = 2-2-2-2-2-2 inc sts. 2nd INC: K 3-3-3-3-3-3, 1 YO, K1, 1 YO, K remaining sts. On next row K YO and inc 1 st (work 2 sts in 1 st) inside 1 edge st at the end of row = 3-3-3-3-3-3 inc sts. 3rd INC: K 5-5-5-5-5-5, 1 YO, K1, 1 YO, K remaining sts. On next row K YO and inc 1 st (work 2 sts in 1 st) inside 1 edge st at the end of row = 3-3-3-3-3-3 inc sts. 4th INC: K 6-6-7-7-7-7, * 1 YO, K1 *, repeat from *-* a total of 3-3-1-1-1-1 times, 1 YO, K remaining sts. On next row K YO and inc 1 st (work 2 sts in 1 st) inside 1 edge st at the end of row = 5-5-3-3-3-3 inc sts. 5th INC: K 9-9-8-8-8-8, * 1 YO, K1 *, repeat from *-* a total of 3-3-3-3-3-3 times, 1 YO, K remaining sts. On next row K YO and inc 1 st (work 2 sts in 1 st) inside 1 edge st at the end of row = 5-5-5-5-5-5 inc sts. 6th INC: K 11-11-11-11-11-11, * 1 YO, K1 *, repeat from *-* a total of 5-5-3-3-3-3 times, 1 YO, K remaining sts. On next row K YO and inc 1 st (work 2 sts in 1 st) inside 1 edge st at the end of row = 7-7-5-5-5-5 inc sts. 7th INC: K 15-15-13-14-14-14, * 1 YO, K1 *, repeat from *-* a total of 5-5-5-3-3-3 times, 1 YO, K remaining sts. On next row K YO and inc 1 st (work 2 sts in 1 st) inside 1 edge st at the end of row = 7-7-7-5-5-5 inc sts. 8th INC: K 18-18-17-16-16-16, * 1 YO, K1 *, repeat from *-* a total of 7-7-5-5-5-5 times, 1 YO, K remaining sts. On next row K YO and inc 1 st (work 2 sts in 1 st) inside 1 edge st at the end of row = 9-9-7-7-7-7 inc sts. 9th INC: K 23-23-20-20-20-20, * 1 YO, K1 *, repeat from *-* a total of 7-7-7-5-5-5 times, 1 YO, K remaining sts. On next row K YO and inc 1 st (work 2 sts in 1 st) inside 1 edge st at the end of row = 9-9-9-7-7-7 inc sts. SIZE S finishes here. 10th INC: K 0-27-25-23-24-24, * 1 YO, K1 *, repeat from *-* a total of 0-9-7-7-5-5 times, 1 YO, K remaining sts. On next row K YO and inc 1 st (work 2 sts in 1 st) inside 1 edge st at the end of row = 0-11-9-9-7-7 inc sts. SIZE M finishes here. 11th INC: K 0-0-29-28-27-27, * 1 YO, K1 *, repeat from *-* a total of 0-0-9-7-7-7 times, 1 YO, K remaining sts. On next row K YO and inc 1 st (work 2 sts in 1 st) inside 1 edge st at the end of row = 0-0-11-9-9-9 inc sts. SIZE L finishes here. 12th INC: K 0-0-0-32-32-32, * 1 YO, K1 *, repeat from *-* a total of 0-0-0-9-7-7 times, 1 YO, K remaining sts. On next row K YO and inc 1 st (work 2 sts in 1 st) inside 1 edge st at the end of row = 0-0-0-11-9-9 inc sts. SIZE XL finishes here. 13th INC: K 0-0-0-0-36-37, * 1 YO, K1 *, repeat from *-* a total of 0-0-0-0-9-9 times, 1 YO, K remaining sts. On next row K YO and inc 1 st (work 2 sts in 1 st) inside 1 edge st at the end of row = 0-0-0-0-11-11 inc sts. SIZE XXL finishes here. 14th INC: K 0-0-0-0-0-41, * 1 YO, K1 *, repeat from *-* a total of 0-0-0-0-0-9 times, 1 YO, K remaining sts. On next row K YO and inc 1 st (work 2 sts in 1 st) inside 1 edge st at the end of row = 0-0-0-0-0-11 inc sts. 15th INC: K 0-0-0-0-0-47, * 1 YO, K1 *, repeat from *-* a total of 0-0-0-0-0-9 times, 1 YO, K remaining sts. On next row K YO and inc 1 st (work 2 sts in 1 st) inside 1 edge st at the end of row = 0-0-0-0-0-11 inc sts. SIZE XXXL finishes her. There are now a total of 50-61-64-69-76-98 inc sts. AT THE SAME TIME when piece measures 13-16-18-19-21-25 cm slip the last 110-112-117-121-126-131 sts on a stitch holder and only work sts on front piece. AT THE SAME TIME cast off for neck on every other row (every row from WS) as follows: 8 sts 1 time, 4 sts 1 time, 2 sts 2 times and 1 st 4 times. When all inc on front piece are complete there are 103-112-115-120-127-145 sts on needle. Work 6 rows open garter st on all sts on front piece without inc. Now work 4 rows garter st on all sts, and then cast off the first 44-52-54-57-61-74 sts = 59-60-61-63-66-71 sts left. Work 4 rows garter st on these sts. On next row make buttonholes as follows: Work 3-4-5-3-6-3 sts, * K2 tog, 1 YO, work 11-11-11-12-12-14 sts * repeat from *-* a total of 4 times, K2 tog 1 YO, work the last 2 sts. K 1 row from WS, then work 4 rows garter st and cast off. BACK PIECE: Slip sts from stitch holder back on needle = 110-112-117-121-126-131 sts and work open garter st on these sts until back piece measures 21-24-26-28-30-34 cm. Cast off. LEFT FRONT AND BACK PIECE: Cast on and work like right piece, but mirrored. ASSEMBLY: Sew tog mid back. Sew side seams and under arm seams inside 1 edge st. Sew buttons on left front band. NECKLINE: Pick up approx 88-100 sts round neck and work 4 rows garter st, cast off. |
|
 |
|
Have you finished this pattern?Tag your pictures with #dropspattern #racinglanescardigan or submit them to the #dropsfan gallery. Do you need help with this pattern?You'll find 20 tutorial videos, a Comments/Questions area and more by visiting the pattern on garnstudio.com. © 1982-2026 DROPS Design A/S. We reserve all rights. This document, including all its sub-sections, has copyrights. Read more about what you can do with our patterns at the bottom of each pattern on our site. |


With over 40 years in knitting and crochet design, DROPS Design offers one of the most extensive collections of free patterns on the internet - translated to 17 languages. As of today we count 324 catalogues and 12290 patterns translated into English (UK/cm). 12290
We work hard to bring you the best knitting and crochet have to offer, inspiration and advice as well as great quality yarns at incredible prices! Would you like to use our patterns for other than personal use? You can read what you are allowed to do in the Copyright text at the bottom of all our patterns. Happy crafting!
Post a comment to pattern DROPS 121-7
We would love to hear what you have to say about this pattern!
If you want to leave a question, please make sure you select the correct category in the form below, to speed up the answering process. Required fields are marked *.