
Popular categories
Looking for a yarn?


Comments / Questions (60)
![]() Tove wrote:
Tove wrote:
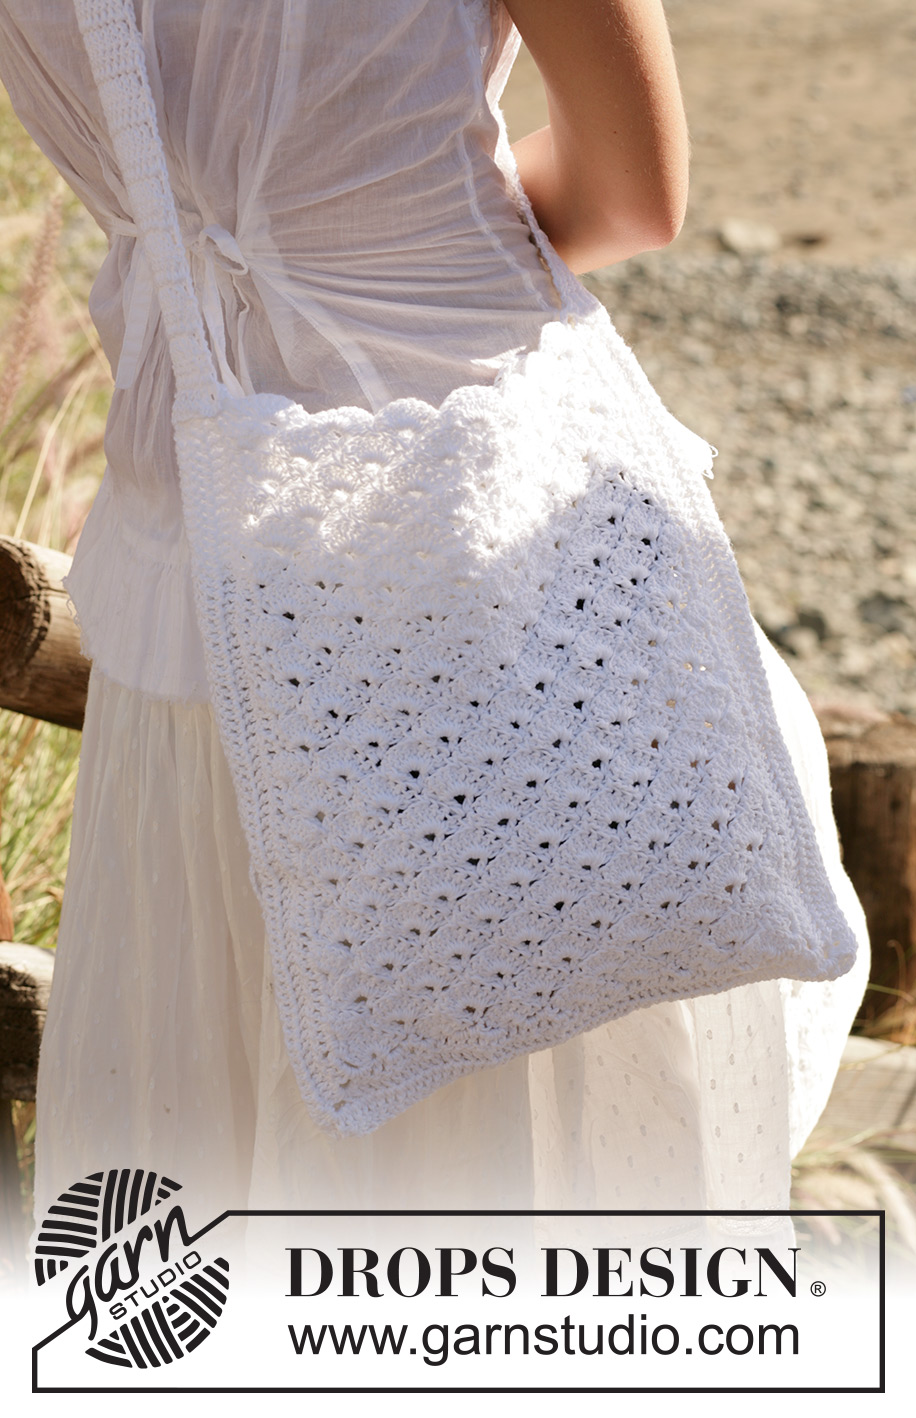
Hei, det står i oppskriften at de to delene skal sys i sammen, men på bildet så ser det ut som det er heklet sammen med en fin kant mellom delene. Er det en feil/mangel i oppskriften? Hvordan kan jeg eventuelt gjøre for få en sånn fin kant? Forstår det også slik at skulder reimen skal kun festes øverst oppe og ikke gå rundt vesken på tre sider.
26.08.2025 - 08:01DROPS Design answered:
Hei Tove. Det er kanske de 3 rader med staver langs nederkanten og de to sidene på forsiden og baksiden du tenker på? Mvh DROPS Design
26.08.2025 - 12:00
![]() Lotta wrote:
Lotta wrote:
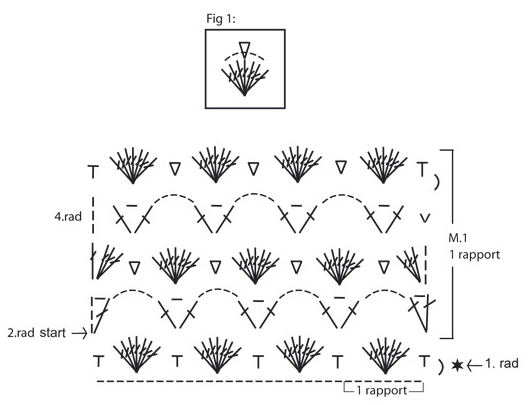
På rad fyra så ska man börja varvet med 3 lm sedan stolpe 1 lm en solpe 5 lm osv... men sen ska jag avsluta varvet med en sm direkt efter sista stolpen? Borde det inte vara 3 lm mellan sista stolpen och sm? Och i början på varv 5 som börjar med en fm efter vändmaskan... vart ska jag virka fm i?
27.06.2023 - 20:47DROPS Design answered:
Hej Lotta, du afslutter rad 4 med 1 smygm, på rad 5 virkar du fm i smygm :)
29.06.2023 - 14:31
![]() Manuela wrote:
Manuela wrote:
Ik snap niet hoe je voorkant en achterkant aan elkaar bevestigd. Op de foto lijkt het niet alsof de tas aan de 3e stokjes toer aan elkaar bevestigd is, maar ergens in de 1e of 2e toer. Zijn de delen met naaimachine of met haaksteken aan elkaar bevestigd? En dan inderdaad waar precies?
14.05.2022 - 10:40DROPS Design answered:
Dag Manuela,
Je kunt de voorkant en de achterkant aan elkaar naaien met halve vasten rondom. Doordat het hengsel aan de toeren van stokjes is vast genaaid lijkt het misschien zo dat de toeren van stokjes na het in elkaar zetten aan de tas gehaakt zijn.
19.05.2022 - 20:31
![]() Sali wrote:
Sali wrote:
Bonjour madame ´ je viens d’essayer le point en ce basant du diagramme ´ j’ai obtenu un point différent de celui du sac ´ svp , il n’ya pas une petite erreur dans le diagramme sachant que je sais très bien lire les diagrammes? et merci.
23.06.2021 - 23:35DROPS Design answered:
Bonjour Sali, le diagramme est juste et ce sac a déjà été réalisé de nombreuses fois depuis sa publication, où pensez-vous avoir trouvé une erreur? Sur quel rang, à quel maille/point?
24.06.2021 - 08:38
![]() Αλεξανδρα Γριβα wrote:
Αλεξανδρα Γριβα wrote:
I can't understand the pattern of the strap...I think that 12 chains are not enough to hold the bag from one's shoulderUnless I have to do it twice ....one for every side
03.04.2021 - 16:45DROPS Design answered:
Dear Αλεξανδρα Γριβα, the 12 ch st is the width of the strap (including the 3 st you turn with), you have to crochet 1 tr into each stitich back and forth until the strap is about 80 cm long (or the desired length. Happy Crafting!
03.04.2021 - 19:50
![]() Lisa Clements wrote:
Lisa Clements wrote:
I have done the first row but do not understand the diagram for the second row . I’m interpreting it as chain 3, 1tr then chain 5 but that doesn’t seem right can you help
24.03.2021 - 22:46DROPS Design answered:
Dear Lisa, in the second row , 4 ch (in place of teh 1st tr), *1 tr, 5 ch, then (1tr, 1ch, 1 tr) indo the previous row's dc*. Happy Crafting!
25.03.2021 - 01:49
![]() Jeanette Sarka wrote:
Jeanette Sarka wrote:
I don’t have the full pattern how do you turn or start the next row? Where do I find pattern M.1 This is not a complete pattern very disappointed !!!!!!
15.03.2021 - 23:51DROPS Design answered:
Dear Jeanette, you can find the diagram of the pattern at the bottom of the page, it also shows how to turn at the end of the rows. If the diagram does not show up, try to reload the page. Happy Crafting!
22.03.2021 - 23:51
![]() Ada wrote:
Ada wrote:
Co je prosím vzor M1
08.07.2020 - 20:05DROPS Design answered:
Dobrý den, Ado! Vzor M.1 najdete vyznačený ve schématu pod návodem - je to úsek, sekvence vzoru (tvoří ji 4 řady), která se stále opakuje. Hodně zdaru! Hana
10.07.2020 - 18:29
![]() Mia wrote:
Mia wrote:
Ska man sy ihop de båda sidorna på ”utsidan” av det tredje varvet av stolpar eller blir de tre varven med stolparna utanför väskan?
14.06.2020 - 19:23DROPS Design answered:
Hei Mia. Du kan sy den ytterste raden med staver på forstykket mot den ytterste raden av staver på bakstykket, Sy stavene sammen med små sting. Om du ønsker å sy fra retten eller vrangen avgjøre du selv, sy fra den siden du syns blir penest. God Fornøyelse!
15.06.2020 - 11:35
![]() Maud wrote:
Maud wrote:
Sorry, nu ik het plaatje vergroot, zie ik dat er vijf lossen tussen zitten. Dat verheldert de zaak!
06.06.2020 - 10:42
|
||||||||||||||||||||||
White Honey Comb#whitehoneycombbag |
||||||||||||||||||||||
|
|
||||||||||||||||||||||
DROPS Crochet bag in “Bomull-Lin”.
DROPS 99-24 |
||||||||||||||||||||||
|
Crochet tension: 3 repeats in the width and 2.5 repeats in the height = 10 x 10 cm Pattern: See diagram M.1. The diagrams are seen from the RS. Crochet info: 1 repeat = 8 ch. If you wish to make the bag wider crochet an extra 8 ch’s for each repeat. Substitute the first tr on each row with 3 ch. You can also crochet an edge around the shoulder strap as follows: *6 tr into 1 tr from the strap, skip 2 cm, 1 dc, skip another 2 cm*, repeat from *-* BAG The bag is crochet in 2 parts 1 front and 1 back part. Front part: Crochet 58 ch (incl 1 ch to turn with) on hook size 4 mm with Bomull-lin. Crochet 1 dc into the 2nd ch, *skip 3 ch, 7 tr in the following ch, skip 3 ch, 1 dc in the following ch*, repeat from *-* a totals of 7 times. Then continue according to M.1. Cut and sew tight when the piece measures approx 33 cm in the height – adjust to 1 repeat. Crochet 3 rows of tr – read crochet info! along the bottom edge and the 2 sides. Crochet in the corners as follows: 1 tr, 3 ch, 1 tr. Back part: Crochet as front part. Shoulder strap: Crochet 12 ch (incl. 3 ch to turn with) - read crochet info! Crochet 1 tr into each ch, and then continue to crochet 1 tr into each tr = 10 tr. Crochet with tr until the shoulder strap measures approx. 80 cm. Cut the thread and sew it tight. Assembly: Sew the bag tog. at the bottom edge and at the sides. Sew the shoulder strap to the bag at the top of the tr section each side. |
||||||||||||||||||||||
Diagram explanations |
||||||||||||||||||||||
|
||||||||||||||||||||||
 |
||||||||||||||||||||||
Have you finished this pattern?Tag your pictures with #dropspattern #whitehoneycombbag or submit them to the #dropsfan gallery. Do you need help with this pattern?You'll find 4 tutorial videos, a Comments/Questions area and more by visiting the pattern on garnstudio.com. © 1982-2026 DROPS Design A/S. We reserve all rights. This document, including all its sub-sections, has copyrights. Read more about what you can do with our patterns at the bottom of each pattern on our site. |
||||||||||||||||||||||


With over 40 years in knitting and crochet design, DROPS Design offers one of the most extensive collections of free patterns on the internet - translated to 17 languages. As of today we count 325 catalogues and 12298 patterns translated into English (UK/cm). 12298
We work hard to bring you the best knitting and crochet have to offer, inspiration and advice as well as great quality yarns at incredible prices! Would you like to use our patterns for other than personal use? You can read what you are allowed to do in the Copyright text at the bottom of all our patterns. Happy crafting!
Post a comment to pattern DROPS 99-24
We would love to hear what you have to say about this pattern!
If you want to leave a question, please make sure you select the correct category in the form below, to speed up the answering process. Required fields are marked *.