
Popular categories
Looking for a yarn?


Comments / Questions (196)
![]() Henriette Rud wrote:
Henriette Rud wrote:
Jeg kan ikke finde farverne 401 og 601 nogen steder. Er det udgået farver og i så fald hvilke farvekoder skal så anvendes?
12.04.2026 - 18:39DROPS Design answered:
Hei Henriette. Begge fargene er utgått fra vårt sortiment. Men ta en titt på Alpacas fargekart, kanskje du finner noen andre farger du vil like / erstatt 401 og 601 med. mvh DROPS Design
13.04.2026 - 14:39
![]() Nadine wrote:
Nadine wrote:
Entschuldigung, Ich habe das Projekt in S, das hatte ich nicht angegeben. Oder muss man die Wolle dann doppelt rechnen da es ja 2 Fädig ist?
11.04.2026 - 21:44
![]() Nadine wrote:
Nadine wrote:
Hallo liebes Drops Team, Ich möchte nur Bescheid geben das die Abgabe von weiß „Natur“ mit 150 g nicht passt. Man Brauch mindestens noch 2 Knäuel mehr. Ich bin jetzt beim ersten Ärmel und habe nur noch ein Knäuel a 50g. Und es folgt noch ein Ärmel und die Passe. Das man das vielleicht korrigiert 😊 Muss jetzt noch welches dazu bestellen. Ist aber nicht schlimm. Liebe Grüße
11.04.2026 - 21:18
![]() Angie wrote:
Angie wrote:
Devant & Dos c'est écrit : à 10cm de hauteur totale, suivre M1. Est-ce qu'on veut dire à 10cm de hauteur de jersey ? Donc à 16cm de hauteur totale incluant la hauteur des côtes ?
20.03.2026 - 15:34DROPS Design answered:
Bonjour Angie, il faut bien comprendre "hauteur totale", soit 4 cm après les côtes et donc 10 cm à partir du rang de montage. Bon tricot!
20.03.2026 - 16:16
![]() CLADIE wrote:
CLADIE wrote:
Bonjour, Modèle milk et chocolate 97-24 Diagramme M2. Pour le symbole à la fin du 6ème rg ; 2 mailles ensemble à l'endroit. (5ème symbole de la légende).Quelle couleur ? Ecru ou brun ? Merci pour votre réponse.
10.02.2026 - 09:23DROPS Design answered:
Bonjour Cladie, tricotez cette diminution en écru à chaque fois (chaque diminution de M.2). Bon tricot!
10.02.2026 - 17:48
![]() CLADIE wrote:
CLADIE wrote:
Bonjour, Pour réaliser ce modèle 97-24 je ne trouve pas les fils nécessaires DROPS ALPACA 401 -100 -601 et 506. Merci pour votre aide
26.01.2026 - 18:54DROPS Design answered:
Bonjour Cladie, il est possible que ces références aient été remplacées car ce modèle a été écrit il y a quelques années, consultez le nuancier de DROPS Alpaca pour retrouver les couleurs similaires, votre magasin saura vous conseiller les meilleures alternatives, même par mail ou téléphone si besoin. Bon tricot!
27.01.2026 - 08:55
![]() Chiara wrote:
Chiara wrote:
Ciao, non capisco come regolarmi con gli aumenti sullo schema m1 della manica. Dove li inserisco se lo schema è a multipli di 8? Quando lo inizio devo già tener conto degli aumenti che ho fatto prima o parto come da schema? Grazie molte
22.01.2026 - 22:49DROPS Design answered:
Buonasera Chiara, deve partire normalmente e includere gli aumenti nella lavorazione del motivo. Buon lavoro!
26.04.2026 - 13:25
![]() Uschi Rutsch wrote:
Uschi Rutsch wrote:
Hallo, kann es sein,dass die Anleitung nicht stimmt? Ich habe nach Anleitung das Garn gewechselt und stricke mit Drops Nord 2 fädig. Die Maschenprobe stimmt mit Nadeln 5. Ich stricke Größe S und die beiden Knäuel in Natur sind bis zum Beginn des Musters beim Vorder- und Rückenteil bis auf 11 g pro Knäuel bereits weg. Laut Anleitung sind nur 150 g in Natur nötig,das wird aber so nicht funktionieren. Wie viele Knäuel muss ich noch bestellen? Gruß Uschi
04.01.2026 - 16:40
![]() Anni wrote:
Anni wrote:
Jeg er ved at strikke Milk & Chocolate i Drops Alpaca. Jeg strikker en størrelse M. Det drejer sig om bærestykket. Der står i opskriften "Luk af på hver 4. omg 0-0-4-5-5 gange". Jeg skal altså ikke lukke af, da jeg strikker str. M. Men skal jeg strikke de 16 omgange uden indtagning alligevel, førend jeg skal lukke af på hver 2. omg 4 gang ???? Hilsen Anni
15.12.2025 - 20:44DROPS Design answered:
Hei Anni. Du hopper over: Fell på hver 4.omg 0-0-4-5-5 ganger, og starter rett på: deretter på hver 2. omg 4-4-0-0-0 ganger = 216-230-262-274-298 m. mvh DROPS Design
22.12.2025 - 11:58
![]() Diane wrote:
Diane wrote:
Ist mir echt schon peinlich, aber ich habe Drops merino extra fine und würde damit gerne diesen wunderschönen Pullover stricken. Geht das und wenn ja muss ich hier auch 2 Fäden nehmen oder reicht dann einer? SORRY 🙈
09.12.2025 - 20:09DROPS Design answered:
Liebe Diane, da die Maschenprobe anders mit Merino Extra Fine wurde, sollten Sie dann die ganze Anleitung nach Ihrer eigenen Maschenprobe neu umrechnen; hier finden Sie Anleitungen für 22-20 Maschen, wie bei Merino Extra Fine, filtern & sortieren Sie je nach Wunsch, das kann Ihnen helfen/inspirieren. Viel Spaß beim Stricken!
10.12.2025 - 07:58
|
||||||||||||||||
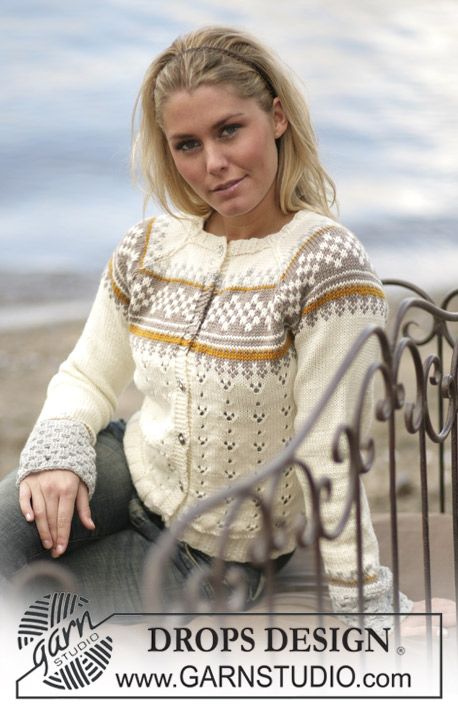
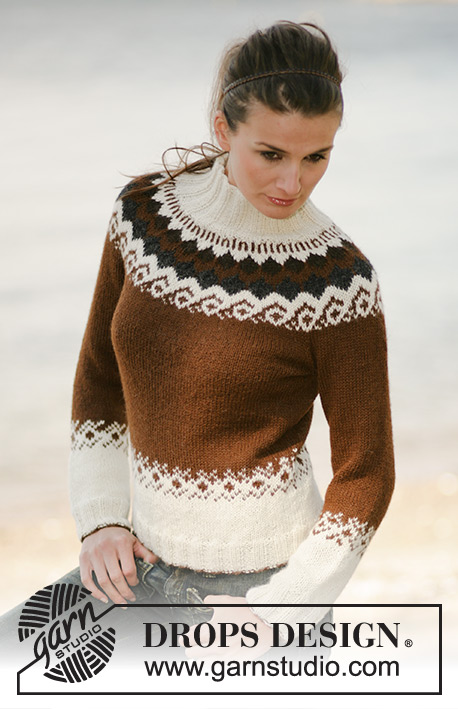
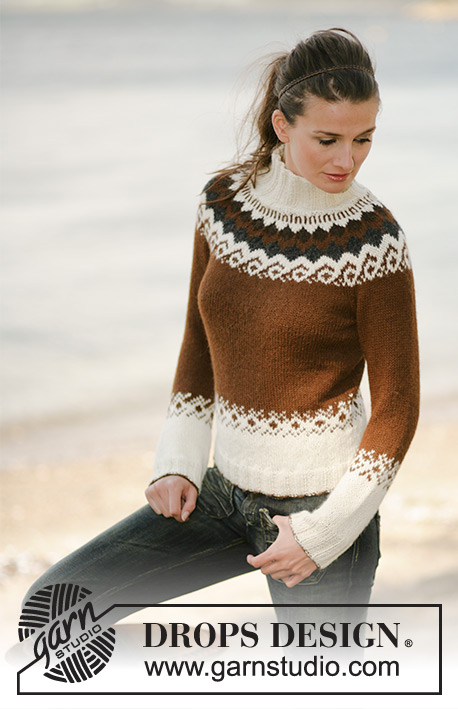
Milk & Chocolate |
||||||||||||||||
 |
 |
|||||||||||||||
DROPS Jumper in double thread Alpaca
DROPS 97-24 |
||||||||||||||||
|
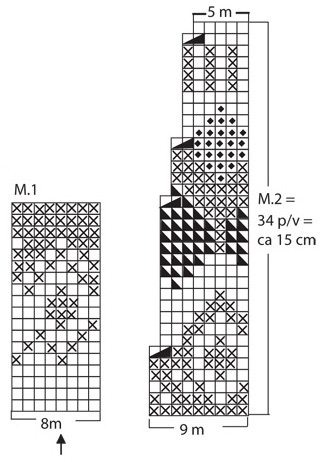
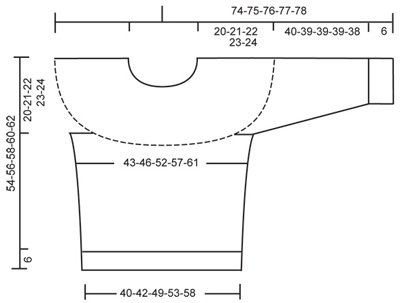
Knitting tension: 18 sts x 23 rows on needles size 4.5 mm with 2 threads of Alpaca in stocking sts = 10 x 10 cm. Pattern: See diagrams M.1 & M.2. The diagram is seen from the right side. English Translations for the wording in the diagrams are given at the bottom of this pattern, and they are given in the vertical order in which they appear in the diagram. Rib: *K3, P3*, repeat from *-* Back and front piece: Knitted round on circular needle. Cast on 150-162-180-198-216 sts on circular needles size 3.5 mm with 2 threads of light brown. Change to 2 threads of off white and knit 6 cm Rib. Change to circular needle size 4.5 mm and continue in stocking sts, at the same time on the 1st row adjust the number of sts to 144-152-176-192-208. Insert a marking thread each side (= 72-76-88-96-104 sts between the marking threads). When the piece measures 10 cm knit M.1 (the arrow in diagram applies to the sleeve only). Continue in stocking sts and light brown. At the same time when the piece measures 18 cm inc 1 st each side of the marking threads, repeat on every 7-7-8-8-9 cm 2 more times = 156-164-188-204-220 sts. When the piece measures 34-35-36-37-38 cm knit the next round as follows: Cast off 4 sts for the armholes, knit 70-74-86-94-102 sts (= front piece), cast off 8 sts for the armhole, knit 70-74-86-94-102 sts (= back piece) and finally cast off 4 more sts for the armhole. Put the piece aside and knit the sleeves. Sleeve: Knitted round on double pointed needles. Cast on 42-48-54-54-60 sts on double pointed needles size 3.5 mm with 2 threads of light brown. Change to 2 threads of off white and knit in 6 cm Rib. Change to double pointed needles size 4.5 mm and continue in stocking sts, at the same time on the 1st round adjust the number of sts to 42-45-49-51-55. When the piece measures 8-10-10-10-9 cm inc 2 sts underneath the sleeve on every 4-3.5-3.5-3.5-3.5 cm a total of 10 times = 62-65-69-71-75 sts. At the same time when the piece measures 15 cm knit M.1 - make sure the repeat is placed at the top of the sleeve (see the arrow in the diagram which marks the centre), include the inc sts in the pattern – make sure that the pattern in not displaced! When the piece measures 46-45-45-45-44 cm cast off 8 sts underneath the sleeve = 54-57-61-63-67 sts. Put the piece aside and knit another sleeve. Yoke: Insert the sleeves on the same circular needle as the front and back piece at the place where you cast off for the armholes = 248-262-294-314-338 sts. Insert a marking thread in all the transitions between sleeves, back and front pieces = 4 marking threads. Continue in stocking sts at the same time dec for raglan. Knit 2-3-2-1-2 rounds before beginning the dec. Dec on both sides of each marking thread = 8 dec per round. Dec before the marking thread as follows: K2 tog. Dec as follows after the marking thread: Slip a st as if to knit, K1, psso. Dec on every 4th row 0-0-4-5-5 times, then on every other row 4-4-0-0-0 times = 216-230-262-274-298 sts. Knit 3-4-2-1-2 rounds with light brown at the same time on the 1st round adjust the number of sts evenly to 216-225-261-270-292. Then knit and dec according to M.2. After the last dec. = 120-125-145-150-165 sts on needle. Then knit 1 round in off white at the same time dec the number of sts evenly on round to 102-108-108-114-120. Change to double pointed needles size 3.5 mm and knit 12 cm Rib in off, then cast off in Rib. Assembly: Sew the openings underneath the arms. |
||||||||||||||||
Diagram explanations |
||||||||||||||||
|
||||||||||||||||
 |
||||||||||||||||
 |
||||||||||||||||
Have you finished this pattern?Tag your pictures with #dropspattern or submit them to the #dropsfan gallery. Do you need help with this pattern?You'll find 19 tutorial videos, a Comments/Questions area and more by visiting the pattern on garnstudio.com. © 1982-2026 DROPS Design A/S. We reserve all rights. This document, including all its sub-sections, has copyrights. Read more about what you can do with our patterns at the bottom of each pattern on our site. |
||||||||||||||||


With over 40 years in knitting and crochet design, DROPS Design offers one of the most extensive collections of free patterns on the internet - translated to 17 languages. As of today we count 324 catalogues and 12290 patterns translated into English (UK/cm). 12290
We work hard to bring you the best knitting and crochet have to offer, inspiration and advice as well as great quality yarns at incredible prices! Would you like to use our patterns for other than personal use? You can read what you are allowed to do in the Copyright text at the bottom of all our patterns. Happy crafting!
Post a comment to pattern DROPS 97-24
We would love to hear what you have to say about this pattern!
If you want to leave a question, please make sure you select the correct category in the form below, to speed up the answering process. Required fields are marked *.