DROPS Super Sale - SAVE 30% on 5 wonderful yarns!
Product image DROPS Air yarn
DROPS Air
65% Alpaca, 28% Polyamide, 7% Wool
from 3.70 € /50g
Get the yarn to make this pattern from 18.50€.

The yarn cost is calculated from the pattern’s smallest size and the yarn’s cheapest product type. Looking for an even better price? You might find it on the DROPS Deals!

DROPS Super Sale

Tidal Treasures

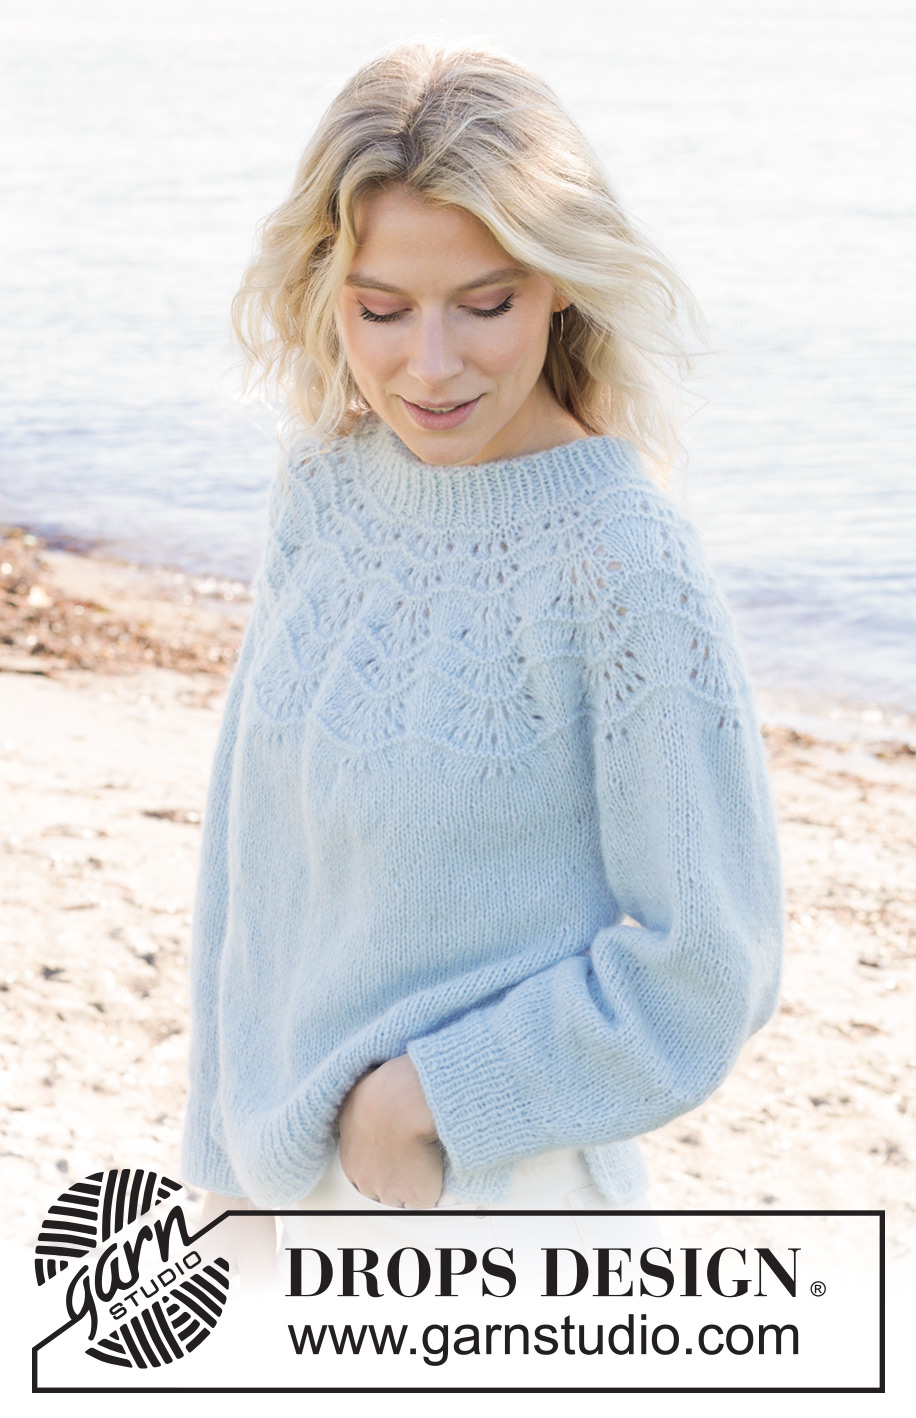
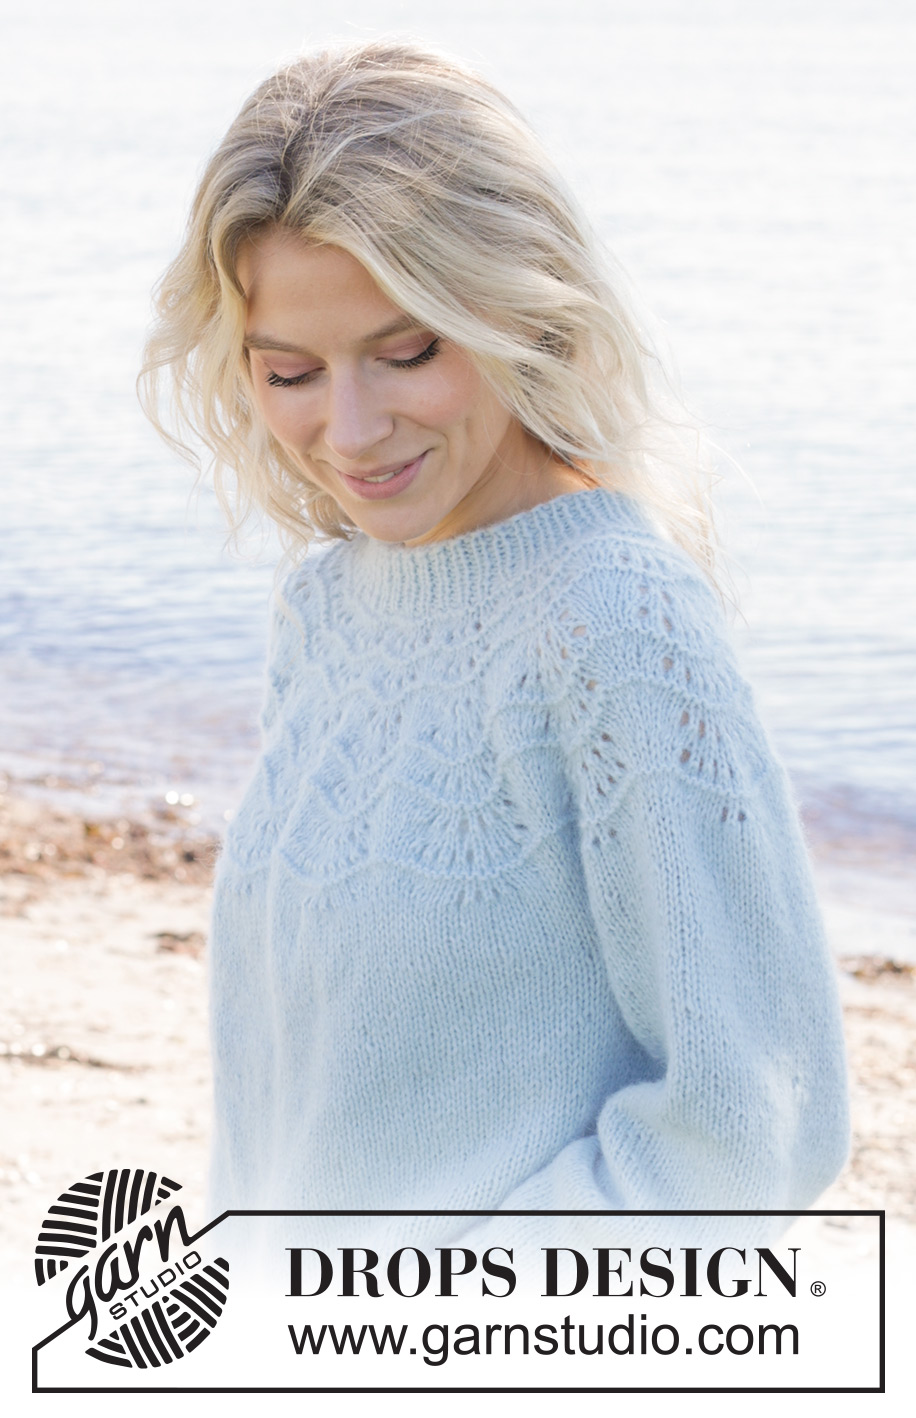
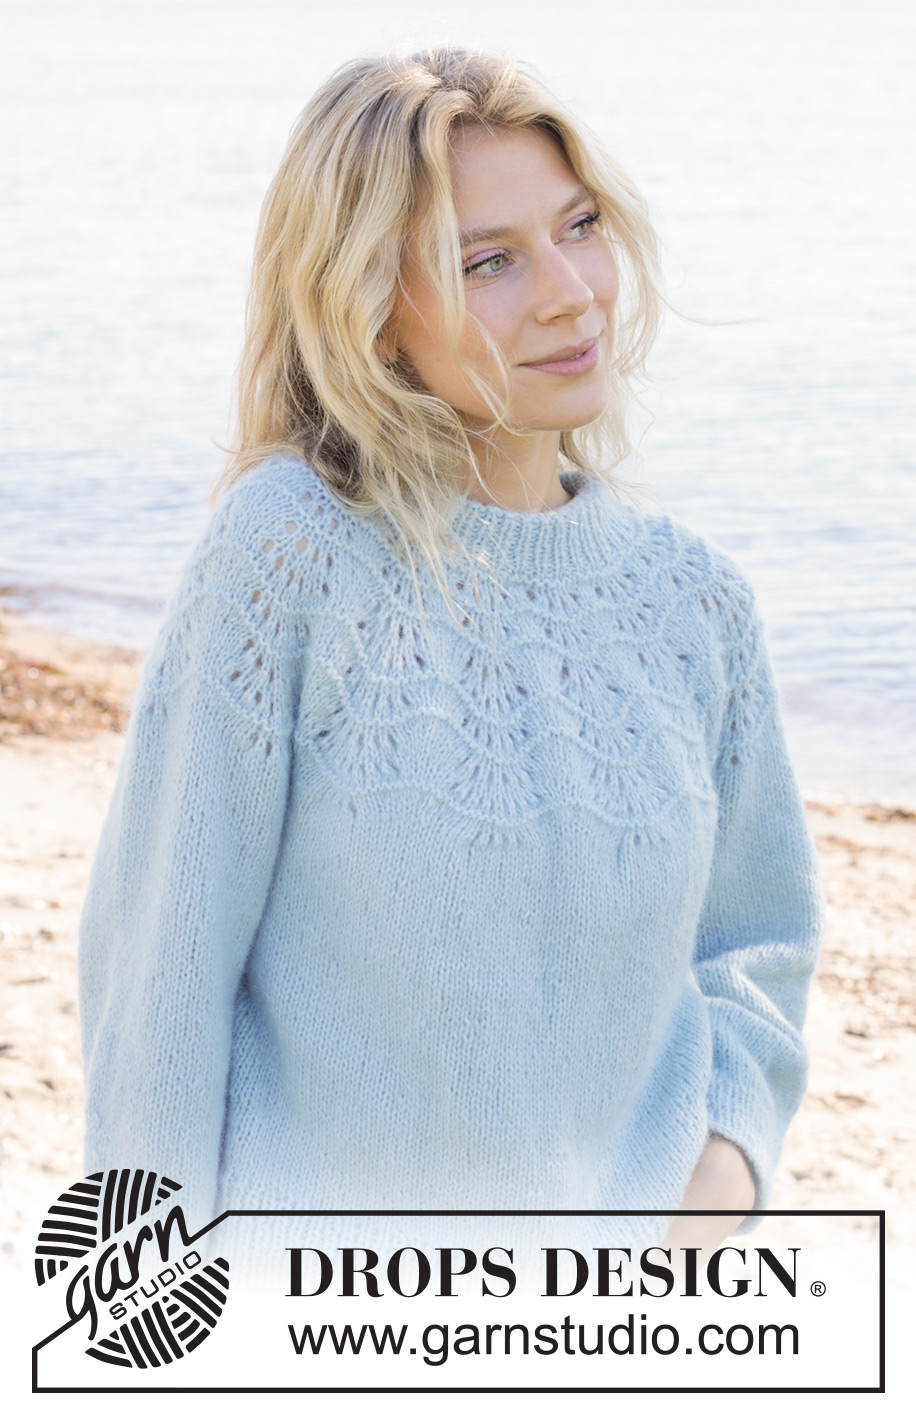
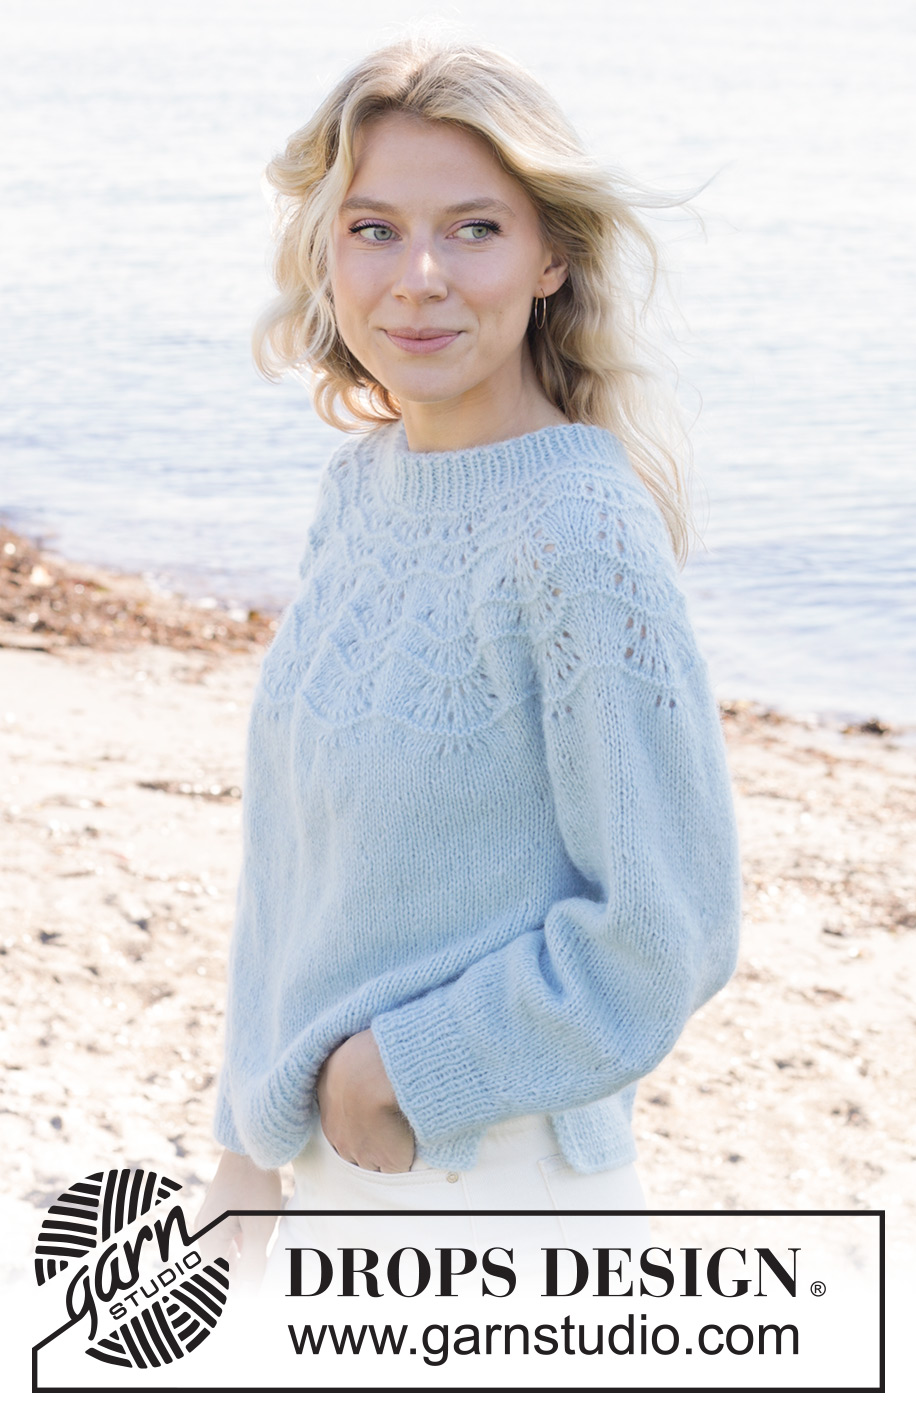
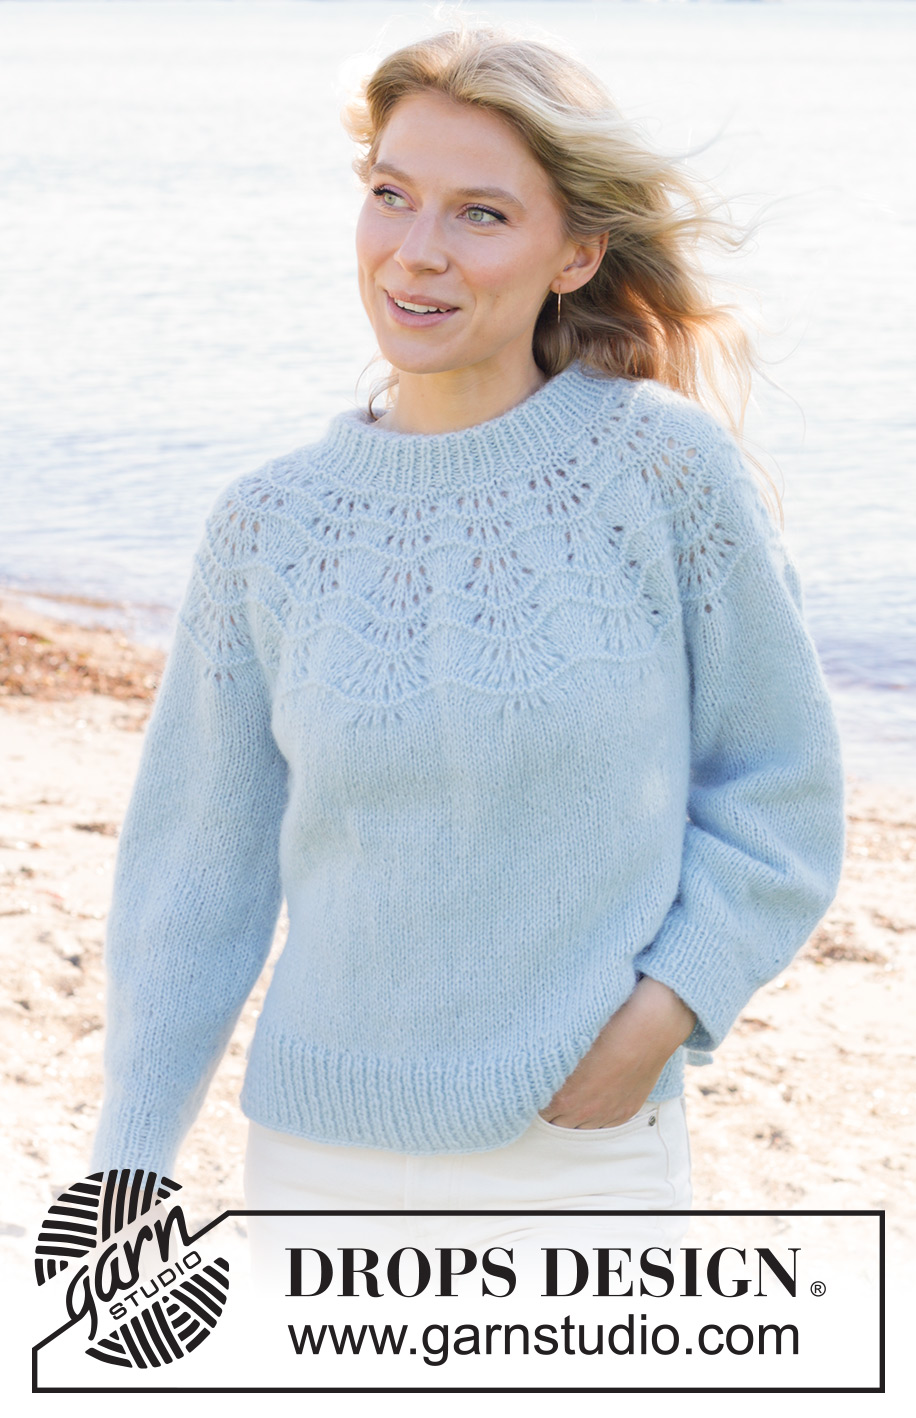
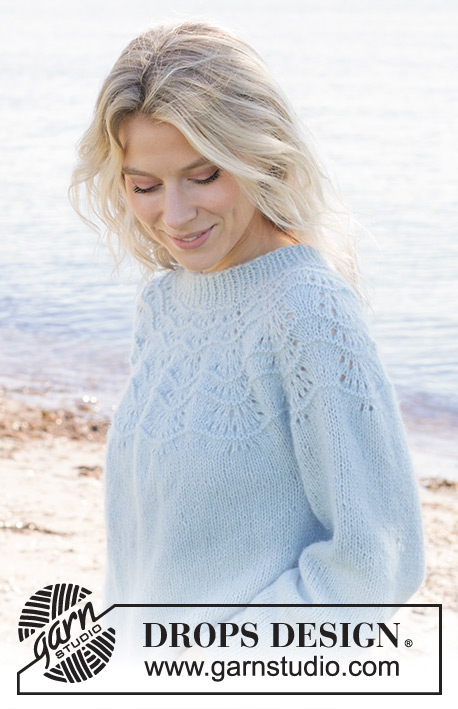
Knitted jumper in DROPS Air. Piece is knitted top down with wave pattern and round yoke. Size: S - XXXL

Highlight Size:
DROPS 239-8

#tidaltreasuressweater

DROPS design: Pattern ai-430
Yarn group C or A + A
----------------------------------------------------------

SIZE:
S - M - L - XL - XXL - XXXL

YARN:
DROPS AIR from Garnstudio (belongs to yarn group C)
250-300-300-350-350-400 g colour 18, morning mist

NEEDLES:
DROPS CIRCULAR NEEDLE SIZE 5 mm: Length 40 and 80 cm.
DROPS CIRCULAR NEEDLE SIZE 4 mm: Length 40 and 80 cm.
DROPS DOUBLE POINTED NEEDLES SIZE 5 mm
DROPS DOUBLE POINTED NEEDLES SIZE 4 mm
The technique MAGIC LOOP can be used – you then only need circular needle of 80 cm in each size.

KNITTING TENSION:
17 stitches in width and 22 rows vertically in stocking stitch = 10 x 10 cm.
NOTE! Remember that needle size is only a suggestion. If you have too many stitches on 10 cm switch to larger needles. If you have too few stitches on 10 cm switch to smaller needles.

-------------------------------------------------------

Alternative Yarn – See how to change yarns here
Yarn Groups A to F – Use the same pattern and change the yarn here
Yarn usage using an alternative yarn – Use our yarn converter here

-------------------------------------------------------

You might also like...

Product image DROPS Air
DROPS Air
65% Alpaca, 28% Polyamide, 7% Wool
from 3.70 € /50g
Get the yarn to make this pattern from 18.50€.

The yarn cost is calculated from the pattern’s smallest size and the yarn’s cheapest product type. Looking for an even better price? You might find it on the DROPS Deals!

Pattern instructions

NOTE: This pattern is written in British English. All measurements in charts are in cm. Convert from cm to inches here. There are different terms for crocheting in British and American English. If this pattern includes crochet, convert "crochet terms" here. See this pattern in American English here..
----------------------------------------------------------

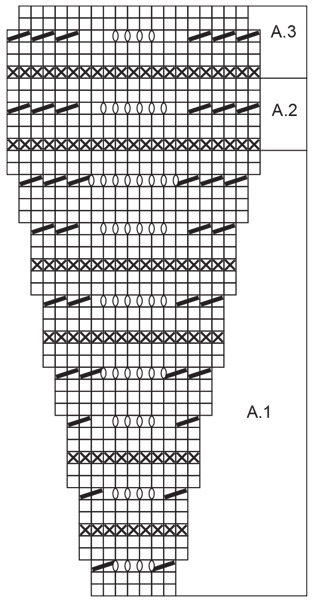
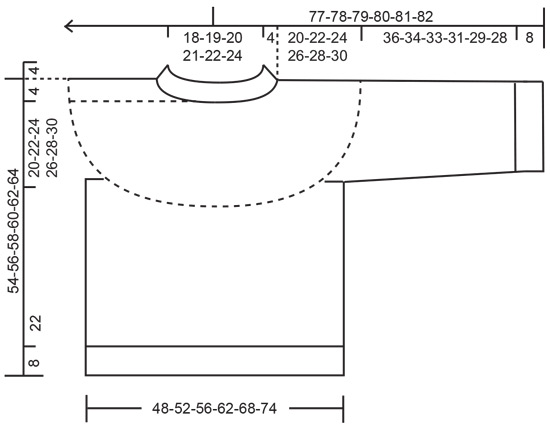
EXPLANATION FOR THE PATTERN:

----------------------------------------------------------

GARTER STITCH (back and forth):
Knit all rows.
1 ridge vertically = knit 2 rows.

PATTERN:
See diagrams A.1 to A.3.

DECREASE TIP (applies to sleeves):
Decrease 1 stitch on each side of marker thread as follows: Work until 3 stitches remain before marker thread and knit 2 together, knit 2 (marker thread is between these 2 stitches), slip 1 stitch knitwise, knit 1, pass slipped stitch over stitch worked.

----------------------------------------------------------

START THE PIECE HERE:

----------------------------------------------------------

JUMPER - SHORT OVERVIEW OF THE PIECE:
Work double neck edge and yoke in the round on circular needle from mid back, top down. Now divide yoke for body and sleeves. Work the body in the round on circular needle. Work sleeves in the round on double pointed needles/a short circular needle.

DOUBLE NECK EDGE:
Cast on 88-92-94-100-104-110 stitches with DROPS Air over a short circular needle size 5 and a short circular needle size 4 mm held together.
Pull out short circular needle 5 mm and keep stitches on the short circular needle size 4 mm (cast is done like this to get an elastic cast-on edge).
Knit 1 round. Then work rib (= knit 1/purl 1) for 4 cm. Purl 1 round over all stitches, then work rib as before until piece measures 8 cm.
Insert 1 marker in middle of round. Work yoke as explained below. Measure yoke from this marker.

YOKE:
Switch to circular needle size 5 mm. Knit 1 round while increasing 3-6-11-19-22-23 stitches evenly = 91-98-105-119-126-133 stitches. Purl 1 round. Work A.1 13-14-15-17-18-19 times in total in the round on body. REMEMBER THE KNITTING TENSION! When A.1 has been worked 1 time vertically, work A.2 0-0-1-1-2-2 times in total vertically, then work A.3. When A.3 has been worked 1 time vertically, there are 247-266-285-323-342-361 stitches on needle. Knit 1 round while increasing 7-8-5-3-0-1 stitches evenly = 254-274-290-326-342-362 stitches. Work in stocking stitch until piece measures 20-22-24-26-28-30 cm from marker. On next round divide piece for body and sleeves as follows:

DIVIDE THE PIECE FOR BODY AND SLEEVES AS FOLLOWS:
Work 37-41-43-48-52-56 stitches as before (half back piece), slip the next 52-54-58-66-66-68 stitches on a thread for sleeve, cast on 6-6-8-8-10-12 new stitches on needle (in the side under sleeve), work 75-83-87-97-105-113 stitches in stocking stitch (front piece), slip the next 52-54-58-66-66-68 stitches on a thread for sleeve, cast on 6-6-8-8-10-12 new stitches on needle (in the side under sleeve), and work the last 38-42-44-49-53-57 stitches as before (half back piece). Finish body and sleeves separately. Now measure piece from here!

BODY:
= 162-178-190-210-230-250 stitches. Insert a marker thread in each side, in the , middle of the 6-6-8-8-10-12 new stitches (used when dividing for vents). Begin round at one of the marker threads and work stocking stitch until piece measures 22 cm from division.
Now divide piece for vents in each side. Keep the first 81-89-95-105-115-125 stitches on the needle. Slip the remaining stitches on a thread.

BACK PIECE:
= 81-89-95-105-115-125 stitches. Knit 1 row from right side while increasing 18-18-20-22-24-26 stitches evenly = 99-107-115-127-139-151 stitches.
Switch to circular needle size 4 mm and work rib as follows (work first row from wrong side):
ROW 1 (= wrong side): Work 2 stitches in GARTER STITCH - read explanation above, * purl 1, knit 1 *, work from *-* until 3 stitches remain, purl 1 and 2 stitches in garter stitch. Work rib like this for 8 cm.
Jumper measures approx. 54-56-58-60-62-64 cm from shoulder and down. Loosely cast off.

FRONT PIECE:
Slip the 81-89-95-105-115-125 stitches from thread on circular needle size 5 mm. Work as on back piece.

SLEEVES:
Slip the 52-54-58-66-66-68 stitches from thread in one side of piece on double pointed needles or a short circular needle size 5 mm and pick in addition up 1 stitch in each of the 6-6-8-8-10-12 new stitches cast on under sleeve = 58-60-66-74-76-80 stitches.
Insert 1 marker thread mid under sleeve – in the middle of the 6-6-8-8-10-12 stitches that were cast on under sleeve. Begin round at the marker thread and work stocking stitch in the round.
When piece measures 3-3-3-2-2-2 cm, decrease 2 stitches mid under sleeve - read DECREASE TIP. Decrease like this every 4-4-2½-2-2-1½ cm 4-4-6-9-9-10 times in total = 50-52-54-56-58-60 stitches.
Work until sleeve measures 36-34-33-31-29-28 cm from division. 8 cm remain until finished measurements. Try the jumper and work to desired length before rib.
Knit 1 round while increasing 10-10-10-12-12-12 stitches evenly = 60-62-64-68-70-72 stitches. Switch to double pointed needles size 4 mm. Work rib (knit 1/purl 1) for 8 cm. Cast off somewhat loosely by knitting. Sleeve measures approx. 44-42-41-39-37-36 cm. Work the other sleeve the same way.

ASSEMBLY:
Fold the neck down inside the garment, and fasten with 1 stitch in each side of the neck towards the shoulders.

Diagram

knit = knit
purl = purl
between 2 stitches make 1 yarn over, on next round knit yarn over to make hole = between 2 stitches make 1 yarn over, on next round knit yarn over to make hole
knit 2 together = knit 2 together
Diagram for DROPS 239-8

Each of our patterns has specific tutorial videos to help you.

Do you have a question? See a list of frequently asked questions (FAQ)

Knitting tension is what determines the final measurements of your work, and is usually measured per 10 x 10 cm. It is provided like so: number of stitches in width x number of rows in height - eg: 19 stitches x 26 rows = 10 x 10 cm.

The knitting tension is very individual; some people knit/crochet loosely while others work tightly. You adjust the knitting tension with the needle size, which is why the suggested needle size is only meant as a guide! You need to adjust this (up or down) to ensure that YOUR knitting tension matches the knitting tension provided in the pattern. If you work with a different knitting tension than provided you will have a different yarn consumption, and your work will have different measurements than what the pattern suggests.

The knitting tension also determines which yarns can replace each other. As long as you achieve the same knitting tension you can replace one yarn with another.

See DROPS lesson: How to measure your tension/gauge

See DROPS video: How to make a gauge tension swatch

The required amount of yarn is provided in grams, eg: 450 g. To calculate how many balls you’ll need you first need to know how many grams are in 1 ball (25g, 50g or 100g). This information is available if you click on the individual yarn quality on our pages. Divide the amount required with the amount of each ball. For example, if each ball is 50g (the most common amount), the calculation will be as follows: 450 / 50 = 9 balls.

The important thing when changing from one yarn to another is that the knitting/crochet tension remains the same. This is so that the measurements of the finished piece will be the same as on the sketch provided. It is easier to achieve the same knitting tension using yarns from the same yarn group. It is also possible to work with multiple strands of a thinner yarn to achieve the knitting tension of a thicker one. Please try our yarn converter. We recommend you to always work a test swatch.

Please NOTE: when changing yarn the garment might have a different look and feel to the garment in the photo, due to individual properties and qualities of each yarn.

See DROPS lesson: Can I use a different yarn than the one mentioned in the pattern?

All our yarns are categorised into yarn groups (from A to F) according to thickness and knitting tension – group A contains the thinnest yarns and group F the thickest. This makes it easier for you to find alternative yarns to our patterns, should you wish to switch yarn. All yarns within the same group have a similar knitting tension and can easily replace each other. However, different yarn qualities have different structures and properties which will give the finished work a unique look and feel.

Click here for an overview of the yarns in each yarn group

At the top of all our patterns you’ll find a link to our yarn calculator, which is a helpful tool should you wish to use a different yarn than suggested. By filling in the yarn quality you wish to replace, the amount (in your size) and number of strands, the calculator will present good alternative yarns with the same knitting tension. Additionally it will tell you how much you’ll require in the new qualities and whether you’ll need to work with multiple strands. Most skeins are 50g (some are 25g or 100g).

If the pattern is worked with multiple colours, every colour will have to be calculated separately. Similarly, if the pattern is worked with several strands of different yarns (for example 1 strand Alpaca and 1 strand Kid-Silk) you will have to find alternatives for each, individually.

Click here to see our yarn calculator

Since different yarns have different qualities and textures we have chosen to keep the original yarn in our patterns. However, you can easily find options among our available qualities by using our yarn calculator, or simply pick a yarn from the same yarn group.

It is possible that some retailers still have discontinued yarns in stock, or that someone has a few skeins at home that they would like to find patterns for.

The yarn calculator will provide both alternative yarn as well as required amount in the new quality.

If you think it's hard to decide what size to make, it can be a good idea to measure a garment you own already and like the size of. Then you can pick the size by comparing those measures with the ones available in the pattern's size chart.

You'll find the size chart at the bottom of the pattern.

See DROPS lesson: How to read size chart

The needle size provided in the pattern serves only as a guide, the important thing is to follow the knitting tension. And since knitting tension is very individual, you will have to adjust the needle size to ensure that YOUR tension is the same as in the pattern – maybe you’ll have to adjust 1, or even 2 needle sizes, up or down to achieve the correct tension. For this, we recommend that you work test swatches.

Should you work with a different knitting tension than the one provided, the measurements of the finished garment might deviate from the measurement sketch.

See DROPS lesson: How to measure your tension/gauge

See DROPS video: How to make a tension/gauge swatch

Working a garment top-down provides more flexibility and room for personal adjustment. For example it is easier to try the garment on while working, as well as making adjustments to length of yoke and shoulder caps.

The instructions are carefully explaining every step, in the correct order. Diagrams are adjusted to the knitting direction and are worked as usual.

The diagram depicts all rows/rounds, and every stitch seen from the right side. It is read from bottom to top, from right to left. 1 square = 1 stitch.

When working back and forth, every other row is worked from the right side and every other row is worked from the wrong side. When working from the wrong side, the diagram will have to be worked reversed: from left to right, knit stitches are purled, purl stitches are knit etc.

When working in the round every round is worked from the right side and the diagram are worked from right to left on all rounds.

See DROPS lesson: How to read knitting diagrams

The diagram depicts all rows/rounds, and every stitch seen from the right side. It is worked from bottom to top, from right to left.

When working back and forth every other row is worked from the right side: from right to left and every other row is worked from the wrong side: from left to right.

When working in the round, every row in the diagram are worked from the right side, from right to left.

When working a circular diagram you start in the middle and work your way outwards, counter clockwise, row by row.

The rows usually start with a given number of chain stitches (equivalent to the height of the following stitch), this will either be depicted in the diagram or explained in the pattern.

See DROPS lesson: How to read crochet diagrams

Instructions for working several diagrams after each other on the same row/round, will often be written like so: “work A.1, A.2, A.3 a total of 0-0-2-3-4 times". This means you work A.1 once, then A.2 is worked once, and A.3 is repeated (in width) the number of times provided for your size – in this case like so: S = 0 times, M = 0 times, L=2 times, XL= 3 times and XXL = 4 times.

The diagrams are worked as usual: begin with the first row in A.1, then work the first row in A.2 etc.

See DROPS lesson: How to read knitting diagrams

See DROPS lesson: How to read crochet diagrams

The total width of the garment (from wrist-to-wrist) will be larger in the larger sizes, despite the actual sleeves being shorter. The larger sizes have longer sleeve caps and wider shoulders, so there will be a good fit in all sizes.

The measurement sketch/schematic drawing provides information regarding the full length of the garment. If it’s a jumper or a jacket the length is measured from the highest point on the shoulder closest to the neckline, and straight down to the bottom of the garment. It is NOT measured from the tip of shoulder. Similarly, the length of yoke is measured from the highest point on the shoulder and down to where yoke is split into body and sleeves.

On a jacket measures are never taken along bands, unless specifically stated. Always measure inside band stitches when measuring the length.

See DROPS lesson: How to read a schematic drawing

Diagrams are often repeated on the round or in height. 1 repeat is the diagram the way it appears in the pattern. If it says to work 5 repeats of A.1 in the round, then you work A.1 a total of 5 times after/next to each other in the round. If it says to work 2 repeats of A.1 vertically/in height you work the entire diagram once, then begin again at the start and work the entire diagram one more time.

Chain stitches are slightly narrower than other stitches and to avoid working the cast-on edge too tight, we simply chain more stitches to begin with. The stitch count will be adjusted on the following row to fit the pattern and measurement sketch.

The rib edge is more elastic and will contract slightly compared to, for example, stocking stitch. By increasing before the rib edge, you avoid a visible difference in width between the rib edge and the rest of the body.

It’s very easy to cast off too tightly, and by making yarn overs while casting off (and simultaneously casting these off) you avoid a too tight cast off edge.

See DROPS video: How to bind off with yarn overs (yo)

To achieve an even increase (or decrease) you can increase on, for example: every 3rd and 4th row alternately, like so: work 2 rows and increase on the 3rd row, work 3 rows and increase on the 4th. Repeat this until the increase is complete.

See DROPS lesson: Increase or decrease 1 st on every 3rd and 4th row alternately

Should you prefer to work in the round instead of back and forth, you may of course adjust the pattern. You’ll need to add steeks mid-front (usually 5 stitches), and follow the instructions. When you would normally turn and work from the wrong side, simply work across the steek and continue in the round. At the end you’ll cut the piece open, pick up stitches to work bands, and cover the cut edges.

See DROPS video: How to knit steeks and cut open

Should you prefer to work back and forth instead of in the round, you may of course adjust the pattern so you work the pieces separately and then assemble them at the end. Divide the stitches for the body in 2, add 1 edge stitch in each side (for sewing) and work the front and back pieces separately.

See DROPS lesson: Can I adapt a pattern for circular needles into straight needles?

Pattern repeats can vary slightly in the different sizes, in order to get the correct proportions. If you’re not working the exact same size as the garment in the photo, yours might deviate slightly. This has been carefully developed and adjusted so that the complete impression of the garment is the same in all sizes.

Make sure to follow instructions and diagrams for your size!

If you have found a pattern you like which is available in women’s size it’s not very difficult to convert it to men’s size. The biggest difference will be the length of sleeves and body. Start working on the women size that you think would fit across the chest. The additional length will be worked right before you cast off for the armhole/sleeve cap. If the pattern is worked top-down you can add the length right after the armhole or before the first decrease on sleeve.

Regarding additional yarn amount, this will depend on how much length you add, but it is better with a skein too many than too few.

All yarns will have excess fibres (from production) that might come off as lint or shedding. Brushed yarns (ie hairier yarns) have more of these loose, excess fibres, causing more shedding.

Shedding also depends on what is worn under or over the garment, and whether this pulls at the yarn fibres. It’s therefore not possible to guarantee that there will be no shedding

Below are some tips on how to get the best result when working with hairier yarns:

1. When the garment is finished (before you wash it) shake it vigorously so the looser hairs come off. NOTE: do NOT use a lint roller, brush or any method that pulls at the yarn.

2. Place the garment in a plastic bag and put it in your freezer - the temperature will cause the fibres to become less attached to each other, and excess fibres will come off easier.

3. Leave in the freezer for a few hours before taking it out and shaking it again.

4. Wash the garment according to the instructions on the yarn label.

Pilling is a natural process that happens to even the most exclusive of fibers. It's a natural sign of wear and tear that is hard to avoid, and that is most visible in high friction areas of your garment like a sweater's arms and cuffs.

You can make your garment look as new by removing the pilling, using a fabric comb or a pill/lint remover.

Still can't find the answer you need? Then scroll down and leave your question so one of our experts can try to help you. This will be done normally within 5 to 10 working days.
In the meantime, you can read the questions and answers that others have left to this pattern or join the DROPS Workshop on Facebook to get help from fellow knitters/crocheters!

Post a comment to pattern DROPS 239-8

We would love to hear what you have to say about this pattern!

If you want to leave a question, please make sure you select the correct category in the form below, to speed up the answering process. Required fields are marked *.

Comments / Questions (48)

country flag Matilde wrote:

La ripetizione del diagramma A1 e A3 in orizzontale : le due maglie prese insieme nello schema sono sempre in direzione / anche la successiva sempre da sinistra a destra o al contrario accavvallata da ds a Sn. - - grazie

05.05.2025 - 15:01

country flag Carla wrote:

Hello, it is my first time knitting a piece from top to bottom. One of the recommended lessons for this pattern is the raglan. Do I have to make the raglan increases while following the A1 pattern? Or are the increases I do with the A1 Diagram enough to make the yolk? Thank you!

12.04.2025 - 02:20

DROPS Design answered:

Dear Carla, the recommended lessons are for guidance only and may not fully reflect what's necessary in this specific pattern. All necessary increases and decreases will be detailed either in the written text or the diagrams. In this case, the increases for the raglan are in the A.1 chart, so you simply work the chart as indicated; you don't need to work any extra increases. Happy knitting!

13.04.2025 - 23:17

country flag Carla wrote:

Hello, it is my first time knitting a piece from top to bottom. One of the recommended lessons for this pattern is the raglan. Do I have to make the raglan increases while following the A1 pattern? Or are the increases I do with the A1 Diagram enough to make the yolk? Thank you!

12.04.2025 - 02:17

DROPS Design answered:

Dear Carla, the lesson shows a raglan but here you will have to increase as explained in the pattern, ie as shown in the diagram A.1 to create the round yoke. The lesson might still help you when dividing stitches for body and sleeve. Happy knitting!

23.04.2025 - 10:40

country flag Zoé Roux-dessarps wrote:

Bonjour, je suis bloqué au moment où il faut faire la division de l'ouvrage. Je ne comprends pas à partir de quel moment il faut compter les premières mailles pour faire la division. Je n'ai aucun repère donc je ne peux pas continuer. Merci pour votre aide. Bonne journée ! Zoé

10.03.2025 - 11:21

DROPS Design answered:

Bonjour Zoé, pendant l'empiècement, les tours commencent au milieu dos (mais comme c'est un empiècement arrondi, on n'a pas non plus clairement de dos, devant, manches de définies), et la division se fait donc à partir du milieu dos, autrement dit à partir du début du tour suivant. Bon tricot!

10.03.2025 - 13:17

country flag Stella wrote:

Ciao, dove e come consigliate di inserire l'alzata lavorata con german short rows per sollevare il collo dietro? Grazie mille!

21.01.2025 - 15:34

DROPS Design answered:

Buonasera Stella, per un'assistenza così personalizzata può rivolgersi al suo rivenditore DROPS di fiducia. Buon lavoro!

21.01.2025 - 22:52

country flag Emma wrote:

Hej, jag har delat in mitt arbete i fyra delar och ska på börja instruktionerna under FRAM- OCH BAKSTYCKE men kan inte riktigt förstå om jag ska första mitt arbete för att börja på nytt vid mitt markören under en arm? Sen tycker jag även att det är otydligt om jag ska ha bak- och framstycke på samma rundsticka eller två olika? Kan inte se det framför mig hur jag går vidare...

16.11.2024 - 09:51

DROPS Design answered:

Hej Emma. Du ska ha maskorna på 1 rundsticka och fortsätter att sticka runt, men nu börjar varvet vid markören under ärmen. Jag tror att denna video kan hjälpa dig att få en översikt över hur du går vidare. Mvh DROPS Design

21.11.2024 - 07:51

country flag Moot wrote:

Thank you for answering my previous question regarding the Tidal Treasures sweater. Please could you help me with one last question?... On the chart A.1 the first line of yarn overs do I read it as K2tog x1, Yo x4, K2tog x1 And on the second lot of yarn overs on A.1 do I read that line as K2tog x1, k1, Yo x4 , k1, k2tog x1 ...Is this correct? .... Thank you so much for your help, kind regards.

25.10.2024 - 09:12

DROPS Design answered:

Dear Mrs Moot, on the first row with yarn overs in A.1 (3rd row in diagram), work: K2 tog, (YO, K1) x3, YO, K2 tog (9 sts); and on the 9th row work: K2 tog, (K1,YO) x 4, K1, K2 tog (11 sts). Happy knitting!

25.10.2024 - 12:59

country flag Moot wrote:

I am making Tidal treasures sweater in the medium size. Pattern tells me to do 1 set of A.1 then one set of A.3 Then continue with another set of A.1 x13 .. If I was to do this then the Pattern would be right down to my knees! ... Please can you explain exactly what A.1 is and how many rows it should consist of. I have already looked at your section on how to read patterns but unfortunately it's not clear to me. Many thanks for your help Best wishes .

23.10.2024 - 21:26

DROPS Design answered:

Dear Mrs Moot, you first work A.1 (=37 rows) one time in height - depending on your number of sts you will have to repeat the 7 sts on first row a total of 13 times in first size; but you work all rows in A.1 only one time in height (the 13 times are worked in the round = in width). After the 37 rows are worked, you will work A.3 (still 13 times in the round) which is 6 rounds so that you will have worked a total of 37+6 rounds in height in pattern for yoke. Happy knitting!

24.10.2024 - 09:26

country flag Andrea wrote:

Ich habe ein Problem bei der Anzahl der Maschen in der Passe. Ich habe 98 Maschen auf der Nadel und habe von A1 14x das Muster gestrickt. Mit der Zunahme von je 2 Maschen pro Muster habe ich 28 Maschen zugenommen. Wenn ich das nun insgesamt 7 x mache habe ich 196 Maschen. Zusammen mit den 98 Maschen habe ich dann 294 Maschen auf der Nadel statt 266 Maschen. Habe ich einen Denkfehler? Wo ist er?

12.10.2024 - 20:02

DROPS Design answered:

Liebe Andrea, nach A.1 sind es, 294Maschen, dann strickt man A.3 und gleichzeitig nimmt man 2 Maschen in jedem A.1, dh 2 m in je den 14 Rapporte = 28 Masche; so hat man 294-28= 266 Maschen übrig nach A.3. Viel Spaß beim Stricken!

14.10.2024 - 08:14

country flag Tamuri wrote:

V části DOKONČENÍ: "Lem průkrčníku přeložíme napolovic do rubu a na každé náramenici 1 stehem přišijeme". Takže lem bude přichycen pouze v jednom bodu na každé náramenici a jeho zbytek zůstane volně viset? Hi, in the part "ASSEMBLY" You wrote: "Fold the neck down inside the garment, and fasten with 1 stitch in each side of the neck." It means that the neck have be fastened only in two points on the each side ? Will it hold together at all?

08.08.2024 - 20:56

DROPS Design answered:

Dobrý den, Tamuri, ano, přesně tak - lem průkrčníku se pěkně složí a není nezbytně nutné přišívat jej po celém obvodu, stačí přichytit po stranách. Ale samozřejmě jej můžete přichytit na více místech, ppř. po celém obvodu - jen dejte pozor, aby stehy byly maličké a na líci neznatelné, celý šev by pak měl zůstat dostatečně volný a pružný. Hodně zdaru! Hana

08.08.2024 - 21:44