
Popular categories
Looking for a yarn?


Comments / Questions (41)
![]() Zoe Mason-Chard wrote:
Zoe Mason-Chard wrote:
Please disregard my last question about the first row of pattern after 33 cm have been worked but on this row is the garter stitch in the round started with a knit or purl row please , on the right side
25.08.2024 - 16:12DROPS Design answered:
Dear Zoe, the garter stitch starts with a knit row. Happy knitting!
25.08.2024 - 23:53
![]() Zoe Mason-Chard wrote:
Zoe Mason-Chard wrote:
Hi , I am working the first row after it measures 33 cm on an even row (row 8) , when working the next row I have the increased stitches for the cable , how do I work the garter stitch over these stitches ? Do I knit 2 together on the cable to knit 15 over 17 sts or work the extra yarn over stitches included in the 15 stitches. For the rest of this row do I count the 3 sts of the cable as 2 sts when working this row please ?
25.08.2024 - 15:23
![]() Leentje Buckens wrote:
Leentje Buckens wrote:
Bij een hoogte van 33-33-35 cm, brei de volgende naald als volgt (er is ongeveer 1 cm over tot het werk wordt verdeeld midden voor en geminderd wordt voor de armsgaten): LET OP! Pas zo aan dat volgende naald een even naald in het patroon is, dit is belangrijk zodat de kabelnaald aan de goede kant zit als het werk heen en weer wordt gebreid. WAT WORDT BEDOELD MET EEN EVEN NAALD ? DIT SNAP IK NIET
05.06.2024 - 02:05DROPS Design answered:
Dag Leentje,
Als je bij de telpatronen kijkt dan is steeds de naald waar je mee begint een oneven naald, de tweede naald is een even naald, enzovoort.
12.06.2024 - 16:58
![]() Annelise wrote:
Annelise wrote:
Jeg forstår ikke strikkeanvisningen i diagram 2: tag 1 maske løs af pinden som om den skulle strikkes ret, strik 2 masker, løft den løse maske over masken som blev strikket. Hvilken maske? Jeg har jo strikket to masker, så hvilken strikket maske skal den løse maske løftes over?
13.05.2024 - 21:48DROPS Design answered:
Hej Annelise, der skal stå, løft den løse maske over maskerne som blev strikket (så du har 2 ud af de 3 på højre pind). Tak for info - det er rettet :)
14.05.2024 - 14:53
![]() Krisztina wrote:
Krisztina wrote:
Hej Jag undrar hur man ska minska på baksidan... Det står innanför 7 maskor... Så ska man sticka ihop 2 maskor avig efter 5 kantmaskor eller? Mvh Krisztina
11.05.2024 - 11:14DROPS Design answered:
Hei Krisztina. Ja, det felles innenfor 7 masker i hver side. Fell ved å strikke 2 masker vrang sammen. På begynnelsen av pinnen strikkes det 5 kantmasker i riller før de 2 neste maskene strikkes vrang sammen (det er felt innenfor 7 masker i siden). På slutten av pinnen når det gjenstår 7 masker, strikk 2 masker vrang sammen og deretter 5 kantmasker i riller (det er felt innenfor 7 masker i siden). mvh DROPS Design
13.05.2024 - 14:24
![]() Lotte Vils wrote:
Lotte Vils wrote:
Har stillet spørgsmål og fået svar, men jeg må spørge igen, da jeg IKKE har 40x8 = 320 masker på omgangen. Jeg har 40x9 = 360. Der står et sted, at a2 hele tiden tælles som 8, men der er stadig 9, altså alt for mange masker. Betyder det, jeg har gjort noget galt tidligere i arbejdet. A2 har hele vejen været med 9 masker (undtagen den pind, hvor jeg løfter en løs over indtagning, og denne er en lige omgang i mønsteret), og set er den også nu. Mvh Lotte
03.05.2024 - 17:14DROPS Design answered:
Hei Lotte. Usikker på hvor det har blitt feil hos deg, men pass på at du har/hadde 320 masker når du var ferdig med A.1, slik at når du skal strikke A.2 får du 40 rapporter av A.2. (A.2 = 8 masker x 40 rapporter = 320). Sett maskemarkører / merketråd mellom hver rapport, så ha du en bedre oversikt. Når du strikker 1., 5. og 9. omgang av A.2 vil du har 8 masker + 1 kast for hver gang A.2 strikkes. Når du strikker 4., 8. og 12. omgang av A.2 vil du ha 8 masker hver gang A.2 strikkes. Når du strikker 2.+3., 6.+7. og 10. +11. omgang av A.2 vil du har 9 masker hver gang A.2 strikkes (= 360 masker). mvh DROPS Design
06.05.2024 - 09:52
![]() Lotte Vils wrote:
Lotte Vils wrote:
Hej. Jeg er IKKE så erfaren i at læse en opskrift, men jeg er stødt på noget, jeg ikke forstår. Jeg er der, hvor der står, arbejdet måler 33-33-35. Strikker L/XL. Antallet af masker på næste pind er 15+58+14+58+15 (x2)=160. Men jeg har jo 20 x A2 på hhv for- og bagstykke. Hver har 9 masker (der står tælles som 8) = 180, men hvor mange masker er da 15? 58? 14? Jeg fatter det simpelthen ikke? Mon spørgsmålet er til at forstå? Håber virkelig, I kan hjælpe mig. Mvh Lotte
29.04.2024 - 17:32DROPS Design answered:
Hej Lotte, ja du strikker 15+58+14+58+30+130+15=320m Men du har taget 4 masker ind så du kun har 10 masker (istedet for 14) midt på forstykket. Alle masker som ikke er forklaret som retstrik, strikkes ifølge det mønster du allerede strikker :)
02.05.2024 - 14:44
![]() Pia Thorn wrote:
Pia Thorn wrote:
Hvordan skal indtagningstips 1 forstås? Skal man tage ind i de 5 retstrikmasker og så lave 2 nye retstrikmasker ind i mønsteret? Mvh Pia
04.10.2023 - 20:22DROPS Design answered:
Hei Pia. Nei, du skal felle innenfor 7 masker i hver side, ikke lage 2 nye masker. Fell ved å strikke 2 masker vrang sammen. mvh DROPS Design
16.10.2023 - 13:07
![]() Luna Estrella García Sánchez wrote:
Luna Estrella García Sánchez wrote:
Como se hace la puntada de grafting o punto de colchoneta
25.08.2023 - 10:54
![]() MARGHERITA PETAZZO wrote:
MARGHERITA PETAZZO wrote:
LE DIMINUZIONI 1 (PER IL DIETRO) VANNO FATTE PRENDENDO 2 MAGLIE INSIEME DOPO LE 5 MAGLIE DI VIVAGNO OPPURE DOPO 7 MAGLIE (5 MAGLIE DI VIVAGNO + 2) QUINDI PRENDENDO L'8^ E LA 9^ MAGLIA INSIEME?
07.06.2022 - 21:46DROPS Design answered:
Buonasera Margherita, deve diminuire dopo 7 maglie. Si ricordi di scrivere in minuscolo la prossima volta. Buon lavoro!
07.06.2022 - 22:49
|
|||||||||||||||||||
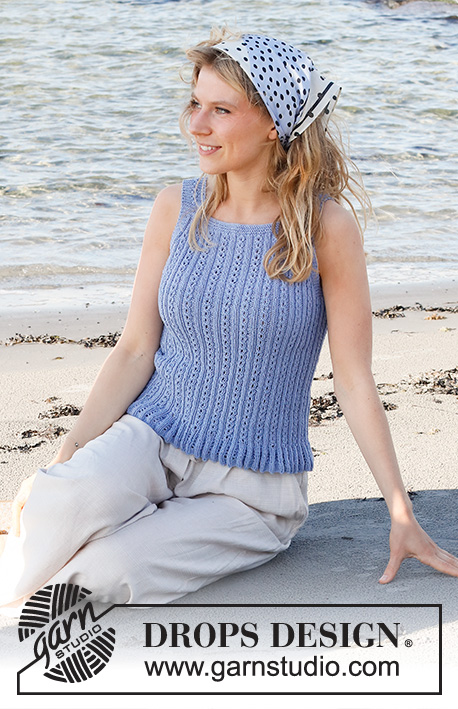
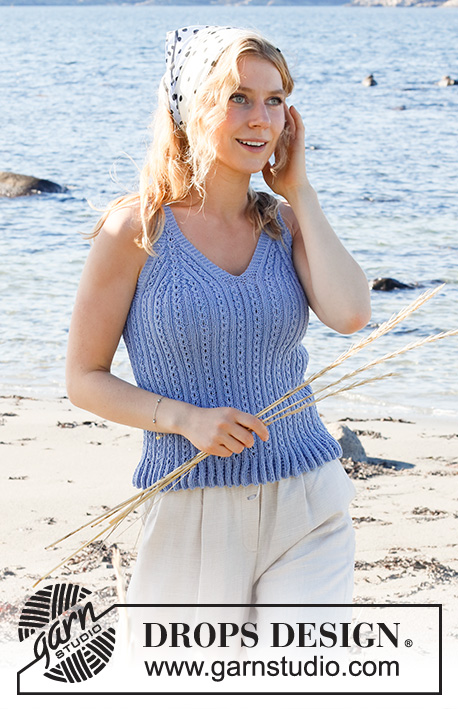
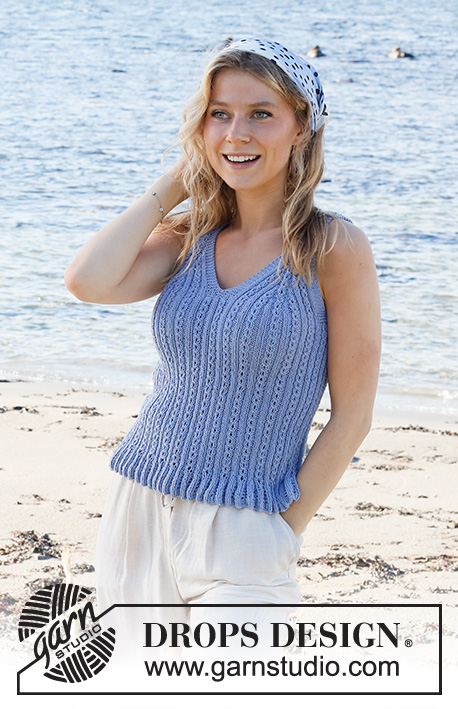
Blue Cove#bluecovetop |
|||||||||||||||||||
 |
 |
||||||||||||||||||
Knitted top in DROPS Safran. Piece is worked bottom up with pattern. Size: S - XXXL
DROPS 221-13 |
|||||||||||||||||||
|
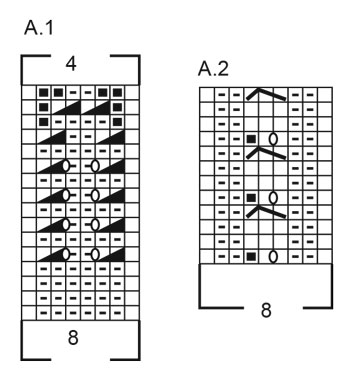
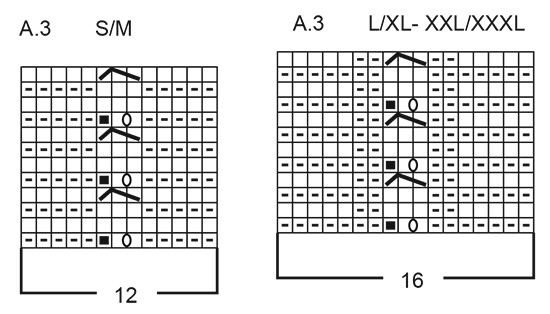
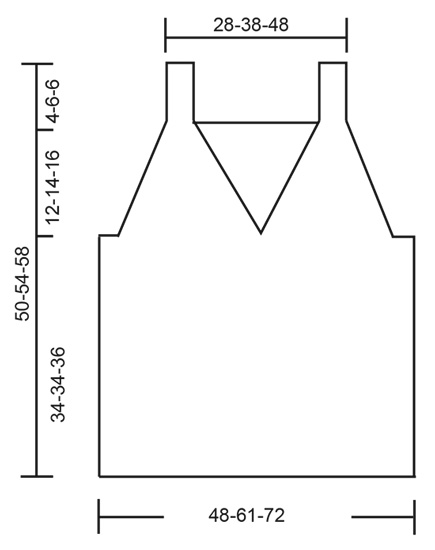
------------------------------------------------------- EXPLANATION FOR THE PATTERN: ------------------------------------------------------- GARTER STITCH (worked in the round): 1 ridge vertically = 2 rounds, i.e. knit 1 round and purl 1 round. GARTER STITCH (back and forth): Knit all rows. 1 ridge vertically = knit 2 rows. PATTERN: See diagrams A.1 to A.3. Diagrams show all rows in pattern seen from the right side. NOTE! Stitches in A.2 are always counted as 8 stitches even though stitches in cable alternates between 2 and 3 stitches. Stitches in A.3 are always counted as 12 stitches in S/M and 16 stitches in L/XL and XXL/XXXL. See diagram for your size in A.3. DECREASE TIP-1 (applies to back piece): Decrease inside 7 stitches in each side. Decrease by purling 2 together. DECREASE TIP-2 (applies to front pieces): Decrease on each side of a cable + 1 purl stitch in each side. All decreases are done from the right side. DECREASE 1 STITCH ON EACH SIDE OF CABLE AS FOLLOWS: Work until 3 stitches remain before cable, purl 2 together, purl 1, work cable, purl 1, purl 2 together = 2 stitches decreased. DECREASE 2 STITCHES ON EACH SIDE OF CABLES AS FOLLOWS: Work until 5 stitches remain before cable, purl 2 together, purl 2 together, purl 1, work cable, purl 1, purl 2 together, purl 2 together = 4 stitches decreased. ------------------------------------------------------- START THE PIECE HERE: ------------------------------------------------------- TOP - SHORT OVERVIEW OF THE PIECE: Work body in the round on circular needle, from the bottom and up to armholes. Then work back piece and the 2 front pieces separately, back and forth on circular needle until finished measurements. Straps on front piece are fastened to back piece. BODY: Cast on 512-640-768 stitches on circular needle size 3 mm with Safran. Work A.1 over all stitches (= 64-80-96 repetitions of 8 stitches). When A.1 has been worked 1 time vertically, there are 256-320-384 stitches on round. Work A.2 over all stitches (= 32-40-48 repetitions of 8 stitches). NOTE! Stitches in A.2 are always counted as 8 stitches even though stitches in cable alternates between 2 and 3 stitches. Work A.2 in the round – insert at the same time 1 marker thread at the beginning of round (= left side when garments is worn), and 1 marker thread after 128-160-192 stitches (= right side when garment is worn). Both marker threads are between 2 knit stitches. Move the marker thread upwards when working. REMEMBER THE KNITTING TENSION! When piece measures 33-33-35 cm, work next round as follows (approx. 1 cm remains until piece is divided mid front and decrease for armholes): NOTE! Adjust so that next round worked, is a even round in pattern, this is important so that the cable row is from right side when piece is worked back and forth. Work in GARTER STITCH over the first 15-15-15 stitches – read explanation above, work pattern as before over the next 42-58-74 stitches, work in garter stitch over the next 14 stitches, AT THE SAME TIME decrease 4 stitches evenly over these stitches (= 10 stitches mid front), work pattern as before over the next 42-58-74 stitches, work in garter stitch over the next 30-30-30 stitches, work pattern as before over the next 98-130-162 stitches (= back piece), and work in garter stitch over the last 15-15-15 stitches. There are 128-160-192 stitches on back piece and 124-156-188 stitches on front piece. Continue pattern like this until 3 ridges have been worked over stitches in the side. On next round cast off for armholes, i.e. work next round as follows: Cast off 10-10-10 stitches for armhole, work 5 stitches in garter stitch, continue pattern as before over the next 42-58-74 stitches, work 10 stitches in garter stitch (= mid front), continue pattern as before over the next 42-58-74 stitches, work 5 stitches in garter stitch, cast off 20-20-20 stitches for armhole, work 5 stitches in garter stitch, continue pattern as before over the next 98-130-162 stitches, work 5 stitches in garter stitch, and cast off the remaining 10-10-10 stitches for armhole. Cut the yarn. Finish back piece and front pieces separately. BACK PIECE: = 108-140-172 stitches. Begin from wrong side and work 1 row in PATTERN as before with 5 edge stitches in GARTER STITCH - read explanation above, in each side. Continue with A.2 and in garter stitch, at the same time decrease for armhole in each side on every row from right side - read DECREASE TIP-1! Decrease 17-19-23 times in total = 74-102-126 stitches remain. Work 3 ridges back and forth over all stitches. Cast off - make sure that the cast-off edge is not too tight. Back piece measures approx. 12-14-16 cm from where piece was divided for front piece and back piece. FRONT PIECE: = 104-136-168 stitches. Divide the piece mid front and slip half the stitches on 1 stitch holder or extra needle. Then work first part as explained below. PART-1: = 52-68-84 stitches. Begin from wrong side and work 1 row in pattern as before with 5 edge stitches in garter stitch in each side. Insert 1 marker between the 2 middle stitches on row (= in the middle of the middle cable). Marker indicates the middle. Continue to work pattern as before with 5 edge stitches in garter stitch in each side while at the same time decreasing on each side of the middle on every other row (i.e. every row from the right side) - read DECREASE TIP-2. Decrease 1 stitch on each side of the middle cable 20-18-18 times in total, then decrease 2 stitches on each side of the middle cable 0-4-8 times in total = 12-16-16 stitches remain on needle for strap, and front piece measures approx. 12-14-16 cm from where piece was divided into front piece and back piece. Work strap as explained below. STRAP: = 12-16-16 stitches. Work A.3 (= 12-16-16 stitches) - see diagram for your size. Work first row from wrong side: Work pattern back and forth until the strap measures approx. 9-13-13 cm – try the top on and work to desired length, strap should continue over the shoulder and down to back piece. Cast off. PART-2: Slip the 52-68-84 stitches from stitch holder or extra needle back on circular needle size 3 mm, and work part-2 the same way as part-1. Then work strap the same way as on part-1. Cast off. ASSEMBLY: Fasten straps to back piece - begin at the edge in each side and fasten with 1 grafting/kitchener stitch in every stitch. Fasten off. |
|||||||||||||||||||
Diagram explanations |
|||||||||||||||||||
|
|||||||||||||||||||
 |
|||||||||||||||||||
 |
|||||||||||||||||||
 |
|||||||||||||||||||
Have you finished this pattern?Tag your pictures with #dropspattern #bluecovetop or submit them to the #dropsfan gallery. Do you need help with this pattern?You'll find 23 tutorial videos, a Comments/Questions area and more by visiting the pattern on garnstudio.com. © 1982-2026 DROPS Design A/S. We reserve all rights. This document, including all its sub-sections, has copyrights. Read more about what you can do with our patterns at the bottom of each pattern on our site. |
|||||||||||||||||||


With over 40 years in knitting and crochet design, DROPS Design offers one of the most extensive collections of free patterns on the internet - translated to 17 languages. As of today we count 324 catalogues and 12290 patterns translated into English (UK/cm). 12290
We work hard to bring you the best knitting and crochet have to offer, inspiration and advice as well as great quality yarns at incredible prices! Would you like to use our patterns for other than personal use? You can read what you are allowed to do in the Copyright text at the bottom of all our patterns. Happy crafting!
Post a comment to pattern DROPS 221-13
We would love to hear what you have to say about this pattern!
If you want to leave a question, please make sure you select the correct category in the form below, to speed up the answering process. Required fields are marked *.