
Popular categories
Looking for a yarn?


Comments / Questions (154)
Katrien wrote:
It was the first time I tried to follow instructions in english (I' m from Greece) and it was very easy! I just had to change the number of loops to feet in my x-small size and now I have the most beautiful summer bolero! Thank you!
17.04.2013 - 08:08
![]() Maureen Smith wrote:
Maureen Smith wrote:
Can you please explain how to increase 1 large loop per row after row 3. Thanks
16.04.2013 - 18:23DROPS Design answered:
Dear Mrs Smith, just repeat row 3 to inc 1 large loop. Happy crocheting!
16.04.2013 - 19:21Lise Martin wrote:
Bonjour, j'aimerais savoir au moment des augmentations, à la fin de chaque rangs, on dit 1 m serré, 3m en l'air, 1 m serré dans la 3e m de l'arceau mais l'autre, la 8e, on la calcule du début de l'arceau ou 5 après le jeu de m serré 3 m en l'air et m serré. merci de me répondre
11.04.2013 - 18:39DROPS Design answered:
Bonjour Madame Martin, on fait la dernière ms dans la 8ème ml = 5 ml après la 3ème où on a fait le petit arceau. Bon crochet !
12.04.2013 - 09:14
![]() Saydee Robles wrote:
Saydee Robles wrote:
Repeat row 3, i.e. inc 1 loop on every row, until there are 35-39-43-47-51-55 large ch-loops on row, finish the last row as follows: 1 sc + 3 ch + 1 sc in 4th ch in last ch-loop, turn piece. The inc are now complete. I'm confused at this part i'm about to add the 39th loop but do I continue as I have been or doing or do I add this on after the 39th loop
07.04.2013 - 03:05DROPS Design answered:
Dear Mrs Robles, you repeat the row 3 as before until you get the 39 large ch-loops (size M), but finish the last row with 1 sc+3ch+1 sc in 4th ch in last loop. happy crocheting!
08.04.2013 - 09:25
![]() Truus Schaefer wrote:
Truus Schaefer wrote:
Acherpand :moet ik de 3 grote lussen van ieder armsgat meteen meehaken samen met de 19 grote lussen of moeten die 3 grote lussen van ieder armsgat helemaal niet meegehaakt worden? graag uw reactie,krijg anders het einde niet klaar.
08.02.2013 - 16:26DROPS Design answered:
Je haakt niet over die 3 lussen, je haakt alleen over de middelste 19-19-19-21-21-23 lussen
12.02.2013 - 12:30
![]() Anita Quoibia wrote:
Anita Quoibia wrote:
On pattern 111-25 it says repeat row 3, i.e inc 1 loop every row. There are no instructions as to how to increase.
26.01.2013 - 01:54DROPS Design answered:
Dear Mrs Quoiba, row 3 includes the inc, so that you can just repeat row 3, you will inc 1 loop every row. Happy crocheting !
26.01.2013 - 10:20
![]() Karen Beglin wrote:
Karen Beglin wrote:
I recently completed this pattern in red with black flowers. It is stunning and I love it!
18.12.2012 - 09:40Fanny Gonzalez wrote:
Cuando dice en la octaba cadena, es a partir de la aguja? gracias
12.10.2012 - 22:08DROPS Design answered:
Hola Fanny, es correcto, es a partir de la aguja.
04.12.2012 - 09:21Rosa wrote:
Muy bueno el modelo.Pero coloca, si podés, el patron del punto junto con la explicacion del modelo.Muchas Gracias
09.09.2012 - 19:02
![]() Ellu wrote:
Ellu wrote:
Voisiko ohjeessa olla virhe? Kierroksen lopussa tehdään ks 3:een silmukkaan lisäyslenkkissä. Silmukan keskikohta olisi kuitenkin 4. silmukka. Aloin tekemään toiseksi viimeisen silmukan 4:een ja näyttää mielestäni paljon paremmalta näin. Viimeinen silmukka normaalisti 8:een. Harmittaa, että en tehnyt niin alusta alkaen, mutta en viitsi purkaakaan enää.
01.08.2012 - 07:20DROPS Design answered:
Ohjeeseen ei ole tehty korjauksia. Jos vaate näyttä mielestäsi paremmalta kun teet ks:n 3. s:aan, voit tehdä näin.
11.12.2012 - 14:20
|
|
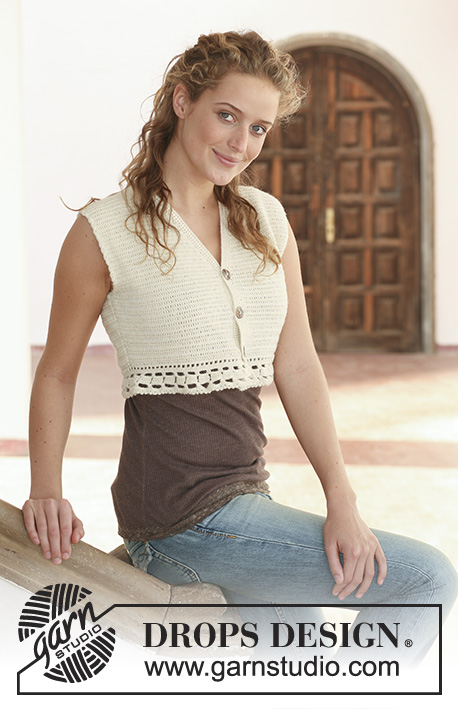
Golden Roses#goldenrosesbolero |
|
 |
 |
Crochet DROPS bolero in ”Cotton Viscose” with flower border round the opening. Size S - XXXL
DROPS 111-25 |
|
|
BOLERO: Work 105-115-125-135-145-155 ch with crochet hook size 3 mm / C and Cotton Viscose. ROW 1: 1 sc in 15th ch from hook, and continue as follows: *7 ch, skip 4 ch, 1 sc in next ch *, repeat from *-* = 19-21-23-25-27-29 ch-loops on row, turn piece. ROW 2: 14 ch, 1 sc in the middle of the 7 ch in first ch-loop from previous row, 3 ch, 1 sc in the same ch, * 7 ch, 1 sc in the middle ch in next ch-loop, 3 ch, 1 sc in the same ch *, repeat from *-*, and finish with: 7 ch, 1 sc in 3rd ch in the last ch-loop, 3 ch, 1 sc in the same ch, 7 ch and 1 sc in 8th ch in the last ch-loop, turn piece. ROW 3: 14 ch, 1 sc in the middle ch in first large loop from previous row, 3 ch, 1 sc in the same ch, * 7 ch, 1 sc in the middle ch in next large ch-loop (skip the small ch-loop), 3 ch, 1 sc in the same ch *, repeat from *-*, and finish with: 7 ch, 1 sc in 3rd ch in last large ch-loop, 3 ch, 1 sc in the same ch, 7 ch and 1 sc in 8th ch in last large ch-loop, turn piece. Repeat row 3, i.e. inc 1 loop on every row, until there are 35-39-43-47-51-55 large ch-loops on row, finish the last row as follows: 1 sc + 3 ch + 1 sc in 4th ch in last ch-loop, turn piece. The inc are now complete. Continue as follows: Beg each row with 7 ch instead of 14, then 1 sc + 3 ch + 1 sc in the middle st in the first large ch-loop from previous row, continue across the row as before and finish with 1 sc + 3 ch + 1 sc in 4th ch in last ch-loop, turn piece. AT THE SAME TIME when piece measures 20-21-23-25-27-29 cm / 8"-8¼"-9"-9¾"-10⅝"-11⅜" divide for armholes – see below! RIGHT FRONT PIECE: Crochet on the first 7-7-7-8-8-9 large ch-loops, turn piece after 1 sc + 3 ch + 1 sc in the last of these 7-7-7-8-8-9 ch-loops, turn with 7 ch and work return row. Continue on remaining ch-loops as before until piece measures 16-17-18-19-20-21 cm / 6¼"-6¾"-7"-7½"-8"-8¼" from where piece was divided, cut the thread but leave approx 200 cm / 79" to crochet tog the shoulders afterwards. LEFT FRONT PIECE: Crochet on the first 7-7-7-8-8-9 large ch-loops the other side and continue as described for right front piece. BACK PIECE: Crochet on the middle 19-19-19-21-21-23 large ch-loops, each armhole = 1-3-5-5-7-7 large loops. Continue until piece measures 16-17-18-19-20-21 cm / 6¼"-6¾"-7"-7½"-8"-8¼" from where piece was divided – make sure to have the same number of ch-loops on back piece as on front piece. ASSEMBLY: Crochet shoulders tog as follows: Work sl sts to the middle of the first large ch-loop on front piece, 4 ch, 1 sc in the middle of the first large ch-loop on back piece, 4 ch, 1 sc in the next large loop on front piece, 4 ch, 1 sc in the next large loop on back piece, etc. Crochet a row of sc with Cotton Viscose round the opening of the bolero as follows: approx 4 sc in each of the large ch-loops and 1 sc in each of the small ch-loops, and work 6 sc in the increases on front pieces – make sure the row is elastic. Crochet in the same way round armholes. FLOWER: 4 ch with crochet hook size 3 mm / C and 1 thread Cotton Viscose + 2 threads Glitter and form a ring with 1 sl st in first ch. ROUND 1: 6 sc in ring, finish with 1 sl st in first sc. ROUND 2: 4 ch, * 1 sc in next sc, 3 ch *, repeat from *-* a total of 5 times, finish with 1 sl st in 2nd ch from beg of round (= 6 ch-loops). ROUND 3: Crochet as follows in each ch-loop: 1 sc, 3 dc, 1 sc, finish with 1 sl st in first sc (= 6 leaves). ROUND 4: Fold leaves towards you and crochet in the back of these as follows: 1 sc round first sc from round 2, 5 ch, * 1 sc round next sc from round 2, 5 ch *, repeat from *-*, and finish with 1 sl st in first sc from beg of round (= 6 ch-loops). ROUND 5: Crochet as follows in each ch-loop: 1 sc, 5 dc, 1 sc, finish with 1 sl st in first sc (= 6 leaves), cut the thread and leave approx 20 cm / 8" – used to sew tog flowers afterwards. Make approx 29-31-35-37-39-41 flowers, and sew them tog, leaf to leaf, to a long row. Now sew the row to bolero, beg mid back. Place the centre of flower on the row of dc and sew the centre of flower to the dc row, repeat for the other flowers down along one front piece, and along bottom edge to mid back. Beg mid back at neckline again and continue to mid back at bottom edge. If you need more/less flowers, adjust this before sewing tog the flowers mid back at bottom edge. |
|
 |
|
Have you finished this pattern?Tag your pictures with #dropspattern #goldenrosesbolero or submit them to the #dropsfan gallery. Do you need help with this pattern?You'll find 7 tutorial videos, a Comments/Questions area and more by visiting the pattern on garnstudio.com. © 1982-2026 DROPS Design A/S. We reserve all rights. This document, including all its sub-sections, has copyrights. Read more about what you can do with our patterns at the bottom of each pattern on our site. |
|


With over 40 years in knitting and crochet design, DROPS Design offers one of the most extensive collections of free patterns on the internet - translated to 17 languages. As of today we count 324 catalogs and 12290 patterns - 12280 of which are translated into English (US/in).
We work hard to bring you the best knitting and crochet have to offer, inspiration and advice as well as great quality yarns at incredible prices! Would you like to use our patterns for other than personal use? You can read what you are allowed to do in the Copyright text at the bottom of all our patterns. Happy crafting!
Post a comment to pattern DROPS 111-25
We would love to hear what you have to say about this pattern!
If you want to leave a question, please make sure you select the correct category in the form below, to speed up the answering process. Required fields are marked *.