
Popular categories
Looking for a yarn?


Comments / Questions (46)
![]() HERIN wrote:
HERIN wrote:
Bonjour, Doit-on faire tous les tours de la casquette dans le brin arrière des mailles ? J'ai fais la casquette mais elle ne donne pas l'effet tombant à l'arrière. La casquette s'arrête juste au dessus des oreilles. Merci en avance de votre réponse.
05.12.2015 - 19:31DROPS Design answered:
Bonjour Mme Herin, vous pouvez au choix crocheter dans le brin arrière des mailles à chaque tour ou dans les 2 brins - mais veillez à bien vérifier votre tension pour obtenir l'effet voulu. Bon crochet!
07.12.2015 - 10:10
![]() Andrea wrote:
Andrea wrote:
Ich wollte mal nachfragen ob man bei der Mütze bei jeder Reihe ins hintere Maschenglied einstechen soll, oder nur die zweite Reihe so häkelt?
25.10.2015 - 20:16DROPS Design answered:
Das gilt für alle weiteren Rd, damit das Strukurmuster entsteht. Viel Spaß beim Häkeln!
27.10.2015 - 22:14
![]() Anja wrote:
Anja wrote:
So, habe die Mütze mit ganzen Stäbchen gehäkelt und nun sitzt sie auch richtig bauschig am Kopf. Würde also empfehlen, die Mütze anstatt mit halben, mit ganzen Stäbchen zu häkeln. Der Schirm aber wieder mit halben, sonst wird er zu groß.
15.09.2015 - 11:47
![]() Anja wrote:
Anja wrote:
Muß mich leider der Petra anschließen. Trotz genauer Maschenprobe und Eskimo Wolle ist auch meine Mütze viel zu klein geworden. Nachdem ich nun alles wieder aufgerippelt habe, werde ich die Mütze anstatt mit halben, nun mit ganzen Stäbchen häkeln. Vielleicht ist das des Rätsels Lösung. Werde berichten, wie es mit der Mütze weiter geht.
07.09.2015 - 20:05
![]() DEBORAH COHEN wrote:
DEBORAH COHEN wrote:
Bonjour, je ne sais pas si ma question a bien été envoyée... Donc je la renvoie et excusez moi si il y a un doublon... D'abord félicitations pour vos magnifiques modèles Grand Bravo aux stylistes! J'ai un problème avec la casquette numéro 151-34; Dès le début du travail, le tricot prend la forme d'un cône au lieu d'être bien plat...! J'ai pourtant commandé exactement la même laine; Merci pour votre aide Bien cordialement Déborah
15.01.2015 - 06:24DROPS Design answered:
Bonjour Mme Cohen et merci - le départ de la casquette devrait être effectivement plat, sur un rond de départ de 8 dB (demi-brides), on va augmenter 8 dB tous les tours - essayez éventuellement de moins "tirer" vos dB en hauteur. Bon crochet!
15.01.2015 - 09:30
![]() Jinksy wrote:
Jinksy wrote:
I'm disappointed - after following the pattern to the letter, using Drops Eskimo 'Grizzly', the resultant hat bears little resemblance to the photograph-pardon the pun! The finished hat seems more rigid than the floppy one in the image, and I suspect the pattern was not written by the person who crocheted the original in your photograph!
08.01.2015 - 11:25DROPS Design answered:
Dear Mrs Jinsky, have you checked your tension ? you should get 9 htr = 10 cm in width to get same result as in the picture. Remember you can get individual assistance from your DROPS store if you need to. Happy crocheting!
08.01.2015 - 13:45
![]() Sirius Boessenkool wrote:
Sirius Boessenkool wrote:
As with others, way smaller than on the picture. I increased the size of the crochet needle to make gauge, but even so it barely fits. Decided to take off the flap again, and wear it as a close fitting cap, as the yarn doesn't come apart again very easily. Quite nice when cycling though, no WAY this is ever going to blow off my head.
25.11.2014 - 19:39
![]() Djodie wrote:
Djodie wrote:
Ik heb precies het patroon gevolgd, maar is een heel klein mutsje geworden. Niks hangend aan achterkant, past op kinderhoofdje, maar ook dan hangt ie niet, Heb juiste garen gebruikt en haaknaald
06.11.2014 - 23:29DROPS Design answered:
Hoi Djodie. Klopt de stekenverhouding? Heb je 9 stk per 10 cm?
07.11.2014 - 10:04
![]() Connie wrote:
Connie wrote:
Ik volg precies het patroon wel met een andere wol maar het word zo klein dat het de muts op een poppenhoofdje past.
21.10.2014 - 19:52DROPS Design answered:
Wij raden u aan het aanbevolen garen te gebruiken en een proeflapje te maken voor de juiste stekenverhouding, zodat u muts wel past.
23.10.2014 - 12:17
![]() BOSSARD wrote:
BOSSARD wrote:
MERCI A VOUS.PARCONTRE J AIMERAI SAVOIR S IL EST FAIT EN DOUBLE BRIDE OU EN DRIDE DB MERCI
22.01.2014 - 12:37DROPS Design answered:
Bonjour Mme Bossard, la casquette est réalisée en demi-brides (dB). Vous retrouverez ici toutes les abréviations utilisées. Bon crochet !
22.01.2014 - 14:30
|
|
Boheme#bohemeset |
|
|
|
|
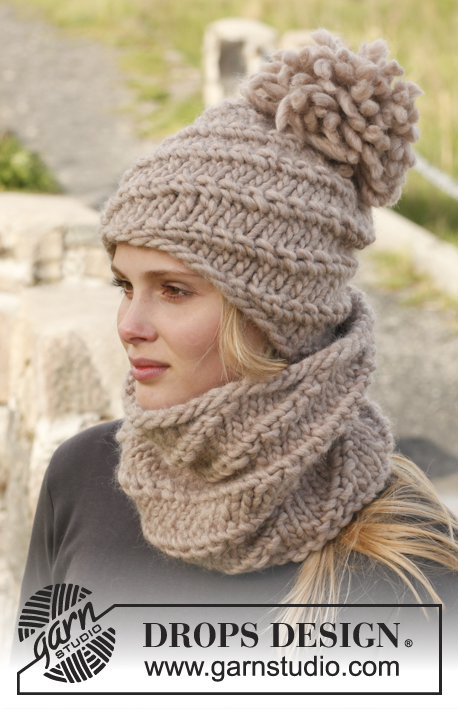
Crochet DROPS neck warmer and cap in ”Snow”.
DROPS 151-34 |
|
|
CROCHET 2 STS TOG: Work first st - but wait with last pull through - work next st and on last pull through, pull yarn though all sts on hook. CROCHET INFO: Replace first hdc on every round with 2 ch. Finish every round with 1 sl st in 2nd ch from beg of round. ---------------------------------------------------------- NECK WARMER: Ch 56 loosely on hook size 8 mm / L/11 with Snow and form a ring with 1 sl st in 1st ch. ROUND 1: ch 3 (= 1st dc), work 1 dc in every ch = 56 dc, finish with 1 sl st in 3rd ch. Continue the rounds like this until 5 rounds have been worked. On 6th round, dec 4 sts evenly on round by working every 13th and 14th st tog - see explanation above = 52 dc. Continue with 1 dc in every dc until piece measures 26 cm / 10¼". Fasten off. ---------------------------------------------------------- CAP: Ch 4 on hook size 8 mm / L/11 with Snow and form a ring with 1 sl st in 1st ch. ROUND 1: Work 8 hdc in ch-ring. Read CROCHET INFO! ROUND 2: Work 2 hdc in every st - but insert hook only through back loop of st - to get texture = 16 hdc. ROUND 3: * 1 hdc in first st, 2 hdc in next st *, repeat from *-* the entire round = 24 hdc. ROUND 4: * 1 hdc in each of the first 2 sts, 2 hdc in next st *, repeat from *-* = 32 hdc. ROUND 5: * 1 hdc in each of the first 3 sts, 2 hdc in next st *, repeat from *-* = 40 hdc. ROUND 6: * 1 hdc in each of the first 4 sts, 2 hdc in next st *, repeat from *-* = 48 hdc. ROUND 7: * 1 hdc in each of the first 5 sts, 2 hdc in next st *, repeat from *-* = 56 hdc. ROUND 8: * 1 hdc in each of the first 6 sts, 2 hdc in next st *, repeat from *-* = 64 hdc. ROUND 9-10: 1 hdc in every st = 64 hdc. ROUND 11: * Work 6 hdc, then work the 7th and 8th hdc tog - see explanation above *, repeat from *-* = 56 hdc. ROUND 12: * Work 5 hdc, then work the 6th and 7th hdc tog *, repeat from *-* = 48 hdc. ROUND 13: * Work 4 hdc, then work the 5th and 6th hdc tog *, repeat from *-* = 40 hdc. ROUND 14-15: 1 sc in every st = 40 sc. Fasten off (this is mid back on cap). BRIM: Work brim with double yarn over the middle 18 sts at the front as follows: ROW 1: Work 1 hdc in every st = 18 hdc. ROW 2-4: Turn piece, work 2 ch, work the next 2 sts tog, work the rest of row but work the last 2 sts tog = 12 hdc after 4th row. ROW 5: Work 1 round with sc around the opening on cap and brim (work 1 sc in every st, now work through both loops of st). STRIPES FOR DECORATION: Insert 1 marker in each side of cap in the 14th round (at the bottom of cap). Work 1 sl st in a st by one marker, make st approx. 1-1.5 cm / ⅜"-½" long, work 1 sl st in 13th round, make st approx. 1-1.5 cm / ⅜"-½" long, work 1 sl st in 12th round - continue like this over the top of cap and down to the other marker. Work 2 more stripes like this over the cap. Fasten off. |
|
Have you finished this pattern?Tag your pictures with #dropspattern #bohemeset or submit them to the #dropsfan gallery. Do you need help with this pattern?You'll find 8 tutorial videos, a Comments/Questions area and more by visiting the pattern on garnstudio.com. © 1982-2026 DROPS Design A/S. We reserve all rights. This document, including all its sub-sections, has copyrights. Read more about what you can do with our patterns at the bottom of each pattern on our site. |


With over 40 years in knitting and crochet design, DROPS Design offers one of the most extensive collections of free patterns on the internet - translated to 17 languages. As of today we count 324 catalogs and 12278 patterns - 12268 of which are translated into English (US/in).
We work hard to bring you the best knitting and crochet have to offer, inspiration and advice as well as great quality yarns at incredible prices! Would you like to use our patterns for other than personal use? You can read what you are allowed to do in the Copyright text at the bottom of all our patterns. Happy crafting!
Post a comment to pattern DROPS 151-34
We would love to hear what you have to say about this pattern!
If you want to leave a question, please make sure you select the correct category in the form below, to speed up the answering process. Required fields are marked *.