
Popular categories
Looking for a yarn?


Comments / Questions (9)
![]() Michaela wrote:
Michaela wrote:
Nachdem ich nochmals genau geschaut habe, der Fehler liegt daran, dass bei der Anzahl der D-Stb. in der ersten Reihe die größte Größe fehlt. Das sollten dann wohl 23-26-29-32-!35! D-Stb. sein, dann passt auch 37 Maschen nach der Seitenzunahme. Zum Glück habe ich erst eine Reihe vom Vorderteil gehäkelt ...
27.01.2023 - 16:49DROPS Design answered:
Oh ja stimmt, genau, danke für den Hinweis, die deutsche Anleitung wird angepasst. Viel Spaß beim häkeln!
30.01.2023 - 08:21
![]() Michaela wrote:
Michaela wrote:
Ich glaube, die Maschenanzahl nach der Zunahme an den Seiten der Vorderteile stimmt nicht? Bei der größten Größe steht dann 37 Maschen, das sollten doch nur 34 sein? Sonst müsste man bei den Vorderteilen ja 5 Mal zunehmen statt 2 Mal wie am Rückenteil und das geht sich bei rund 62 cm Länge ja gar nicht aus.
27.01.2023 - 16:42DROPS Design answered:
Liebe Michaela, beim Vorderteil sind es 35 Maschen, dann 2 Mal 1 Zunahme an der Seite sind 37 Maschen, dann nehmen Sie 1 M 9 Mal = 46 Maschen aber gleichzeitig nehmen Sie für das Armloch: 3 Maschen x 2 Mal, 2 maschen x 1 Mal und 1 Masche 2 Mal = 46-6-2-2=36 Maschen übrig. Oder Misverstehe ich Ihre Frage?
30.01.2023 - 08:19
![]() Cecilia Freyre wrote:
Cecilia Freyre wrote:
He tenido problemas en la realización de esta chaqueta: he necesitado más lana de la que indicáis para la talla L con la fatalidad de no encontrar la misma tintada; tengo la sensación de que ha salido muy pequeña; no he forrado los botones porque para este tipo de lana y con este número de ganchillo hubiesen quedado desproporcionados; el hueco del cuerpo para las mangas no se correspondía con el de estas y por ello he necesitado dejar vueltas de las mangas sin coser para adecuarlas al hueco
02.09.2015 - 15:32
![]() Edith Hoekstra wrote:
Edith Hoekstra wrote:
Kan het zijn dat er een fout zit in het patroon? Als voor SMALL 3 x 3 dst (armsgaten) moet zijn: 0 x 3 dst, dan kloppen de 42 steken na de minderingen wel!
23.08.2015 - 14:58DROPS Design answered:
Hoi Edith. Ja, er was een fout - het is nu aangepast :-)
26.08.2015 - 14:40
![]() Edith Hoekstra wrote:
Edith Hoekstra wrote:
Ik heb net de beschrijving gelezen van de meerderingen en minderingen bij het rugpand. Voor mijn maat SMALL kom je uit op 46 steken na het meerderen, en 42 steken na het minderen voor de armsgaten... Dit begrijp ik niet. Ik tel 2 x (3x3) + 2 x (1 x 2) voor de armsgaten en kom dan uit op 46 minus 22 = 24 steken. Wil je me a.j.b. vertellen welke denkfout ik maak?
23.08.2015 - 13:52DROPS Design answered:
Hoi Edith. Je maakt geen denkfout, er was een fout in de Nederlandse vertaling. Het afkanten voor de armsgaten moet zijn: 0-1-1-1-2 keer 3 dstk, 1-0-1-1-1 keer 2 dstk en 0-1-1-2-2 keer 1 dstk. Het patroon is nu ook aangepast.
26.08.2015 - 14:39
![]() Lena wrote:
Lena wrote:
Hej! Har snart virkat klart denna kofta. Har just gjort kragen och konstaterade att med ökningen, främst den på varvbytena bidrog till mer spetsiga kragsnibbar än vad det är på bilden. Får riva upp, för gillar de raka bättre. Men är det så att bildens kofta inte riktigt stämmer överens med mönstret? Stämmer inte med antal hålmönstervarv heller...?
02.03.2015 - 23:05DROPS Design answered:
Hej Lena, Jo beskrivningen stämmer med bilden, men det kan vara en annan storlek på bilden.
25.05.2015 - 14:33
![]() Lena Carlsvärd wrote:
Lena Carlsvärd wrote:
Hej! Undrar varför inte 650 gram garn (som är angivet) räcker till denna kofta i stlk L? Jag virkar varken löst eller hårt, och känner att jag kommer att behöva nästan 100 g till..
06.02.2015 - 22:06DROPS Design answered:
Hej Lena, det bör räcka, men virkar du bara lite hårdare än vad vi beräknar beskrivningen efter, så vill du behöva flera varv pr 10 cm och da räcker inte garnet. Lycka till!
09.02.2015 - 10:40
![]() Marlene wrote:
Marlene wrote:
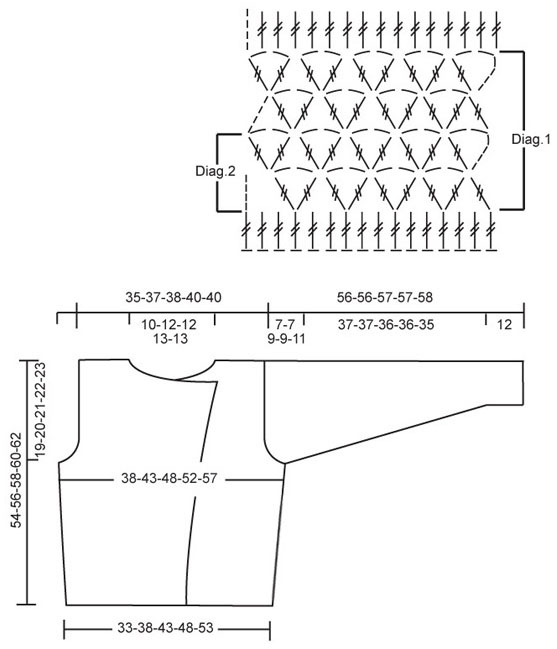
In your drops 90-21, drops crocheted cardigan can you please explain what to do for the lace pattern, your diagram is very hard to follow.
22.01.2015 - 21:55DROPS Design answered:
Dear Marlene, in the diagram each symbol represents 1 st, on 1st row in Diag.2 start with 4 ch, *skip next 2 tr, 1 tr+2ch+1 tr i next tr, skip 2 tr*, repeat accross and finish with skipping 2 tr, 1 tr in last tr. On row 2, ch6 (=first 4 ch= 1st tr), then ch 2, 1 tr in next tr, *1 tr in next tr, ch2, 1 tr in next tr*, repeat accross. Happy crocheting!
23.01.2015 - 13:35
![]() Kat wrote:
Kat wrote:
I am having so many problems with this, I need to know how to exactly bind of the arm(I can't figure it out) also the diagram I need to know exactly how to do that to and some of the measurements are very confusing.
13.09.2012 - 04:03DROPS Design answered:
Dear Kat, to create the armholes, you should decrease as indicated in "Decreasing tips" each side for back piece = at the beg and at the end of each row : 3 tr 0-1-1-1-2 times means 0 for first size = no 3 tr dec in size S, 3 tr 1 time in sizes M, L and XL, and 3 tr 2 times for size XXL. To follow diagram, please read explanation to symbol to know which kind of st you have to crochet and where it has to be done. Measurements are done, jacket lying flat. Happy crocheting!
12.11.2012 - 13:53
|
|||||||
DROPS 90-21 |
|||||||
|
|
|||||||
DROPS Crocheted cardigan in Paris
DROPS 90-21 |
|||||||
|
Crochet gauge: 12 tr in width and approx. 4.5 rows in height = 10 x 10 cm. Crochet tip (for tr): The first tr of every row is replaced by ch 4 and every row ends with 1 tr in the ch 4 from previous row. Pattern: See the Diagram. Decreasing tips: Dec or bind off as follows: At the beginning of rows: replace 1 tr with 1 sl st. At the end of rows: turn piece when the number of sts to be decreased remain on the row, turn and crochet back. Back: Ch 55-63-71-79-87. Crochet the first row as follows: 1 tr in 5th ch from hook, 1 tr in the next ch, * skip over 1 ch, 1 tr in each of the next 3 ch *, repeat * - * and finish with 1 tr in the last ch = 40-46-52-58-64 tr, turn the work. Continue, crocheting 1 tr in each tr from previous row – read Crochet tip. Read the entire section before continuing: Side incs: When the piece measures 10-10-10-12-12 cm inc at each side by crocheting 1 extra tr in the next to outermost tr at each side every 10-10-10-12-12 cm a total of 3-3-3-2-2 times = 46-52-58-62-68 tr – the increased tr are not crocheted in the lace pattern. Lace pattern: When the piece measures 11-13-13-15-15 cm crochet Diagr.1 one time (make the pattern start and end inside of the increased tr at each side), then continue with tr as before (see diagram). When the piece measures 35-36-37-38-39 cm bind off for armhole at each side every row – see decreasing tips above: 3 tr 0-1-1-1-2 times, 2 tr 1-0-1-1-1 time and 1 tr 0-1-1-2-2 times = 42-44-46-48-48 tr. When the piece measures 52-54-56-58-60 cm (or one row before desired length), crochet 1 row over only 15-15-16-16-16 tr at each side (do not crochet over the center 12-14-14-16-16 tr = neckband). Cut yarn and fasten, the piece measures approx. 54-56-58-60-62 cm. Right front: Ch 32-36-40-44-48. Crochet the first row as follows (from center front edge): 1 tr in 5th ch from hook, 1 tr in the next ch, * skip over 1 ch, 1 tr in each of the next 3 ch *, repeat * - * and finish with 1 tr in each of the last 2 ch = 23-26-29-32-35 tr, turn the work. Continue, crocheting 1 tr in each tr from previous row – read Crochet tip. Read the entire section before continuing: Side incs: When the piece measures 10-10-10-12-12 cm inc at the side as on back = 26-29-32-34-37 tr. Lace pattern: When the piece measures 11-13-13-15-15 cm crochet Diagr.1 one time, but work the outermost 4 tr at the center front as before (= buttonband) – remember to start the pattern inside of the increased tr at the side). After Diagr.1 continue with tr over all sts as before. Buttonband: When the piece measures 22-24-25-26-28 cm inc for sloped edge at the center front by crocheting 1 extra tr in the next to outermost tr at the center front. Inc every approx. 4-4-4-3.5-3 cm a total of 7-7-7-8-9 times. (Translator’s note: this does not appear to matrh the photo, but it is correct for the pattern.) Armhole: When the piece measures 35-36-37-38-39 cm bind off for armhole at the side as on back. After all incs and decs are complete 31-32-33-35-36 tr remain on row. When inc for sloped buttonband is complete (the piece measures approx. 46-48-49-51-52 cm) bind off 12-13-13-15-16 tr at the center front for neck. Continue bind off for the neck at the center front every row – see decreasing tips above: 2 tr 1 time and 1 tr 2 times = 15-15-16-16-16 tr remain on shoulder. Continue until piece measures the same as the back, cut yarn and fasten. Left front: Crochet same as right, reversing shaping. Sleeve: Ch 39-39-43-43-47. Crochet the first row as follows: 1 tr in 5th ch from hook, 1 tr in the next ch * skip over 1 ch, 1 tr in each of the next 3 ch*, repeat * - * and finish with 1 tr in last ch = 28-28-31-31-34 tr, turn the work. Continue, crocheting 1 tr in each tr from previous row. Read the entire section before continuing: Lace pattern: When the piece measures 8 cm crochet Diagr.1 once, then continue with tr as before. When the piece measures 32 cm crochet Diagr.2 once, then continue with tr as before to finished measurements. Inc: When the piece measures approx. 12 cm inc at each side by crocheting 1 extra tr in the outermost tr at each side every 7-5.5-5.5-4-4 cm a total of 6-7-7-9-9 times = 40-42-45-49-52 tr – do not crochet the increased tr in the lace pattern. When the piece measures 49-49-48-48-47 cm bind off for sleeve cap at each side by crocheting 3-3-4-4-5 rows with 3 tr less at each side every row – see decreasing tips above. Cut yarn and fasten, the piece measures approx. 56-56-57-57-58 cm. Assembly: Sew shoulder seams edge to edge. Sew in sleeves. Sew sleeve and side seams edge to edge. Collar: Crochet approx. 34-46 tr around the neck – but do not crochet over buttonbands – start at left side (from wrong side), 12-13-13-15-16 tr in from edge, then crochet up along front neckband, along back neck and continue down along neckband on right front but stop when 12-13-13-15-16 tr remain. Continue with 1 tr in each tr. On the 2nd row inc at each side by crocheting 1 extra tr in the next to outermost tr at each side. Repeat inc at each side every row. At the same time on 2nd row inc 4 extra tr evenly distributed from shoulder to shoulder on back neck, repeat inc every row. When the collar measures approx. 9-10 cm cut yarn and fasten. Buttonhole loops: Make 3 buttonhole loops along right front – make the 1st loop at the top of the buttonband and the bottom loop at the last row of Diagr.1, the center one in between. 1 buttonhole loop = 1 sc in outermost tr, ch 10, 1 sc in same tr, cut yarn and fasten. Crocheted button: Ch 2, then 6 sc in the first ch, finish with 1 sl st in first sc (= 1st row). 2nd row: 2 sc in each sc from previous row, finish with 1 sl st in first sc at the beginning of row (= 12 sc). 3rd + 4th rows: 1 sc in each sc from previous row, finish with 1 sl st in first sc at the beginning of row (= 12 sc). 5th row: 1 sc in every other sc, finish with 1 sl st in first sc at the beginning of row (= 6 sc). Insert a button, tack around opening and pull tight. Sew buttons onto left front – place so that the right front does not droop. Sew a button or hook onto right front to keep the left side even. |
|||||||
Diagram explanations |
|||||||
|
|||||||
 |
|||||||
Have you finished this pattern?Tag your pictures with #dropspattern or submit them to the #dropsfan gallery. Do you need help with this pattern?You'll find 7 tutorial videos, a Comments/Questions area and more by visiting the pattern on garnstudio.com. © 1982-2026 DROPS Design A/S. We reserve all rights. This document, including all its sub-sections, has copyrights. Read more about what you can do with our patterns at the bottom of each pattern on our site. |
|||||||


With over 40 years in knitting and crochet design, DROPS Design offers one of the most extensive collections of free patterns on the internet - translated to 17 languages. As of today we count 324 catalogs and 12290 patterns - 12280 of which are translated into English (US/in).
We work hard to bring you the best knitting and crochet have to offer, inspiration and advice as well as great quality yarns at incredible prices! Would you like to use our patterns for other than personal use? You can read what you are allowed to do in the Copyright text at the bottom of all our patterns. Happy crafting!
Post a comment to pattern DROPS 90-21
We would love to hear what you have to say about this pattern!
If you want to leave a question, please make sure you select the correct category in the form below, to speed up the answering process. Required fields are marked *.