
Popular categories
Looking for a yarn?


Comments / Questions (36)
![]() JAULIN Nadia wrote:
JAULIN Nadia wrote:
Bonsoir, Encore moi, pouvez-vous m'expliquer comment je dois faire correspondre le diagramme M1 et la figure 2.Ensuite si je regarde la légende diagramme le motif M1 correspond à 2B, 3ml (voir légende symbole) je ne sais même pas ou cette légende ce trouve, 2B. La figure 2 le symbole correspond à 3B écoulées ensemble. Merci par avance pour votre aide. Cordialement.
18.11.2021 - 14:40DROPS Design answered:
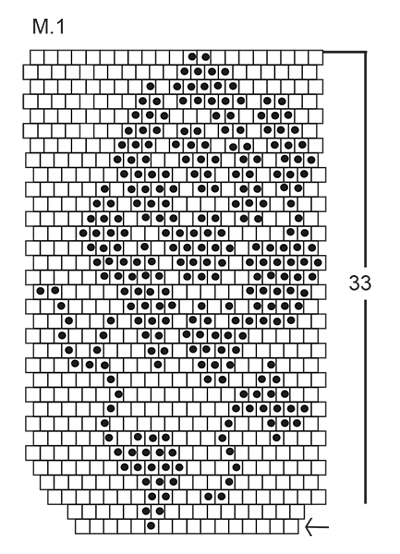
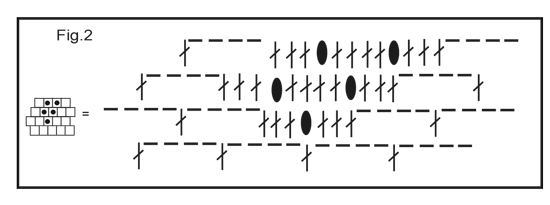
Bonjour Mme Jaulin, la fig. 2 montre juste comment tricoter les points noirs du diagrammes (= 1 point noir = 3 brides dans l'arceau, 3 brides écoulées ensemble dans la bride, 3 brides dans l'arceau suivant - donc au 1er rang de M.1 crochetez ainsi après 10 arceaux, au 2ème rang après 5 arceaux (sur l'envers on lit de gauche à droite) etc.. Bon crochet!
18.11.2021 - 17:25
![]() JAULIN Nadia wrote:
JAULIN Nadia wrote:
Bonsoir, Encore moi, pouvez-vous m'expliquer comment je dois faire correspondre le diagramme M1 et la figure 2.Ensuite si je regarde la légende diagramme le motif M1 correspond à 2B, 3ml (voir légende symbole) je ne sais même pas ou cette légende ce trouve, 2B. La figure 2 le symbole correspond à 3B écoulées ensemble. Merci par avance pour votre aide. Cordialement.
16.11.2021 - 17:47DROPS Design answered:
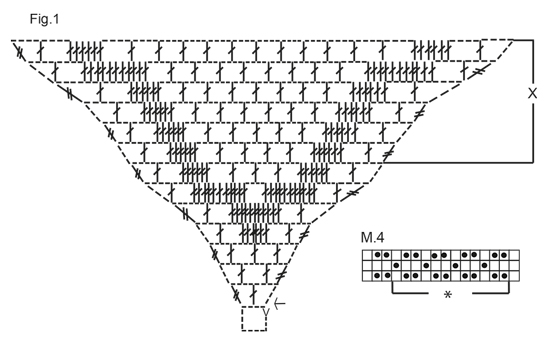
Bonjour Mme Jaulin, dans les diagrammes vous retrouvez 1 point noir, ce point noir se crochète comme indiqué dans la fig.2 = 3 brides autour de l'arceau, 3 brides écoulées ensemble dans la bride du rang précédent, 3 brides dans l'arceau suivant. Lorsque Fig.1 est terminé, continuez à augmenter de chaque côté comme dans X, le rang avec 16 carrés entiers entre les augmentations de X, crochetez M.1: le 1er carré de M.1 se fait juste après les augmentations de X. (après les 5 double-brides). Bon crochet!
17.11.2021 - 08:05
![]() JAULIN Nadia wrote:
JAULIN Nadia wrote:
Merci infiniment de votre aide.
16.11.2021 - 15:55
![]() JAULIN Nadia wrote:
JAULIN Nadia wrote:
Bonsoir, Pouvez vous m'expliquer le démarrage de la figure N° 1. J'ai fait mes 14 ml, fermer par une mc ensuite 3ml, 1B autour de l'arceau une double bride dans la 4ème maille (je pense) et ensuite je ne sais pas quoi faire, dans quel sens je dois lire la figure N° 1. Merci de votre aide.
15.11.2021 - 19:08DROPS Design answered:
Bonjour Mme Jaulin, pour les 14 ml et 1 mc, c'est juste, mais au 1er rang (à la flèche), crochetez: 7 mailles en l'air + 1 bride dans le rond de mailles en l'air, 4 mailles en l'air, 1 double-bride dans l'arceau. Tournez, crochetez: 7 mailles en l'air, 1 bride dans le 1er arceau, 4 mailles en l'air, 1 bride dans le 2ème arceau, 4 mailles en l'air, 1 double-bride dans la 4ème maille en l'air du début du rang précédent, etc.. Bon crochet!
16.11.2021 - 08:43
![]() Elba Viviana Vergara Wetzell wrote:
Elba Viviana Vergara Wetzell wrote:
Me encanta seguir su pagina pero me gustaria me ayuden a encontrar otro modelo de chal con diseño con su respectivo patron paso a paso.gracias.
04.11.2020 - 06:07DROPS Design answered:
Hola Elba, puedes ver todos los modelos de chales a ganchillo filtrando en la búsqueda en la página principal; a continuación tienes el enlace a la lista: https://www.garnstudio.com/search.php?action=search&w=chal&c=0&mt=2&t=0&k=0&yg=0&y=0&col=0&df=0&lang=es
19.11.2020 - 11:44
![]() Charlotte Worm wrote:
Charlotte Worm wrote:
Jeg kan ikke få OMG 2 i fig m1 til at passe har 2n mellemrum for meget
02.08.2019 - 12:56DROPS Design answered:
Hej Charlotte, det er svært at sige hvor det går galt. Men hvis du sørger for at hækle som forklaringen af de 2 prikker i diagrammet, lige over den ene prik på første række i diagrammet, så skal det nok blive super flot. God fornøjelse! :)
02.08.2019 - 13:37
![]() Muriel wrote:
Muriel wrote:
Impossible d'avoir les diagrammes et ce sur 3 appareils différents et 3 navigateurs
01.09.2018 - 06:32DROPS Design answered:
Bonjour Muriel, une récente modification des diagrammes a été effectuée, essayez à nouveau, tout devrait fonctionner. Bon crochet!
06.09.2018 - 09:43
![]() Christine Bezemer wrote:
Christine Bezemer wrote:
Jeg forstår ikke fig. 2 kan Ikke få det til at stemme, fordi de 3 st i samme m giver for mange masker i næste række
19.05.2018 - 11:38DROPS Design answered:
Hej Christine, Jo på 2.række hækler du 1 gruppe af 3 st imellem hver af de yderste st og så fordeler du de 4 midterste st imellem de to grupper. St på ydersiden af grupperne hækles i lm. God fornøjelse!
21.05.2018 - 09:46
![]() M.J. wrote:
M.J. wrote:
Dat had ik inderdaad gedaan...maar nu blijft mijn vraag nog steeds of ik het dus goed begrijp dat er nu dus 7 stokjes op de 4 lossen gaan komen in M4?
11.05.2018 - 14:22DROPS Design answered:
Hallo M.J., Aha, ik had je vraag verkeerd begrepen. Volgens het patroon inderdaad 7 stokjes in de 4 lossen, maar eerlijk gezegd lijkt het me wat veel. Kijk even hoe je uitkomt, misschien is 5 of zelfs 4 stokjes voldoende. Het gaat er denk ik om dat je dichte en open blokjes hebt, zeg maar.
12.05.2018 - 16:13
![]() Marjon wrote:
Marjon wrote:
Ik begrijp M4 nog steeds niet...ik ben klaar met de doek tot M4...omdat deze vakjes niet in verband maar recht boven elkaar staan, was mijn vraag of er dus 7 stokjes op 4 lossen moeten nu? Ipv bij de rest van de doek 2 stokjes, 3 stokjes in 1 stokje, 2 stokjes.
06.05.2018 - 21:48DROPS Design answered:
Hallo Marjon, Aan het eind bij de beschrijving van de omslagdoek staat beschreven dat je een toer haakt met stokjes in stokjes en lossen boven lossen. Op die manier komen de hokjes a.h.w. boven elkaar en kun je verder met M.4
10.05.2018 - 11:57
|
||||||||||||||||||||||||||||||||||
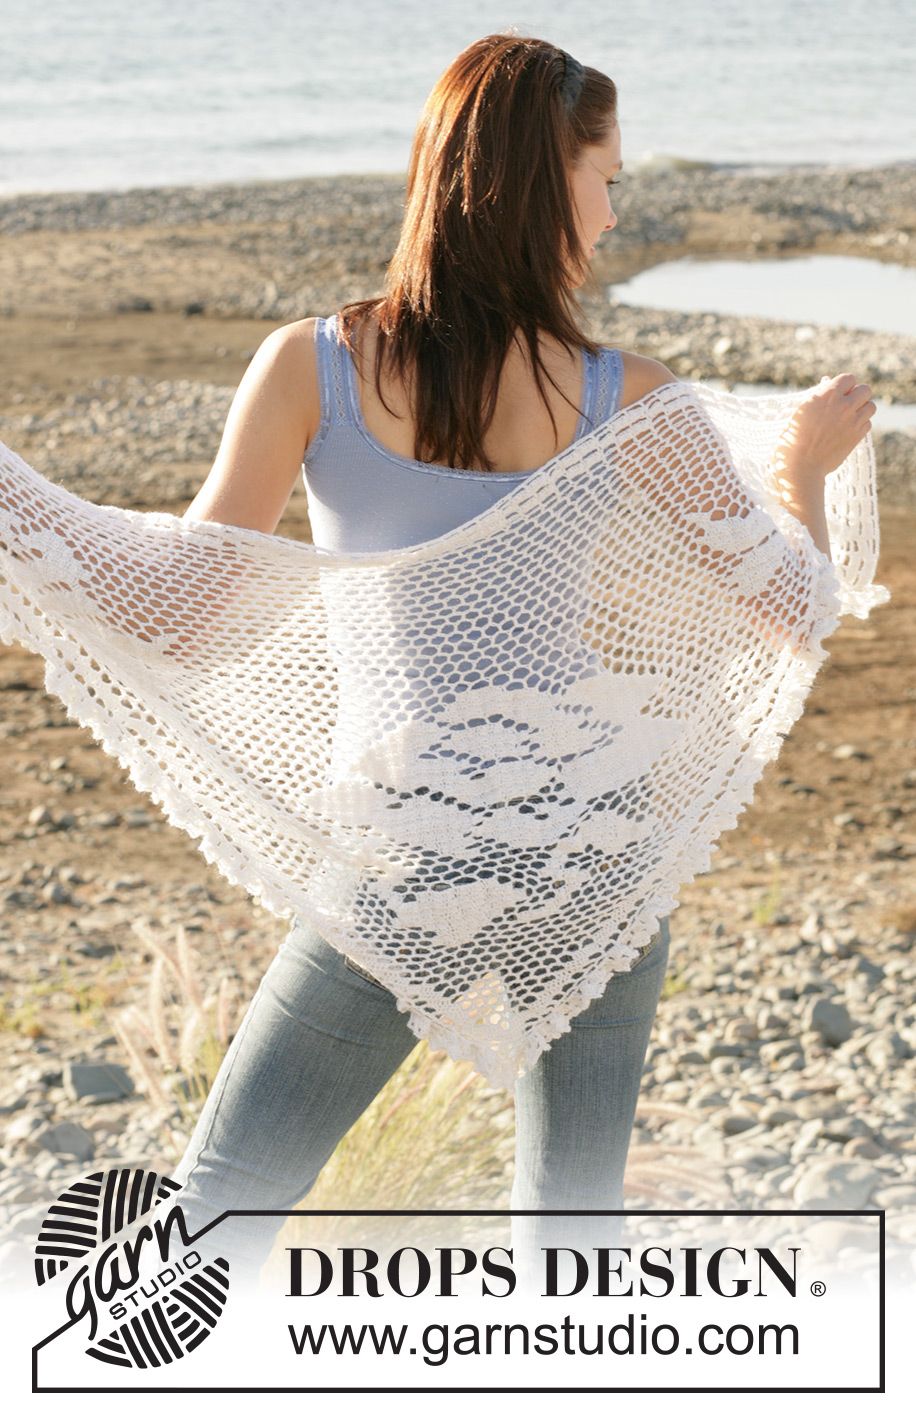
Bed of Roses#bedofrosesshawl |
||||||||||||||||||||||||||||||||||
|
|
||||||||||||||||||||||||||||||||||
DROPS Crochet shawl with rose pattern in “Alpaca”
DROPS 99-6 |
||||||||||||||||||||||||||||||||||
|
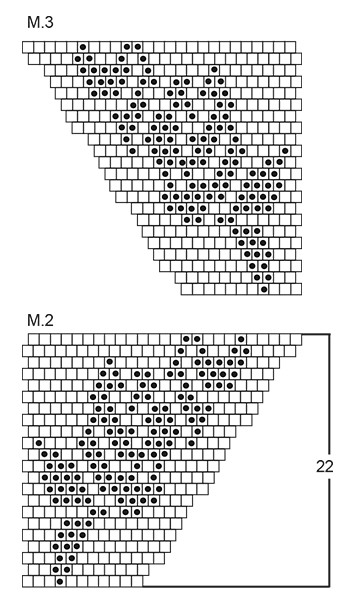
Crochet gauge: width of 6 diamonds x height of 10 diamonds = 10 x 10 cm [4" x 4"]. Pattern: See diagrams M.1-M.4 and Fig 1 and Fig 2. Crochet info 1: In diamonds crochet dc in ch-loop. In rose pattern crochet as shown in Fig. 2. Crochet info 2: Replace the last dc on each row with 1 tr (see Fig. 1). Do this to make sure the edge round the shawl doesn’t become too tight. If it is still too tight, replace 1 dc with a dtr. Tip: Press the shawl before use for best result. SHAWL Crochet from point mid back and up. Crochet 14 ch on crochet hook size 3 mm [US C] and form a ring with a sl st in the first ch = Row 1 (see Fig 1). Continue from start arrow in Fig. 1. After the last row in Fig. 1 repeat the inc each side (= X) until finished measurements. At the same time on row 18 beg the rose pattern. Beg with chart M.1 in the first diamond inside the full diamond along the outer edge (see arrow at the bottom of M.1 and Fig. 2). At the same time on row 42 beg chart M.2 and M.3 at the sides. M.2 begins in the first diamond inside the full diamond at the right side and M.3 begins in diamond no 38 on the same row. After the pattern is complete there are a total of 83 diamonds on row. Continue inc according to Fig. 1 for another 6 rows = 91 diamonds on row. Now crochet 1 row with dc in dc and ch over ch and then 1 vertical repeat of chart M.4. Finish with 1 row with dc in dc and ch over ch. Crochet border: Crochet round the whole shawl from the top on the right side, down towards the point and up along the left side as follows: Row 1: 1 sc in the first ch-loop, 4 ch (= 1 tr), 3 tr in the same ch-loop, 1 ch, *4 tr in next ch-loop, 1 ch*, repeat from *-* and finish with 4 tr and 1 sl st in the last ch-loop. Row 2: 4 ch (= 1 tr), 2 tr in the first ch-loop from previous row, 4 ch, 3 tr in the same ch-loop, *3 tr in the next ch-loop, 4 ch, 3 tr in the same ch-loop*, repeat from *-* and finish with 1 sl st in the last ch-loop. US english explanation to pattern diagram: M.1: 34 rader/varv = 34 rows 1. rad fra høyre = first row from the right M.2: 22 rader/varv = 22 rows |
||||||||||||||||||||||||||||||||||
Diagram explanations |
||||||||||||||||||||||||||||||||||
|
||||||||||||||||||||||||||||||||||
 |
||||||||||||||||||||||||||||||||||
 |
||||||||||||||||||||||||||||||||||
 |
||||||||||||||||||||||||||||||||||
 |
||||||||||||||||||||||||||||||||||
Have you finished this pattern?Tag your pictures with #dropspattern #bedofrosesshawl or submit them to the #dropsfan gallery. Do you need help with this pattern?You'll find 2 tutorial videos, a Comments/Questions area and more by visiting the pattern on garnstudio.com. © 1982-2026 DROPS Design A/S. We reserve all rights. This document, including all its sub-sections, has copyrights. Read more about what you can do with our patterns at the bottom of each pattern on our site. |
||||||||||||||||||||||||||||||||||


With over 40 years in knitting and crochet design, DROPS Design offers one of the most extensive collections of free patterns on the internet - translated to 17 languages. As of today we count 324 catalogs and 12284 patterns - 12274 of which are translated into English (US/in).
We work hard to bring you the best knitting and crochet have to offer, inspiration and advice as well as great quality yarns at incredible prices! Would you like to use our patterns for other than personal use? You can read what you are allowed to do in the Copyright text at the bottom of all our patterns. Happy crafting!
Post a comment to pattern DROPS 99-6
We would love to hear what you have to say about this pattern!
If you want to leave a question, please make sure you select the correct category in the form below, to speed up the answering process. Required fields are marked *.