
Looking for a yarn?


Comments / Questions (28)
![]() Pennock wrote:
Pennock wrote:
Patroon 201/30, wat wordt bedoeld met 3 strepen? Uit hoeveel naalden bestaan die strepen? Met vriendelijke dank
31.05.2019 - 10:20DROPS Design answered:
Dag Pennock,
Bovenaan in het patroon bij 'STREPEN' staat uitgelegd hoe je de strepen breit en hoe breed deze strepen moeten worden. Je breit de strepen een aantal cm's. Hoeveel naalden dit is hangt af van je stkenverhouding.
31.05.2019 - 15:39
![]() Elvanna wrote:
Elvanna wrote:
Das Modell ist unnötig kompliziert beschrieben. Anstatt das Patentmuster auf die Reihen mit den linken Patentmaschen zu stricken und dann alles komplett in linken Maschen zu arbeiten, ist es wesentlich sinnvoller den kompletten Pullover 'von innen' zu arbeiten (Zu- und Abnahmen auf rechte Patentmaschen und rechte Maschen im Muster) und ihn nach Abschluss umzuwenden.
14.04.2019 - 12:56DROPS Design answered:
Liebe Elvanna, ja grundsätzlich ginge das, allerdings müssen dann auch die Farben des Patentmusters umgedreht werden, damit sie auf der Vorderseite richtig erscheinen. Gutes Gelingen!
24.04.2019 - 11:32
![]() Eva wrote:
Eva wrote:
Falta el diagrama. Gracias por estos patrones tan preciosos.
16.03.2019 - 23:55
![]() Parker Posey wrote:
Parker Posey wrote:
Ooh this looks like a brioche yoke! lovely!
12.01.2019 - 02:37
![]() Riwaboot wrote:
Riwaboot wrote:
Ein sehr schönes Briochemodell, da gibt es leider viel zu wenige zu sehen, daher bitte unbedingt veröffentlichen!!!!
08.01.2019 - 14:10
![]() María wrote:
María wrote:
Parece que el canesú está hecho en brioche. Me parece precioso
18.12.2018 - 08:02
![]() Annu Kiili wrote:
Annu Kiili wrote:
Ihana ylöosa paidassa
17.12.2018 - 15:46
![]() Laura Waterfield wrote:
Laura Waterfield wrote:
I can't tell if this is crochet or knit but like it.
14.12.2018 - 11:51
|
||||||||||||||||||||||||||||||||||||||||
Egyptian Feathers#egyptianfeatherssweater |
||||||||||||||||||||||||||||||||||||||||
 |
 |
|||||||||||||||||||||||||||||||||||||||
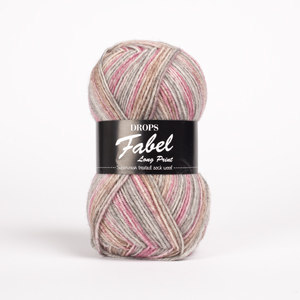
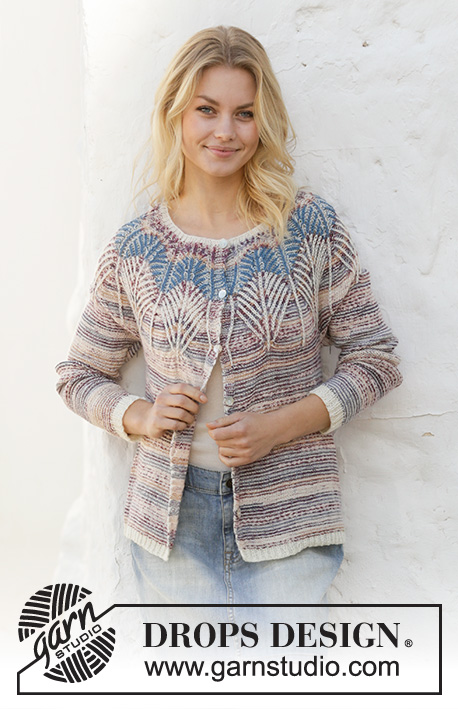
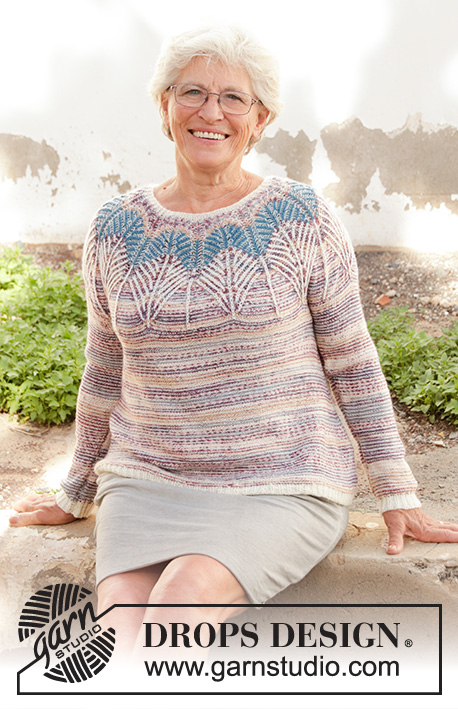
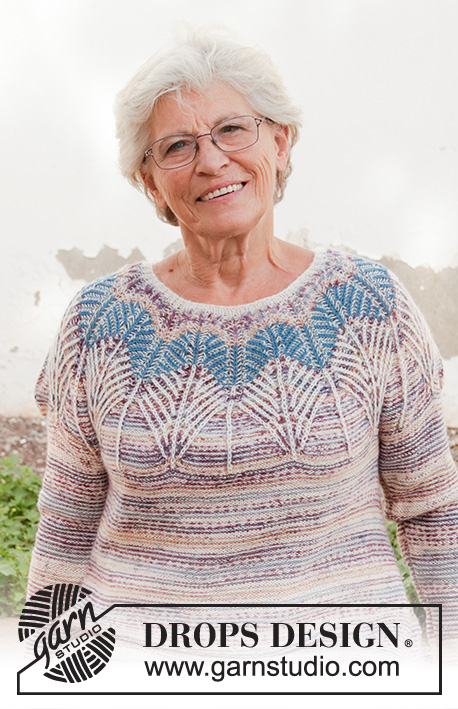
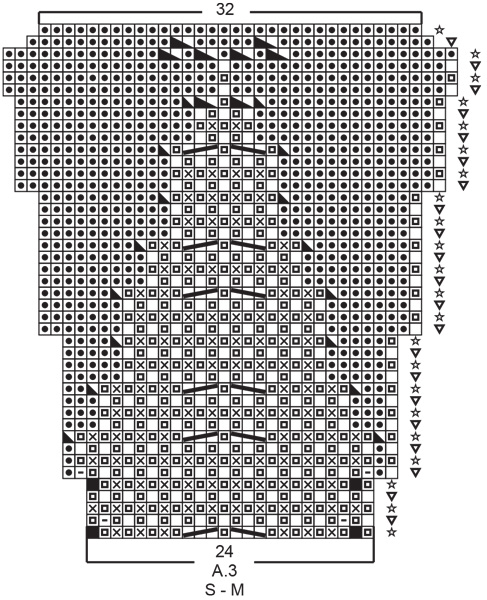
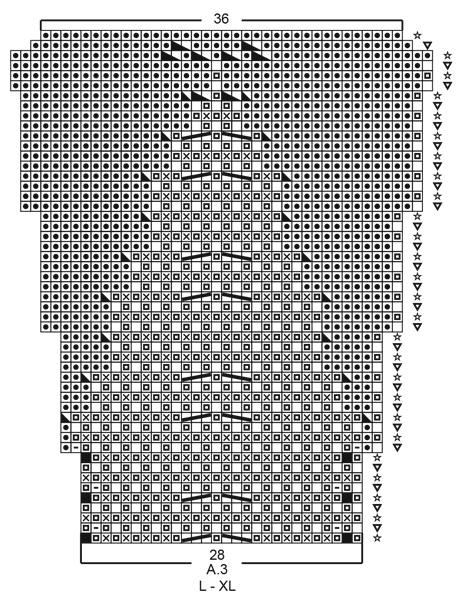
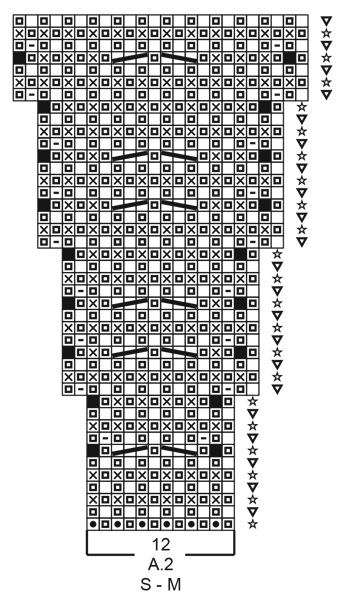
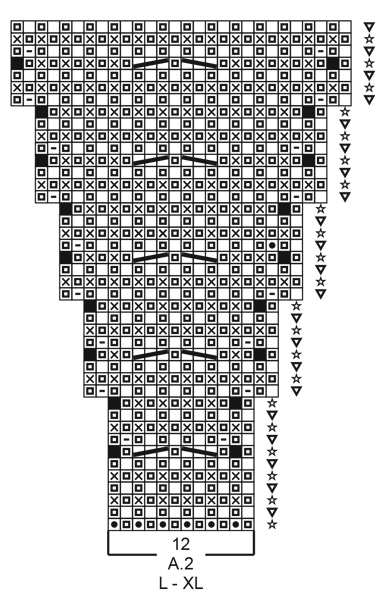
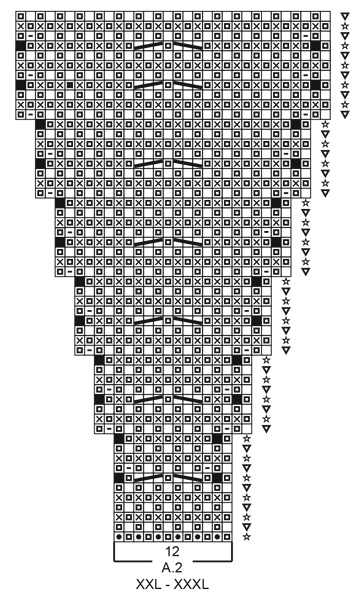
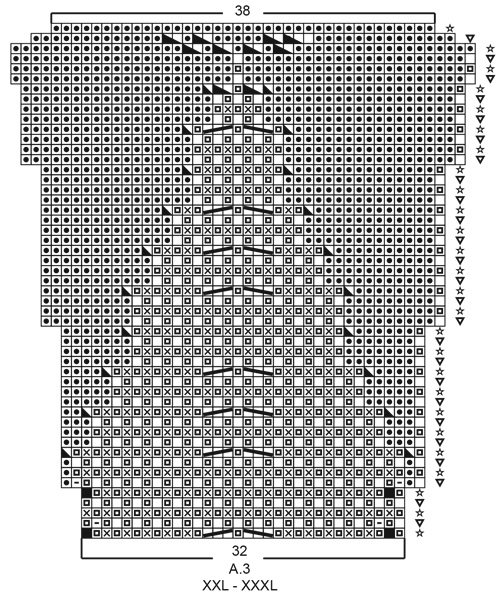
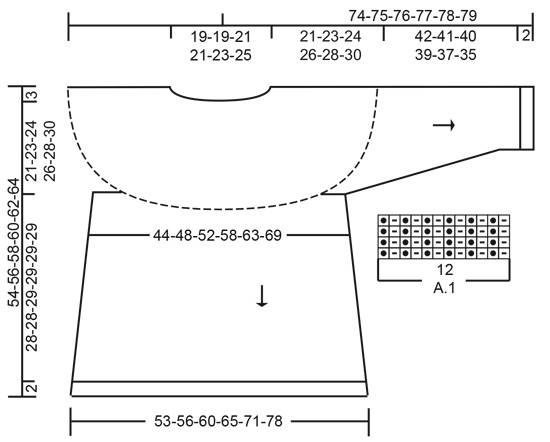
Knitted jumper with round yoke in DROPS Fabel. The piece is worked top down with 2-coloured English rib and zigzag stripes. Sizes S - XXXL.
DROPS 201-30 |
||||||||||||||||||||||||||||||||||||||||
|
------------------------------------------------------- EXPLANATIONS FOR THE PATTERN: ------------------------------------------------------- PATTERN: See diagrams A.1 to A.3. Choose diagram for your size. First work A.1 (= rib on neck). When A.1 has been worked 1 time in height, work A.2 over A.1. When A.2 has been worked 1 time in height, work A.3 over A.2. STRIPES: To get the 2-coloured effect work stripes with, alternately, 1 round of colour-2 and 1 round of colour-1. Pattern A.2 starts with a round off-white as described in text. Each time you decrease or increase in A.2 and A.3, you work on a round with colour-2. Stripes are worked in English rib. STRIPE 1: Colour-1 = lavender, colour-2 = off white. Work until the piece measures 5 cm at the shortest point. STRIPE 2: Colour-1 = grey blue, colour-2 = off white. Work until the piece measures a total of 9 cm at the shortest point. STRIPE 3: Colour-1 = off white, colour-2 = lavender. Work until A.3 has been worked 1 time in height. The last row in the diagram is worked with lavender. Then continue the stripes, in reversed stocking stitch, as follows: ROUND 1: Work with off white. ROUND 2: Work with lavender. Repeat rounds 1 and 2. KNITTING TIP: All stitch counts when working English rib are without yarn overs, because the yarn overs belong to the knitted stitches and are therefore counted as 1 stitch (unless otherwise stated). DECREASE TIP (for mid under sleeves): Decrease 1 stitch on each side of the marker thread as follows: Work until there are 3 stitches left before the marker thread, purl 2 together, purl 2 (marker thread sits between these 2 stitches), purl 2 stitches together twisted (2 stitches decreased). INCREASE TIP-1 (evenly spaced): To work out how to increase evenly, count the total number of stitches on the needle (e.g. 252 stitches) and divide by the number of increases to be made (e.g. 18) = 14. In this example, increase by making 1 yarn over after each 14th stitch. On the next round work the yarn overs twisted to avoid holes. INCREASE TIP-2 (for sides of body): Work until there are 2 stitches left before marker thread, 1 yarn over, purl 4 (marker thread sits in middle of these 4 stitches), 1 yarn over (= 2 stitches increased). On the next round purl the yarn overs twisted to avoid holes. Then purl the new stitches onwards. ------------------------------------------------------- START THE PIECE HERE: ------------------------------------------------------- JUMPER - SHORT OVERVIEW OF THE PIECE: Neck and yoke are worked in the round with circular needle, top down. The yoke is worked in 2-coloured English rib with zigzag, then the piece is continued in stocking stitch with wrong side out and stripes, with 1 round of each colour. The yoke is divided for body and sleeves. The body is continued in the round with circular needle. The sleeves are worked in the round with short circular needle/double pointed needles, top down. NECK: Cast on 120-132-132-144-144-156 stitches with circular needle size 2.5 mm and off-white. Knit 1 round. Then work A.1 in the round (= 10-11-11-12-12-13 repeats of 12 stitches). When A.1 has been worked 1 time in height, work yoke as described below. YOKE: Change to circular needle size 3 mm. Work A.2 in the round (= 10-11-11-12-12-13 repeats of 12 stitches –first round worked with off-white). Read STRIPES and KNITTING TIP and REMEMBER THE KNITTING TENSION! When A.2 has been worked 1 time in height there are 240-264-308-336-384-416 stitches on the needle. The piece measures approx. 9-9-9-9-11-11 cm from the cast-on edge mid front. Now work A.3 over A.2. When A.3 has been worked 1 time in height there are 320-352-396-432-456-494 stitches on the needle. The piece measures approx. 17-17-19-19-21-21 cm from the cast-on edge mid front. Continue in the round with purl and stripes as before. When the piece measures 19-19-21-21-21-21 cm from the cast-on edge increase evenly spaced as follows: Increase 4-4-4-4-8-8 stitches every 2 cm a total of 1-2-1-1-2-2 times = 324-360-400-436-472-510 stitches – read INCREASE TIP-1. When the piece measures 21-23-24-26-28-30 cm from the cast-on edge mid front, divide the piece for body and sleeves as follows: Purl 49-53-58-65-72-78 stitches as before (= ½ back piece), place the next 64-74-84-88-92-98 stitches on 1 thread for sleeve, cast on 8 new stitches on the needle (= in side under sleeve), purl the next 98-106-116-130-144-157 stitches (= front piece), place the next 64-74-84-88-92-98 stitches on 1 thread for sleeve, cast on 8 new stitches on the needle (= in side under sleeve) and purl the remaining 49-53-58-65-72-79 stitches (= ½ back piece). Cut the strand. Body and sleeves are finished separately. THE PIECE IS NOW MEASURED FROM HERE! BODY: = 212-228-248-276-304-330 stitches. Insert 1 marker thread in each side of the body, in the middle of the 8 stitches cast on under each sleeve. Allow the marker threads to follow your work onwards; they will be used when increasing in the sides. Start the round at one of the marker threads and purl in the round as before with stripes. When the piece measures 2 cm from the division, increase 1 stitch on each side of both marker threads – read INCREASE TIP-2 (= 4 stitches increased). Increase like this every 2½-2½-2½-3-3-2½ cm a total of 10-10-10-9-9-11 times = 252-268-288-312-340-374 stitches. Continue working until the piece measures 28-28-29-29-29-29 cm from the division (or to desired length; there is 2 cm left to finished length). Knit 1 round where you increase 18-20-18-18-17-19 stitches evenly spaced = 270-288-306-330-357-393 stitches. Change to circular needle size 2.5 mm and work rib in the round with off-white (= knit 1/ purl 2) for 2 cm. Loosely cast off with knit over knit and purl over purl. The jumper measures approx. 54-56-58-60-62-64 cm from the shoulder down. SLEEVE: Place the 64-74-84-88-92-98 stitches from the thread on the 1 side of the piece on short circular needle/double pointed needles size 3 mm and knit up 1 stitch in each of the 8 stitches cast on under the sleeve = 72-82-92-96-100-106 stitches. Insert 1 marker thread in the middle of the 8 stitches cast on under the sleeve. Allow the marker threads to follow your work onwards; they will be used when decreasing under the sleeve. Start the round by the marker thread and purl in the round with stripes as before. When the piece measures 2 cm from the division decrease 2 stitches mid under sleeve – read DECREASE TIP. Decrease like this every 4-2½-2-1½-1½-1½ cm a total of 9-13-17-18-19-21 times = 54-56-58-60-62-64 stitches. Continue working until the piece measures 42-41-40-39-37-35 cm from the division (or to desired length; there is 2 cm left to finished length. NOTE: Shorter measurements in larger sizes due to wider neck and longer yoke). Knit 1 round where you increase 0-1-2-0-1-2 stitches evenly spaced = 54-57-60-60-63-66 stitches. Change to double pointed needles size 2.5 mm and work rib in the round with off-white (= knit 1/ purl 2) for 2 cm. Loosely cast off with knit over knit and purl over purl. The sleeve measures approx. 44-43-42-41-39-37 cm from the division. Work the other sleeve in the same way. |
||||||||||||||||||||||||||||||||||||||||
Diagram explanations |
||||||||||||||||||||||||||||||||||||||||
|
||||||||||||||||||||||||||||||||||||||||
 |
||||||||||||||||||||||||||||||||||||||||
 |
||||||||||||||||||||||||||||||||||||||||
 |
||||||||||||||||||||||||||||||||||||||||
 |
||||||||||||||||||||||||||||||||||||||||
 |
||||||||||||||||||||||||||||||||||||||||
 |
||||||||||||||||||||||||||||||||||||||||
 |
||||||||||||||||||||||||||||||||||||||||
Have you finished this pattern?Tag your pictures with #dropspattern #egyptianfeatherssweater or submit them to the #dropsfan gallery. Do you need help with this pattern?You'll find 22 tutorial videos, a Comments/Questions area and more by visiting the pattern on garnstudio.com. © 1982-2025 DROPS Design A/S. We reserve all rights. This document, including all its sub-sections, has copyrights. Read more about what you can do with our patterns at the bottom of each pattern on our site. |
||||||||||||||||||||||||||||||||||||||||


With over 40 years in knitting and crochet design, DROPS Design offers one of the most extensive collections of free patterns on the internet - translated to 17 languages. As of today we count 320 catalogues and 12092 patterns translated into English (UK/cm). 12092
We work hard to bring you the best knitting and crochet have to offer, inspiration and advice as well as great quality yarns at incredible prices! Would you like to use our patterns for other than personal use? You can read what you are allowed to do in the Copyright text at the bottom of all our patterns. Happy crafting!
Post a comment to pattern DROPS 201-30
We would love to hear what you have to say about this pattern!
If you want to leave a question, please make sure you select the correct category in the form below, to speed up the answering process. Required fields are marked *.