
Popular categories
Looking for a yarn?


Comments / Questions (52)
![]() Eileen wrote:
Eileen wrote:
Flott👍
10.01.2019 - 22:55
![]() Monika wrote:
Monika wrote:
Wird das Rippenmuster am Halsausschnitt mit Nadel 5,5 oder 8 gestrickt?
06.01.2019 - 19:52DROPS Design answered:
Liebe Monika, das Rippenmuster wird mit den Nadel Nr 8 gestrickt. Viel Spaß beim stricken!
07.01.2019 - 13:03
![]() Petra wrote:
Petra wrote:
Beste, op welke naald kan ik dit werk het beste opzetten? Ik ben nu al drie keer herbegonnen, de laatste keer op naald 8, en nog steeds rekt het onderaan niet voldoende mee. Of is er een andere methode om op te zetten? Alvast bedankt!
06.01.2019 - 15:13DROPS Design answered:
Dag Petra,
Je zet het werk op met naald 5,5 mm en dan ga je na de boord over naar naald 8 mm. Doordat je een grotere naald gebruikt en doordat je steken meerdert vlak na de boordsteek, zal de boord rekbaar worden. Controleer wel eerst of je stekenverhouding klopt met de aangegeven stekenverhouding in het patroon.
23.01.2019 - 11:40
![]() Sarah wrote:
Sarah wrote:
Hallo, welchen Durchmesser sollen die Knöpfe haben?
22.11.2018 - 22:20DROPS Design answered:
Liebe Sarah, alle unsere Knöpfe finden Sie hier = die Nummer 614 sind 20 mm. Viel Spaß beim stricken!
23.11.2018 - 10:15
![]() Inge wrote:
Inge wrote:
In het patroon bij voorpand staat: ga verder met tricotsteek en zet 1 steek op aan het einde van de volgende 2 naalden. Nu is mijn vraag wat wordt er precies bedoeld met zet 1 steek op is dit een omslag maken?
12.11.2018 - 15:01DROPS Design answered:
Dag Inge,
Het is de bedoeling dat je een nieuwe steek opzet aan het eind van de naald, naast de bestaande steken, dus geen omslag. In deze video zie je hoe je dat kunt doen.
13.11.2018 - 08:41
![]() Solveig Marie Brenna wrote:
Solveig Marie Brenna wrote:
Hei. :) Hvis jeg ikke ønsker knapper på skuldrene, kan jeg bare droppe å lage hemper og heller sy for- og bakstykket sammen?
05.11.2018 - 14:48DROPS Design answered:
Hei Solveig. ja det er ikke noe i veien for at du heller syr delene sammen om du ønsker det. God fornøyelse
06.11.2018 - 07:46
![]() Elaine Hébert wrote:
Elaine Hébert wrote:
À quelle distance de la bordure serait-il souhaitable de coudre les boutons ?
02.11.2018 - 04:11DROPS Design answered:
Bonjour Mme Hébert, enfilez le pull pour bien repérer l'emplacement idéal pour les boutons, pour que les épaules vous plaisent. Bonnes finitions!
02.11.2018 - 08:09
![]() Inge wrote:
Inge wrote:
Beste, Ik kom er niet helemaal uit hoe je nu de lus kan breien in bovenstaande patroon. Hebben jullie hier misschien een filmpje van? Alvast bedankt! Groeten, Inge
30.10.2018 - 14:42DROPS Design answered:
Dag Inge,
Je maakt een omslag en die omslag kant je af door de steek die vlak voor de omslag op de rechter naald zit, over de omslag te halen. Dit herhaal je een aantal keren. Voor zover ik weet is hier geen video van.
31.10.2018 - 14:36
![]() Maria wrote:
Maria wrote:
Vorrei lavorare con ferri diritti,posso?
08.10.2018 - 18:12DROPS Design answered:
Buongiorno Maria, questo capo è lavorato in tondo. Può lavorare con i ferri dritti, aggiungendo una maglia di vivagno a ogni lato per la cucitura, ma deve adattare le spiegazioni alla lavorazione in piano. Per un aiuto più approfondito, può rivolgersi al suo rivenditore DROPS di fiducia. Buon lavoro!
09.10.2018 - 09:48
![]() Ulla wrote:
Ulla wrote:
Ich stricke noch nicht so lange und möchte mich nun an diesem schönen Pullover versuchen. Das sind vermutlich blöde Fragen, aber ich steh da gerade echt auf dem Schlauch. Die Maschenprobe ... auf welche der beiden Nadelstärken bezieht die sich? Muss ich die zweite angegebene Nadelstärke dann auch größer oder kleiner wählen?
02.10.2018 - 13:45DROPS Design answered:
Liebe Ulla, die Maschenprobe wird mit den Nadeln Nr 8 mm (glatt rechts und mit 2 Fäden Brushed Alpaca Silk) gestrickt. Viel Spaß beim stricken!
02.10.2018 - 15:58
|
|
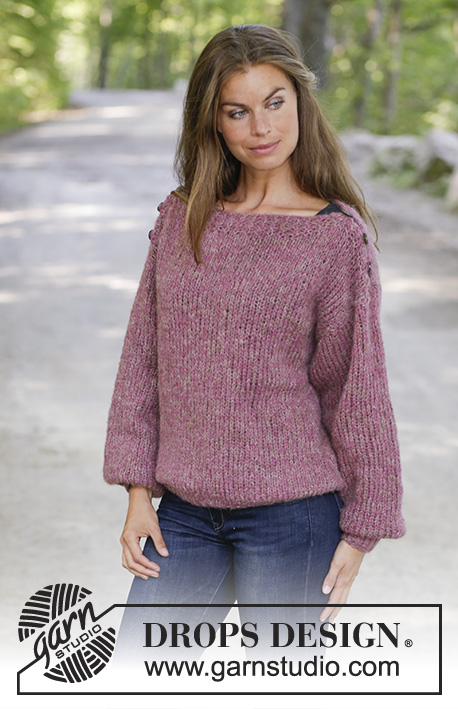
Raspberry Flirt#raspberryflirtsweater |
|
 |
 |
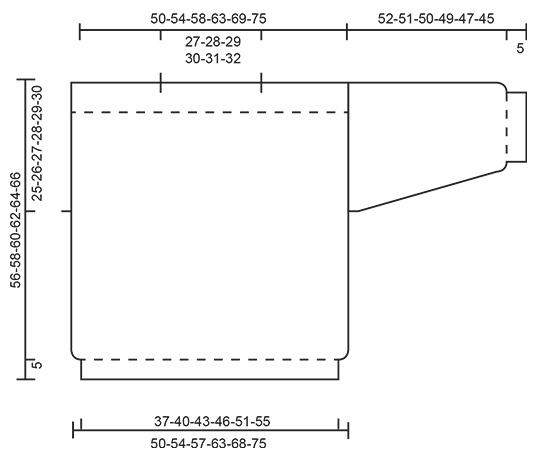
Knitted jumper in 2 strands DROPS Brushed Alpaca Silk. The piece is worked in stocking stitch and rib with boat neck. Sizes S - XXXL.
DROPS 196-34 |
|
|
EXPLANATIONS FOR THE PATTERN: ------------------------------------------------------- INCREASE TIP-1 (evenly spaced): To work out how to increase evenly, count the total number of stitches on the needle (e.g. 96 stitches) and divide by the number of increases to be made (e.g. 14) = 6.9. In this example, increase by making 1 yarn over after approx. each 7th stitch. On the next round knit the yarn overs twisted to avoid holes. RIDGE/GARTER STITCH (worked back and forth): 1 ridge = Knit 2 rows. LOOP: 1 loop: * make 1 yarn over, cast off the yarn over *, repeat from *-* until the loop measures 2 cm. INCREASE TIP-2 (for mid under sleeve): Work until there is 1 stitch left before the marker thread, 1 yarn over, knit 2 stitches (marker thread sits in the middle of these 2 stitches), 1 yarn over. On the next round, knit the yarns over twisted to avoid holes. Then work the new stitches in stocking stitch. ------------------------------------------------------- START THE PIECE HERE: ------------------------------------------------------- JUMPER - SHORT OVERVIEW OF THE PIECE: The piece is worked in the round with circular needle as far as the armholes, then the front and back pieces are finished separately back and forth on the needle. The sleeves are worked in the round with double pointed needles/short circular needle. BODY: Cast on 96-104-112-120-132-144 stitches with circular needle size 5.5 mm and 1 strand heather + 1 strand beige (= 2 strands). Knit 1 round. Then work rib (= knit 1 twisted / purl 1) for 5 cm. Change to circular needle size 8 mm and knit 1 round where you increase 14-14-14-18-18-22 stitches evenly on round – read INCREASE TIP = 110-118-126-138-150-166 stitches. Then work stocking stitch – REMEMBER THE KNITTING TENSION! When the piece measures 31-32-33-34-35-36 cm, work only the first 55-59-63-69-75-83 stitches on the needle, the last 55-59-63-69-75-83 are placed on a thread. FRONT PIECE: = 55-59-63-69-75-83 stitches. Continue with stocking stitch and cast on 1 stitch at the end of the next 2 rows = 57-61-65-71-77-85 stitches. The new stitches are worked in GARTER STITCH – see description above. When the piece measures 52-54-56-58-60-62 cm work the next row as follows – from the right side: 1 stitch in garter stitch, * knit 1 twisted / purl 1 *, work from *-* until there are 2 stitches left, knit 1 twisted and 1 stitch in garter stitch. Continue this rib until the piece measures 56-58-60-62-64-66 cm. Cast off with knit over knit and purl over purl. BACK PIECE: Place the 55-59-63-69-75-83 stitches on circular needle size 8 mm and work in the same way as for front piece until the piece measures 56-58-60-62-64-66 cm – but do not cast off! On the next row from the right side cast off with knit over knit and purl over purl – AT THE SAME TIME as you work loops as follows: Cast off 4-5-5-4-6-7 stitches, make 1 LOOP – read description above, * cast off the next 5-5-6-5-5-6 stitches, make 1 loop * work from *-* a total of 2-2-2-3-3-3 times, cast off 29-31-31-33-35-35 stitches (= neck), * make 1 loop, cast off the next 5-5-6-5-5-6 stitches *, work from *-* a total of 2-2-2-3-3-3 times, make 1 loop, cast off the last 4-5-5-4-6-7 stitches. SLEEVE: Cast on 26-28-28-30-32-32 stitches with double pointed needles size 5.5 mm and 1 strand heather + 1 strand beige (= 2 strands). Knit 1 round. Then work rib (= knit 1 twisted /purl 1) for 5 cm. Change to double pointed needles size 8 mm and knit 1 round where you increase 9-7-8-8-6-8 stitches evenly on round = 35-35-36-38-38-40 stitches. Insert 1 marker thread at the beginning of the round = mid under sleeve. Then work stocking stitch. When the piece measures 8-8-8-8-8-7 cm increase 2 stitches mid under sleeve – read INCREASE TIP. Increase like this every 4½-4-3½-3½-3-3 cm a total of 10-11-12-12-13-13 times = 55-57-60-62-64-66 stitches. Continue working until the sleeve measures 52-51-50-49-47-45 cm and then cast off loosely – make sure the cast-off edge is not tight! Work the other sleeve. ASSEMBLY: Sew in sleeves inside the 1 edge stitch in garter stitch. Sew buttons onto front piece. |
|
|
|
Have you finished this pattern?Tag your pictures with #dropspattern #raspberryflirtsweater or submit them to the #dropsfan gallery. Do you need help with this pattern?You'll find 22 tutorial videos, a Comments/Questions area and more by visiting the pattern on garnstudio.com. © 1982-2025 DROPS Design A/S. We reserve all rights. This document, including all its sub-sections, has copyrights. Read more about what you can do with our patterns at the bottom of each pattern on our site. |
|


With over 40 years in knitting and crochet design, DROPS Design offers one of the most extensive collections of free patterns on the internet - translated to 17 languages. As of today we count 314 catalogues and 11821 patterns translated into English (UK/cm). 11821
We work hard to bring you the best knitting and crochet have to offer, inspiration and advice as well as great quality yarns at incredible prices! Would you like to use our patterns for other than personal use? You can read what you are allowed to do in the Copyright text at the bottom of all our patterns. Happy crafting!
Post a comment to pattern DROPS 196-34
We would love to hear what you have to say about this pattern!
If you want to leave a question, please make sure you select the correct category in the form below, to speed up the answering process. Required fields are marked *.