
Popular categories
Looking for a yarn?


Comments / Questions (141)
![]() Ute Perlick wrote:
Ute Perlick wrote:
Hallo! Ich stricke den Pullover in Größe M. Bei den Ärmeln habe ich ein Problem. Ich habe 68 Maschen auf der Nadel. Nachdem ich A1 zu Ende gestrickt habe, soll ich A2 in Runden stricken (= 9 à 8 Maschen). Das wären dann 72 Maschen. Bei A2 ist das noch kein Problem, weil da ja nur einzelne Farbstreifen gestrickt werden. Ab A 3 komme ich mit den Maschen nicht aus, da ein Rapport ja aus 12 Maschen besteht, was nicht durch 68 teilbar ist. Wo ist mein Denkfehler? Viele Grüße Ute Perlick
22.04.2021 - 20:26DROPS Design answered:
Liebe Frau Perlick, hier wird es erklärt, wie man ein Diagram in der Mitte platziert, so können Sie A.3 stricken. Diagram wird nicht in der Runde stimmen, aber die Masche mit der Markierung muss der mit dem kleinen Dreiecke sein. Viel Spaß beim stricken!
23.04.2021 - 07:57
![]() Ute Perlick wrote:
Ute Perlick wrote:
Hallo! Ich stricke den Pullover in Größe M. Bei den Ärmeln habe ich ein Problem. Ich habe 68 Maschen auf der Nadel. Nachdem ich A1 zu Ende gestrickt habe, soll ich A2 in Runden stricken (= 9 à 8 Maschen). Das wären dann 72 Maschen. Bei A2 ist das noch kein Problem, weil da ja nur einzelne Farbstreifen gestrickt werden. Ab A 3 komme ich mit den Maschen nicht aus, da ein Rapport ja aus 12 Maschen besteht, was nicht durch 68 teilbar ist. Wo ist mein Denkfehler? Viele Grüße Ute Perlick
21.04.2021 - 11:23
![]() Valérie wrote:
Valérie wrote:
Bonjour, ce modèle est magnifique, par contre je viens de recevoir la laine et les coloris sont beaucoup plus foncés que sur la photo, est ce parce que la photo a été prise en plein soleil? j'ai vérifié les no des pelotes qui correspondent à celles que vous reprenez dans les fournitures. Merci par avance pour votre retour,
18.04.2021 - 12:56DROPS Design answered:
Bonjour Valérie, les couleurs peuvent effectivement apparaître différemment en fonction de l'éclairage/les autres couleurs sur la photo, mais également d'un écran à l'autre. Bon tricot!
19.04.2021 - 08:28
![]() Patricia Fisk wrote:
Patricia Fisk wrote:
Is this pattern written in English please
15.04.2021 - 10:48DROPS Design answered:
Hi Patricia. You find the english pattern here. Happy knitting!
15.04.2021 - 13:52
![]() Gerd Wright wrote:
Gerd Wright wrote:
Jeg er veldig begeistret over alle de fine oppskriftene dere har :)
10.04.2021 - 06:09
![]() Elin Hirmoen wrote:
Elin Hirmoen wrote:
Har strikket forhøyning bak. Hvor starter jeg å strikke på bærestykket for å få fargeskiftet minst synlig. Jeg tenker jo å starte i den ene siden, men vil fargeskiftet da komme midt på armen?
06.04.2021 - 09:54DROPS Design answered:
Hej Elin, når du kommer ned til ærmet, kan du flytte farveskiftet til siden af bærestykket og under ærmet. God fornøjelse!
06.04.2021 - 14:05
![]() Kjersti Anette Rasmussen wrote:
Kjersti Anette Rasmussen wrote:
Hvorfor velge forhøyning I nakken? Penere på feks damemodell?
29.03.2021 - 13:40DROPS Design answered:
Hej Kjersti, det er en smagssag om man gerne vil at tøjet bliver lidt højere i nakken :)
06.04.2021 - 15:53
![]() Bianca Kotterink wrote:
Bianca Kotterink wrote:
Ik heb wel een tutorial gevonden hoe een streepovergang goed te krijgen bij 2 toeren van dezelfde kleur, maar hoe krijg ik hem mooi als ik al na 1 toer moet wisselen van kleur? Of gaat dit vanzelf goed?? De wisselingen van de schouderpas vallen middenachter.
23.02.2021 - 09:54DROPS Design answered:
Dag Bianca,
Helaas heb ik daar niet een oplossing voor bij wisselen van kleur na 1 toer; je blijft het altijd een beetje zien.
23.02.2021 - 12:07
![]() Ute Eisebraun wrote:
Ute Eisebraun wrote:
Hallo, Ich möchte gerne das "Winter Carnival Set" stricken. Ist Drops Karisma eine wirklich gute Qualität. Das Set ist schon sehr aufwändige und ich möchte, dass es sich lange gut hält. Sehr tolle Anleitungen von Drops, vielen Dank " Herzliche Grüße von Ute Eisebraun
25.01.2021 - 13:00DROPS Design answered:
Liebe Frau Eisebraun, DROPS Karisma gehört schon lange zu unserem Sortiment - Alternative finden Sie durch den Garnumrechner - hier lesen Sie mehr - gerne wird Ihnen Ihr DROPS Laden noch weiterhelfen, das beste passende Garn zu finden. Viel Spaß beim stricken!
25.01.2021 - 14:04
![]() Havearkitekt Sanne Paludan wrote:
Havearkitekt Sanne Paludan wrote:
Hej, jeg har prøvet at bruge garn converteren, men den giver ikke noget svar til Karisma, 100 gr, 4 tråd. Kan I anbefale en anden garn uden uld, jeg kan bruge til opskriften?
08.01.2021 - 23:32DROPS Design answered:
Hej Sanne, jo men du skal kun bruge 1 tråd ad gangen. Så vælg DROPS Karisma, antal gram i din størrelse og 1 tråd, så skal du se :)
11.01.2021 - 13:04
|
||||||||||||||||||||||||||||||||||
Winter Carnival#wintercarnivalsweater |
||||||||||||||||||||||||||||||||||
 |
 |
|||||||||||||||||||||||||||||||||
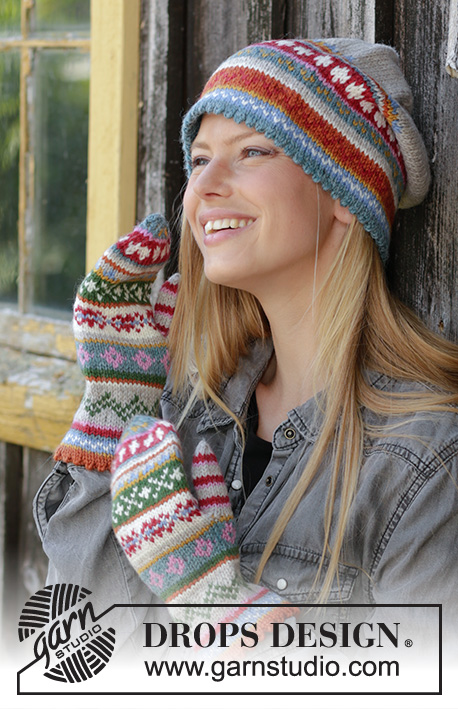
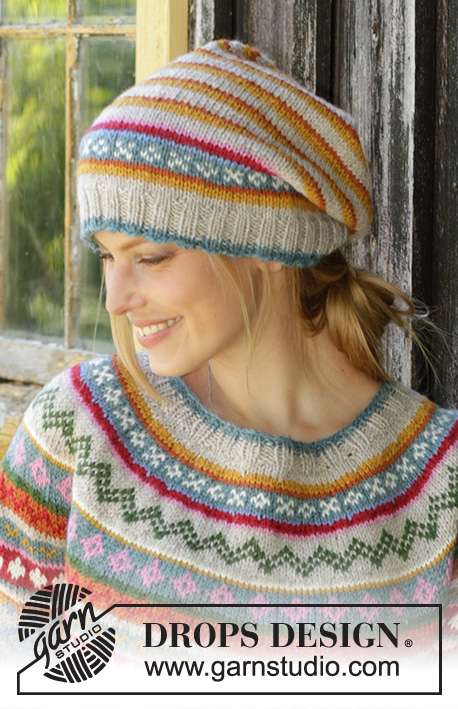
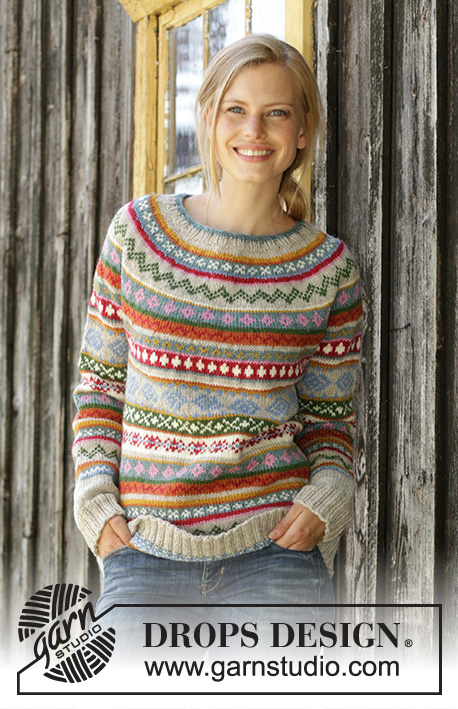
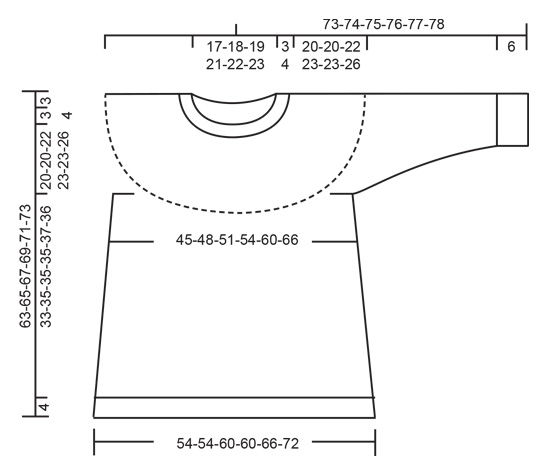
Knitted jumper in DROPS Karisma. The piece is worked top down with round yoke, Nordic pattern and A-shape. Sizes S - XXXL. Knitted hat in DROPS Karisma. The piece is worked with Nordic pattern and stripes.
DROPS 196-6 |
||||||||||||||||||||||||||||||||||
|
EXPLANATIONS FOR THE PATTERN: ------------------------------------------------------- INCREASE TIP (evenly spaced): To work out how to increase evenly, count the total number of stitches on the needle (e.g. 104 stitches) and and divide by the number of increases to be made (e.g. 24) = 4.3. In this example, increase by making 1 yarn over after approx. each 4th stitch. On the next round knit the yarn overs twisted to avoid holes. ELEVATION (back of neck): Skip this section if you do not want an elevation. Insert 1 marker at the beginning of the round. Start from the right side with light oak and knit 16-17-18-19-20-21 stitches past the marker, turn, tighten strand and purl 32-34-36-38-40-42 stitches. Turn, tighten strand and knit 48-51-54-57-60-63 stitches, turn, tighten strand and purl 64-68-72-76-80-84 stitches. Turn, tighten strand and knit 80-85-90-95-100-105 stitches, turn, tighten strand and purl 96-102-108-114-120-126 stitches. Turn, tighten strand and knit to mid back. Then work YOKE as described in text. PATTERN: Jumper: See diagrams A.1 to A.4. Choose diagram for your size. Hat: See diagrams A.5 and A.6. The whole pattern is worked in stocking stitch. KNITTING TIP: To avoid the knitting tension becoming tighter when working pattern, it is important that the strands at the back are not tight. Use a larger needle size when working pattern if this is a problem. It is also important to maintain the knitting tension in height, or the yoke will be too short and the armholes too small! DECREASE TIP-1 (for mid under sleeve): Start 2 stitches before the stitch with the marker thread, knit 2 together, knit 1 (= stitch with marker thread), slip 1 stitch as if to knit, knit 1, pass the slipped stitch over the knitted stitch (= 2 stitches decreased). DECREASE TIP-2 (for top of hat): Start 2 stitches before the marker thread and knit 2 together (= 1 stitch decreased). ------------------------------------------------------- START THE PIECE HERE: ------------------------------------------------------- JUMPER - SHORT OVERVIEW OF THE PIECE: Neck, yoke and body are worked in the round with circular needle, top down. Sleeves are worked in the round with short circular needle/double pointed needles, top down. NECK: Cast on 104-108-112-116-124-128 stitches with short circular needle size 3.5 mm and sea green. Knit 1 round. Then work rib in the round (= knit 2 / purl 2). When you have worked 1 round with sea green change to light oak. Continue the rib until the neck measures 3-3-3-4-4-4 cm. Knit 1 round where you increase 24-26-28-28-28-32 stitches evenly on round - read INCREASE TIP = 128-134-140-144-152-160 stitches. Change to circular needle size 4.5 mm. You can now work an elevation in the back of the neck so that the back of the yoke is slightly higher. You can leave out this elevation; the neck will then be the same front and back – work ELEVATION – read description above or go straight to YOKE. YOKE: Work 2 rounds stocking stitch with light oak. Then work A.1 in the round. REMEMBER THE KNITTING TENSION! AT THE SAME TIME on each round with an arrow in A.1, increase evenly on round as described below - remember INCREASE TIP. On round marked with arrow-1 increase 32-34-36-40-40-40 stitches evenly on round = 160-168-176-184-192-200 stitches (there is room for 20-21-22-23-24-25 repeats of 8 stitches). On round marked with arrow-2 increase 32-36-40-44-48-52 stitches evenly on round = 192-204-216-228-240-252 stitches (there is room for 32-34-36-38-40-42 repeats of 6 stitches). On round marked with arrow-3 increase 24-30-36-36-42-42 stitches evenly on round = 216-234-252-264-282-294 stitches (there is room for 36-39-42-44-47-49 repeats of 6 stitches). On round marked with arrow-4 increase 20-26-28-28-30-34 stitches evenly on round = 236-260-280-292-312-328 stitches (there is room for 59-65-70-73-78-82 repeats of 4 stitches). On round marked with arrow-5 increase 16-20-20-24-24-28 stitches evenly on round = 252-280-300-316-336-356 stitches (there is room for 63-70-75-79-84-89 repeats of 4 stitches). On round marked with arrow-6 increase 16-16-16-20-24-28 stitches evenly on round = 268-296-316-336-360-384 stitches (there is room for 67-74-79-28-30-32 repeats of 4-4-4-12-12-12 stitches). When the last row of A.1 is left, the piece measures 23-23-25-27-27-30 cm from the cast-on edge mid front. The last round is worked as follows: Knit 41-44-46-49-54-59 stitches (= ½ back piece), place the next 52-60-66-70-72-74 stitches on 1 thread for sleeve, cast on 8-8-10-10-12-14 new stitches on the needle (= in side mid under sleeve), knit 82-88-92-98-108-118 stitches (= front piece), place the next 52-60-66-70-72-74 stitches on 1 thread for sleeve, cast on 8-8-10-10-12-14 new stitches on the needle (= in side under sleeve) and knit the remaining 41-44-46-49-54-59 stitches (= back piece). Cut the strand. Body and sleeves are now finished separately. BODY: = 180-192-204-216-240-264 stitches. Insert 1 marker thread in the middle of the 8-8-10-10-12-14 stitches cast on under the one sleeve and start the round at this marker thread. The first round is worked as follows: SIZES XS/S - S/M - L/XL - XL/XXL: Work A.2 in the round (= 15-16-18-20 repeats of 12 stitches). When A.2 has been completed, work A.3 in the round (= 15-16-18-20 repeats of 12 stitches). Continue A.3 as described under ALL SIZES. SIZES M/L - XXL/XXXL: Work A.3 in the round (= 17-22 repeats of 12 stitches). Continue A.3 as described under ALL SIZES! ALL SIZES: Continue A.3 as described above. AT THE SAME TIME on the round marked with arrow-7 increase 12-16-12-16-16-16 evenly on round = 192-208-216-232-256-280 stitches (there is now room for 24-26-27-29-32-35 repeats of 8 stitches). On the round marked with arrow-8 increase 12-8-12-8-8-8 stitches evenly on round = 204-216-228-240-264-288 stitches (there is now room for 34-36-38-40-44-48 repeats of 6 stitches). On the round marked with arrow-9 increase 12-0-12-0-0-0 stitches evenly on round in all sizes = 216-216-240-240-264-288 stitches (there is now room for 54-54-60-60-66-72 repeats of 4 stitches). When A.3 has been completed, work A.4 in the round in all sizes (= 9-9-10-10-11-12 repeats of 24 stitches). When A.4 has been completed, the piece measures approx. 59-59-61-63-63-66 cm from the shoulder down (approx. 33 cm from the division in all sizes). Repeat A.4 until the piece measures approx. 33-35-35-35-37-36 cm from the division (shorter measurements in larger sizes due to longer yoke). NOTE: Finish after a whole stripe or pattern – if you do not want pattern all the way down to the rib, you can continue with stocking stitch and light oak when you have completed A.4 for the first time. Change to circular needle size 3.5 mm. Knit 1 round with light oak where you increase 56-56-60-60-64-72 stitches evenly on round = 272-272-300-300-328-360 stitches. Work rib in the round (= knit 2 / purl 2) for 4 cm. Then cast off with knit over knit and purl over purl, but make sure that the cast-off edge is not tight (if the cast-off edge is tight you can make 1 yarn over after approx. each 8th stitch at the same time as you cast off - yarn overs cast off as normal stitches). The jumper measures approx. 63-65-67-69-71-73 cm from the shoulder down. SLEEVE: Place the 52-60-66-70-72-74 stitches from the thread on the one side of the piece on short circular needle size 4.5 mm and in addition knit up 1 stitch in each of the 8-8-10-10-12-14 stitches cast on under the sleeve = 60-68-76-80-84-88 stitches. Insert 1 marker thread in the middle of the 8-8-10-10-12-14 stitches under the sleeve, i.e. insert the marker thread in the first stitch after the middle, count 29-33-37-39-41-43 stitches, insert 1 marker thread in the next stitch (= mid-stitch). There are now 29-33-37-39-41-43 stitches left on the round after the last marker thread. Allow the marker threads to follow your work onwards. The marker thread under the sleeve will be used a little later when decreasing and the marker thread on top of sleeve will be used to count where the pattern starts. READ THE REST OF SLEEVE BEFORE CONTINUING! Work the last row of A.1 so that A.1 finishes in the same way as the body. PATTERN: SIZES S, M, L/XL and XL/XXL: Work A.2 in the round but make sure that A.2 in L/XL and XL/XXL fits neatly over A.1 on the yoke (you will not get a complete repeat of the pattern under the sleeve). When A.2 has been completed, work A.3, but count out from the mid-stitch where the pattern should start - mid-stitch in A.3 should match the stitch with the marker thread mid top of sleeve (in L/XL and XL/XXL the first 3 rounds in A.3 need to be adjusted so that they fit neatly over A.1/A.2). Continue as described under ALL SIZES! SIZES L and XXL/XXXL: When the last row in A.1 has been completed, work A.3, but count out from the mid-stitch where the pattern should start - mid-stitch in A.3 should match the stitch with the marker thread mid top of sleeve (in XXL/XXXL XXL the first 3 rounds in A.3 need to be adjusted so that they fit neatly over A.1/A.2). Continue as described under ALL SIZES! ALL SIZES: When A.3 has been completed, work A.4, then continue with stocking stitch and light oak. DECREASE: AT THE SAME TIME when the piece measures 2 cm from the division decrease 2 stitches mid under sleeve – read DECREASE TIP-1. Decrease like this every 1 cm a total of 3-5-6-6-6-7 times and then every 5-3½-3-2½-2-2 cm a total of 6-7-9-10-11-11 times = 42-44-46-48-50-52 stitches. When the sleeve measures approx. 36-36-35-33-33-31 cm from the division (shorter measurements in larger sizes due to longer yoke) knit 1 round with light oak where you increase 10-8-10-8-10-8 stitches evenly on round in all sizes = 52-52-56-56-60-60 stitches. Change to double pointed needles size 3 mm. Work rib in the round (= knit 2 / purl 2) for 6 cm. Cast off with knit over knit and purl over purl, but make sure that the cast-off edge is not tight (if the cast-off edge is tight you can make 1 yarn over after approx. each 8th stitch at the same time as you cast off - yarn overs cast off as normal stitches). The sleeve measures approx. 42-42-41-39-39-37 cm from the division and down. Work the other sleeve in the same way. ------------------------------------------------------- HAT - SHORT OVERVIEW OF THE PIECE: The piece is worked in the round with short circular needle, bottom up. Change to double pointed needles when necessary. HAT: Cast on 108-108-116 stitches with short circular needle size 3 mm and sea green. Knit 1 round. Then work rib in the round (= knit 2 / purl 2). When you have worked 1 round of rib, change to light oak. Continue the rib until the piece measures 4 cm from the cast-on edge. Change to circular needle size 4 mm. Knit 1 round where you decrease 4 stitches evenly on round = 104-104-112 stitches. Then work A.5 in the round (= 13-13-14 repeats of 8 stitches). Continue this pattern. REMEMBER THE KNITTING TENSION! When A.5 has been completed, work A.6 in the round. A.6 is repeated to finished length. When the piece measures 21-22-23 cm insert 8 marker threads in the piece as follows: The first marker thread is inserted at the beginning of the round. The next 7 marker threads are inserted with 13-13-14 stitches between each one. On the next round, decrease 1 stitch before each of the 8 marker threads – read DECREASE TIP = 8 stitches decrease. Decrease like this every 2nd round a total of 6-6-5 times and then every round a total of 2-2-4 times = 40 stitches left for all sizes. Knit 2 rounds where all the stitches are knitted together 2 and 2 on both rounds = 10 stitches left for all sizes. Cut the strand, pull it through the remaining stitches, tighten and fasten well. The hat measures approx. 26-27-28 cm from the top down. |
||||||||||||||||||||||||||||||||||
Diagram explanations |
||||||||||||||||||||||||||||||||||
|
||||||||||||||||||||||||||||||||||

|
||||||||||||||||||||||||||||||||||

|
||||||||||||||||||||||||||||||||||

|
||||||||||||||||||||||||||||||||||
|
||||||||||||||||||||||||||||||||||
Have you finished this pattern?Tag your pictures with #dropspattern #wintercarnivalsweater or submit them to the #dropsfan gallery. Do you need help with this pattern?You'll find 28 tutorial videos, a Comments/Questions area and more by visiting the pattern on garnstudio.com. © 1982-2025 DROPS Design A/S. We reserve all rights. This document, including all its sub-sections, has copyrights. Read more about what you can do with our patterns at the bottom of each pattern on our site. |
||||||||||||||||||||||||||||||||||


With over 40 years in knitting and crochet design, DROPS Design offers one of the most extensive collections of free patterns on the internet - translated to 17 languages. As of today we count 314 catalogues and 11820 patterns translated into English (UK/cm). 11820
We work hard to bring you the best knitting and crochet have to offer, inspiration and advice as well as great quality yarns at incredible prices! Would you like to use our patterns for other than personal use? You can read what you are allowed to do in the Copyright text at the bottom of all our patterns. Happy crafting!
Post a comment to pattern DROPS 196-6
We would love to hear what you have to say about this pattern!
If you want to leave a question, please make sure you select the correct category in the form below, to speed up the answering process. Required fields are marked *.