
Popular categories
Looking for a yarn?


Comments / Questions (24)
![]() Erika Walzl wrote:
Erika Walzl wrote:
Sorry, aber die Anleitung stimmt nach wie vor nicht. Das Diagramm passt nicht zur Strickschrift. Was ist denn nun richtig. Die Korrektur ist nicht sichtbar.
07.10.2020 - 20:54DROPS Design answered:
Liebe Frau Walzl, könnten Sie uns bitte erklären, was hier nicht stimmt? Wenn Sie dieses Modell nach der Korrektur gedruckt haben, dann stimmt die Anleitung, sonnst drücken Sie am besten die Anleitung nochmal. Haben Sie diese Lektion gelesen?
08.10.2020 - 10:22
![]() Christian wrote:
Christian wrote:
Bjr à toutes et a tous voilà la clef du problémes il s agit tout simplement de reprendre A1 et de rajouter 1 maille au symbole central du premier rang et d inverser ensuite les données de ce symbole ( 2 end, 2 env) ensuite une maille en + au deux symboles sur le coté; bon tricot
24.12.2019 - 07:59
![]() Eila Sillman wrote:
Eila Sillman wrote:
Har stickat pannbandet och det gick bra, men nu när jag skulle sticka halsvärmaren, så stämmer det inte med mönstret, får avjgmaskor på där det ska vara räta. Har gjort om och om igen. Måste vara fel någonstans i beskrivningen eller dom täcken som visar hur man gör, gäller A.2 Blir snart tokig
15.12.2019 - 17:43
![]() Mary wrote:
Mary wrote:
This pattern for the headband has mistakes. I have read and re-read the pattern and have ripped out my work 5 times. I am so frustrated I'm near tears. Does anyone have a corrected pattern for this headband in written pattern and NOT a diagram? Please post and Thank you.
10.01.2019 - 07:13DROPS Design answered:
Dear Mary, start reading diagram on the bottom corner on the right side from RS and read from the right towards the left, read the WS rows from the left towards the right. Each symbol represents a group of sts - see diagram key. Follow each row as shown in diagram. Should you need any help reading diagrams, you are welcome to contact the store where you bought the yarn - even per mail or telephone. Happy knitting!
10.01.2019 - 13:00
![]() Carina wrote:
Carina wrote:
Hej! Jag har lite svårt att förstå diagrammet. Skall jag läsa från höger till vänster samtliga varv eller ska jag läsa från vänster till höger varannat varv?
07.08.2018 - 19:36DROPS Design answered:
När du stickar varv från rätsidan läser du diagrammet från höger till vänster och när du stickar varv från avigsidan läser du diagrammet från vänster till höger.
13.08.2018 - 14:26
![]() Susana Rodríguez-Vida wrote:
Susana Rodríguez-Vida wrote:
Veo que Drops no ha tenido en cuenta mi comentario de hace un mes y no ha corregido los errores del patrón. Es una gran lástima, porque nadie puede reproducirlo tal como está, como se deduce de los comentarios de las lectoras. Con mis correcciones, en cambio, yo sí he logrado reproducirlo, lo que confirma la validez de mis correcciones.
04.04.2018 - 18:46
![]() Susana Rodríguez-Vida wrote:
Susana Rodríguez-Vida wrote:
Es imposible reproducir el dibujo del cuello porque hay varios errores, 1) La explicación del signo V debe decir “colocar por DELANTE”. 2) La explicación del triángulo debe decir “colocar por DETRÁS, 2 DERECHOS, 2 REVESES”. 3) En el diagrama hay que invertir las líneas 1 y 5 (vuelta 1, “V triángulo V” ; vuelta 5, “triángulo V triángulo”. Una vez corregidos todos estos errores ¡he logrado reproducir fielmente el dibujo!
04.03.2018 - 16:58
![]() Susana Rodríguez-Vida wrote:
Susana Rodríguez-Vida wrote:
En las explicaciones en español de los diagramas hay un error. La última línea, la que describe la acción de la diagonal que se eleva a la derecha, no debe decir "colocar por detrás" (que, de hecho, es lo que se indica también para la diagonal en sentido inverso), sino "colocar por delante", tal como he comprobado al cotejar con el original noruego. Vaya no obstante mi felicitación por el magnífico sitio web.
01.03.2018 - 20:33
![]() Gerlinde wrote:
Gerlinde wrote:
Sehr geehrte Damen und Herren, was mache ich falsch? Seit einigen Tagen druckt mein Drucker nicht mehr die vollständige Anleitung aus: z.B.von dem Set 180-10 lediglich die Seiten 1 und 2. Die früher ausdruckbaren Seiten 3 und 4 werden nicht mal mehr angezeigt. Liebe Grüße Gerlinde
05.12.2017 - 17:34DROPS Design answered:
Liebe Gerlinde, die Druckeinstellungen sollen Sie sicher prüfen, es wurde hier auch 4 Seiten gedruckt. Aktualisieren Sie die Seite, dann noch mal probieren, es kann wegen Ihr Browser kommen. Viel Spaß beim stricken!
06.12.2017 - 09:02
![]() Trinca wrote:
Trinca wrote:
Bonjour: après moult essais , impossible d'avoir le même effet que la photo. N'y aurait-il pas encore des erreurs au niveau du 5ème rang??? Il apparait 2 mailles en mousses au milieu des torsades en jersey. Merci de votre aide.
03.12.2017 - 10:19DROPS Design answered:
Bonjour Mme Trinca, pouvez-vous indiquer de quel diagramme vous parlez pour que les vérifications puissent être faites, merci d'avance.
04.12.2017 - 10:57
|
|||||||||||||||||||||||||
Dovre#dovreset |
|||||||||||||||||||||||||
 |
 |
||||||||||||||||||||||||
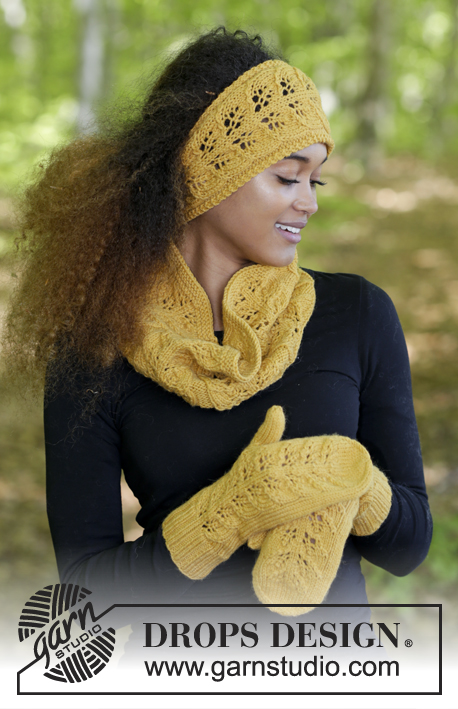
Set consists of: Knitted head band and neck warmer with garter stitch and cables. All parts are knitted in DROPS Snow.
DROPS 180-10 |
|||||||||||||||||||||||||
|
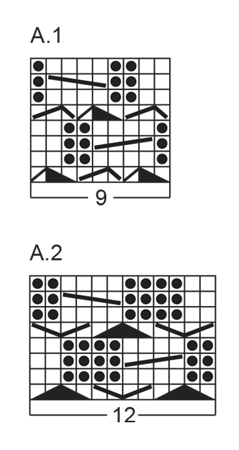
INFORMATION FOR PATTERN: GARTER STITCH (back and forth): 1 ridge = knit 2 rows. PATTERN: Head band: See diagram A.1. Neck warmer: See diagram A.2. Diagrams show all rows in pattern seen from the right side. SHORT ROWS: Work short rows in each side of neck warmer as follows: ROW 1 (= right side): Work the first 6 stitches in garter stitch, turn piece. ROW 2: (= wrong side): Tighten yarn and knit the 6 stitches in garter stitch. ROW 3: Work over all stitches. ROW 4: Work the first 6 stitches in garter stitch, turn piece. ROW 5: Tighten yarn and knit the 6 stitches in garter stitch. ROW 6: Work over all stitches. ---------------------------------------------------------- HEAD BAND: Work piece back and forth on needle. Cast on 17 stitches on needle size 8 mm with Snow. Work next row as follows from right side: 4 stitches in GARTER STITCH - see explanation. A.1 (= 9 stitches), 4 stitches in garter stitch. REMEMBER THE KNITTING TENSION! Continue with A.1 with 4 stitches in garter stitch in each side until piece measures 54 cm - finish with last row in A.1. Loosely cast off all stitches. Sew head band together mid back with grafting/kitchener stitches. ---------------------------------------------------------- NECK WARMER: Work piece back and forth on needle. Cast on 24 stitches on needle size 8 mm with Snow. Work next row as follows from right side: 6 stitches in GARTER STITCH - see explanation. A.2 (= 12 stitches), 6 stitches in garter stitch. Work A.2 with 6 stitches in garter stitch in each side and work SHORT ROWS - see explanation above - on every 6 cm. REMEMBER THE KNITTING TENSION! Insert 1 marker at the end of next row from right side when piece measures 22 cm (sew neck warmer together here later). Continue until piece measures approx. 76 cm in the middle of neck warmer - finish with last row in A.2, loosely cast off all stitches. ASSEMBLY: Sew cast-off edge between cast-on edge and marker inserted in the side to form a tip at the front - sew neatly edge to edge to avoid a chunky seam. |
|||||||||||||||||||||||||
Diagram explanations |
|||||||||||||||||||||||||
|
|||||||||||||||||||||||||
|
|||||||||||||||||||||||||
Have you finished this pattern?Tag your pictures with #dropspattern #dovreset or submit them to the #dropsfan gallery. Do you need help with this pattern?You'll find 20 tutorial videos, a Comments/Questions area and more by visiting the pattern on garnstudio.com. © 1982-2025 DROPS Design A/S. We reserve all rights. This document, including all its sub-sections, has copyrights. Read more about what you can do with our patterns at the bottom of each pattern on our site. |
|||||||||||||||||||||||||


With over 40 years in knitting and crochet design, DROPS Design offers one of the most extensive collections of free patterns on the internet - translated to 17 languages. As of today we count 314 catalogues and 11820 patterns translated into English (UK/cm). 11820
We work hard to bring you the best knitting and crochet have to offer, inspiration and advice as well as great quality yarns at incredible prices! Would you like to use our patterns for other than personal use? You can read what you are allowed to do in the Copyright text at the bottom of all our patterns. Happy crafting!
Post a comment to pattern DROPS 180-10
We would love to hear what you have to say about this pattern!
If you want to leave a question, please make sure you select the correct category in the form below, to speed up the answering process. Required fields are marked *.