
Popular categories
Looking for a yarn?


Comments / Questions (100)
![]() Turid S wrote:
Turid S wrote:
Hei, jeg skal begynne med denne dressen, bruker å lese gjennom mønsteret før jeg begynner. Kan ikke se noe montering . ser heller ikke hva vi skal gjøre med stolpene øverst vist vi må sy en maskin søm gjennom den.
30.08.2019 - 11:21
![]() Nienke Van Der Voort wrote:
Nienke Van Der Voort wrote:
Ik brei Wild Blueberries. Ik wil graag weten hoe ik patroon A1 moet starten: het lijkt in de tweede naald een witte steek wordt gemeerderd (1e steek). Klopt dat? En moet dat dan ook iedere keer herhaald worden, net zoals het hele patroon 11 x herhaald wordt per naald? En geldt dat dan ook voor de meeraderig en verderop in het telpatronen? Dus herhalen? Dank voor uw antwoord!
08.07.2019 - 22:47DROPS Design answered:
Dag Nienke,
In A.1 begin je inderdaad met een omslag, dus een meerdering. Deze meerdering herhaal je inderdaad bij elke herhaling in de breedte, dus telkens na de 6 steken. Dit geldt ook voor de meerderingen verderop.
12.07.2019 - 08:22
![]() Christiane wrote:
Christiane wrote:
Ich habe eine Frage zu den Zunahmen im Musterabschnitt A.1. Bei den Tipps zum Zunehmen der Maschen steht, daß man nicht bei den Blenden zunehmen soll. Wenn ich aber den Umschlag am Anfang oder Ende des Rapports weglasse, weil dann die Blende kommt, fehlt diese Masche ja im weiteren Verlauf. Oder soll die dann früher eingearbeitet werden? Oder bezieht sich der Tipp nur auf die Ab-/Zunahmen, die nicht im Musterabschnitt erfolgen?
11.02.2019 - 20:32DROPS Design answered:
Liebe Christiane, ABNAHME-/ZUNAHMETIPP gilt für die Ab- sowie Zunahmen, die regelmäßig verteilt gestrickt werden (z.B. nach dem Bündchen und vor der Erhöhung am Hals). Bei A.1 stricken Sie die Zunahmen, wie sie im Diagram erscheinen (mit 1 Umschlag, der verschränkt gestrickt wird). Viel Spaß beim stricken!
12.02.2019 - 08:45
![]() Janine wrote:
Janine wrote:
Aansluitend op mijn vorige vraag: ik brei dit patroon met deze kleuren in het rond (naar patroon Winterberries), vandaar dat ik telkens middenachter van pattoon/kleur wissel.
18.01.2019 - 09:36
![]() Janine wrote:
Janine wrote:
Ik ben nu bezig met de pas en in de12e naald van het patroon A1. Ik ben ontevreden over middenachter. Het patroon sluit daar niet mooi aan. Ik lees daar niets over in de beschrijving. Kunt u mij helpen?
18.01.2019 - 09:24DROPS Design answered:
Dag Janine,
Helaas kun je altijd een beetje en verspring zien als je een scandinavisch patroon in de rondte breit.
23.01.2019 - 11:06
![]() Anne Grete Jagland wrote:
Anne Grete Jagland wrote:
Oppskrift 27-1 children har feil type garn i forhold til mengde og farge oppgitt. Har dermed blitt helt feil.
08.11.2018 - 13:56DROPS Design answered:
Hej Anne Grete, hvis du skriver til os hvad som er fejl, så skal vi se på det så hurtigt som muligt :)
09.11.2018 - 12:48
![]() Christine wrote:
Christine wrote:
Wie kann ich diese Anleitung auf Größe 134 umändern?? Viele Grüße Christine
30.10.2018 - 14:45DROPS Design answered:
Liebe Christine, leider können wir nicht jeder Anleitung nach jeden Anfrage anpassen. Nehmen Sie bitte Kontakt mit Ihrem DROPS Laden auf - auch telefonisch oder per Email. Viel Spaß beim stricken!
30.10.2018 - 16:02
![]() Ane wrote:
Ane wrote:
Strikker st. 3/4 og kan ikke få det til at passe. Jeg har regnet ud hvor mange masker der skal være efter hver udtagning og ende med 220 m. hvilket er korrekt. Mener det begynder at gå galt efter p. 13, herefter har jeg skiftevis for mange eller for lidt masker, det er meget frustrerende. Masker ved start 88, efter1. Udtagning 99 m derefter 2. Udt.= 121m derefter 132m-143m-154m (her starter problemerne) -165m-176m-187m-198m=209m-220m slut.
29.10.2018 - 20:40
![]() Marit wrote:
Marit wrote:
Går det an å få litt hjelp angående begynnelsen på mønsteret
22.10.2018 - 16:41DROPS Design answered:
Hei Marit. Klart du kan. Jeg antar det er dressen du strikker? Etter at det er strikket forhøyning skal du strikke etter A.1 (velg diagram etter størrelse). Diagrammet leses som vanlig: fra nederst til øverst, fra høyre mot venstre. Første omgangen begynner hver rapport med 1 kast - NB ikke den siste "rapporten" av A.1, rett før stolpen, der du kun strikker 1. masken i A.1. Etter første omgang har du økt 1 maske på begynnelsen av hver hele rapport av A.1 = 11-12-11-11 masker økt på omgangen. Er det noe spesifikt du lurer på angående begynnelsen av mønstert? God fornøyelse.
23.10.2018 - 09:16
![]() Carielle Wilhelmsen wrote:
Carielle Wilhelmsen wrote:
Er det mye vanskelig å strikke denne nedenfra og opp? Syns det er vanskelig med ovenfra og ned...
31.03.2018 - 15:41DROPS Design answered:
Hej Carielle, ja den er lettere at strikke ovenfra og ned. Begynd med at markere tallene i din størrelse så bliver det lettere at følge rad efter rad. God fornøjelse!
04.04.2018 - 13:44
|
||||||||||||||||
Wild Blueberries#wildblueberriesoverall |
||||||||||||||||
 |
 |
|||||||||||||||
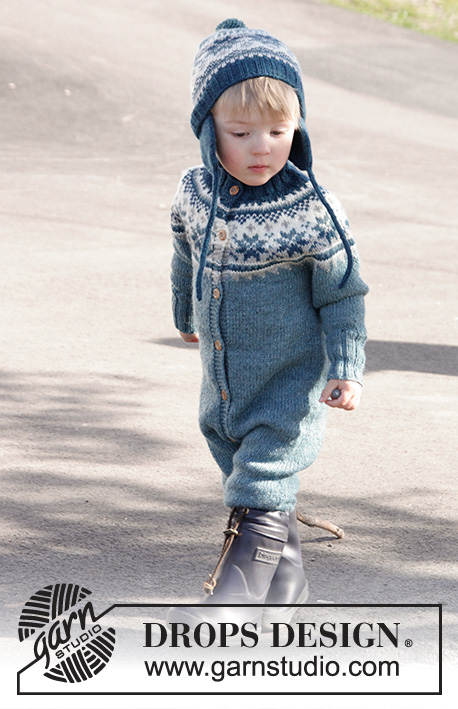
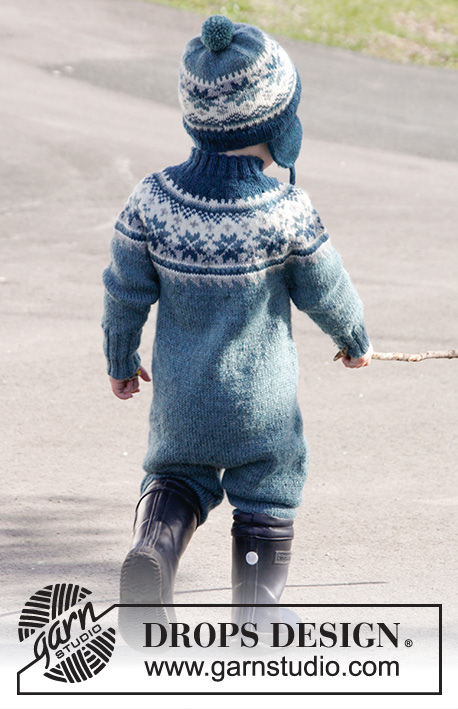
Set of knitted overall worked top down with Nordic pattern and round yoke, plus hat with ear flaps and pompom in DROPS Karisma. Size children 1 - 6 years
DROPS Children 27-1 |
||||||||||||||||
|
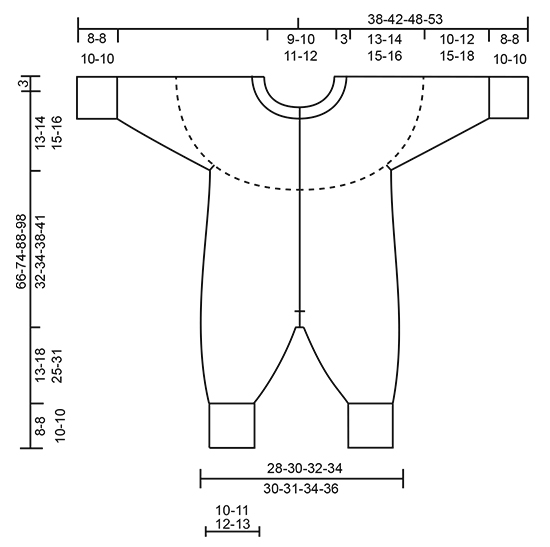
SUIT: GARTER ST (back and forth): K all rows. 1 ridge = 2 rows K. PATTERN: See diagram A.1 - NOTE: Choose diagram for correct size. Work entire pattern in stocking st. KNITTING TIP (applies to bands): On the rows where there are either stripes or pattern border work the colour in the stripes or the base colour of pattern border also over the 5 band sts in each side but do yarn change between band and body (to avoid fastening the yarn on band). DECREASE/INCREASE TIP: To calculate how often dec/inc should be done, use the total no of sts on row (e.g. 84 sts), minus bands (e.g. 10 sts) and divide the remaining sts by no of dec/inc to be done (e.g. 7) = 10.6. I.e. In this example dec by working alternately approx. every 9th and 10th st and 10th and 11th st tog or inc after alternately approx. every 10th and 11th st by making 1 YO (work YO twisted on next row to avoid hole – NOTE: Do not inc/dec over bands). INCREASE TIP-1: Inc 1 st on each side of marker as follows: Beg 2 sts before marker and make 1 YO, work 4 sts (marker is in the middle of these 4 sts), make 1 YO (= 2 sts inc). On next row work YOs twisted to avoid holes. DECREASE TIP-1 (applies to mid under sleeve and on inside of leg): Dec 1 st on each side of marker as follows: Beg 3 sts before marker and K 2 tog, K 2 (marker is between these 2 sts), slip 1 st as if to K, K 1, psso (= 2 sts dec). BUTTONHOLES: Dec for buttonhole on right band (when garment is worn). 1 button hole = beg from WS and K tog second and third st from edge and make 1 YO. On next row K the YO to make a hole. Dec for first buttonhole after 1½-2 cm on neck edge, then dec the next 5-5-6-6 buttonholes every 7½-8-7½-8 cm. ---------------------------------------------------------- SUIT: Worked back and forth on circular needle from mid front. To make it easier to adjust the length of sleeves and legs the suit is worked top down. YOKE: Cast on 84-88-92-96 sts (incl 5 band sts in each side towards mid front) on a short circular needle size 3 mm with petrol. P 1 row from WS. Work next row as follows from RS: 5 band sts in GARTER ST - see explanation above - * K 2, P 2 *, repeat from *-* until 7 sts remain on needle, finish with K 2 and 5 bands sts in garter st. Continue rib like this for 3 cm – remember BUTTONHOLES on right band – see explanation above and finish after 1 row from RS (= neck edge). Switch to circular needle size 4 mm. P 1 row from WS while dec 7-5-4-1 sts evenly - READ DECREASE/INCREASE TIP = 77-83-88-95 sts on needle. Then work an elevation at the back in stocking st as follows: K until 12-13-14-15 sts remain, turn, tighten yarn and P until 12-13-14-15 sts remain in the other side. Turn, tighten yarn and K until 20-22-24-26 sts remain, turn, tighten yarn and P until 20-22-24-26 sts remain in the other side. Turn, tighten yarn and K until 28-31-34-37 sts remain, turn, tighten yarn and P until 28-31-34-37 sts remain in the other side. Turn, tighten yarn and K the rest of row, then P 1 row from WS (work bands in garter st). Work next row as follows from RS: 5 band sts in garter st, work pattern according to diagram A.1 until 6 sts remain on row - NOTE: Choose diagram for correct size (= 11-12-11-12 repetitions of 6-6-7-7 sts), work first st in A.1 (so that pattern beg and ends the same way inside band in each - NOTE: Do not inc in this st) and finish with 5 band sts in garter st. Continue pattern like this and inc as shown in diagram - READ KNITTING TIP AND REMEMBER KNITTING TENSION. When A.1 has been worked = 187-203-220-239 sts on needle. Work 0-1-0-1 cm with green. Piece now measures approx. 13-14-15-16 cm mid front (measured without rib in the neck). Now work piece in stocking st with green. On first row from RS inc now 7-7-10-7 sts evenly (do not inc over bands) = 194-210-230-246 sts. Work next row as follows from WS: Work 29-31-34-36 sts as before, slip the next 42-46-50-54 sts on 1 stitch holder for sleeve (without working them first), cast on 6 new sts on row, work 52-56-62-66 sts (= back piece), slip the next 42-46-50-54 sts on 1 stitch holder for sleeve (without working them first), cast on 6 new sts on row and work 29-31-34-36 sts as before. BODY: = 122-130-142-150 sts. Insert 1 marker 32-34-37-39 sts in from each side (= 58-62-68-72 sts between markers on back piece). NOW MEASURE PIECE FROM HERE! Then continue back and forth in stocking st and 5 band sts in garter st in each side towards mid front - remember BUTTONHOLES on band. When piece measures 10-10-12-12 cm, inc on each side of both markers – READ INCREASE TIP 1 (= 4 sts inc). Repeat inc when piece measures 20-20-24-24 cm = 130-138-150-158 sts. When piece measures 29-31-35-38 cm from armhole, end bands mid front. Cast off the first 3 sts at the beg of the next 2 rows = 124-132-144-152 sts. Then work in stocking st in the round over all sts for approx. 3 cm – piece now measures 32-34-38-41 cm from armhole and 45-48-53-57 cm from mid front (measured without rib in neck). Now divide for legs. LEG: Beg mid front, switch to double pointed needles size 4 mm and work in stocking st in the round over the first 62-66-72-76 sts (keep the remaining 62-66-72-76 sts on circular needle). Insert 1 marker at beg of round = inside of leg. On next round, dec 2 sts on inside of leg - READ DECREASE TIP-1 (= 2 sts dec). Dec like this every round a total of 2-3-3-3 times = 58-60-66-70 sts. Then dec every 4th-5th-7th-9th round a total of 8-7-8-8 times = 42-46-50-54 sts. When leg measures 13-18-25-31 cm, inc 10 sts evenly = 52-56-60-64 sts. Switch to double pointed needles size 3 mm and work rib in the round = K 2/P 2 for 8-8-10-10 cm (or desired length). On next round, inc all 2 P sts to 3 P sts = 65-70-75-80 sts. Then cast off sts with K over K and P over P. Slip sts from circular needle on double pointed needles size 4 mm and work the other leg the same way. Entire suit now measures approx. 66-74-88-98 cm mid front (measured without rib in the neck). SLEEVE: Slip sts from one stitch holder back on double pointed needles size 4 mm, pick up 1 st in each of the 6 sts cast on under sleeve = 48-52-56-60 sts. Insert 1 marker in the middle of the 6 sts (= mid under sleeve). NOW MEASURE PIECE FROM HERE! Work in stocking st in the round with green. When sleeve measures 2-2-1-1 cm, dec 2 sts mid under sleeve - READ DECREASE TIP-1. Repeat dec every 3rd-3rd-4th-4th round a total of 7-9-10-12 times = 34-34-36-36 sts. When sleeve measures 10-12-15-18 cm, inc 6-6-8-8 sts evenly = 40-40-44-44 sts. Switch to double pointed needles size 3 mm and work rib in the round = K 2/P 2 for 8-8-10-10 cm (or desired length). On next round, inc all 2 P sts to 3 P sts = 50-50-55-55 sts. Then cast off sts with K over K and P over P. Work the other sleeve the same way. ASSEMBLY: Place right band over left band and fasten at the bottom with small stitches. Sew the buttons on to the left band. ---------------------------------------------------------- HAT: PATTERN: See diagram A.2. Work entire pattern in stocking st. DECREASE TIP-1: Dec 1 st after every marker as follows: Slip 1 st as if to K, K 1, psso (= 1 st dec). DECREASE TIP-2: Beg 2 sts before marker, K 2 tog, marker, slip 1 st as if to K, K 1, psso (= 2 sts dec). TUBE TIE: Slip the 4 sts tog on 1 double pointed needle size 3 mm. K 1 row, * move all sts to the right side of needle without turning piece, tighten yarn and K over all sts *, repeat from *-* until desired length. ---------------------------------------------------------- HAT: Worked in the round on circular needle from the bottom up, switch to double pointed needles when needed. Cast on 96-112 sts on circular needle size 3 mm with petrol. K 1 round. Then work rib = K 2/P 2 for 3 cm. Switch to circular needle size 3.5 mm and K 1 round while at the same time dec 12-16 sts evenly = 84-96 sts. Then work pattern according to diagram A.2 (= 7-8 repetitions of 12 sts). REMEMBER THE KNITTING TENSION When A.2 has been worked, piece measures approx. 14 cm. Work with green until piece measures 15-17 cm. Now insert 6 markers in piece with 14-16 sts between every marker. On next round dec 1 st after every marker - SEE DECREASE TIP 1 (= 6 sts dec). Dec like this every other round a total of 5 times and then every round 3 times in total = 36-48 sts. On next round K all sts tog 2 by 2, K 1 round and K all sts tog 2 by 2 again = 9-12 sts remain on needle. Cut the yarn and pull it through the remaining sts, tighten tog and fasten. Hat measures approx. 20-22 cm. EAR FLAP: Cast on 40-44 sts with petrol and distribute sts on 2 double pointed needles size 3 mm = 20-22 sts on each needle. Work in stocking st in the round on these 2 needles - NOTE: Tighten yarn in every transition between the 2 needles when working. When ear flap measures 5-6 cm, insert 1 marker in each side. On next round dec 2 sts in each side - SEE DECREASE TIP 2. Dec like this every other round a total of 5-5 times and then every round 4-5 times in total = 4 sts remain on needle. Work TUBE TIE – see explanation above – over the remaining sts until tie measures approx. 20-25 cm. Cut the yarn and pull it through sts, tighten tog and fasten. Knit another ear flap the same way. ASSEMBLY: Place ear flaps approx. 3 cm in under rib on hat and fasten on WS - NOTE: There should be approx. 13-15 cm between ear flaps at the front (= approx. 7-9 cm between ear flaps at the back). Make a pompom with green, 4-5 cm in diameter and fasten pompom at the top of hat. |
||||||||||||||||
Diagram explanations |
||||||||||||||||
|
||||||||||||||||

|
||||||||||||||||

|
||||||||||||||||
|
||||||||||||||||
Have you finished this pattern?Tag your pictures with #dropspattern #wildblueberriesoverall or submit them to the #dropsfan gallery. Do you need help with this pattern?You'll find 38 tutorial videos, a Comments/Questions area and more by visiting the pattern on garnstudio.com. © 1982-2025 DROPS Design A/S. We reserve all rights. This document, including all its sub-sections, has copyrights. Read more about what you can do with our patterns at the bottom of each pattern on our site. |
||||||||||||||||


With over 40 years in knitting and crochet design, DROPS Design offers one of the most extensive collections of free patterns on the internet - translated to 17 languages. As of today we count 314 catalogues and 11820 patterns translated into English (UK/cm). 11820
We work hard to bring you the best knitting and crochet have to offer, inspiration and advice as well as great quality yarns at incredible prices! Would you like to use our patterns for other than personal use? You can read what you are allowed to do in the Copyright text at the bottom of all our patterns. Happy crafting!
Post a comment to pattern DROPS Children 27-1
We would love to hear what you have to say about this pattern!
If you want to leave a question, please make sure you select the correct category in the form below, to speed up the answering process. Required fields are marked *.