
Popular categories
Looking for a yarn?


Comments / Questions (43)
![]() Nina wrote:
Nina wrote:
Hallo liebes Drop Design Team, ich habe ein Problem mit dem Übergang zum Daumen und mit dem Daumenschlauch. Seit mehreren Tagen sitze ich bereits daran und bekomme es nicht hin. Ich habe die drei Maschen abgekettet und dann in der nächsten Runde 13 neue Maschen nach Bild A2 aufgenommen. Aber es entsteht immer ein Loch. Könnt ihr mir da bitte helfen? Ich weiß auch nicht genau, wieso ich mich damit so schwer tue. Vielen Dank und liebe Grüße Nina
12.01.2018 - 09:04DROPS Design answered:
Liebe Nina, aus der Daumenöffnung werden Sie dann später 22 M auffassen und A.3 stricken - siehe DAUMEN. Viel Spaß beim stricken!
12.01.2018 - 10:02
![]() Marie-Charlotte Stenmarker wrote:
Marie-Charlotte Stenmarker wrote:
Mönster 173-42. Jag stickar sockorna och har kommit till hälen o avmaskningen, men får inte ihop avkastningen att det ska vara 10 masker kvar i kanten. Det blir ju ett stort hål där. Skulle vilja att det minskar maskor på sidorna istället. Hoppas att ni kan hjälpa mig. Mvh Marie-Charlotte
18.12.2017 - 21:49
![]() Mathilde wrote:
Mathilde wrote:
Bonjour, Il y a une petite erreur à la fin du patron des chaussettes, il faut lire "Augmenter ainsi 3 fois au total tous les 4 cm = 60-60-62 m", et non 4 fois comme indiqué. Me semble-t-il...
17.02.2017 - 02:13DROPS Design answered:
Bonjour Mathilde, merci pour votre retour, la correction a été faite. Bon tricot!
21.02.2017 - 09:03
![]() Simone wrote:
Simone wrote:
Hallo, Wenn ich die Socken in Größe 38/40 stricke, soll ich zu Anfang das Muster A.4 und A.5A stricken, bis ich eine Länge von 17cm habe. Danach werden seitlich Maschen aufgenommen und die Ferse gestrickt. Wenn ich 17 cm stricke, ist der Fuß nach der Ferse viel zu lang. Ich habe nur ca. 14 cm gestrickt, dann hat der Socken gepasst. Was mache ich falsch?
22.12.2016 - 11:18DROPS Design answered:
Liebe Simone, am Anfang stricken Sie zuerst A.4 und dann wiederholen Sie A.5A bis 17 cm - Die Zunahmen werden dann in Streifen gestrickt (ca 6 cm) und dann beginnt der Ferse - gerne können Sie auch die Massen nach Ihrem Fuß anpassen. Viel Spaß beim stricken!
22.12.2016 - 14:50
![]() Rebecka wrote:
Rebecka wrote:
Hej. Jag har svårt att lista ut hur man ska göra tummen. Tycker att det i texten om själva vanten verkar som att man ska sticka tummen sist, men i texten om tummen att man ska sticka den samtidigt. Hur ska man göra? Stickas den samtidigt som en kil? Var plockar du upp maskorna i så fall? Hur ska man kunna plocka upp 13 maskor på de tre man maskade av? Hoppas att ni förstår vad jag menar och kan hjälpa mig. Mvh Rebecka
24.11.2016 - 09:24DROPS Design answered:
Hej Rebecka. Du strikker först selve vanten, men tager ud til start af tommelen (=kilen). Du har saa lukket af 3 m baade under og oven, saa der er plads nok til at tage 13 m op omkring aabningen.
24.11.2016 - 15:31
![]() Vic wrote:
Vic wrote:
Don't know what your problem is but these diagrams are not printable. Please send the diagrams to me. NOT PRINTING. LIKE EVERYONE ELSE HAS SAID.
12.10.2016 - 17:41DROPS Design answered:
Dear Vic, we have just made several test on different browsers and were able to print the pattern and the diagrams - try to refresh the page and launch printing again. Happy knitting!
13.10.2016 - 08:10
![]() Polly Warnes wrote:
Polly Warnes wrote:
I have tried to print this pattern and although the text print perfectly, the charts do not, it is blank paper. I even saved the image of the charts to my computer but when I try to print them, nothing prints. Can you rectify this please.
27.08.2016 - 12:54DROPS Design answered:
Dear Mrs Warnes, we made a succesfull test, make sure to print all pages and avoid selecting pages that could be the reason why you cannot print all. Happy knitting!
29.08.2016 - 11:31
![]() Diane Gagnon wrote:
Diane Gagnon wrote:
J'ai fait ce patron,mais il manque le diagramme A3 pour les moufles et A4 et A5 pour les chaussettes..Merci!
23.07.2016 - 22:42DROPS Design answered:
Bonjour Mme Gagnon, les diagrammes A.3 à A.5 sont maintenant visibles. Merci. Bon tricot!
25.07.2016 - 10:29
![]() Anette wrote:
Anette wrote:
Nydelig mønster, men jeg forstår ikke hvorfor dere lager så mange sokkemønstre i Karisma, når det ikke er et sokkegarn. Å strikke sokker av garn som ikke er nylonforsterket er bortkastet tid. Jeg har i mange år ønsket meg at dere lager et sokkegarn i denne tykkelsen, håper dere vil vurdere det.
23.07.2016 - 21:32
![]() Hege wrote:
Hege wrote:
Gleder meg så til å strikke disse, håper oppskriften snart legges ut! 😍
07.07.2016 - 11:25
|
|||||||||||||||||||||||||||||||||||||||||||
Hokey Pokey#hokeypokeyset |
|||||||||||||||||||||||||||||||||||||||||||
 |
 |
||||||||||||||||||||||||||||||||||||||||||
Set consists of: Knitted DROPS mittens and toe-up socks with Nordic pattern, Latvian braid and pompom in ”Karisma”.
DROPS 173-42 |
|||||||||||||||||||||||||||||||||||||||||||
|
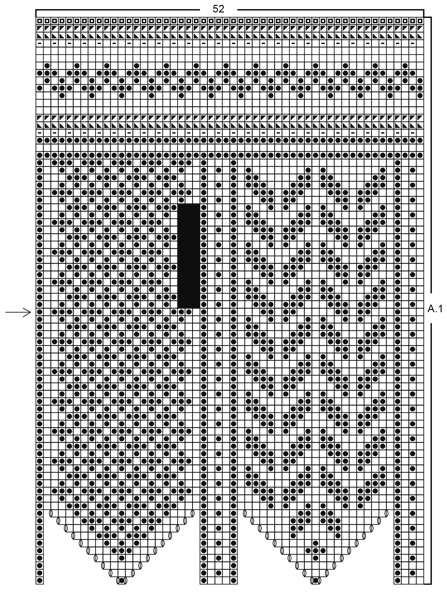
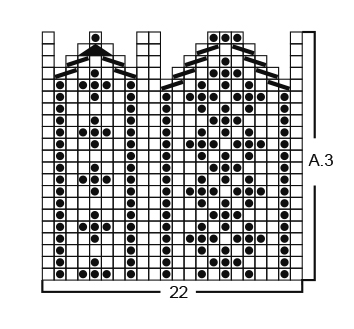
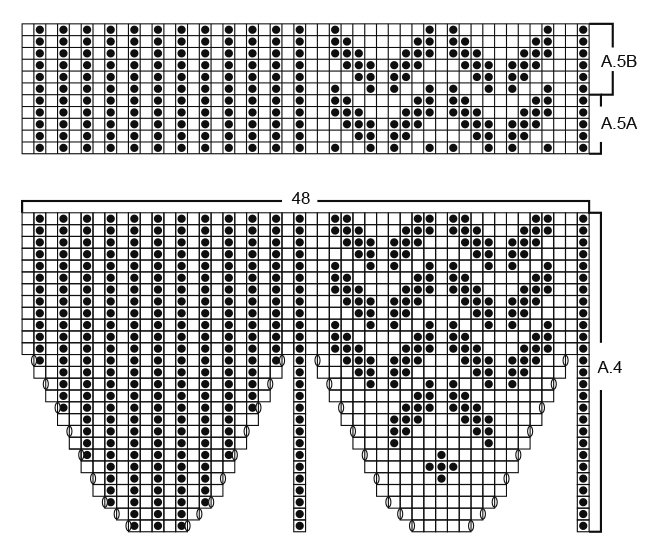
MITTENS: MAGIC CIRCLE: To avoid hole in the middle beg with this technique: Hold yarn end in the left hand and make a loop around left index finger (from left to right). Hold the loop with left thumb and index finger. Insert needle through loop, get yarn from ball (i.e. place yarn 1 time over needle from you), pull yarn back through loop, 1 YO (now place yarn from the back and towards you) and pull YO through sts on needle, * insert needle through loop, 1 YO (place yarn from the back and towards you), pull YO through loop, 1 YO (from the back and towards you) and pull YO through outermost st on right needle (i.e. the last st made) *, repeat from *-* until there are 12 sts on needle. Distribute sts on 4 double pointed needles size 3 mm as explained in pattern. Then work as explained in pattern – AT THE SAME TIME pull yarn end so that loop is tighten tog and the hole disappears. PATTERN: See diagrams A.1 to A.3. Work entire pattern in stocking st. LATVIAN BRAID: Braid consists of 3 rounds - all rounds are shown in diagram and worked as follows: ROUND 1: * K 1 with off white, K 1 with coral *, repeat from *-* the entire round. ROUND 2: Place both strands in the front of piece (towards you). Then move the off white strand to the back, P 1 and move the strand to the front again. Pull the coral strand underneath the off white strand and then move the coral to the back, P 1 and move the strand to the front again. Continue like this with P alternately with off white and coral but always place the strand underneath the strand from the last st worked. ROUND 3: Work as 2nd round but now place strand always OVER strand from the last st worked. ---------------------------------------------------------- LEFT MITTEN: Worked in the round on double pointed needles and work from fingertip to wrist. Start with mustard and MAGIC CIRCLE - see explanation above = 12 sts distributed on 4 double pointed needles 3 mm - NOTE: If you do not want to start with a magic circle cast on 12 sts with mustard distributed over 4 double pointed needles size 3 mm (when mitten is done baste a yarn up and down through sts around hole at the top and tighten tog). Then work pattern in the round according to diagram A.1 and inc as shown in diagram = 52 sts on needle. REMEMBER THE KNITTING TENSION When piece measures 12 cm from the tip (i.e. after round marked with arrow in diagram), cast off 3 sts over the 3 black squares in diagram for thumb opening (try the mitten and work to desired length). On next round: cast on 13 new sts over these = 62 sts on needle. NOTE: cast on as if working first row of diagram A.2, ie: cast on with 2 colours. See black star in diagram. Continue A.2 over these 13 sts, and A.1 as over the remaining sts. When A.2 has been worked, there are 52 sts on needle and continue A.1 in the round over all sts again. When A.1 has been worked, loosely cast off with coral. The entire mitten measures approx. 24 cm. THUMB: Pick up 1 st in each of the 13 sts cast on for thumb opening and pick in addition up 9 sts around thumb opening = 22 sts. Distribute sts on double pointed needles size 3 mm and work pattern in the round according to diagram A.3. Dec as shown in diagram. When A.3 has been worked, 8 sts remain on needle. Cut the yarns and pull them through the remaining sts, tighten tog and fasten. POMPOM: Make 1 small pompom with coral with an approx. diameter of 3 cm. When tying the yarn around the pompom leave approx. 20 cm of yarn at the end. Now use the yarn ends and make knots after each other in a row until this tie is approx. 3 cm. Then fasten tie with pompom in the side on mitten (see picture). There should be 2 pompom with ties in the side on mitten. RIGHT MITTEN: Cast on and work as left mitten but reversed, i.e. the 3 black squares for thumb are worked in 2nd, 3rd and 4th st from the left in the diagram. ---------------------------------------------------------- SOCKS: PATTERN: See diagrams A.4 to A.8 – choose diagram for correct size. INCREASE TIP: Inc 1 st by making 1 YO, on next round work YO twisted to avoid holes. HEEL: ROW 1 (= RS): Work until 10-10-11 sts remain, slip 1 st as if to K, K 1, psso, turn piece. ROW 2 (= WS): Work until 10-10-11 sts remain, slip 1 st as if to P, P 1, psso, turn piece. ROW 3 (= RS): Work until 9-9-10 sts remain, slip 1 st as if to K, K 1, psso, turn piece. ROW 4 (= WS): Work until 9-9-10 sts remain, slip 1 st as if to P, P 1, psso, turn piece. Continue dec like this with 1 less st before each dec until there are 17-17-19 sts on needle. LATVIAN BRAID: Braid consists of 3 rounds - all rounds are shown in diagram and worked as follows: ROUND 1: * K 1 with off white, K 1 with coral *, repeat from *-* the entire round. ROUND 2: Place both strands in the front of piece (towards you). Then move the off white strand to the back, P 1 and move the strand to the front again. Pull the coral strand underneath the off white strand and then move the coral to the back, P 1 and move the strand to the front again. Continue like this with P alternately with off white and coral but always place the strand underneath the strand from the last st worked. ROUND 3: Work as 2nd round but now place strand always OVER strand from the last st worked. ---------------------------------------------------------- SOCK: Worked in the round on double pointed needles and work from the toes and up. Cast on 12 sts on double pointed needles size 3.5 mm with off white. Work pattern in the round according to diagram A.4 and inc as shown in diagram = 48 sts on needle. REMEMBER THE KNITTING TENSION When A.4 is done, continue pattern in the round according to diagram A.5A. When piece measures 15-17-18 cm from toe (approx. 7-7-9 cm remain until full foot length – try the sock and work to desired length) insert 1 marker in 1st st on round and 1 marker in 25th st on round (both markers are in a mustard st on sock). Now inc 1 st before first marker and 1 st after 2nd marker - READ INCREASE TIP (= 2 sts inc). Inc like this every other round a total of 6-6-8 times = 60-60-64 sts on needle –NOTE: Work the inc sts in stripes under foot. After last inc keep the first 25 sts on needle and continue with stripes back and forth according to diagram A.6 over the remaining 35-35-39 sts for 3½-3½-4 cm (sock measures 22-24-27 cm from the toe). Then work HEEL - see explanation above, over the 35-35-39 sts (continue stripes in A.6 as before). After heel work next round as follows: Work with off white over the 17-17-19 sts on heel, pick up 8-8-9 sts (with off white) along edge on the 3½-3½-4 cm worked back and forth, continue A.5A over the next 25 sts and pick up 8-8-9 sts along edge on the 3½-3½-4 cm in the other side = 58-58-62 sts on needle. Insert 1 marker, NOW MEASURE PIECE FROM HERE! Work next round as follows: Work pattern according to diagram A.7A over the first 33-33-37 sts (= behind sock) and dec AT THE SAME TIME 4-4-6 sts evenly over these sts on first round, so that pattern continues over 29-29-31 sts, continue A.5A as before over the next 25 sts (= at the front of sock) = 54-54-56 sts on needle. When A.7A has been worked one time vertically, repeat A.7B over these 29-29-31 sts (continue A.5A as before at the front of sock). AT THE SAME TIME when piece measures 4 cm, inc 1 st inside outermost st in each side of A.7B - READ INCREASE TIP (= 2 sts inc). Inc like this every 4 cm a total of 4 times = 60-60-62 sts - NOTE: Work the inc sts in A.7B but the outermost 1-1-2 sts in each side should always be in off white. When piece measures approx. 13-14-15 cm from marker – adjust after one whole repetition in A.5A and finish as shown on last round in A.5B K 1 round over all sts with off white. Then continue pattern in the round according to diagram A.8. AT THE SAME TIME on round marked with arrow inc 4-4-6 sts evenly = 64-64-68 sts. When A.8 has been worked, loosely cast off with coral. Sock measures approx. 19-20-21 cm from marker. ASSEMBLY: Sew opening at the front of toe tog with grafting/kitchener sts in mustard. Knit another sock the same way. |
|||||||||||||||||||||||||||||||||||||||||||
Diagram explanations |
|||||||||||||||||||||||||||||||||||||||||||
|
|||||||||||||||||||||||||||||||||||||||||||
|
|||||||||||||||||||||||||||||||||||||||||||

|
|||||||||||||||||||||||||||||||||||||||||||
|
|||||||||||||||||||||||||||||||||||||||||||
|
|||||||||||||||||||||||||||||||||||||||||||
Have you finished this pattern?Tag your pictures with #dropspattern #hokeypokeyset or submit them to the #dropsfan gallery. Do you need help with this pattern?You'll find 20 tutorial videos, a Comments/Questions area and more by visiting the pattern on garnstudio.com. © 1982-2025 DROPS Design A/S. We reserve all rights. This document, including all its sub-sections, has copyrights. Read more about what you can do with our patterns at the bottom of each pattern on our site. |
|||||||||||||||||||||||||||||||||||||||||||


With over 40 years in knitting and crochet design, DROPS Design offers one of the most extensive collections of free patterns on the internet - translated to 17 languages. As of today we count 314 catalogues and 11820 patterns translated into English (UK/cm). 11820
We work hard to bring you the best knitting and crochet have to offer, inspiration and advice as well as great quality yarns at incredible prices! Would you like to use our patterns for other than personal use? You can read what you are allowed to do in the Copyright text at the bottom of all our patterns. Happy crafting!
Post a comment to pattern DROPS 173-42
We would love to hear what you have to say about this pattern!
If you want to leave a question, please make sure you select the correct category in the form below, to speed up the answering process. Required fields are marked *.