
Popular categories
Looking for a yarn?


Comments / Questions (68)
![]() Marilyn Boyle wrote:
Marilyn Boyle wrote:
I understand how to increase at the two points (top and bottom on A5), but don't understand, nor can I find specific instructions for, 'rounding' the other two points, the ones that will be over the arms. The written pattern seems to say to increase at all 4 points, the diagram says just top and bottom. How do I follow the pattern around (A4), with no increase on the side points (specifically what to do with the corner chains). Thank you in advance.
05.08.2019 - 02:38DROPS Design answered:
Dear Mrs Boyle, the first round explains how to crochet the very first round after square, but then from round 2 you will increase only a total of 2 times = on mid front + on mid back, working 2 dc, 3 ch, 2 dc around the middle ch-space on each side (just as for a granny square), ie you will inc 1 st at the beg of front/back piece + 1 st at the end of front/back piece = 2 sts on each side = 4 sts increased. Happy crocheting!
07.08.2019 - 10:45
![]() Debbie wrote:
Debbie wrote:
Since this Pattern is causing so much trouble, why isn't there an errata addition here? Why aren't there stitch counts after each Rnd? They would make these patterns so much easier to use, I have tried 2 Drops patterns so far, and i had to "fudge" the pattern both times to make it work. I am using The US terms, I have been crocheting for over 50 years, I am not nee at this...I just think that these additions to all your patterns would be very helpful.
11.05.2019 - 01:55DROPS Design answered:
Dear Debbie, all corrections are listed in red at the end of the written pattern, but if you printed the pattern after these corrections, written pattern is correct. The DROPS patterns are knitted and crocheted by thousands and thousands of people around the world. We understand however that in certain countries, with different knitting/crochet traditions than Scandinavia, our patterns might be written in a way that differs from what some are used to. Should you need any individual assistance you are welcome to contact your DROPS store, even per mail or telephone - or to ask your question here. Happy crocheting!
13.05.2019 - 08:45
![]() Desiree Campbell wrote:
Desiree Campbell wrote:
I am also battling to get this first row after joining the squares ..the pattern doesn't read well at all. Is it possible to put a close up picture of the poncho so I can zoom in and try see it in the actual crocheting. This might help a few of us who seem to be having the same problem with A4
28.04.2019 - 22:44DROPS Design answered:
Dear Mrs Campbell, you can get a closer look on this round on the 3rd foto. On the first round from squares and down, work 1 tr (= Uk-English) in each tr on each square working the corners as explained. Work then A.4 starting on row 2 (= the one after the row with a star): (1 ch, skip 1 tr, 1 tr in next tr) repeat from (to). On row 2, work 1 tr around the chain, 1 tr in next tr, repeat these 2 sts. Happy crocheting!
29.04.2019 - 10:51
![]() Linda wrote:
Linda wrote:
On diagram A5 the end squares are one shape, the middle side squares are another shape, and the other two side squares (on both sides) are yet another shape. And yet the instructions say make 8 squares and there is instructions for only one kind of square. How can that be?
24.10.2018 - 22:35DROPS Design answered:
Dear Linda, squares look different on our chart A.5 just due to the shape, but just crochet 8 similar squares and sew them together in a ring as shown in A.5. Happy crocheting!
25.10.2018 - 08:33
![]() Ann Thomas wrote:
Ann Thomas wrote:
Ok squares are finished and joined together - where do I start and how many stitches should you be workin round do I increase on first row sorry I am unable to follow pattern further
18.08.2018 - 23:44DROPS Design answered:
Hi Ann, You start where the black square is in A.5 (on the side of the square) and you work 1 stitch in each stitch apart from at the square corners where you work 2 stitches in each corner. The two corners marked with circles are increased as explained in the text. I hope this helps and happy crocheting!
22.08.2018 - 07:35
![]() Ann Thomas wrote:
Ann Thomas wrote:
Hello do you have a video that carry’s on from the squares once sewn together please I find the instructions confusing Thank you
08.08.2018 - 18:22DROPS Design answered:
Dear Mrs Thomas, the chart A.5 is showing how piece looks when squares are crocheted together. Happy crocheting!
09.08.2018 - 08:30
![]() Julie Cates wrote:
Julie Cates wrote:
I am running out of the beige yarn before starting the striped section. I have two off white skeins left and half of a beige skein left to do the stripes. I ordered for size extra large and wonder if I was shorted a couple of skeins.
01.08.2018 - 00:45DROPS Design answered:
Dear Mrs Cates, it sounds very strange, are you using DROPS Cotton Light? Is your tension correct and did you kept the correct tension while crocheting the piece? The square should measure 15 x 15 cm.
06.08.2018 - 10:17
![]() Julie Cates wrote:
Julie Cates wrote:
I am running out of the beige yarn before starting the striped section. I have two off white skeins left and half of a beige skein left to do the stripes. I ordered for size extra large and wonder if I was shorted a couple of skeins.
31.07.2018 - 22:07
![]() Barbara Bryson wrote:
Barbara Bryson wrote:
Why on earth does this have to be written this way? Seems like it’s meant to confuse.
01.07.2018 - 17:32DROPS Design answered:
Dear Mrs Bryson, should you have any question to this pattern, please feel free to ask your question here. For any further individual assistance, you are welcome to contact the store where you bought the yarn. Happy crocheting!
02.07.2018 - 10:16
![]() Sissau wrote:
Sissau wrote:
Bonjour, lors du 1er tour apres les carrés, à la fin de la seconde augmentation... on ne fait pas de bride autour de la ml?
17.05.2018 - 16:19DROPS Design answered:
Bonjour Mme Sissau, probablement pour que les 2 coins soient identiques, votre question va être transférée à nos stylistes, merci.
18.05.2018 - 08:42
|
|||||||||||||||||||||||||||||||||||||||||||
Sweet Martine#sweetmartineponcho |
|||||||||||||||||||||||||||||||||||||||||||
 |
 |
||||||||||||||||||||||||||||||||||||||||||
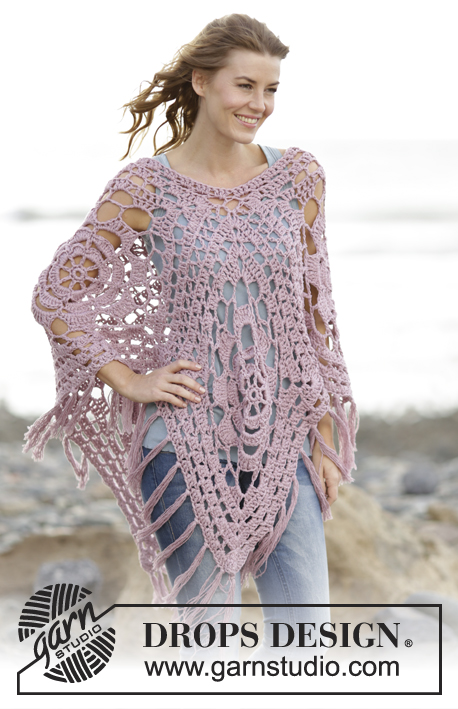
Crochet DROPS poncho with squares and lace pattern in ”Cotton Light”. The piece is worked top down. Size: S - XXXL.
DROPS 167-21 |
|||||||||||||||||||||||||||||||||||||||||||
|
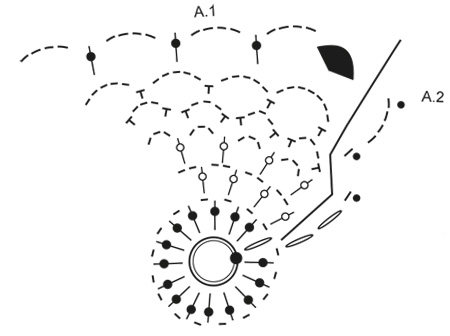
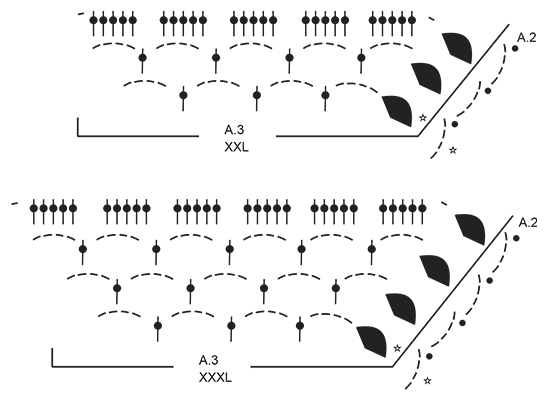
PATTERN: See diagrams A.1 to A.5. On diagram A.1 work first round in the entire round, then repeat A.1 and A.3 4 times in total on round. Diagram A.2 shows how every round beg and ends. A.5 shows how squares are assembled. CROCHET INFO: Beg every round with tr with 3 ch and finish with 1 sl st in 3rd ch. STRIPES: Work 0-4-4-4 rounds with light beige, then work * 2 rounds with off white, work 4 round with light beige *, repeat from *-* 3 times in total. INCREASE: On 1st round in A.4 (i.e. round with tr and ch) inc as follows: Work 1 ch, around ch-space at the tip work as follows: 2 tr around ch-space, 3 ch, 2 tr around same ch-space. On 2nd round in A.4 (i.e. round with tr) inc as follows: Work 1 tr around ch, around ch-space at the tip work as follows: 2 tr around ch-space, 3 ch, 2 tr around same ch-space. ---------------------------------------------------------- PONCHO: The piece is worked from the neck down. First work squares as follows: SQUARE: Work 4 ch on hook size 4 mm with light beige and form a ring with 1 sl st in first ch. Work A.1. Diagram A.2 shows how every round beg and ends. When first round of A.1 is worked, repeat A.1 4 times in total on round. When A.1 has been worked 1 time vertically, there are 16 ch-spaces and 4 corners. Work A.3 over A.1, i.e. repeat A.3 4 times in total on round (see diagram for correct size). NOTE: First round in A.3 is not worked, it only shows how next round is worked around sts. Diagram A.2 shows how every round beg and ends. When A.3 has been worked 1 time vertically, there are 80-80-100-120 tr and 4 corners. Fasten off. Square measures approx. 15-15-17-19 x 15-15-17-19 cm. REMEMBER THE CROCHET TENSION! Work 8 squares. ASSEMBLY: Sew squares tog edge to edge (see A.5) i.e. sew in outer loops of edge sts. These make up the upper part of poncho. Now work in the round from bottom edge of squares as follows: FROM SQUARES AND DOWN: ROUND 1: Beg in the side of square (see A.5), in the middle of the 1st square (i.e. 10-10-12-15 tr before corner). Work 3 ch – READ CROCHET INFO, work 1 tr in each of the first 10-10-12-15 tr, * over the 2 corners sewn tog work as follows: 1 tr in each of the next 2 tr, 2 tr around each of the next 2 corners, 1 tr in each of the next 2 tr *, then work 1 tr in every tr until next corner sewn tog (= over the next 20-20-25-30 tr), repeat from *-* over the next 2 corners sewn tog, 1 tr in each of the next 20-20-25-30 tr, over the next corner inc (see A.5) as follows: Work 1 tr around ch, around ch-space at the tip work as follows: 2 tr around ch-space, 3 ch, 2 tr around same ch-space, 1 tr around next ch. Work 1 tr in every tr and from *-* over the next 8 corners sewn tog and the next 100-100-125-150 tr (i.e. 20-20-25-30 tr between each of the 2 corners sewn tog). Around next corner inc as follows: Work 1 tr around ch, around ch-space at the tip work as follows: 2 tr around ch-space, 3 ch, 2 tr around same ch-space. Work 1 tr in every tr and from *-* the entire round, finish with 1 sl st in 3rd ch = 276-276-326-376 tr. ROUND 2: Work with off white - READ STRIPES. Work A.4 until 3 tr remain before ch-space in the tip, adjust to finish with 1 tr in last tr, work INCREASE – see explanation above. Repeat A.4 until next tip, work increase, work A.4 the rest of round. On every round inc 8 tr, i.e. inc 2 tr on each side of mid front/back. Repeat stripes and A.4 until finished measurements. When stripes have been worked, piece measures approx. 36-40-42-44 cm from the neck. EDGE AT THE BOTTOM: ROUND 1: Work with light beige. Work 1 ch, work 1 dc in first tr, work * 5 ch, skip 4 tr, 1 dc in next tr *, repeat from *-* until mid front/back, ** adjust so that last dc is worked around ch-space mid front/back, 5 ch, 1 dc around same ch-space **, repeat from *-* until mid front/back, repeat from **-** around ch-space mid front/back, repeat from *-* the rest of round, finish with 1 sl st in first ch at beg of round. ROUND 2: Work 3 ch, 1 sl st around first ch-space, 2 ch (= 1 htr), work * 4 ch, 1 htr around next ch-space *, repeat from *-* until ch-space mid front/back, ** 4 ch, around ch-space mid front/back work 1 htr + 4 ch + 1 htr **, repeat from *-* until mid front/back, repeat from **-** around ch-space mid front/back, repeat from *-* the rest of round, finish with 1 sl st in 2nd ch (= htr) at beg of round. ROUND 3: Work 3 ch (= 1 tr), work 5 tr around every ch-space, around ch-space mid front/back work: 1 ch, 2 tr around ch-space, 3 ch, 2 tr around same ch-space, 1 ch, finish round with 1 sl st in 3rd ch at beg of round. Fasten off. NECK EDGE: Beg mid front - see diagram and work with light beige on hook size 4 mm. Work as follows from RS: ROUND 1: Work 1 dc around ch-space in the middle (tip for the middle square), ** work 5 ch, skip corner (i.e. 3 ch + 2 tr), 1 dc around ch, * 5 ch, skip 5 tr, 1 dc between 2 tr *, repeat from *-* 2-2-3-4 more times, 5 ch, skip 5 tr, 1 dc around ch, 5 ch, 1 dc in seam between squares **, repeat from **-** around the entire neck, finish with 1 sl st in first dc. ROUND 2: Work 2 ch, 1 sl st around first ch-space, 2 ch (= 1 htr), * 4 ch, 1 htr around next ch-space *, repeat from *-* until 1 ch-space remains before mid back, work 1 htr around the next 2 ch-spaces, repeat from *-* until 1 ch-space remains, work 1 htr around last ch-space, finish with 1 sl st in 2nd ch (= 1 htr) at beg of round. ROUND 3: Work 3 ch (= 1 tr), work 2 tr around first ch-space, work 5 tr around every ch-space until 1 ch-space remains before mid back, work 3 tr around each of the next 2 ch-spaces, work 5 tr around every ch-space until 1 ch-space remains, work 3 tr around last ch-space, finish with 1 sl st in first tr. Fasten off. |
|||||||||||||||||||||||||||||||||||||||||||
Diagram explanations |
|||||||||||||||||||||||||||||||||||||||||||
|
|||||||||||||||||||||||||||||||||||||||||||
|
|||||||||||||||||||||||||||||||||||||||||||
|
|||||||||||||||||||||||||||||||||||||||||||

|
|||||||||||||||||||||||||||||||||||||||||||

|
|||||||||||||||||||||||||||||||||||||||||||
Have you finished this pattern?Tag your pictures with #dropspattern #sweetmartineponcho or submit them to the #dropsfan gallery. Do you need help with this pattern?You'll find 11 tutorial videos, a Comments/Questions area and more by visiting the pattern on garnstudio.com. © 1982-2025 DROPS Design A/S. We reserve all rights. This document, including all its sub-sections, has copyrights. Read more about what you can do with our patterns at the bottom of each pattern on our site. |
|||||||||||||||||||||||||||||||||||||||||||


With over 40 years in knitting and crochet design, DROPS Design offers one of the most extensive collections of free patterns on the internet - translated to 17 languages. As of today we count 314 catalogues and 11821 patterns translated into English (UK/cm). 11821
We work hard to bring you the best knitting and crochet have to offer, inspiration and advice as well as great quality yarns at incredible prices! Would you like to use our patterns for other than personal use? You can read what you are allowed to do in the Copyright text at the bottom of all our patterns. Happy crafting!
Post a comment to pattern DROPS 167-21
We would love to hear what you have to say about this pattern!
If you want to leave a question, please make sure you select the correct category in the form below, to speed up the answering process. Required fields are marked *.