
Looking for a yarn?


Comments / Questions (36)
![]() Pirkko wrote:
Pirkko wrote:
Piirroksen alla olevat merkit ja A1 eivät aukea. Puuttuuko ohjeesta joku mallipiiros? Voiko ohjeeseen käyttää puuvilalankaa?
12.09.2019 - 14:37DROPS Design answered:
Hei, piirrosten tulisi aueta. Voit korvata mallin langan esim. DROPS Paris-langalla, jolla on sama neuletiheys.
20.01.2020 - 18:03
![]() Hanne Eriksen wrote:
Hanne Eriksen wrote:
Hvorfor kan jeg ikke udskrive opskriften
05.09.2019 - 14:13DROPS Design answered:
Hej Hanne, Du skal klikke på "Skriv ud" knappen som ligger lige til højre for billedet i opskriften. God fornøjelse!
06.09.2019 - 08:23
![]() Maija wrote:
Maija wrote:
The diagram of A1 is unclear to me. 1)The explanatory box next to “slip 1 stitch as if to knit, K1, psso” is grey on the edges & empty. 2)There is no explanation for the diagonal descending right to left on the diagram itself. So I am going to make a leap that the grey box matches the missing instruction, so that for A1, I do a row of K. Then a row of *yo, K2 tog*. Then a row of K. Then a row of *slip 1 stitch as of to knit, K1, psso, yo*. Is that correct?
05.02.2019 - 22:17DROPS Design answered:
Dear Maija, on 1st row in A.1 work: *YO, slip 1 st as if to K, K 1, psso*, repeat from *-* and on 3rd row in A.1 work *K 2 tog, YO*, repeat from *-*. Happy knitting!
06.02.2019 - 09:24
![]() Sylbermond wrote:
Sylbermond wrote:
Was ist denn die Rumpfseite? Wird die Jacke von unten nach oben gestrickt, oder von rechts nach Links? Verstehe leider die Anleitung diesbezüglich und die Maßskizze nicht. Lieber Gruß Sylvia
05.04.2018 - 12:38DROPS Design answered:
Liebe Sylbermond, Jacke wird von unten nach oben gestrickt, beide Vorderteile und Rückenteil werden in einem Stück bis Armlöcher gestrickt (vom rechten bis linken Vorderteil), dann wird jedes Teil separat bis Schulter gestrickt und neue Maschen für die Ärmel angeschlagen., Viel Spaß beim stricken!
05.04.2018 - 13:15
![]() Lauga wrote:
Lauga wrote:
Bonjour, Comment savoir le nombre de pelotes pour ce modèle en taille L. Merci pour votre réponse
30.01.2018 - 10:27DROPS Design answered:
Bonjour, vous avez besoin de 225 g de laine Brushed Alpaca Silk, cela veut dire 9 pelotes. Bon tricot!
02.02.2018 - 10:16
![]() Marina wrote:
Marina wrote:
Verso la fine del davanti destro le istruzioni dicono "continuare a lavorare il diagramma A.1 e lavorare le 2 m vivagno da ciascun lato a punto legaccio" : cioè delle 26m 4 sono di vivagno? Perché fino a quel momento 2 erano di vivagno e 24 di schema. Adesso ne tolgo 2 allo schema e le uso per il vivagno?
13.05.2017 - 17:31DROPS Design answered:
Buona sera Marina. Sì è corretto. Le maglie che toglie allo schema e che diventano maglie vivagno, serviranno per cucire il colletto allo scollo sul dietro. Buon lavoro!
13.05.2017 - 18:08
![]() Marina wrote:
Marina wrote:
Grazie, l'ho iniziato. Come lavorare le maglie gettate dello schema A1 sul rovescio del lavoro?
29.03.2017 - 16:06DROPS Design answered:
Buongiorno Marina. Sul rovescio, lavora le gettate a rovescio così si formano i buchi. Buon lavoro!
29.03.2017 - 16:09
![]() Marina wrote:
Marina wrote:
Buongiorno, vorrei realizzare questo modello per mia madre ma essendo un regalo non posso chiederle le misure esatte. Porta una 46, che taglia mi consigliate? Grazie!
29.03.2017 - 10:45DROPS Design answered:
Buongiorno Marina. Le taglie Drops vestono comodo. La 46 corrisponde generalmente alla L. Il capo è comunque un capo che deve risultare non aderente. Se non riesce a misurare un capo della mamma, provi comunque a verificare la sua di taglia, misurando un indumento simile e confrontando le misure con quelle del grafico in fondo alle spiegazioni. Buon lavoro!
29.03.2017 - 11:31
![]() Maria wrote:
Maria wrote:
How many skeins or balls of yarn do I need for the large size?
26.05.2016 - 02:11DROPS Design answered:
Dear Maria, you will find total weight of yarn required for each size under tab "Materials", ie in size L, you need 225 g divided by 25 g a ball DROPS Brushed Alpaca Silk - seee here = 9 balls in size L. Happy knitting!
26.05.2016 - 09:53
![]() Maria Greco wrote:
Maria Greco wrote:
Body: "work pattern according to A1 over the next 24 sts" A1 is worked in rows, not sts. What do I do?
26.04.2016 - 23:06DROPS Design answered:
Dear Mrs Greco, A.1 is worked over 2 sts and 4 rows, repeat the 2 sts in A.1 over the next 24 sts (= a total of 12 times in width). Happy knitting!
27.04.2016 - 08:45
|
|||||||||||||
Saltwater#saltwaterjacket |
|||||||||||||
|
|
|||||||||||||
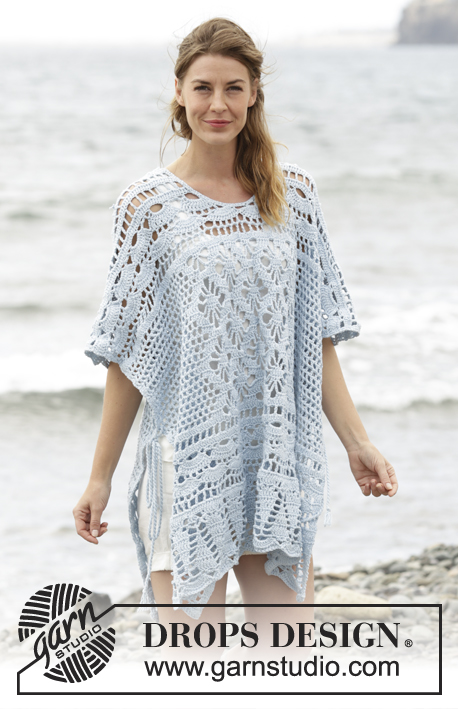
Knitted DROPS jacket with lace pattern and band collar in ”Brushed Alpaca Silk”. Size: S - XXXL.
DROPS 168-32 |
|||||||||||||
|
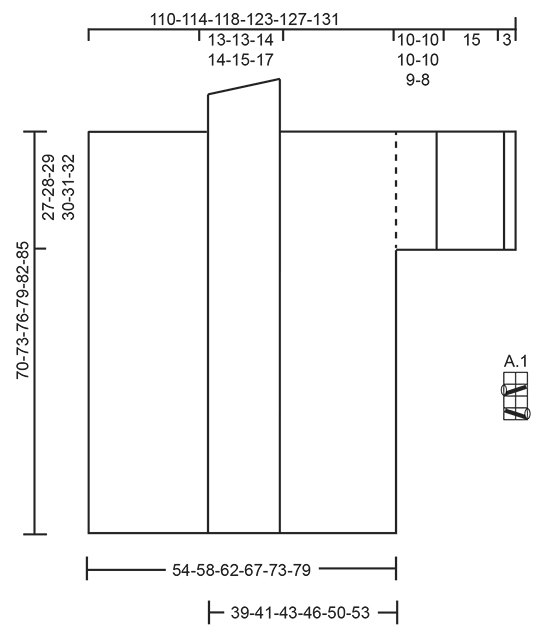
GARTER ST (back and forth on needle): K all rows. 1 ridge = 2 rows K. PATTERN: See diagram A.1. The diagram shows all rows in pattern seen from RS. ---------------------------------------------------------- JACKET: Worked back and forth on circular needle from mid front up to armhole, then cast on new sts for sleeve and work front and back piece separately. BODY: LOOSELY cast on 191-203-217-233-251-269 sts on circular needle size 6 mm with Brushed Alpaca Silk. Work 2 ridges in GARTER ST - see explanation above. Work next row as follows from RS: 2 edge sts in garter st, work pattern according to diagram A.1 over the next 22-22-24-24-26-26 sts, work 31-34-36-40-43-47 sts in stocking st, insert 1 marker (marks the side), work 81-87-93-101-109-119 sts in stocking st (= back piece), insert 1 marker (marks the side), work 31-34-36-40-43-47 sts in stocking st, A.1 over the next 22-22-24-24-26-26 sts and finish with 2 edge sts in garter st. Continue the pattern like this and move the markers upwards when working. REMEMBER THE KNITTING TENSION When piece measures 43-45-47-49-51-53 cm, adjust so that last row is worked from WS, divide the piece at the markers and finish each front piece and back piece separately. BACK PIECE: = 81-87-93-101-109-119 sts. Work 2 rows in stocking st and cast on 39-39-39-39-38-36 new sts for sleeves at the end of these 2 rows = 159-165-171-179-185-191 sts on needle. Work next row as follows from RS: 4 edge sts in garter st, A.1 over the next 20 sts, work in stocking st until 24 sts remain on needle, work A.1 over the next 20 sts and finish with 4 edge sts in garter st. Continue pattern like this. When piece measures 68-71-74-77-80-83 cm, cast off the middle 17-17-19-19-21-23 sts for neck and finish each shoulder separately. Continue to cast off 1 st on next row from neck = 70-73-75-79-81-83 sts remain on the shoulder. When piece measures approx. 69-72-75-78-81-84 cm - adjust so that next row is worked from RS - K 2 rows over all sts before LOOSELY casting off with K from RS. Jacket measures approx. 70-73-76-79-82-85 cm from shoulder and down. RIGHT FRONT PIECE: = 55-58-62-66-71-75 sts. Work 1 row from RS as before and cast on 39-39-39-39-38-36 new sts for sleeve at the end of this row = 94-97-101-105-109-111 sts on needle. P 1 row from WS but K the first 4 sts (= sleeve edge) and work the last 24-24-26-26-28-28 sts towards mid front as before. Work next row as follows from RS: 2 edge sts in garter st, A.1 over band as before, work in stocking st until 24 sts remain on needle, work A.1 over the next 20 sts and finish with 4 edge sts in garter st (= sleeve edge). Continue the pattern like this until piece measures approx. 69-72-75-78-81-84 cm (adjust so that next row is worked from WS). K 2 rows but work the outermost 24-24-26-26-28-28 sts in towards mid front as before. On next row from WS, cast off the first 70-73-75-79-81-83 sts on shoulder = 24-24-26-26-28-28 sts on needle for collar. Insert 1 marker, NOW MEASURE PIECE FROM HERE! Continue A.1 with 2 edge sts in garter st in each side until collar measures 9-9-9-9-10-11 cm from marker. At beg of the next 3 rows from WS cast off the first 6-6-6-6-7-7 sts = 6-6-8-8-7-7 sts remain on needle. Cast off these sts on next row from WS. LEFT FRONT PIECE: Work as right but reversed. I.e. work first row from RS as before. On next row (= WS), cast on new sts for sleeve at the end of row. Continue to work next row from RS as follows: Work 4 edge sts in garter st (= sleeve edge), A.1 over the next 20 sts, work in stocking st until 24-24-26-26-28-28 sts remain on needle, continue with A.1 over the next 22-22-24-24-26-26 sts and finish with 2 edge sts in garter st. When piece measures approx. 69-72-75-78-81-84 cm - adjust so that next row is worked from RS, K 2 rows over the first 70-73-75-79-81-83 sts on shoulder (work the other sts as before). On next row from RS, cast off the first 70-73-75-79-81-83 sts = 24-24-26-26-28-28 collar sts remain on needle. When casting off collar sts, cast off at beg of every row from RS (instead of beg of every row from WS). ASSEMBLY: Sew shoulder seam inside cast-off edge with 1 stitch in every st so that 2 ridges are placed towards each other on shoulder - make sure to avoid a tight seam. Sew collar tog mid back - sew WS against WS and sew collar to neck line in the back of neck (the seam should be in towards WS). Sew underarm seams inside 1 edge st. CROCHET EDGE: Work a finishing edge from RS up along right front piece, around the collar in the back of neck and down along left front piece on hook size 5 mm with Brushed Alpaca Silk as follows: Work 1 dc in first st, * 4 ch, skip 2 sts, 1 dc in next st *, repeat from *-*. Work the same edge at the bottom of both sleeves but now finish round with 1 sl st in first dc at beg of round (instead of 1 dc in next st). |
|||||||||||||
Diagram explanations |
|||||||||||||
|
|||||||||||||
 |
|||||||||||||
Have you finished this pattern?Tag your pictures with #dropspattern #saltwaterjacket or submit them to the #dropsfan gallery. Do you need help with this pattern?You'll find 20 tutorial videos, a Comments/Questions area and more by visiting the pattern on garnstudio.com. © 1982-2025 DROPS Design A/S. We reserve all rights. This document, including all its sub-sections, has copyrights. Read more about what you can do with our patterns at the bottom of each pattern on our site. |
|||||||||||||


With over 40 years in knitting and crochet design, DROPS Design offers one of the most extensive collections of free patterns on the internet - translated to 17 languages. As of today we count 320 catalogues and 12091 patterns translated into English (UK/cm). 12091
We work hard to bring you the best knitting and crochet have to offer, inspiration and advice as well as great quality yarns at incredible prices! Would you like to use our patterns for other than personal use? You can read what you are allowed to do in the Copyright text at the bottom of all our patterns. Happy crafting!
Post a comment to pattern DROPS 168-32
We would love to hear what you have to say about this pattern!
If you want to leave a question, please make sure you select the correct category in the form below, to speed up the answering process. Required fields are marked *.