Comments / Questions (4)
![]() Birthe Nielsen wrote:
Birthe Nielsen wrote:
Jeg er ved at lave denne, men synes ikke, den er stor nok til at nå omkring en papvin. Skal posen tages ud af pappen for at den kan være der? mvh Birthe
03.02.2019 - 12:34DROPS Design answered:
Hej Birthe, ja du tager posen ud inden du stopper den i hønen. Se også vores video hvordan vi gør
How to fill the hen wine cover in DROPS Extra 0-1099 from Garnstudio Drops design on Vimeo.
06.02.2019 - 10:20
![]() Carol Baker wrote:
Carol Baker wrote:
I would love to make this in a water cooler cover. Could you please tell me how much of each colour of Eskimo yarn I would need ( it is not stated in the pattern :0( ) Thank you.
26.03.2018 - 20:50DROPS Design answered:
Dear Mrs Baker, you will find the amount of yarn required under the header, ie 300 g Eskimo in yellow and 100 g Eskimo in red. Happy crocheting!
28.03.2018 - 14:56Jeanette Brodie wrote:
I would love to knit this but I don't crochet. Can it be adapted
21.03.2015 - 12:12DROPS Design answered:
Dear Mrs Brodie, it probably can - you will also find all videos to start crochet and crochet this successfully in our video library - for any further individual assistance you are welcome to contact your DROPS store. Happy knitting!
23.03.2015 - 10:41
![]() Sissi wrote:
Sissi wrote:
You guys have more humor than you seem :)
20.03.2015 - 10:42
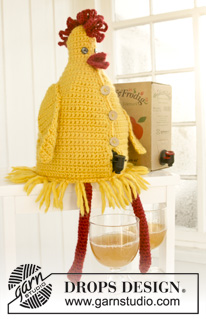
Coq Au Vin#dropscoqauvin |
|
 |
 |
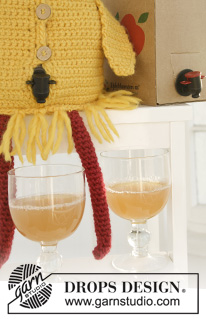
Crochet wine box cover in DROPS Snow. Theme: Easter
DROPS Extra 0-1099 |
|
|
CROCHET INFO-1: Replace first dc at beg of every dc round/row with 1 ch. Finish every round with 1 sl st in ch from beg of round. CROCHET INFO-2 (applies to wings): At beg of every row with dc work 1 ch (ch not counted in no of dc). INCREASE TIP: Inc by working 2 dc in same dc. DEC INFO-1: Crochet 2 dc tog into 1 dc as follows: * Insert hook in next st, get yarn *, repeat from *-* one more time, make a YO and pull yarn through all 3 sts on hook. DEC INFO-2 (applies to beak): Crochet 3 dc tog into 1 dc as follows: * Insert hook in next st, get yarn *, repeat from *-* 2 more times, make a YO and pull yarn through all 4 sts on hook. DC IN A CIRCLE (applies to legs): After last dc on 1st round, work 1 dc in next dc (= 1st dc from beg of 1st round), then work in the round with 1 dc in every dc. ---------------------------------------------------------- HEN WINE COVER: Work back and forth from head and down. Work 6 ch on hook size 5.5 mm with yellow. ROW 1: Work 1 dc in 2nd ch from hook (= 2 dc), 1 dc in each of the next 4 ch = 6 dc. Turn. ROW 2: READ CROCHET INFO-1. Work 1 dc in first dc, 2 dc in each of the next 5 dc = 11 dc, turn. ROW 3: Work 2 dc in every dc = 22 dc. Turn. ROW 4: Work 1 dc in every dc. Turn. Repeat 4th row 10 more times. Now work the body as follows: ROW 1: READ INCREASE TIP! Work 1 dc in every dc while AT THE SAME TIME inc 6 dc evenly = 28 dc. Turn. ROW 2 (and then on every even numbered row): Work 1 dc in every dc. Turn. ROW 3: 1 dc in every dc while AT THE SAME TIME inc 6 dc evenly = 34 dc. Turn. ROW 5: 1 dc in every dc while AT THE SAME TIME inc 6 dc evenly = 40 dc. Turn. Continue to inc 6 dc evenly on every other row until there are 52 dc on row. REMEMBER THE CROCHET TENSION! ROW 11: * 1 dc in each of the next 12 dc, 2 dc in next dc *, repeat from *-* the entire row = 56 dc. Turn. ROW 13: * 1 dc in each of the next 13 dc, 2 dc in next dc *, repeat from *-* the entire row = 60 dc. Turn. ROW 15: * 1 dc in each of the next 14 dc, 2 dc in next dc *, repeat from *-* the entire row = 64 dc. Turn. Continue to work 1 dc more between inc every other row until there are 72 dc on row. Turn. ROW 20: Work 1 dc in every dc. Continue to work 1 dc in every dc until piece measures approx. 30-35 cm measured from the top. Fasten off. BASE: Worked in the round. Work 4 ch on hook size 5.5 mm with yellow and form a ring with 1 sl st in first ch. ROUND 1: REMEMBER CROCHET INFO-1! Work 6 dc in ch-ring. ROUND 2: Work 2 dc in every dc = 12 dc. ROUND 3: * 2 dc in first dc, 1 dc in next dc *, repeat from *-* the entire round = 18 dc. ROUND 4: * 2 dc in first dc, 1 dc in each of the next 2 dc *, repeat from *-* the entire round = 24 dc. ROUND 5: * 2 dc in first dc, 1 dc in each of the next 3 dc *, repeat from *-* the entire round = 30 dc. ROUND 6: * 2 dc in first dc, 1 dc in each of the next 4 dc *, repeat from *-* the entire round = 36 dc. REMEMBER THE CROCHET TENSION! ROUND 7: * 2 dc in first dc, 1 dc in each of the next 5 dc *, repeat from *-* the entire round = 42 dc. ROUND 8: * 2 dc in first dc, 1 dc in each of the next 6 dc *, repeat from *-* the entire round = 48 dc. ROUNDS 9-12: Then work 1 dc more between inc = 72 dc on last round. Bottom measures approx. 17 cm in diameter. Fasten off. ASSEMBLY: Place last row on body edge to edge with last round on base (= 72 dc) with RS outwards and work with yellow as follows: Work 1 dc in every dc through both layers, finish with 1 sl st in first dc = 72 dc. Fasten off. LEG: Worked in the round. Work 6 ch on hook size 5.5 mm with red and form a ring with 1 sl st in first ch. Work 1 dc in every ch = 6 dc. Then work DC IN A CIRCLE - see explanation above - for approx. 20 cm. Then work 1 round while inc 4 dc evenly = 10 dc. Work 1 round without inc, 1 round while inc 4 dc evenly = 14 dc. Work 1 round without inc. Cut the yarn - fold last round in two and sew tog so that it is flat. Work another leg the same way. WING: Worked back and forth. Work 4 ch (incl 1 ch to turn with) on hook size 5.5 mm with yellow. ROW 1: Work 1 dc in 2nd ch from hook, 1 dc in each of the next 2 dc = 3 dc. Turn. ROW 2: READ CROCHET INFO-2. Work 1 dc in every dc. Turn. ROW 3: 2 dc in first dc, 1 dc in next dc, 2 dc in next dc = 5 dc. Turn. ROW 4: 1 dc in every dc. Turn. ROW 5: 2 dc in first dc, 1 dc in each of the next 3 dc, 2 dc in next dc = 7 dc. Turn. Continue working 1 dc in every dc until piece measures approx. 15-18 cm. Now work with dec as follows: ROW 1: READ DEC INFO-1. Work 2 dc tog, 1 dc in each of the next 3 dc, 2 dc tog = 5 dc. Turn. ROW 2: Work 1 dc in every dc. Turn. ROW 3: Work 2 dc tog, 1 dc in next dc, 2 dc tog = 3 dc. Turn. ROW 4:Work 1 dc in every dc. Fasten off. Work another wing the same way. BEAK: Work 3 ch on hook size 5.5 mm with red. ROW 1: Work 1 dc in 2nd ch from hook (= 2 dc), work 2 dc in same dc, 1 dc in next ch = 5 dc. Turn. ROW 2: REMEMBER CROCHET INFO-1! Work 1 dc in every dc. Turn. ROW 3: Work 1 dc in first dc, 2 dc in next dc, 1 dc in next dc, 2 dc in next dc, 1 dc in next dc = 7 dc. Turn. ROWS 4-8: Work 1 dc in every dc. Turn. ROW 9: Work 1 dc in first dc, * 2 dc tog, 1 dc in next dc *, repeat from *-* 1 more time = 5 dc. Turn. ROW 10: Work 1 dc in every dc. Turn. ROW 11: Work 1 dc, work 3 dc tog - READ DEC INFO-2, 1 dc in next dc = 3 dc. Turn. ROW 12: Work 3 dc tog. Fasten off. BUTTON BAND: Left band: ROW 1: Work up from RS 23-29 dc evenly along edge with yellow up until approx. 10 cm remain from the top. Cut the yarn. ROW 2: Work straps, beg from RS as follows: Skip the first 7 dc (= this is for the tab of the wine bag), work 1 dc in next dc, * 3 ch, skip 2 dc, 2 dc in next dc, 1 dc in next dc, 2 dc in next dc, 1 dc in next dc *, repeat from *-* 0-1 more time, 3 ch, skip 2 dc, 1 dc in each of the next 7 dc. Fasten off. Right band: ROW 1: Work up from WS 23-29 dc evenly along edge up until approx. 10 cm remain from the top - adjust according to left band. Fasten off. COMB: Work 15 ch on hook size 5.5 mm with red. Work 1 dc in 2nd ch from hook (= 2 dc), work 1 dc in every ch = 15 dc. Hold piece flat with left hand while working ch-space back in these dc and ch as follows: Work 12 ch, fasten with 1 dc in first dc (= 1 space), work 12 ch, fasten with 1 dc in first ch (= 1 space), * work 12 ch, fasten with 1 dc in next ch (= 1 space), work 12 ch, fasten with 1 dc in next dc (= 1 space) *, repeat from *-* 12 more times = 28 ch-spaces. ASSEMBLY: Place piece edge to edge from head and down to band and sew tog with yellow. Place left band over right band and sew neatly tog at the top, fasten off. Sew coconut button on right side directly inside band. Sew on comb as follows: Beg approx. 5 cm down from top of head mid front, and sew comb to head and down approx. 5 cm at the back. Sew on 2 engraved button for eyes approx. 3 cm from beg of comb and approx. 1.5 cm between each eye. Fold beak in 2 and fasten it approx. 2.5 cm below eyes. Fasten a wing by placing dec parallel with row on body, measure approx. 12-15 cm straight down from top of head and approx. 5 cm out to the side (NOTE! Only sew around the top so that wing hangs loosely at the bottom). Sew the other wing the same way but on opposite side - i.e. approx. 10 cm between each wing on the back. Fasten the 2 legs in under the edge approx. 8 cm between each leg. Fill the head with some cotton wool. FRINGES: 1 FRINGE = Cut 2 lengths of 20 cm each. Fold them double and pull loop through 1 dc in base and Then pull yarn ends through the loop. Fasten 1 fringe in approx. every 3rd dc along the base of hen but not over legs. Cut fringes to a length of approx. 6 cm. |
|
Have you finished this pattern?Tag your pictures with #dropspattern #dropscoqauvin or submit them to the #dropsfan gallery. Do you need help with this pattern?You'll find 11 tutorial videos, a Comments/Questions area and more by visiting the pattern on garnstudio.com. © 1982-2025 DROPS Design A/S. We reserve all rights. This document, including all its sub-sections, has copyrights. Read more about what you can do with our patterns at the bottom of each pattern on our site. |
|


Post a comment to pattern DROPS Extra 0-1099
We would love to hear what you have to say about this pattern!
If you want to leave a question, please make sure you select the correct category in the form below, to speed up the answering process. Required fields are marked *.