
Popular categories
Looking for a yarn?


Comments / Questions (53)
![]() Manuela wrote:
Manuela wrote:
Wenn ich das so Stricke wie es das Diagramm zeigt und wie es beschrieben ist, habe ich leider ein Riesenproblem. Nach der Beschreibung besteht das Muster [ Diagramm) aus 4 Reihen und wenn ich den Umschlag der 1. Reihe auf der Rückseite rechts stricken soll, kann diese Masche von vorne gesehen dann keine Rechte sein. Und wenn ich die 4. Reihe so Stricke wie angegeben, habe ich plötzlich weniger Maschen, denn die schwarzen Kästchen sind keine Masche ???
28.09.2019 - 16:52DROPS Design answered:
Liebe Manuela, der Umschlag von der 1. Reihe wird bei der nächsten Reihen (=Rückreihe) links gestrickt, dann haben Sie 3 Maschen + 1 Umschlag (= siehe letzter Symbol) bei der 4. Reihe lassen Sie den Umschlag von der Nadel gleiten, dann: 1 M li abh, 2 M re stricken und die abgehobene Masche über die 2 M re ziehen (= 2 Maschen bleiben). Viel Spaß beim stricken!
30.09.2019 - 15:48
![]() Cecilia wrote:
Cecilia wrote:
Salve sto realizzando questo modello,ma con le maniche a campana(larghe al polso)ho avvisato 99 m.come proseguo con le diminuzioni x arrivare al sottobraccio.grazie
22.05.2019 - 06:25DROPS Design answered:
Buongiorno Cecilia, per un aiuto così personalizzato può rivolgersi al suo rivenditore DROPS di fiducia. Buon lavoro!
22.05.2019 - 06:52
![]() Franca wrote:
Franca wrote:
Il diagramma A1 non è per niente chiaro, lo sostituirò con un altro punto. Spero che almeno il resto delle istruzioni non contenga errori!
07.09.2018 - 16:11
![]() Chiara wrote:
Chiara wrote:
Ciao, sono bloccata con A1 e per via della lunghezza del messaggio non posso scrivervi quello che ho capito. Vi chiedo perciò la cortesia di mostrarmi maglia per maglia come funzionano le 4 righe di diagramma, tra modello e commenti non riesco a trovare il modo... grazie!
08.05.2018 - 12:45DROPS Design answered:
Buongiorno Chiara. Purtroppo, per ragioni di spazio, non riusciamo a scriverle in dettaglio la spiegazione del diagramma. I video consigliati per questo modello possono esserle di aiuto; può provare a specificare meglio quale punto del diagramma non è chiaro; può anche chiedere consiglio via mail al suo rivenditore drops di fiducia. Buon lavoro!
08.05.2018 - 13:26
![]() Anna Rita wrote:
Anna Rita wrote:
Non riesco ad andare avanti con il motivo A.1. Fatto il primo ferro con il secondo non corrisponde la lavorazione delle maglie così come indicate anche perché i gettati del ferro 1 adesso dovrei lavorarli al dritto. Grazie
18.03.2016 - 23:49DROPS Design answered:
Buongiorno Annarita. Alla seconda riga, la seconda m da sinistra viene lavorata a dir; la gettata della seconda riga (quella che verrà poi fatta cadere) serve perchè in questo modo il motivo non stringa troppo le m. Se fa una prova anche solo su una ripetizione, le dovrebbe risultare più chiaro. Buon lavoro!
19.03.2016 - 07:53
![]() Karolien wrote:
Karolien wrote:
Hallo, Is de teruggaande naald de tweede regel van A1?Lees ik het dan van links naar rechts of van rechts naar links? Alvast bedankt voor het antwoord.
25.02.2016 - 16:18DROPS Design answered:
Hoi Karolien. Lees hier hoe je onze telpatronen moet lezen
26.02.2016 - 10:54
![]() Nessy wrote:
Nessy wrote:
Bonjour, Le diagramme indique-t-il seulement les rangs endroits? Ou les rangs 2 et 4 sont-ils sur l'envers? Parce-que je n'arrive pas du tout au résultat de l'image.
28.06.2015 - 07:28DROPS Design answered:
Bonjour Nessy, tous les rangs sont indiqués dans le diagramme (voir aussi ici) - la vidéo ci-dessous montre comment réaliser la petite torsade (n'oubliez pas le jeté au rang 2 de A.1 qui est lâché au rang 3 et ne figure pas dans la vidéo). Bon tricot!
29.06.2015 - 10:55Heather Davis wrote:
What sizes, in inches or centimetres, do the pattern sizes S,M,L,XL etc correspond to in Drops patterns?
02.04.2015 - 13:06DROPS Design answered:
Dear Mrs Davis, you will find at the bottom of each pattern a measurement chart with all measures in cm for each size, taken flat, from side to side. Compare these to a similar garment you have and like the shape to find out the matching size. Happy knitting!
02.04.2015 - 15:10
![]() Anette Bure wrote:
Anette Bure wrote:
Hej! Hur följer jag mönstret A.1 i Ibiza Paris med hålmönster. Går man vågrätt i mönstret, var börjar man? Har försökt olika sätt men det blir helt fel hur jag än följer det. Vänliga hälsningar Anette
26.01.2015 - 19:18DROPS Design answered:
Hej Anette, Du börjar nederst i hörnet till höger och stickar från rätsiden såhär: am, vridet rät, am, rm, omslag, rm osv Nästa varv stickar du från avigsidan såhär: am, am, am, omslag, rm, vridet am, rm osv Fortsät från rätsidan enligt 3:e varv i diagrammet. Lycka till!
29.01.2015 - 14:56Nina wrote:
I am sorry you are right, diagram covers 6 st
11.08.2014 - 20:49
|
||||||||||||||||||||||
Ibiza#ibizasweater |
||||||||||||||||||||||
|
|
||||||||||||||||||||||
Knitted DROPS jumper with lace pattern in ”Paris”. Size: S - XXXL.
DROPS 153-12 |
||||||||||||||||||||||
|
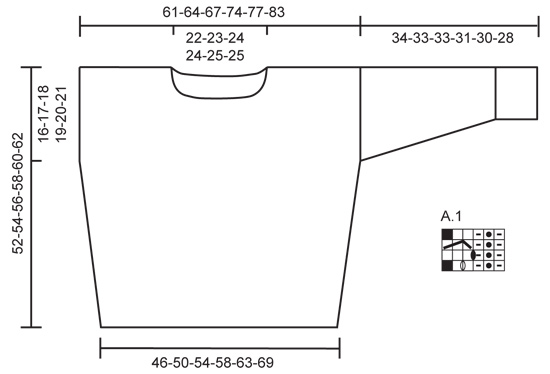
GARTER ST (back and forth on needle): K all rows. 1 ridge = 2 rows K. PATTERN: See diagram A.1. The diagram shows all rows in pattern seen from RS. ---------------------------------------------------------- JUMPER: Worked back and forth on needle in parts and sewn tog when finished. FRONT PIECE: Cast on 76-83-88-94-103-113 sts (incl 1 edge st in each side) on needle size 5.5 mm and work 3 ridges in garter st. Then work in stocking st with 1 edge st in GARTER ST - see explanation above - in each side of piece. When piece measures approx. 2 cm, inc 1 st in each side, inc with 1 YO inside 1 edge st, work YO twisted on next row to avoid holes. Repeat inc approx. every 3-3½-3½-3-3½-3½ cm 11-10-10-12-10-10 more times (= 12-11-11-13-11-11 times in total) = 100-105-110-120-125-135 sts on needle. Work until piece measures 36-37-38-39-40-41 cm, insert a marker in each side, marks where to sew in sleeves. Then work as follows from RS: 1 edge st in garter st, repeat A.1 until 4 sts remain on row, P 1, K 1 twisted, P 1 and 1 edge st in garter st. Work the twisted st P twisted from WS. Work like this until piece measures 46-48-50-52-54-56 cm adjust after one whole repetition of A.1 vertically. Work the first 35-37-39-44-46-51 sts as before, cast off the next 30-31-32-32-33-33 sts and work the rest of row as before. Work each shoulder separately - AT THE SAME TIME cast off 1 st at beg of every row from neck 3 times in total = 32-34-36-41-43-48 sts remain on each shoulder. Continue until piece measures 52-54-56-58-60-62 cm and cast off. BACK PIECE: Work as front piece BUT work until piece measures 50-52-54-56-58-60 cm before casting off for neck - adjust after one whole repetition of A.1 vertically. Work as before over the first 33-35-37-42-44-49 sts, cast off the next 34-35-36-36-37-37 sts and work the rest of row as before. Work each shoulder separately - AT THE SAME TIME cast off 1 st at beg of next row from neck = 32-34-36-41-43-48 sts remain on each shoulder. Work until piece measures 52-54-56-58-60-62 cm and cast off. SLEEVE: Cast on 45-45-50-50-53-53 sts on needle size 5.5 mm (incl 1 edge st in each side) and work 3 ridges back and forth on needle. Then work as follows: 1 edge st in garter st, P 0-0-0-0-2-2, A.1 until 4-4-4-4-5-5 sts remain, P 1, K 1 twisted, P 1-1-1-1-2-2 and 1 edge st in garter st. Work the twisted st P twisted from WS. Work until piece measures 12 cm, adjust after one whole repetition of A.1 vertically. Then work in stocking st while at the same time inc 1 st inside 1 edge st in garter st in each side, repeat inc approx. every 6½-4½-4½-3½-4-2½ cm 3-4-4-5-4-5 more times (= 4-5-5-6-5-6 times in total) = 53-55-60-62-63-65 sts on needle. Work until piece measures 34-33-33-31-30-28 cm and cast off (shorter measurements in the larger sizes because of wider body). Knit another sleeve the same way. ASSEMBLY AND NECK EDGE: Sew one shoulder seam, leave the other open. Pick up 80-100 sts from RS around the neck edge. Work 3 ridges back and forth on needle, cast off. Sew the other shoulder seam and side of neck edge. Sew in sleeves inside the two markers inserted on front and back piece. Sew underarm and side seams in one inside 1 edge st. |
||||||||||||||||||||||
Diagram explanations |
||||||||||||||||||||||
|
||||||||||||||||||||||
|
||||||||||||||||||||||
Have you finished this pattern?Tag your pictures with #dropspattern #ibizasweater or submit them to the #dropsfan gallery. Do you need help with this pattern?You'll find 20 tutorial videos, a Comments/Questions area and more by visiting the pattern on garnstudio.com. © 1982-2025 DROPS Design A/S. We reserve all rights. This document, including all its sub-sections, has copyrights. Read more about what you can do with our patterns at the bottom of each pattern on our site. |
||||||||||||||||||||||


With over 40 years in knitting and crochet design, DROPS Design offers one of the most extensive collections of free patterns on the internet - translated to 17 languages. As of today we count 314 catalogues and 11820 patterns translated into English (UK/cm). 11820
We work hard to bring you the best knitting and crochet have to offer, inspiration and advice as well as great quality yarns at incredible prices! Would you like to use our patterns for other than personal use? You can read what you are allowed to do in the Copyright text at the bottom of all our patterns. Happy crafting!
Post a comment to pattern DROPS 153-12
We would love to hear what you have to say about this pattern!
If you want to leave a question, please make sure you select the correct category in the form below, to speed up the answering process. Required fields are marked *.