
Popular categories
Looking for a yarn?


Comments / Questions (112)
![]() Leen wrote:
Leen wrote:
"Then continue back and forth on needle - at the same time bind off at the beg of every row in each side: 2 sts 1-3-4-6 times" I don't understand how to do this section. For a small, do I bind off 2 on the RS and then 2 on the WS and this counts as 1 time? Then I do that 2 more times?
19.06.2015 - 17:40DROPS Design answered:
Dear Leen, that's correct, you will bind off 2 sts each side every other row: from RS bind off 2 sts, from WS, bind off 2 sts and repeat these 2 rows 2 more times = 2 sts have been bound off a total of 3 times each side. Happy knitting!
19.06.2015 - 18:27
![]() Marie wrote:
Marie wrote:
Hei :) Jeg strikker i str L, vet jeg har gjort riktig hele A-1! Når jeg var på siste rad av A-2 la jeg til 1m og strikket de første 7 radene på A-3, her målte arbeidet 12 cm, felt 1 maske, satt 33 på en pinne og felt 1 maske, da sitter jeg igjen med 109 masker på rundp. Det jeg ikke skjønner er at mønsteret passer jo ikke når det strikkes med 8m per omgang... Kan dere forklare på en lettere måte? :) Tusen takk ;)
13.02.2015 - 23:25DROPS Design answered:
Jo det er de samme 8 m som gentages i diagrammet, nu strikker du bare frem og tilbage istedet for rundt, det vil sige hver 2.p strikkes fra vrangen, men i samme mønster. God fornøjelse!
10.08.2015 - 14:34
![]() Margaret D Fellows wrote:
Margaret D Fellows wrote:
I havn't been able to figure out how to print off this pattern for the Drops dog jumper. Any tips?
25.11.2014 - 17:45DROPS Design answered:
Dear Mrs Fellow, when you click on the "Print:pattern" button, a new window will open - make sure your browser allows pop'up windows - in this new window, click on the link "Continue to print the pattern" to launch printing. Happy knitting!
26.11.2014 - 09:22
![]() Inger Marit Amundsen wrote:
Inger Marit Amundsen wrote:
Når man skal montere og strikke opp masker rundt, skal man da også strikke opp masker under magen, eller bare på kanten rundt langs sidene og helt nederst ved halen?
11.11.2014 - 13:28DROPS Design answered:
Hei Inger. Du skal ikke samle masker op under magen.
11.11.2014 - 16:00Maureen wrote:
Hello, I've been attempting to knit this beautiful coat for my Miniature Schnauzer. I've got to the part where I have cast off 22 stitches mud under belly. (Medium size). The pattern then instructs you to continue back and forth. Are you to treat the two sections either side of where you have cast off separate? Ie left sued and right side. Casting off at the beginning of each section? Im assuming this creates the curved edge. Thank you for your help in advance.
14.08.2014 - 00:31
![]() Evy Fjellsbø wrote:
Evy Fjellsbø wrote:
Hvilken str må jeg ta til Engelsk bulldog....???
28.12.2013 - 21:39DROPS Design answered:
Hej Evy. Der står også mål i opskriften i cm (Rygglengde og brystvidde) Du kan måle din hund og sammenligne og vælge din str.
29.12.2013 - 09:55
![]() Sue Solnok wrote:
Sue Solnok wrote:
Just starting this pattern.
23.12.2013 - 19:49
![]() Karianne Jonsson wrote:
Karianne Jonsson wrote:
Felling til forben - De 23 maskene som skal settes på en tråd er det til begge bena eller skal det gjentas på slutten av omgangen og? Jeg har lest mønsteret mange ganger, men syns dette er veldig uklart. Takknemlig for svar.
01.11.2013 - 00:32DROPS Design answered:
Hei Karianne. De 23 m er til magen og ikke til benene. Du feller 1 m (= 1 ben), sett 23 m på 1 tråd (magen), fell 1 m (= 1 ben), videre fortsettes mønsteret frem og tilbake på p over de gjenværende m (= ryggstykket).
01.11.2013 - 09:33
![]() Gors Anita wrote:
Gors Anita wrote:
Hebben jullie ook een patroon voor een standaard teckel?
27.10.2013 - 15:53DROPS Design answered:
Hoi Anita. We hebben alleen de maten, die hier in het patroon staan vermeld. We hebben bovenwijdte en lengte van de truien per maat vermeld. Deze kan je vergelijken met jouw hondje en eventueel aanpassen waar nodig. Veel breiplezier.
28.10.2013 - 19:06
![]() Liz Rashvand wrote:
Liz Rashvand wrote:
I made this for my friends Bichon Frise, she was so pleased and her little dog looks adorable in it. It was so easy to knit and the wool is lovely - my first attempt at 'knitting in the round' and I'm now hooked on it!
13.10.2013 - 12:15
|
||||||||||
Let's Go#letsgodogsweater |
||||||||||
 |
 |
|||||||||
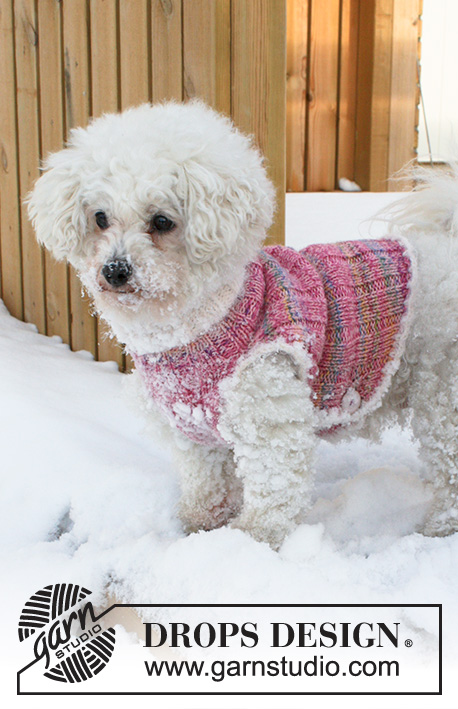
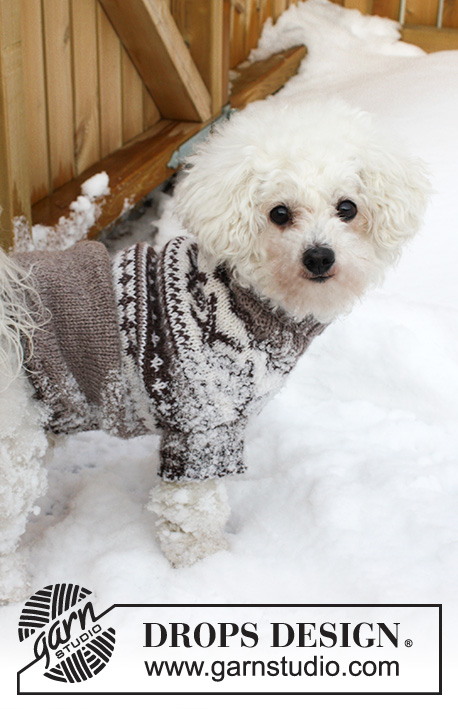
Knitted DROPS dog's jumper with Norwegian pattern in ”Karisma”. Size XS - L.
DROPS Extra 0-836 |
||||||||||
|
PATTERN: See diagram A-1 to A-4. All rows in diagram are worked in stocking st. ---------------------------------------------------------- JUMPER: Worked in the round on double pointed needles/circular needle from the neck down. The smallest size is worked on double pointed needles, the other sizes on circular needle. Cast on 52-76-100-124 sts on double pointed needles/circular needle size 3 mm with light beige brown. Work rib = K 2/P 2 for 6-8-10-12 cm (= neck). Switch to double pointed needles/circular needle size 3.5 mm – NOW MEASURE PIECE FROM HERE! Work 1 round in stocking st while at the same time inc 8 sts evenly = 60-84-108-132 sts. READ ALL OF THE FOLLOWING SECTION BEFORE CONTINUING! Work pattern as follows: SIZE XS: A-1, A-2, and A-4. SIZE S: A-1, A-2, A-3, and A-4. SIZE M: A-1, A-2, A-3, A-2, and A-4. SIZE L: A-1, A-2, A-3, A-2, A-3, and A-4. AT THE SAME TIME on last round of A-1, inc 5-7-9-11 sts evenly = 65-91-117-143 sts. AT THE SAME TIME on last round of A-2, dec 1 st in XS and M and inc 1 st in S and L = 64-92-116-144 sts. AT THE SAME TIME when piece measures 4-6-9-12 cm (measured after neck), divide for front legs as follows: Cast off 1 st, slip 11-17-23-33 sts on a stitch holder (= under the belly), cast off 1 st, then continue pattern back and forth on needle over the remaining sts (= back piece). When piece measures 10-14-18-22 cm (opening for legs measures approx. 6-8-9-10 cm), slip sts on another stitch holder. Slip sts from stitch holder under the belly back on needle (= 11-17-23-33 sts) and work pattern over these the same length as on back piece. Slip all sts on the same needle again and cast on 1 new st in each side between over and under piece = 64-92-116-144 sts. Finish the pattern, then work with light beige brown until finished measurements. When piece measures 15-20-25-30 cm, cast off the middle 10-14-18-22 sts mid under the belly. Then continue back and forth on needle - at the same time cast off at the beg of every row in each side: 2 sts 1-3-4-6 times, 1 st 9-8-9-8 times, 2 sts 1-3-4-6 times and 3 sts 1 time = 22-32-42-52 sts remain on needle. Piece measures approx. 29-38-47-52 cm incl the neck. ASSEMBLY: Slip the remaining sts on double pointed needles/circular needle size 3 mm, knit in addition up sts around the cast off edge so that there are a total of 84-112-144-188 sts. Work rib = K 2/P 2 as follows: 3-6-9-12 rounds with light beige brown, 2 rounds with dark brown, 2 rounds with light beige brown, 2 rounds with dark brown, then loosely cast off with K over K and P over P. LEG: Knit up 36-44-52-60 sts on double pointed needles size 3 mm with light beige brown around one opening for the leg. Work rib = K 2/P 2 as follows: 5-8-12-17 rounds with light beige brown, 2 rounds with dark brown, 2 rounds with light beige brown, 2 rounds with dark brown, then loosely cast off with K over K and P over P. Leg length is approx. 4-5-6-8 cm. Repeat around the other opening. PS: The neck is folded double when worn. |
||||||||||
Diagram explanations |
||||||||||
|
||||||||||

|
||||||||||
Have you finished this pattern?Tag your pictures with #dropspattern #letsgodogsweater or submit them to the #dropsfan gallery. Do you need help with this pattern?You'll find 25 tutorial videos, a Comments/Questions area and more by visiting the pattern on garnstudio.com. © 1982-2025 DROPS Design A/S. We reserve all rights. This document, including all its sub-sections, has copyrights. Read more about what you can do with our patterns at the bottom of each pattern on our site. |
||||||||||


With over 40 years in knitting and crochet design, DROPS Design offers one of the most extensive collections of free patterns on the internet - translated to 17 languages. As of today we count 314 catalogues and 11820 patterns translated into English (UK/cm). 11820
We work hard to bring you the best knitting and crochet have to offer, inspiration and advice as well as great quality yarns at incredible prices! Would you like to use our patterns for other than personal use? You can read what you are allowed to do in the Copyright text at the bottom of all our patterns. Happy crafting!
Post a comment to pattern DROPS Extra 0-836
We would love to hear what you have to say about this pattern!
If you want to leave a question, please make sure you select the correct category in the form below, to speed up the answering process. Required fields are marked *.