Comments / Questions (195)
![]() Ulla Hoffmann Larsen wrote:
Ulla Hoffmann Larsen wrote:
Jeg har downloaded opskriften til drops baby 21-11 hvor der står man skal bruge 250g til str 6/9og at det billigst muligt koster 31kr og at det derfor koster 62kr at strikke de????? hvad er rigtigt
21.04.2021 - 08:39DROPS Design answered:
Hej Ulla, tak for info, fejlen er nu rettet!
21.04.2021 - 08:54
![]() Marita Schmidt wrote:
Marita Schmidt wrote:
Guten Tag, beim Diagramm ist die Seitenlänge mit 27-29-33 (37-40) angegeben. Laut Anleitung wird genau da eine Markierung gesetzt und dann 1 cm weiter gestrickt. Müsste die Seitenlänge deshalb nicht jeweils 1 cm mehr sein ? Und die Länge des Armausschnittes auch ? Liebe Grüße Marita Schmidt
14.04.2021 - 17:53DROPS Design answered:
Liebe Frau Schmidt, dieser extra cm nach der Markierung wird für den Halsausschnitt am Rückenteil gestrickt. Viel Spaß beim stricken!
15.04.2021 - 07:28
![]() Claudia wrote:
Claudia wrote:
Huhu nachdem ich am Rückenteil über die mittleren 26 M. 2 Krausrippe gestrickt habe und danach mit M1 weiter. Geht mein Muster nicht auf. Ich habe dann 2 re Maschen dann 2 linke und dann wieder 2 linke. Was habe ich falsch gemacht. Ich habe genau die maschenanzahl wie beschrieben! Bitte um Hilfe?!
11.04.2021 - 18:57DROPS Design answered:
Liebe Claudia, vermutlich liegt es daran, dass Sie das linke Vorderteil nicht ganz gegengleich gestrickt haben - auch das Muster muss gegengleich (spiegelverkehrt) gestrickt werden. Die Anleitung wurde in diesem Punkt ergänzt. Sie müssen aber nun das linke Vorderteil nicht neu stricken, es reicht, wenn Sie ab dem Halsausschnitt noch mal beginnen - schlagen Sie für den Halsausschnitt einfach 2 Maschen mehr an, dann geht das Muster später auf. Gutes Gelingen!
12.04.2021 - 23:43
![]() Claudia wrote:
Claudia wrote:
Hallo. Ich habe rechtes u linkes Vorderteil auf eine Nadel mit 14 Neuen Maschen mittig. Das fadenende beider Teile liegt jetzt mittig. Vernähme ich diese und fange mit einem neuen Faden auf der rechten Seite an? Wenn ich von der Mitte weiter stricke habe ich ungleichmässige seiten.
05.04.2021 - 20:24DROPS Design answered:
Liebe Claudia, stricken Sie die Maschen vom rechten Vorderteil, schlagen Sie die neuen Maschen an und stricken Sie die Maschen vom linken Vorderteil, und so weiterstricken; Viel Spaß beim stricken!
06.04.2021 - 14:47
![]() Claudia wrote:
Claudia wrote:
Ich bin jetzt am Rückenteil. Hätte man vorher schon vor den 27cm Arbeit an Ärmel schon mit 6 Maschen Krausrippe armbündchen Stricken müssen. Ich habe jetzt alle teile wieder auf eine Nadel. Jetzt steht da 6 Maschen krausrippe (Kante unten am Ärmel) weiß nicht genau welche? M1 über die nächsten 52 Maschen dann 26 krausrippe (Halsbündchrn) und dann 52 Maschen M1 und 6 Maschen krausrippe -ist dass das Bündchen? Ich habe vorher kein armbündchen ?meien Ärmel sind nur mit M1
05.04.2021 - 15:07DROPS Design answered:
Liebe Claudia, wenn alle Maschen für die Ärmel angeschlagen sind, soll man 6 M kraus rechts beidseitig stricken (= Blende + Ärmel), beim Rückenteil stricken Sie weiter wie zuvor mit den neuen Maschen für den Hals auch krausrechts. Viel Spaß beim stricken!
06.04.2021 - 14:24
![]() Rösler Andrea wrote:
Rösler Andrea wrote:
Hallo, ich verstehe Folgendes nicht: Nach total 4 R. Bündchen M1 mit Randm in Krausrippe stricken.
12.03.2021 - 16:05DROPS Design answered:
Liebe Frau Rösler, zuerst stricken Sie 4 Reihen mit Bündchen (und Blendemaschen) wie zuvor erklärt dann stricken das Muster M.1 anststatt Bündchen, dh Hinreihen so: 6 Blendemaschen kraus rechts, die 4 Maschen in M.1 wiederholen bis die letzte Masche und 1 Randmasche krausrechts stricken. Viel Spaß beim stricken!
15.03.2021 - 07:52
![]() Hanna wrote:
Hanna wrote:
Ist es richtig ( oder lese ich richtig), dass die Ärmel 37 cm lang sind? Das kommt mir sehr lang vor.... ( für die zweite Größe)
23.02.2021 - 23:08DROPS Design answered:
Liebe hanna, ich bin leider nicht sicher wo Sie diese 37 cm gelesen haben. In die 2. Größe werden neuen Maschen für die Ärmel so angeschlagen: 5 Maschen x 4 + 7 M + 24 M = 51 M = ca 24 cm - davon werden die unteren 5 cm nach oben umgeschlagen = ca 19 cm. Kann das Ihnen helfen? Viel Spaß beim stricken!
24.02.2021 - 07:45
![]() BEAUCLAIR wrote:
BEAUCLAIR wrote:
Bonjour. J'aimerais tricoter ce modèle à deux aiguilles est ce possible car je n'aime pas du tout les aiguilles circulaires. Merci pour votre réponse.
22.02.2021 - 12:25DROPS Design answered:
Bonjour Mme Beauclair, on tricote ici en allers et retours sur aiguille circulaire pour avoir suffisamment de place pour y loger toutes les mailles, vous pouvez donc utiliser des aiguilles droites si vous le souhaitez . Retrouvez plus d'infos sur les aiguilles circulaires ici. Bon tricot!
22.02.2021 - 13:37
![]() Sophie wrote:
Sophie wrote:
Bonjour, je tricote ce modèle en 3/4 ans. J'en suis au dos après l'encolure pour reprendre tout le rang en M1 en ayant 6 mailles mousse à chaque extrémité. J'ai 100 mailles côté droit + 22 mailles encolure + 100 mailles côtés gauche soit 222 mailles. Si j'enlève 6+6 mailles des poignets, il reste 110 mailles hors ce nombre n'est pas divisible par 4, bas du motif M1. Je retrouve donc décalée dans le motif dans le rang juste après l"encolure . Comment faire ? Merci d'avance !
05.02.2021 - 11:09DROPS Design answered:
Bonjour Sophie, de part la symétrie, vous devriez retomber juste, mais si ce n'est pas le cas, vous pouvez diminuer/augmenter au niveau de l'encolure pour que le double point de riz tombe juste en largeur, ces 2 mailles en plus / en moins au choix ne se verront pas sur la veste. Bon tricot!
05.02.2021 - 13:01
![]() Aurélie wrote:
Aurélie wrote:
Bonjour J'avoue que je n'ai pas fait d'échantillon 😅 mais j'ai bien pris les mesures et je reste exactement sur les dimensions indiquées dans le modèle (je tombe juste systématiquement) J'ai bien pris la bonne laine, exactement celle conseillée, drops coloris 20, taille 3/4 ans. Et là je suis en train de terminer, j'ai bien utilisé une bonne partie de la pelote supplémentaire.
04.02.2021 - 16:58
Checco's Dream#checcosdreamcardigan |
|||||||
 |
 |
||||||
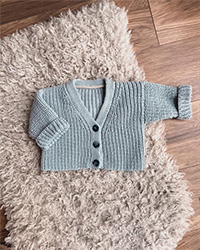
Knitted jacket with seamless sleeves in moss st for baby and children in DROPS Merino Extra Fine
DROPS Baby 21-11 |
|||||||
|
GARTER ST (back and forth on needle): K all rows. PATTERN: See diagram M.1 - diagram shows pattern from RS. BUTTON HOLES: Cast off for button holes on right band. 1 button hole = K tog 3rd and 4th st from edge and make 1 YO, on next row K YO. Cast off for button holes when piece measures: Size 1/3 months: 2, 6, 11 and 15 cm. Size 6/9 months: 2, 7, 12 and 16 cm. Size 12/18 months: 2, 8, 13 and 19 cm. Size 2 years: 2, 7, 12, 17 and 22 cm Size 3/4 years: 2, 8, 13, 19 and 24 cm DECREASE TIP (applies to V-neck): All dec are done from RS! DEC AFTER 6 BAND STS AS FOLLOWS: When first st should be K: Slip 1 st as if to K, K 1, psso. When first st should be P: P 2 twisted tog (i.e. work in back loop of st instead of front). DEC BEFORE 6 BAND STS AS FOLLOWS: When last st should be K: K 2 tog. When last st should be P: P 2 tog. -------------------------------------------------------- JACKET: Worked back and forth on circular needle. Beg on front piece, cast on new sts for sleeve and work up to the shoulder. Work the other front piece, then place both front pieces tog and work down the back piece. RIGHT FRONT PIECE: Cast on 31-35-39 (43-43) sts (incl 6 band sts towards mid front and 1 edge st in the side) on circular needle size 4 mm with Merino Extra Fine. P 1 row from WS. Then work next row as follows from RS: 6 sts in GARTER ST – see explanation above (= band), * K 2, P 2 *, repeat from *-* until 1 st remains and finish with 1 edge st in GARTER ST. When a total of 4 rows in rib have been worked, continue with diagram M.1 with 6 band sts in garter st towards mid front and 1 edge st in garter st in the side. REMEMBER BUTTON HOLES ON RIGHT BAND - see explanation above. REMEMBER THE KNITTING TENSION! When piece measures 7-8-9 (10-11) cm, work next row as follows from RS: 6 band sts in garter st, diagram M.1 over the next 18-22-22 (26-26) sts, slip the last 12-16-16 (20-20) sts that were worked on a stitch holder for pocket slit, continue diagram M.1 over the next 6-6-10 (10-10) sts and finish with 1 edge st in garter st. On next row cast on 12-16-16 (20-20) new sts over the sts on stitch holder = 31-35-39 (43-43) sts. Work pattern as before until piece measures 16-17-20 (23-25) cm. READ ALL OF THE FOLLOWING SECTION BEFORE CONTINUING! V-NECK: Work 2 rows in garter st back and forth over the 6 band sts at beg of row (do not work the other sts on row) – this is done to make the V-neck pretty. Then work over all sts again while AT THE SAME TIME dec for V-neck every other row (i.e. on every row from RS) as follows: Dec 1 st a total of 12-14-16 (16-16) times – read DECREASE TIP. INCREASE FOR SLEEVE: AT THE SAME TIME cast on new sts at the end of every row towards the side for sleeve: 5 sts 4-4-5 (5-5) times, 7 sts 0-1-1 (2-3) times and 25-24-21 (22-27) sts 1 time. After last inc, continue diagram M.1 with 6 sts in garter st in each side for band and sleeve edge until piece measures 27-29-33 (37-40) cm. There are now 64-72-76 (88-100) sts on needle. Insert a marker here – NOW MEASURE PIECE FROM HERE. Continue pattern as before until 1 cm have been worked from marker – adjust so that last row is from WS. Slip the sts on a stitch holder. LEFT FRONT PIECE: Work as right front piece but reversed. Also make sure that M.1 is worked mirrored in relation to the right front piece. NOTE: Do not cast off for button holes on left band. BACK PIECE: Slip the 64-72-76 (88-100) sts from right front piece back on circular needle size 4 mm, cast on 14-14-18 (18-22) new sts on needle (= neck line in back of neck) and slip the 64-72-76 (88-100) sts from left front piece on to same circular needle = 142-158-170 (194-222) sts. Work next row as follows from RS: 6 sts in garter st (= sleeve edge), diagram M.1 as before over the next 52-60-64 (76-88) sts, 26-26-30 (30-34) sts in garter st (= neck edge at the back), diagram M.1 over the next 52-60-64 (76-88) sts and 6 sts in garter st (= sleeve edge). Continue like this until 2 ridges (= 4 rows in garter st) have been worked over the middle 26-26-30 (30-34) sts. Then continue diagram M.1 as before over all sts with 6 sts in garter st in each side for sleeve edges. When piece measures 7½-8-8 (8½-8½) cm from marker on shoulder, cast off at beg of every row in each side as follows: 25-24-21 (22-27) sts 1 time, 7 sts 0-1-1 (2-3) times and 5 sts 4-4-5 (5-5) times = 52-56-64 (72-76) sts remain on back piece. Continue diagram M.1 with 1 edge st in garter st in each side until piece measures 25-27-31 (35-38) cm from marker. Work next row as follows from RS: 1 edge st in garter st, * K 2, P 2 *, repeat from *-* until 3 sts remain and finish with K 2 and 1 edge st in garter st. When a total of 4 rows in rib have been worked, K 1 row (from RS) over all sts before loosely casting off. ASSEMBLY: Sew the side and underarm seams inside 1 edge st. Sew on buttons. Fold up the bottom 5 cm on each sleeve and fasten if necessary the fold up edge with a couple of neat little stitches. POCKET SLIT: Slip the 12-16-16 (20-20) sts from stitch holder on one front piece back on circular needle size 4 mm. Work rib back and forth with 1 st in garter st and 2 K sts in each side (seen from RS). When pocket slit measures 2½-2½-3 (3-3) cm, loosely cast off with K over K and P over P. Sew pocket slit to front piece with duplicate sts in each side. Sew pocket opening to bottom of pocket slit (where sts were put on a stitch holder) on the back of piece. Work another pocket slit the same way on the other front piece. |
|||||||
Diagram explanations |
|||||||
|
|||||||

|
|||||||
Have you finished this pattern?Tag your pictures with #dropspattern #checcosdreamcardigan or submit them to the #dropsfan gallery. Do you need help with this pattern?You'll find 15 tutorial videos, a Comments/Questions area and more by visiting the pattern on garnstudio.com. © 1982-2025 DROPS Design A/S. We reserve all rights. This document, including all its sub-sections, has copyrights. Read more about what you can do with our patterns at the bottom of each pattern on our site. |
|||||||


Post a comment to pattern DROPS Baby 21-11
We would love to hear what you have to say about this pattern!
If you want to leave a question, please make sure you select the correct category in the form below, to speed up the answering process. Required fields are marked *.