
Popular categories
Looking for a yarn?


Comments / Questions (59)
![]() Yvonne wrote:
Yvonne wrote:
Als ik nu met akryl doe kan ik hem dan met 1 van de andere bollen doen zodat wat dikker word. Moet het proeflapje dan met m1 of m2 doen voor te zien of het gaat?
11.03.2019 - 19:48
![]() Yvonne wrote:
Yvonne wrote:
Kan ik deze jurk met 100% akryll breien?
02.03.2019 - 09:35DROPS Design answered:
Dag Yvonne,
Dat zou kunnen, maar het kan wel een wat ander effect hebben, doordat acryl lichter is. Maak altijd even een proeflapje,
05.03.2019 - 20:31
![]() Dia wrote:
Dia wrote:
Når kjolen måler 71 cm står der at man (i str. xs) skal tage 1 m ind over hver vrang parti. Fra 156 m til 130. Men hvis man kun tager 1 m ind bliver det til 143 m. Skal jeg tage de 3 vr ind til 1 ret?
01.02.2019 - 09:34DROPS Design answered:
hei Dia. Alle vrangpartiene er 3 vrang, du strikker 3 rett, 3 vrang rundt hele omgangen. Du feller på samme måte som da arbeidet målte 52 cm, og du går igjen fra 156 til 130 masker - akkurat slik du gjorde tidligere. Den eneste forskjellen er at du nå strikker rett over alle maskene, mend du feller altså 1 maske over hvert av de 26 vrangpartiene. God fornøyelse
04.02.2019 - 14:51
![]() Olivia Fitzgerald wrote:
Olivia Fitzgerald wrote:
I knitted this dress a few years back. Loved it so much. Bought wool to knit again but you have discontinued the cotton viscose which really sets it off on the crochet edge, what do you suggest in its replace please, colours in teal/blue green.
16.12.2018 - 01:04DROPS Design answered:
Dear Mrs Fitzgerald, try our yarn converter to see alternatives to Cotton Viscose - Please contact your DROPS store - even per mail or telephone - to get individual assistance choosing a colour. Happy knitting!
17.12.2018 - 10:40
![]() Daniella Young wrote:
Daniella Young wrote:
It does seem like part of the neck pattern is missing, as someone else mentioned. It looks like there is some special stitch that makes the top of the neck look more rigid where it flips over. Also, there is expansion towards the base of the neck, but that is not included. Any advice?
12.10.2018 - 23:20DROPS Design answered:
Hello Daniella! When starting the neck piece you purl 1 round. Later you use it to crochet a border. Happy knitting!
14.10.2018 - 01:13
![]() Marie Laure wrote:
Marie Laure wrote:
Comment faites vous le col
06.04.2018 - 13:48DROPS Design answered:
Bonjour Marie-Laure, on relève 80 à 90 m tout autour de l'encolure (y compris les mailles qui ont été mises en attente pour l'encolure devant), puis on tricote 1 tour env en ajustant le nombre de mailles (cf pour chaque taille). On tricote ensuite 1 tour d'augmentations puis M.1. À 10 cm de hauteur de col (arrêtez après un motif complet de M.1), tricotez M.2 et rabattez souplement les mailles comme elles se présentent (les m end à l'end et les m env à l'env). Bon tricot!
06.04.2018 - 14:05
![]() Cutolo Matilde wrote:
Cutolo Matilde wrote:
Nella cartella colori del COTTON VISCOSE UNICOLOR il numero 27 (rosa antico chiaro) non c'è. Come mai? Come ovviare? Grazie
26.03.2018 - 00:02DROPS Design answered:
Buongiorno Matilde, abbiamo corretto il nome del colore: il colore 27 di Cotton Viscose è il lilla, ed è presente nella cartella colori, ma è un colore fuori produzione: provi a verificare se il suo rivenditore di fiducia ne ha ancora a magazzino. Buon lavoro!
27.03.2018 - 10:52
![]() Sasha wrote:
Sasha wrote:
Thank you for reply, but I am sorry to say it doesn't help - that's exactly what pattern says. Result of the pattern doesn't give what I see on the picture. Pattern accounts only for 10cm of the turtleneck (up to the chin on the picture), it looks like there is at least 15cm more before the crochet edge...
09.03.2017 - 21:53DROPS Design answered:
Dear Sasha, that's how you have to work neck, but feel free to work some more cm in M.1 to adjust to the desired length if you rather want a higher collar. Happy knitting!
10.03.2017 - 09:01
![]() Sasha wrote:
Sasha wrote:
I love how the neck looks on the picture, but pattern seems to describe something very different. Do l knit the neck facing the right side (like the hem of the dress)? In that case when you tern the turtleneck cables will show their back side. How would I get that sharp bend at the top of the neck? And it looks like pattern doesn't tell anything about the widening of the edge of the neck which would reflect the design of the hem and sleeves. It feels like half of the neck pattern is missing.
08.03.2017 - 20:34DROPS Design answered:
Dear Sasha, you will first pick up sts around neck and work M.1 then M.2 before casting off. Then you will crochet an edge in the first P round around neck. Happy knitting!
09.03.2017 - 09:12Marina Van Rijn wrote:
Waarom krijg ikmijn patroon niet meer in hetnederlands?
04.01.2016 - 13:17DROPS Design answered:
Hoi Marina. Kies Nederlands in de dropdown menu net onder de patroonfoto, dan krijg je weer het patroon in het Nederlands.
05.01.2016 - 15:26
|
|||||||||||||||||||
Blooming Iris |
|||||||||||||||||||
 |
 |
||||||||||||||||||
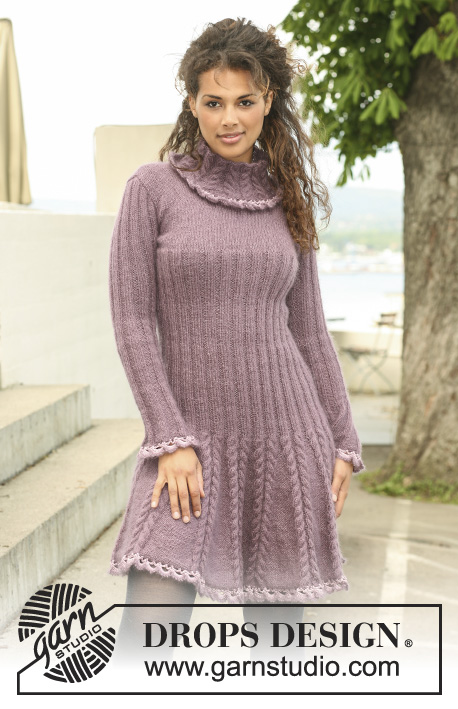
Knitted DROPS dress in ”Alpaca” and ”Kid-Silk” with crochet borders in ”Cotton Viscose”. Size XS to XXL
DROPS 123-40 |
|||||||||||||||||||
|
MEASUREMENT TIP: Make all measurements when piece is lying flat. PATTERN: See diagram M.1 and M.2 - diagram is seen from RS. DECREASING TIP: To make the pleats even dec at the beg and at the end of each P-section alternately. INCREASING TIP: Inc 1 st each side of the 3 K sts mid under sleeve by making 1 YO, on next round K YO into back of loop to avoid a hole. Incorporate inc sts in K3/ P3 as you go along. After the first inc there will be K5 mid under sleeve. After 2nd inc there will be K7 mid under sleeve. After 3rd inc there will be K9 mid under sleeve. After 4th inc there will be K3, P1, K3, P1, K3. After 5th inc there will be K3, P2, K3, P2, K3. After 6th inc there will be K3, P3, K3, P3, K3. Repeat the 6 inc 1 more time. -------------------------------------------------------- BODY PIECE: Worked in the round. See MEASUREMENT TIP! Cast on 494-570-608-684-760-836 sts on circular needle size 4.5 mm with 1 strand Alpaca + 1 strand Kid-Silk. K 1 round. Continue as follows: * M.1 (= 15 sts), P23 *, repeat from *-* to end (= 13-15-16-18-20-22 repeats with 38 sts each). When piece measures 3 cm dec 1 st in all the large P-sections (i.e. all P23 become P22), dec by P tog the first 2 sts = 481-555-592-666-740-814 sts. Repeat the dec in all the large P-sections on every 4th round – SEE DECREASING TIP – until there are P3 left in all P-sections = 234-270-288-324-360-396 sts. Piece now measures approx 35 cm, complete the repeat of M.1 over each cable, then work M.2 = 156-180-192-216-240-264 sts. Continue with K3 / P3. When piece measures 52 cm for all sizes dec all P3 to P2 = 130-150-160-180-200-220 sts. When piece measures 62 cm for all sizes inc all P2 back to P3 by making 1 YO between the 2 P sts - on next round work YO into back of loop to avoid a hole = 156-180-192-216-240-264 sts. When piece measures 71 cm for all sizes K 1 round on all sts, at the same time dec 1 st in each P-section = 130-150-160-180-200-220 sts. Change to circular needle size 5 mm and continue in stocking st – NOW MEASURE PIECE FROM HERE! When piece measures 3-4-5-6-7-8 cm work next round as follows: K 59-69-74-84-94-104 sts (= front piece), cast off 6 sts for armhole, K 59-69-74-84-94-104 sts (= back piece) and cast off 6 sts for armhole. Complete front and back pieces separately. FRONT PIECE: = 59-69-74-84-94-104 sts. Continue in stocking st – AT THE SAME TIME cast off for armhole at the beg of every row each side: 2 sts 0-1-2-3-5-6 times and 1 st 1-2-2-4-4-6 time = 57-61-62-64-66-68 sts. Continue until piece measures 13-15-16-18-19-21 cm. Now slip the middle 15-15-16-16-18-18 sts on a stitch holder for neck and complete each shoulder separately. Cast off to shape the neckline at beg of every row from mid front: 3 sts 1 time, 2 sts 1 time and 1 st 2 times = 14-16-16-17-17-18 sts left on shoulder. Cast off when piece measures 21-23-25-27-29-31 cm (the dress measures a total of approx 92-94-96-98-100-102 cm). BACK PIECE: = 59-69-74-84-94-104 sts. Cast off for armhole each side as described for front piece = 57-61-62-64-66-68 sts. When piece measures 19-21-23-25-27-29 cm cast off the middle 25-25-26-26-28-28 sts for neck and complete each shoulder separately. Cast off 2 sts on neckline on next row = 14-16-16-17-17-18 sts left on shoulder. Cast off when piece measures 21-23-25-27-29-31 cm. SLEEVE: Worked in the round. Cast on 63-63-72-72-81-81 sts with 1 strand Alpaca + 1 strand Kid-Silk on double pointed needles size 4.5 mm. K 1 round, Continue as follows: * K3, P6 *, repeat from *-* 7-7-8-8-9-9 times. Insert a marker in the middle of the first 3 K sts (= mid under sleeve). When piece measures 4 cm dec all P6 to P5 by P tog the first 2 sts in each P-section = 56-56-64-64-72-72 sts. Continue with K3/P5. When piece measures 8 cm dec all P5 to P4 - SEE DECREASING TIP = 49-49-56-56-63-63 sts. Continue with K3/P4. When piece measures 12 cm dec all P4 to P3 = 42-42-48-48-54-54 sts. Continue with K3/P3. When piece measures 15 cm inc 1 st each side of the 3 K sts mid under sleeve – SEE INCREASING TIP! Repeat the inc on every 6th round a total of 12 times = 66-66-72-72-78-78 sts. When piece measures 48-47-46-44-43-41 cm (less for the larger sizes because of longer sleeve cap and wider shoulder) cast off 7 sts mid under sleeve and complete piece back and forth on needle. Cast off for sleeve cap at the beg of every row each side: 2 sts 3 times and 1 st 1-2-3-5-6-9 times, then 2 sts each side until piece measures 54 cm, now cast off 3 sts 1 time each side and cast off remaining sts. Piece measures approx 55 cm. ASSEMBLY: Sew shoulder seams. NECK: Pick up approx 80 to 90 sts (includes sts on stitch holder at front) round the neck on small circular needle size 4.5 mm with 1 strand Alpaca + 1 strand Kid-Silk. P 1 round – AT THE SAME TIME adjust no of sts to 84-90-90-96-96-102 sts. K 1 round. Work next round as follows: * K 2 sts in each of the first 3 sts, P3 *, repeat from *-* to end = 126-135-135-144-144-153 sts. Continue in M.1 on all sts. When neck measures 10 cm – adjust after a full repeat - work M.2, then cast off LOOSELY with K over K and P over P. CROCHET BORDER: Crochet round bottom edge of dress and round sleeves edges with 1 strand Cotton Viscose and crochet hook size 3 mm as follows: ROUND 1: 1 dc in first st, * 5 ch, skip approx 1-1.5 cm, 1 dc in next st *, repeat from *-*, finish with 5 ch and 1 sl st in first dc from beg of round. NOTE: Adjust to an even no of ch-loops. ROUND 2: Crochet sl sts to the middle of first ch-loop, 1 dc in ch-loop, * 7 ch, 1 dc in next ch-loop, 1 ch, 1 dc in next ch-loop *, repeat from *-* to end, but replace last dc with 1 sl st in first dc on round. ROUND 3: Crochet as follows in each of the large ch-loops: 1 dc, 7 tr, 1 dc and crochet 1 dc in each of the small ch-loops, finish with 1 sl st in first dc from beg of round. ROUND 4: Change to 1 strand Kid-Silk. Crochet 1 dc in first dc and 1 dc in first tr, * [3 ch, 1 dc in first ch (= 1 picot), 1 dc in next tr], repeat from [-] a total of 6 times, 1 dc in each of the next 4 sts *, repeat from *-* all the way round, i.e. 6 picots in each of the large ch-loops, finish with 1 sl st in first dc. Crochet in the same way in the P-round at the bottom of neck – hold the dress with neck towards you and the rest of the dress away from you – to make the border sit nicely work the first round as follows: 1 dc in first st, * 5 ch, 1 dc in next st, 5 ch, skip 1 st, 1 dc in next st *, repeat from *-* - make sure to have an equal no of ch-loops. Continue with round 2 to 4 as above. FURTHER ASSEMBLY: Set in sleeves. |
|||||||||||||||||||
Diagram explanations |
|||||||||||||||||||
|
|||||||||||||||||||

|
|||||||||||||||||||
Have you finished this pattern?Tag your pictures with #dropspattern or submit them to the #dropsfan gallery. Do you need help with this pattern?You'll find 17 tutorial videos, a Comments/Questions area and more by visiting the pattern on garnstudio.com. © 1982-2025 DROPS Design A/S. We reserve all rights. This document, including all its sub-sections, has copyrights. Read more about what you can do with our patterns at the bottom of each pattern on our site. |
|||||||||||||||||||


With over 40 years in knitting and crochet design, DROPS Design offers one of the most extensive collections of free patterns on the internet - translated to 17 languages. As of today we count 314 catalogues and 11820 patterns translated into English (UK/cm). 11820
We work hard to bring you the best knitting and crochet have to offer, inspiration and advice as well as great quality yarns at incredible prices! Would you like to use our patterns for other than personal use? You can read what you are allowed to do in the Copyright text at the bottom of all our patterns. Happy crafting!
Post a comment to pattern DROPS 123-40
We would love to hear what you have to say about this pattern!
If you want to leave a question, please make sure you select the correct category in the form below, to speed up the answering process. Required fields are marked *.