
Looking for a yarn?


Comments / Questions (31)
![]() Céline wrote:
Céline wrote:
Bonjour,Je ne comprends pas comment je dois procéder pour cette partie: "Pointe du pied: se tricote en...jusqu'à.. quand il reste 5-5-6 m." Si je comprends bien je tricote 67 m , un retour mais je m'arrête 5 mailles avant la fin du rang pour faire mon raccourci , je refais un rang entier , retour ,je m'arrête de nouveau 5 mailles avant la fin du rang pour faire de nouveau mon rang raccourci puis mon troisième rang entier, retour, 6 mailles avant la fin pour mon rang raccourci ?? Merci
05.12.2015 - 17:56DROPS Design answered:
Bonjour Céline, vous tricotez 2 rangs sur toutes les 67 mailles, puis 2 rangs sur 62 m (ne tricotez pas les 5 dernières m de la pointe). Répétez ces 2 rangs tout du long, on forme ainsi la pointe de la chaussette. Bon tricot!
07.12.2015 - 10:06
![]() Laetitia wrote:
Laetitia wrote:
Bonjour, pour les rangs raccourcis au debut et a la fin, faut-il intercaler avec un rang ou deux rangs normaux, le rang raccourci ? A quel moment exactement ? Je vous remercie
19.11.2014 - 00:00DROPS Design answered:
Bonjour Laetitia, les rangs raccourcis du début et de la fin se tricotent sur les mailles indiquées soit au début: 2 rangs sur les 7 premières m, 2 rangs sur les 16 premières m, 2 rangs sur les 24 premières m (+ 2 rangs sur les 32 premières m dans la dernière taille) et à la fin : 2 rangs sur les 32 premières m en taille 41/42 seulement, 2 rangs sur les 24 premières m, 2 rangs sur les 16 premières m, 2 rangs sur les 7 premières m. Bon tricot!
19.11.2014 - 13:51
![]() Laetitia wrote:
Laetitia wrote:
Bonjour, pour reprendre après les 10 cm, vous m'indiquez que le rang suivant commence par la pointe. Est ce bien la ou il y a les rangs raccourcis? Je vous remercie
12.11.2014 - 22:21DROPS Design answered:
Bonjour Laetitia, tout à fait côté pointe, on a bien des rangs raccourcis. Après les 10 cm, vous commencez le rang suivant par la pointe et placez un marqueur et augmentez de chaque côté de ce marqueur. Bon tricot!
13.11.2014 - 09:20
![]() Laetitia wrote:
Laetitia wrote:
Bonjour, pour la 1ere taille, après avoir tricoter jusqu'à 10 cm de hauteur. Quel est le point ou je mesure les 10 cm? pour arrêter du même cote que la pointe, ou le dernier rang arrive t-il? Merci
11.11.2014 - 17:54DROPS Design answered:
Bonjour Laetitia, les 10 cm se mesurent à partir de la dernière diminution, c'est-à-dire au niveau du marqueur où vous avez diminué pour former le talon, le rang suivant après ces 10 cm doit commencer par la pointe vers le haut de la jambe pour placer le marqueur au bon endroit. Bon tricot!
12.11.2014 - 09:03
![]() Alyson Wildman wrote:
Alyson Wildman wrote:
Hello. I am confused about the part of the pattern regarding the Tip of the Toe where it says every 3rd and 4th row is shorten. The reference to the 3rd and 4th row is confusing me. Is it every other row i.e. every time I am knitting towards the toe that I do this or every other row in terms of first row knit towards toe, knit without doing the shorten, second row of knitting towards toe knit and do the shorten. Hope this makes sense.
21.02.2014 - 16:39DROPS Design answered:
Dear Mrs Wildman, RS rows start from leg and end towards toe. Work 2 rows on all sts, 2 rows on sts leaving the toe sts unworked, and repeat these 4 rows until the end. Happy knitting!
21.02.2014 - 16:57
![]() Yuko wrote:
Yuko wrote:
In den ersten Reihen sollen nur ein paar Maschen gestrickt, dann die Arbeit gedreht, 1 Masche abgehoben, und dann die Maschen wieder zurück gestrickt werden. Soll danach die Arbeit wieder gedreht werden? Oder wo stricke ich sonst als nächstes lang? Und welche "verkürzten Reihen gegen die Zehen nicht vergessen"? Zu dem Zeitpunkt habe ich doch nur 72 Maschen mit einer Beule auf einer Seite? Und die Beule ist die Ferse, oder? Vielen Dank!
25.11.2013 - 22:45DROPS Design answered:
Liebe Yuko, das Wenden oder Drehen der Arbeit erwähnen wir normalerweise nur, wenn mitten in der Reihe gewendet wird (bei verkürzten Reihen), am Ende der Reihe ist es klar, dass dann in die andere Richtung gestrickt werden muss. Und ja, die Ferse formt eine Art "Beule".
26.11.2013 - 09:34
![]() Sanne wrote:
Sanne wrote:
Tusind tak, det hjalp :-)
20.12.2012 - 12:53
![]() Jeanette wrote:
Jeanette wrote:
Pind 1 strikker du over alle masker, det samme med pind 2, pind 3 strikker du til de sidste 5 masker og vender, pind 4 strikker du over alle masker forestil dig en serie på 4 hele tiden, sådan holder jeg nemmest styr på det :)Håber det hjalp
19.12.2012 - 02:56
![]() Sanne wrote:
Sanne wrote:
Har vist samme spørgsmål som Elin. Er det rigtigt at vende på hver 3. og 4. p.?? Den ene vending må da så blive modsat tåen, eller svare en p til "en omgang", dvs 2 pinde...??
13.12.2012 - 14:17DROPS Design answered:
Her mener vi at 3.og4.pind bliver kortere og altså hver anden gang man strikker en "rille". God fornøjelse!
19.12.2012 - 13:28
![]() Elin wrote:
Elin wrote:
Tå: På hver 3. og 4.p strikkes det forkortede p, det vil si at annenhver gang man strikker ned mot tåen strikkes det ikke over alle m, men snues midt i arb når det gjenstår 5-5-6 m.Får ikke dette til å stemme.Skal man snu på enten omgan 3 eller 4?Man kan jo ik snu mot tå på hælen på omg 4 som er vrangen på en måte.Håper du skjønner hva jeg spør om..
03.02.2008 - 23:20
|
|
DROPS 103-4 |
|
|
|
|
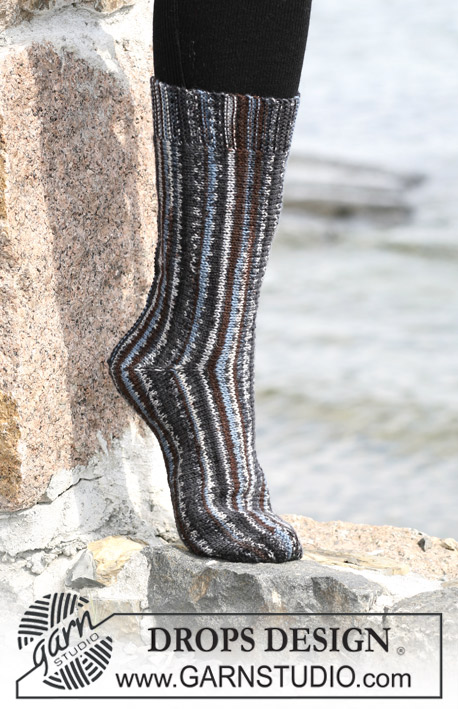
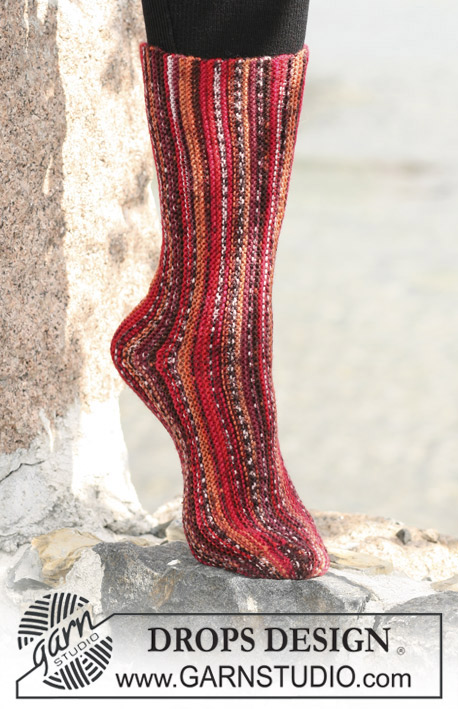
DROPS socks knitted sideways in garter sts with ”Snow”
DROPS 103-4 |
|
|
Knitting tension: 12 sts x 26 rows in garter sts = 10 x 10 cm Garter sts: Knit back and forth on all rows Knitting tips: Each time turning in the middel of a row, slip a st. tighten the thread and continue back on row. This is done to avoid a hole in the turnings. Sock: Remember the knitting tension! Knit the sock back and forth. Beg. mid underneath the foot, then up over the instep and finish mid underneath the foot. The sock is knitted in garter sts through out. Tip of the toe: Every 3rd and 4th row is shorten. This means on every other row knitted down towards the toe not all sts are knitted, but turn the middel of the work when 5-5-6 sts are left – read knitting tips above! Cast on 62-67-72 sts with needles size 6 mm in Snow. First knit a ”rise” at the back part of the sock as follows: Knit 8 sts, turn, slip a st, knit 7 sts. Knit 16 sts, turn, slip a st, knit 15 sts. Knit 24 sts, turn, slip a st, knit 23 sts. Size 6/7: Knit 32 sts, turn, alip a st, knit 31 sts. All sizes: Continue with 3 rows over all 62-67-72 sts (remember the shorten rows towards the toe – the opporsite side of the ”rise” of the back part of the sock). Now dec for heel as follows: Insert a MT (marking thread) in the 26th-29th-32nd sts (from the toe). Dec 1 st each side of the st with the MT on every other row a total of 5 times = 52-57-62 sts. Knit in garter sts until the piece measures 10-12-14 cm from the last dec. – stop at the same side as the toe. Continue to inc. for the heel as follows: Insert a MT in the 21st-24th-27th sts (from the toe). Inc. 1 st each side of the st with the MT on every other row a total of 5 times = 62-67-72 sts. Knit 3 rows over all sts. Continue the”rise” of the back part as follows: Size 6/7: Knit 32 sts, turn, slip a st, knit 31 sts. All sizes: Knit 24 sts, turn, slip a st, knit 23 sts. Knit 16 sts, turn, slip a st, knit 15 sts. Knit 8 sts, turn, slip a st, knit 7 sts. Put sts on a thread or a sts holder. Knit 1 more sock. Assembly: Sew sts from the thread or sts holder and the casting on edge tog. with drafting sts. The seam begins underneath the foot and comes up along the back of the leg. Pull the sts tog. with the thread and sew tight. |
|
Have you finished this pattern?Tag your pictures with #dropspattern or submit them to the #dropsfan gallery. Do you need help with this pattern?You'll find 11 tutorial videos, a Comments/Questions area and more by visiting the pattern on garnstudio.com. © 1982-2025 DROPS Design A/S. We reserve all rights. This document, including all its sub-sections, has copyrights. Read more about what you can do with our patterns at the bottom of each pattern on our site. |


With over 40 years in knitting and crochet design, DROPS Design offers one of the most extensive collections of free patterns on the internet - translated to 17 languages. As of today we count 320 catalogues and 12094 patterns translated into English (UK/cm). 12094
We work hard to bring you the best knitting and crochet have to offer, inspiration and advice as well as great quality yarns at incredible prices! Would you like to use our patterns for other than personal use? You can read what you are allowed to do in the Copyright text at the bottom of all our patterns. Happy crafting!
Post a comment to pattern DROPS 103-4
We would love to hear what you have to say about this pattern!
If you want to leave a question, please make sure you select the correct category in the form below, to speed up the answering process. Required fields are marked *.