
Popular categories
Looking for a yarn?


Comments / Questions (18)
![]() Carin Ehrs wrote:
Carin Ehrs wrote:
Raglanökning: Hur ska jag sticka den ökade raglanmaskan från rätsidan? Ska maskan stickas rät från rätsidan och bli en del av fram- respektive bakstycket? mvh/Carin
10.12.2023 - 08:41DROPS Design answered:
Hei Carin. Öka 1 maska på varje sida av A.1/A.2 genom att göra 1 omslag om stickan efter/före A.1/A.2 som förklarat i beskrivningen. På nästa varv stickas omslagen vridna som förklarat nedan, sedan stickas de nya maskorna fortlöpande in i resår över varje axel och slätstickning på framstycket/bakstycket. mvh DROPS Design
11.12.2023 - 12:53
![]() Van Doninck Margriet wrote:
Van Doninck Margriet wrote:
Hoe brei ik verder na de halswarmer. Dus het patroon , raglan op de rondbreinaald.
12.11.2023 - 21:14DROPS Design answered:
Dag Margriet,
Je breit dan verder in patroon en meerdert tegelijkertijd voor de raglan. Daarom moet je beide paragrafen eerst goed doorlezen voordat je verder breit. Je breit dus in patroon en als A.1 klaar is in de hoogte, brei je A.2 boven A.1 en de schoudersteken brei je in boordsteek. Terwijl je dit patroon verder breit meerder je tegelijkertijd voor de RAGLAN, zoals beschreven staat onder de paragraaf RAGLAN.
15.11.2023 - 14:01
![]() Barbara Schmale wrote:
Barbara Schmale wrote:
Sorry, ich habe wieder aufgemacht. Wieder eine ihrer Anleitungen mit denen man nicht klar kommt. Das ist wirklich ärgerlich.
29.09.2023 - 22:02
![]() Barbara Schmale wrote:
Barbara Schmale wrote:
Nach den ersten 12cm ist dieAnleitung total unverständlich für mich. A1 und A2 sind nicht separat erklärt und ich verstehe das vorne und hinten nicht.
26.09.2023 - 19:40DROPS Design answered:
Liebe Frau Schmale, nach den 12 cm sollen Sie Bündchen wie zuvor. + das Diagram A.1 stricken, so wird man für die Zöpfe in A.2 zunehmen; bei der 2. Reihe A.1 nehmen Sie für den Raglan zu; und dann stricken Sie A.2 anstatt A.1 für die Raglanlinien und stricken Sie weiter mit den Raglanzunehmen beidseitig von A.2. Viel Spaß beim stricken!
29.09.2023 - 07:43
![]() Cheryl O'Bryan wrote:
Cheryl O'Bryan wrote:
Chestnut warmer
03.08.2023 - 22:00
![]() Lydia wrote:
Lydia wrote:
Shieldmaiden
03.08.2023 - 20:37
![]() Inga Heafey wrote:
Inga Heafey wrote:
Wonderful and very heroic looking
03.08.2023 - 14:49
![]() Thais Ribeiro wrote:
Thais Ribeiro wrote:
Armory vest
03.08.2023 - 13:07
|
|||||||||||||||||||
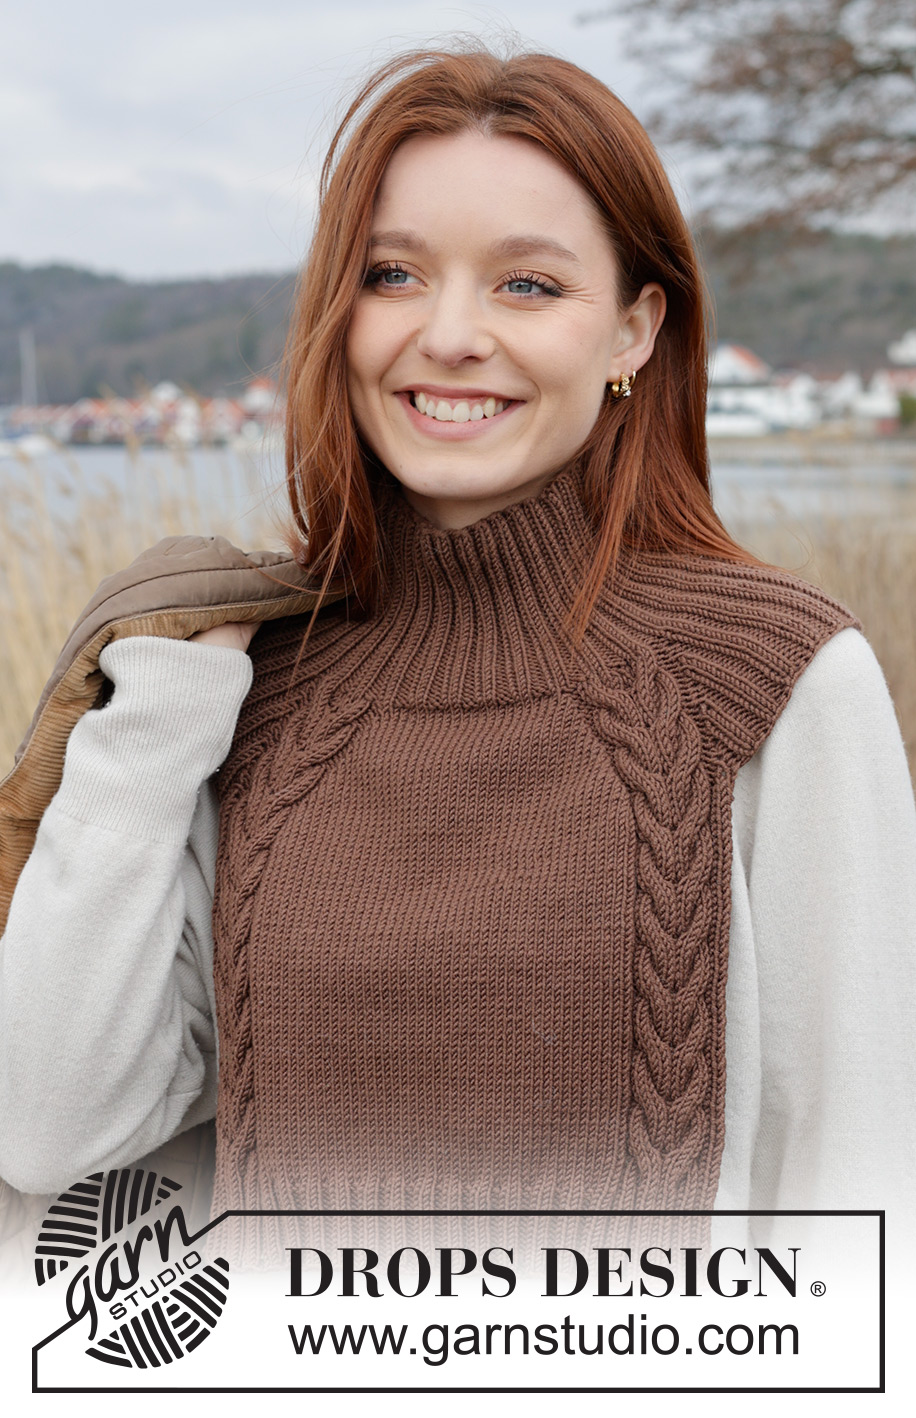
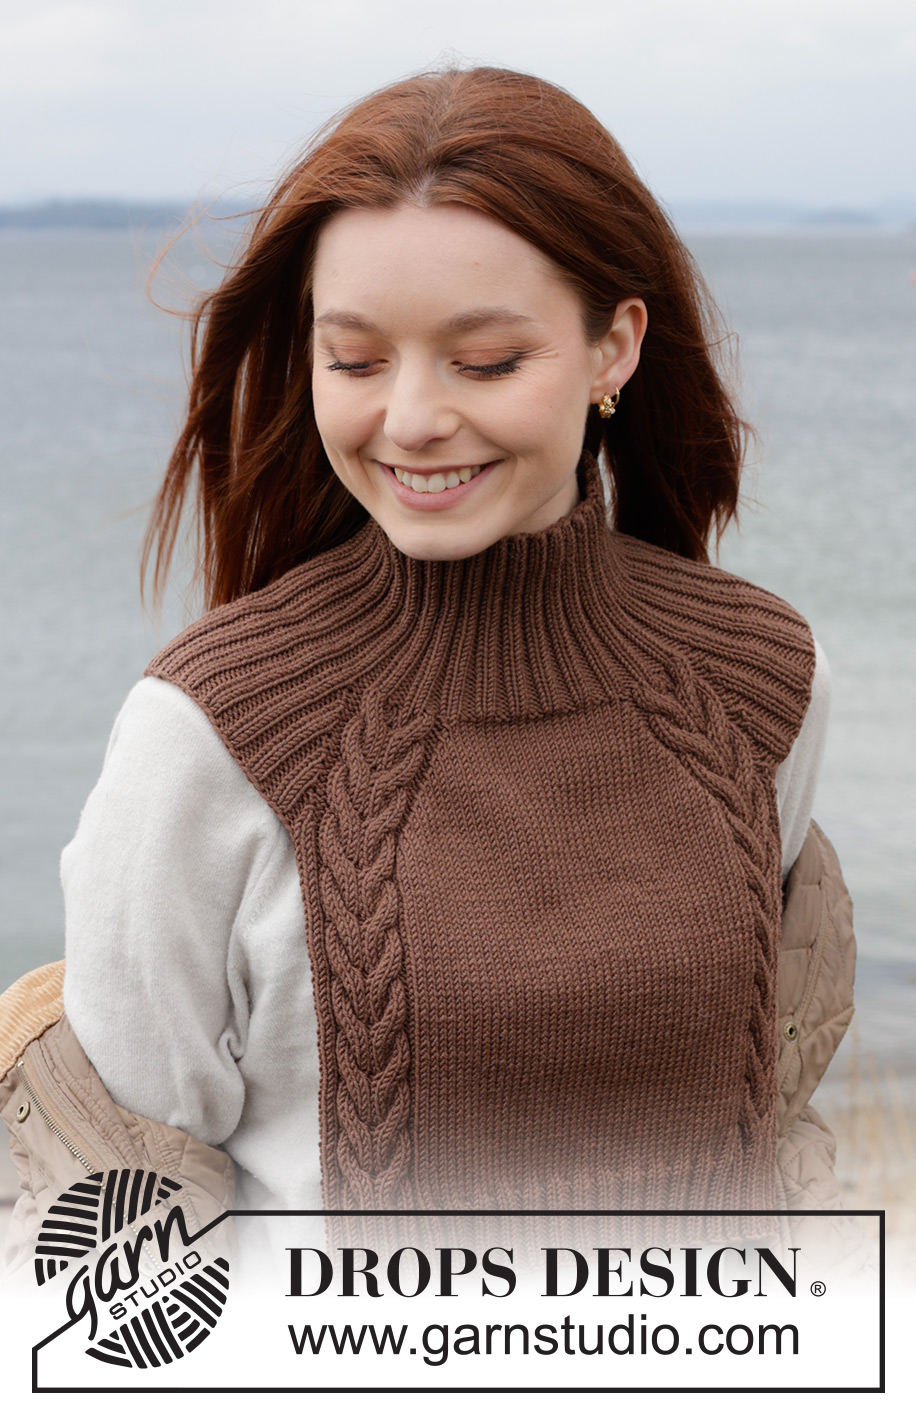
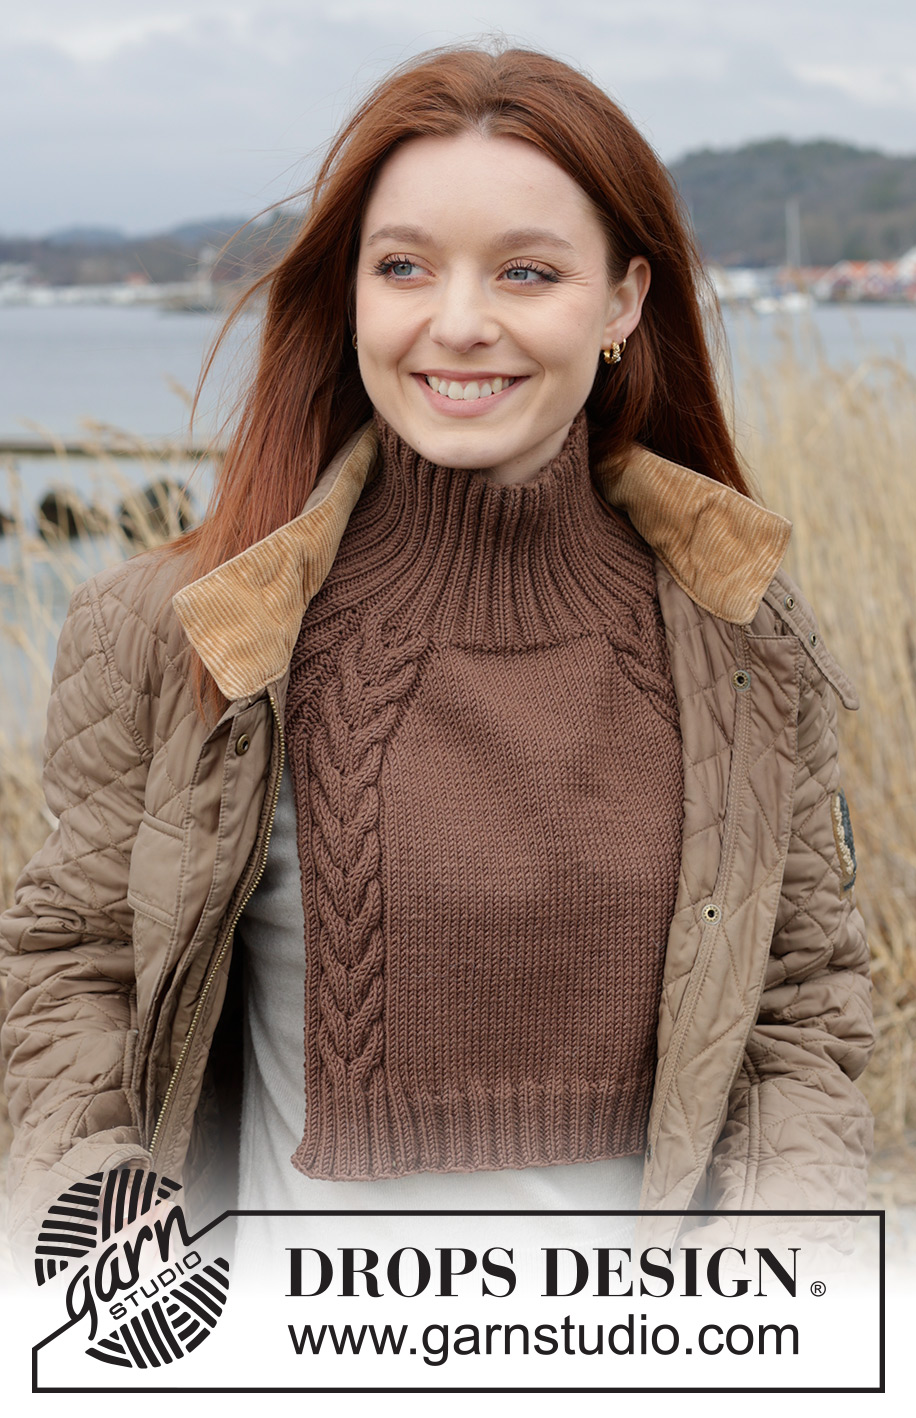
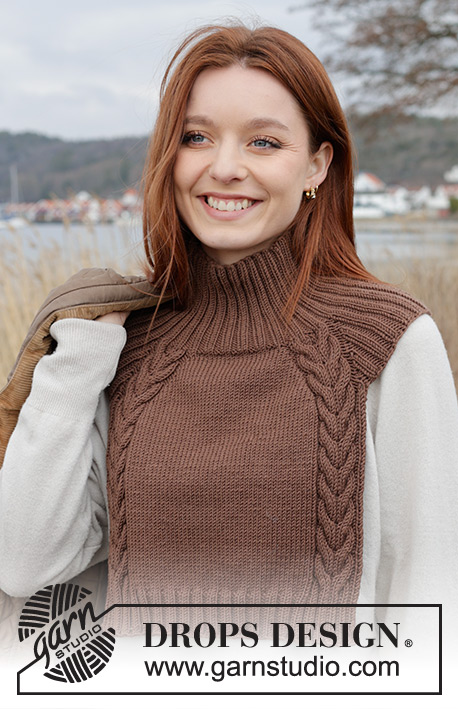
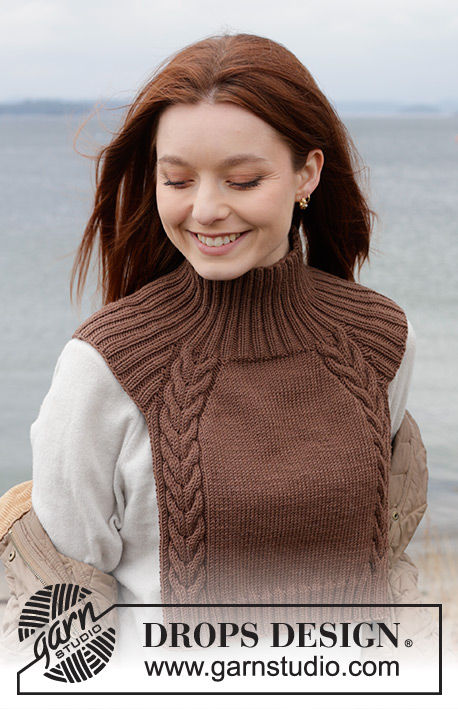
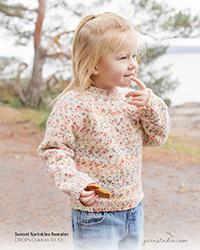
Chestnut Love Neck Warmer#chestnutloveneckwarmer |
|||||||||||||||||||
 |
 |
||||||||||||||||||
Knitted neck warmer in DROPS Merino Extra Fine or DROPS Fiesta. The piece is worked top down with raglan and cables.
DROPS 242-32 |
|||||||||||||||||||
|
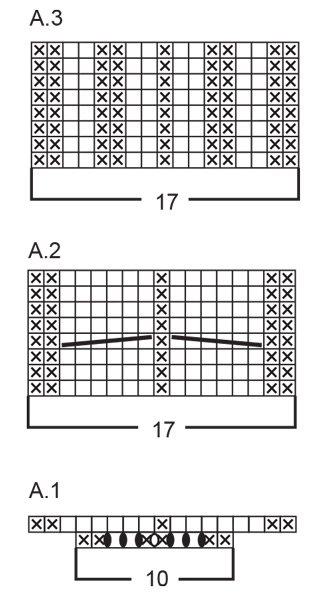
------------------------------------------------------- EXPLANATIONS FOR THE PATTERN: ------------------------------------------------------- GARTER STITCH (worked back and forth): Knit all rows. 1 ridge = knit 2 rows. PATTERN: See diagrams A.1 to A.3. The diagrams show all rows in the pattern from the right side. RAGLAN: Increase 1 stitch on each side of A.1/A.2 by making 1 yarn-over after/before A.1/A.2 as described in the text. On the next round/row work the yarn overs as described below. The new stitches are then worked into the rib on each shoulder and stocking stitch on the front/back pieces. FROM THE RIGHT SIDE: BEFORE A.1/A.2: Slip the yarn over onto the right needle knit-wise, insert the left needle and replace the yarn over onto the left needle reversed (twisted), knit/purl to avoid a hole. AFTER A.1/A.2: Knit/purl twisted to avoid a hole. FROM THE WRONG SIDE: BEFORE A.1/A.2: Purl/knit twisted to avoid a hole. AFTER A.1/A.2: Slip the yarn over onto the right needle knit-wise, insert the left needle and replace the yarn over reversed onto the left needle (twisted), purl/knit to avoid a hole. ------------------------------------------------------- START THE PIECE HERE: ------------------------------------------------------- NECK WARMER - SHORT OVERVIEW OF THE PIECE: The piece is worked in the round with circular needle, top down. Increase for raglan on each side of the cables on the yoke. Then cast off the shoulder stitches. The neck warmer is finished from top down, back and forth with circular needle. NECK WARMER: Cast on128-136-144 stitches with short circular needle size 3 mm and DROPS Merino Extra Fine or DROPS Fiesta. Work rib in the round (knit 2, purl 2), the beginning of the round is the back right shoulder. Work this rib for 10-11-12 cm. Change to circular needle size 4 mm. Work the next round as follows: * Knit 2, purl 2, 1 yarn over *, work from *-* a total of 5-6-7 times, knit 2, A.1, 22 stitches in stocking stitch (mid-front), A.1, * knit 2, purl 2, 1 yarn over *, work from *-* a total of 5-6-7 times, knit 2, A.1, 22 stitches in stocking stitch (mid-back), A.1 = 166-176-186 stitches. Insert 1 marker in the middle of one shoulder (middle of one purled section). This is used to measure from. Continue the pattern and increase for raglan as described below. Read both sections before continuing. PATTERN: Continue the above pattern but when A.1 is finished in height work A.2 over these stitches. Repeat A.2 in height. The shoulder stitches are worked in rib (on the first round purl the yarn overs twisted – no hole, then work in rib, knit 2, purl 3). REMEMBER THE KNITTING TENSION! RAGLAN: At the same time, on the last round in A.1 increase for RAGLAN after/before each A.1 – read description above (start by increasing at the beginning of the round after the last A.1 on the previous round – 8 increased stitches). Continue this increase on each side of A.2 every 2nd round a total of 15 times in all sizes (including the first increase on each side of A.1) = 286-296-306 stitches. Finish after an odd round in A.2 so the cables are worked from the right side when you work back and forth. Cut the strand. DIVIDE FOR FRONT AND BACK PIECES: This must be an even round in A.2. Slip the first 3 stitches (2 knitted + 1 purled) onto the right needle without working them. Cast off the next 51-56-61 stitches a little loosely, work 1 GARTER STITCH – read description above, knit 2, work A.2, 52 stitches in stocking stitch, A.2, knit 2, 1 garter stitch, place these 92 stitches on a stitch holder for the back piece, cast off the next 51-56-61 stitches a little loosely, work 1 garter stitch, knit 2, A.2, 52 stitches in stocking stitch, A.2, knit 2, 1 garter stitch = 92 stitches in all sizes. FRONT PIECE: = 92 stitches. Continue the pattern back and forth. AT THE SAME TIME on the next row from the right side increase as follows in sizes M/L and L/XL: Increase 1 stitch after A.2 at the beginning of the row and before A.2 at the end of the row = 92-94-94 stitches. Repeat this increase in size L/XL after working 3 rows without increasing = 92-94-96 stitches. When the piece measures 29-31-33 cm from the marker on the shoulder and the next row is from the wrong side, change to circular needle size 3 mm. Work as follows from the wrong side: 1 garter stitch, purl 2, A.3, stocking stitch over the next 52-54-56 stitches and increase 6-8-6 stitches evenly over these stitches, work A.3, purl 2, 1 garter stitch = 98-102-102 stitches. Work as follows from the right side: 1 garter stitch, knit 2, A.3, * knit 2, purl 2 *, work from *-* a total of 14-15-15 times, knit 2, A.3, knit 2, 1 garter stitch. Continue this rib back and forth. After 2 rows increase 14-15-15 stitches between A.3 mid-front by increasing all purl-2 to purl-3 (seen from the right side) by making 1 yarn over after all purl-2. The yarn overs are worked twisted on the next row to avoid holes = 112-117-117 stitches. Continue working until the piece measures approx. 34-36-38 cm from the marker on the shoulder (5 cm rib). Cast off with knit over knit and purl over purl. BACK PIECE: Place the 92 stitches from the stitch holder on circular needle size 4 mm and work in the same way as the front piece. |
|||||||||||||||||||
Diagram explanations |
|||||||||||||||||||
|
|||||||||||||||||||
 |
|||||||||||||||||||
Have you finished this pattern?Tag your pictures with #dropspattern #chestnutloveneckwarmer or submit them to the #dropsfan gallery. Do you need help with this pattern?You'll find 21 tutorial videos, a Comments/Questions area and more by visiting the pattern on garnstudio.com. © 1982-2026 DROPS Design A/S. We reserve all rights. This document, including all its sub-sections, has copyrights. Read more about what you can do with our patterns at the bottom of each pattern on our site. |
|||||||||||||||||||
With over 40 years in knitting and crochet design, DROPS Design offers one of the most extensive collections of free patterns on the internet - translated to 17 languages. As of today we count 324 catalogues and 12202 patterns translated into English (UK/cm). 12202
We work hard to bring you the best knitting and crochet have to offer, inspiration and advice as well as great quality yarns at incredible prices! Would you like to use our patterns for other than personal use? You can read what you are allowed to do in the Copyright text at the bottom of all our patterns. Happy crafting!
Post a comment to pattern DROPS 242-32
We would love to hear what you have to say about this pattern!
If you want to leave a question, please make sure you select the correct category in the form below, to speed up the answering process. Required fields are marked *.