
Popular categories
Looking for a yarn?


Comments / Questions (32)
![]() Mader Cornelia wrote:
Mader Cornelia wrote:
Hallo, Ich finde das Diagramm nicht. Die Erklärung der Zeichen ist da, aber nicht die Musterzeichnung . Können Sie mir helfen?? Danke und vG Cornelia Mader
06.07.2023 - 19:54DROPS Design answered:
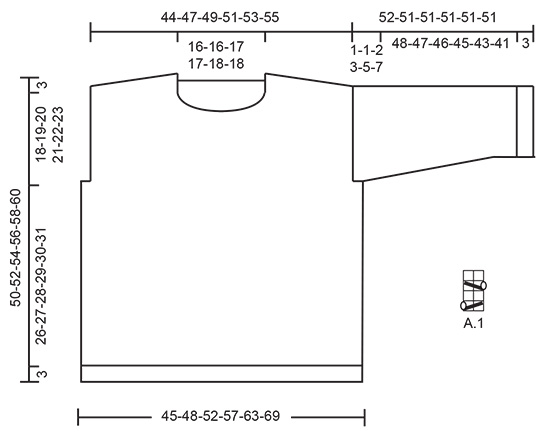
Liebe Cornelia, das Diagramm finden Sie rechts neben der Maßskizze unter dem Ärmel. Viel Spaß beim Stricken!
07.07.2023 - 17:07
![]() Fotini wrote:
Fotini wrote:
Hello, I am currently work your pattern 231-37. I have some problems knitting short rows around neck. Is it working in "wrap and turn" method? Ι am grateful for your assistance! Your work is amazing! Fotini
05.07.2023 - 12:36DROPS Design answered:
Hi Fotini, you can either use wrap and turn method or the simple basic technique HERE. Happy knitting!
05.07.2023 - 12:51
![]() Lyn wrote:
Lyn wrote:
Thanks so much for the quick response I received today for my question, but I think I didn't ask the question properly. I don't understand what the A.1 diagram is telling me. (i.e. the A.1 diagram is that little box with 8 boxes within & with diagonal lines on it - above this section. What is it telling me to do? Or is the information in the brackets following hte A.1 in the directions telling me what to do? So sorry to be so dense!! Thanks again, Lyn
16.06.2023 - 08:50DROPS Design answered:
Dear Lyn, the diagram A.1 is for the lace pattern, it's worked over 2 stitches (in width) and 4 rows (in height), as follows (in the round): Round 1: *K2 tog, YO*, repeat from *-*. Round 2 and 4: K all stitches. Round 3: *YO, slip 1, K1, psso*, repeat from *-*. Repeat the 4 rounds. Hope it can now help more :) Happy knitting!
16.06.2023 - 11:22
![]() Lyn wrote:
Lyn wrote:
What does this mean? A.1 over next 2 stitches ( = over the middle 2 stitches over the 6 stitches in garter stitch in each side)
15.06.2023 - 13:32DROPS Design answered:
Dear Lynn, when joining front and back pieces together you worked with 6 stitches in garter stitch on each side; and then knit 1 stitch. You now knit the first stitches, then work the 2 next stitches as shown in diagram A.1 (these both stitches are the 2 middle stitches of the 6 stitches worked previously in garter stitch), knit the next 92-142 sts (see size) and work the last 2 sts as shown in A.1 (these both stitches are the 2 middle stitches of the 6 stitches worked previously in garter stitch on the other side of jumper). Happy knitting!
15.06.2023 - 15:26
![]() Els Van Zantvliet wrote:
Els Van Zantvliet wrote:
Beste lezers, voor de schouders: De verkorte toeren, brei ik die aan de kant vd hals of van de schouders ? (ik ben linkshandig maar brei rechts das afentoe onhandig) alvast bedankt Groetjes Els
02.06.2023 - 09:58DROPS Design answered:
Dag Els,
De verkorte toeren worden aan de kant van de hals gemaakt, zodat er een schuine schouderlijn ontstaat. (Zie ook de tekening onderaan het patroon.)
04.06.2023 - 10:23
![]() Rousseau Catherine wrote:
Rousseau Catherine wrote:
Bonjour. Où est le fameux diagramme A1? Merci de votre réponse.
01.06.2023 - 20:29DROPS Design answered:
Bonjour Mme Rousseau, vous trouverez le diagramme A.1 à droite du schéma des mesures, sous la manche. C'est un petit diagramme qui se tricote sur 2 mailles et 4 rangs. Bon tricot!
02.06.2023 - 08:09
![]() Els Van Zantvliet wrote:
Els Van Zantvliet wrote:
Best team, dank jullie wel voor het antwoord. Ik was veeel te moeilijk aan het denken. Groetjes Els
25.05.2023 - 15:13
![]() Els Van Zantvliet wrote:
Els Van Zantvliet wrote:
Ik ben bij het armsgat. Nu lees ik dat ik eerst de mouwkop moet breien en daarna verder moet met de mouw en patroon A1 tot de lengte. Dit snap ik niet. Vanaf waar ga ik minderen? Moet ik ergens steken samen breien? Help!!
20.05.2023 - 13:34DROPS Design answered:
Dag Els,
Je breit eerst het voorpand en het achterpand helemaal en pas daarna brei je de mouwen vanaf de manchet naar boven. Als je de mouwen breit, dan brei je eerst in de rondt en als je bij de mouwkop bent, brei je de mouw verder heen en weer.
24.05.2023 - 21:17
![]() Eva Brunnbauer wrote:
Eva Brunnbauer wrote:
Liebes Team, die Anleitung Sticke nach Anleitung A.1 kenne ich nur so, eine Extraanleitung für diesen Teil wurde gedruckt, hier finde ich keine Anleitung A.1? Danke und viele Grüße
24.04.2023 - 09:08DROPS Design answered:
Liebe Frau Brunnbauer, A.1 gilt für das Diagram, das rechts der Maßskizze liegt; Diagrambeschreibung finden Sie oben; es wird über 2 Maschen und 4 Reihen gestrickt. Viel Spaß beim stricken!
24.04.2023 - 10:34
![]() Birgit wrote:
Birgit wrote:
Auf welche Nadelstärke bezieht sich die Maschenprobe: (1) Nadel Nr. 3, in der fast der komplette Pullover gestrickt werden soll? Oder (2) mit Nadel Nr. 4, wie auf der Drops Belle-Garnbanderole angegeben? D.h. wenn ich für die korrekte Maschenprobe Nadel Nr. 4,5 benötige, stricke ich dann mit (1) Nr. 4,5 und Nr. 5,5 oder mit (2) Nr. 3,5 und Nr. 4,5?
25.03.2023 - 21:58DROPS Design answered:
Liebe Birgit, Nadle Nr 3 wird nur für das Bündchen benutzt, dann strickt man glatt rechts mit Nadel Nr 4 - Maschenprobe sollen Sie mit Nadel Nr 4 stricken. Wenn Sie Nadel Nr 4,5 brauchen, um die Maschenprobe zu haben, dann stricken Sie das Bündchen mit Nadeln Nr 3,5. Viel Spaß beim stricken!
27.03.2023 - 09:18
|
||||||||||||||||
Time to Unwind#timetounwindsweater |
||||||||||||||||
 |
 |
|||||||||||||||
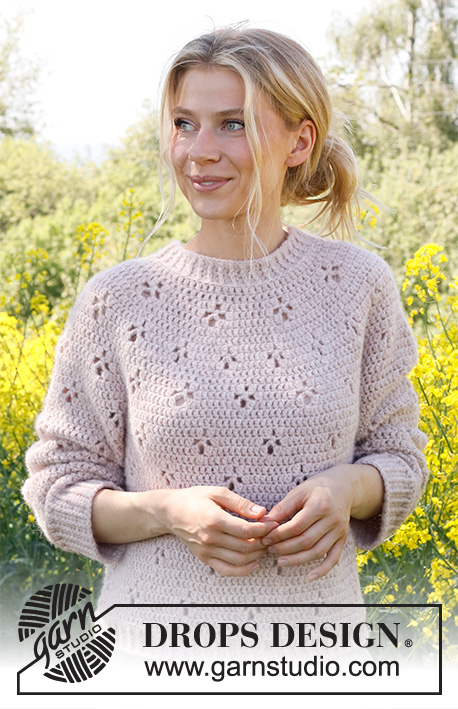
Knitted jumper in DROPS Belle. Piece is knitted bottom up with lace pattern. Size: S - XXXL
DROPS 231-37 |
||||||||||||||||
|
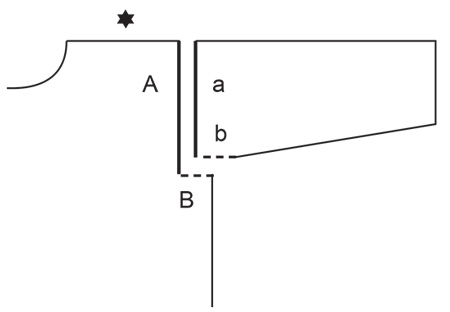
---------------------------------------------------------- EXPLANATION FOR THE PATTERN: ---------------------------------------------------------- GARTER STITCH (back and forth): Knit all rows. 1 ridge vertically = knit 2 rows. PATTERN: See diagram A.1. Diagrams show all rows in pattern seen from the right side. DECREASE TIP (evenly): To calculate how to decrease evenly, use number of stitches on needle (e.g. 106 stitches) and divide stitches by number of decreases to be done (e.g. 18) = 5,8. In this example decrease by knitting approx. every 5th and 6th stitch together. INCREASE TIP (applies to under sleeves): Work until 2 stitches remain before A.1 thread, make 1 yarn over, knit 2, A.1, knit 2, make 1 yarn over (= 2 stitches increased). On next round knit yarns over twisted to avoid holes. Then work the new stitches in stocking stitch. ---------------------------------------------------------- START THE PIECE HERE: ---------------------------------------------------------- JUMPER - SHORT OVERVIEW OF THE PIECE: Work back piece and front piece first back and forth on circular needle separately until vent is done. Then work body in the round on circular needle up to armholes. Then work front piece and back piece back and forth separately. Work sleeves in the round on double pointed needles/circular needle up to sleeve, then work the rest of sleeve back and forth. Finish with a edge with i-cord. BACK PIECE: Cast on 112-124-136-148-164-180 stitches on circular needle size 3 mm with DROPS Belle. Purl 1 row from wrong side. Then work rib as follows: Work 3 stitches in GARTER STITCH - read explanation above, work rib (knit 2/purl 2) until 5 stitches remain on needle, knit 2, work 3 stitches in garter stitch. Continue rib back and forth like this until piece measures 3 cm. Work next row from right side as follows: Work 3 stitches in garter stitch, knit the next 106-118-130-142-158-174 stitches and decrease at the same time 18-24-26-28-32-36 stitches evenly – read DECREASE TIP, work 3 stitches in garter stitch = 94-100-110-120-132-144 stitches. Switch to circular needle size 4 mm. Purl 1 row with 3 stitches in garter stitch in each side. Now work in stocking stitch with 3 stitches in garter stitch in each side until piece measures 8 cm, adjust so that next row is worked from right side. REMEMBER THE KNITTING TENSION! Cut the yarn. Put piece aside. FRONT PIECE: Work the same way as on back piece but do not cut the yarn. BODY: Now insert front piece and back piece on to same circular needle size = 188-200-220-240-264-288 stitches. Work in stocking stitch in the round and continue with GARTER STITCH - read explanation above (= 6 stitches in garter stitch in each side). When 2 ridges have been worked over the 6 stitches, work pattern as follows: Knit 1 stitch. Insert a marker thread here (after this stitch). This is now the beginning of round. Knit over the first 92-98-108-118-130-142, A.1 over the next 2 stitches (= over the middle 2 stitches over the 6 stitches in garter stitch), knit over the next 92-98-108-118-130-142 stitches, work A.1 over the last 2 stitches (= over the middle 2 stitches of the 6 stitches in garter stitch). Continue in the round like this until piece measures 29-30-31-32-33-34 cm from cast-on edge. Now cast off stitches for armholes in each side as follows: Begin 0-0-3-5-9-13 stitches before beginning of round, cast off the next 2-2-8-12-20-28 stitches for armhole, work until 0-0-3-5-9-13 stitches remain before next A.1, cast off the next 2-2-8-12-20-28 stitches for armhole, work the rest of round = 92-98-102-108-112-116 stitches both for front piece and back piece. BACK PIECE: = 92-98-102-108-112-116 stitches. Work back and forth in stocking stitch and with 1 edge stitch in garter stitch in each side. When piece measures 46-48-50-52-54-56 cm, slip the middle 38-38-40-40-42-42 stitches on a thread for neck, and finish each shoulder separately. Then on next row from the neck, cast off 1 stitch = 26-29-30-33-34-36 stitches for shoulder. Continue back and forth with stocking stitch and 1 edge stitch in garter stitch in each side, at the same time on next row from right side work short rows on shoulders as follows: Right shoulder: ROW 1 (= right side): Work over all stitches. ROW 2 (= wrong side): Turn, work until 6-6-7-7-8-8 stitches remain on needle. ROW 3: Turn, tighten yarn and work back. ROW 4: Work until 3-3-3-4-4-4 stitches more remain than on previous time. ROW 5: Turn, tighten yarn and work back. ROW 6: Work until 3-3-3-4-4-4 stitches more remain than on previous time. ROW 7: Turn, tighten yarn and work back. ROW 8: Work until 3-3-3-4-4-4 stitches more remain than on previous time. ROW 9: Turn, tighten yarn and work back. When short rows are done, cast off all stitches by purling from wrong side. Jumper measures approx. 50-52-54-56-58-60 cm from shoulder and down. Left shoulder: ROW 1 (= right side): Work until 6-6-7-7-8-8 stitches remain on needle. ROW 2: Turn, tighten yarn and work back. ROW 3: Work until 3-3-3-4-4-4 stitches more remain than on previous time. ROW 4: Turn, tighten yarn and work back. ROW 5: Work until 3-3-3-4-4-4 stitches more remain than on previous time. ROW 6: Turn, tighten yarn and work back. ROW 7: Work until 3-3-3-4-4-4 stitches more remain than on previous time. ROW 8: Turn, tighten yarn and work back. When short rows are done, cast off all stitches by knitting from right side. Jumper measures approx. 50-52-54-56-58-60 cm from shoulder and down. FRONT PIECE: Work as on back piece. When piece measures 43-45-46-48-49-51 cm, slip the middle 22-22-24-24-26-26 stitches on a thread for neck, and finish each shoulder separately. Then cast off stitches on every row from neck as follows: Cast off 2 stitches 3 times and 1 stitch 3 times = 26-29-30-33-34-36 stitches for shoulder. Continue back and forth with stocking stitch and 1 edge stitch in garter stitch towards the armhole, at the same time when piece measures 47-49-51-53-55-57 cm, work short rows on shoulders the same way as on back piece: I.e. work right shoulder as left shoulder on back piece, and left shoulder as right shoulder on back piece. When short rows are done, cast off. Jumper measures approx. 50-52-54-56-58-60 cm from shoulder and down. SLEEVES: Cast on 64-68-72-72-76-76 stitches on double pointed needles size 3 mm with Belle. Knit 1 round. Then work rib (= knit 2/purl 2) in the round for 3 cm. Knit 1 round while decreasing 12-14-16-14-16-14 stitches evenly - remember DECREASE TIP = 52-54-56-58-60-62 stitches. Switch to double pointed needles size 4 mm. Work pattern as follows: A.1 over the first 2 stitches, knit the remaining stitches on round. When piece measures 8-8-8-8-6-7 cm, increase 1 stitch on each side of A.1 - read INCREASE TIP. Increase like this approx. every 3½-3-3-2½-2½-2 cm 12-13-14-15-16-17 times in total = 76-80-84-88-92-96 stitches. When sleeve measures 51-50-49-48-46-44 cm, work sleeve cap back and forth on circular needle until finished measurements. Continue to work in stocking stitch from the middle of A.1 until sleeve measures approx. 52-51-51-51-51-51 cm. Cast off. Work the other sleeve the same way. ASSEMBLY: Sew shoulder seams inside cast-off edge. Sew sleeve cap to armhole. Then sew vent at the top of sleeve to bottom of armhole - see chart. NECK EDGE: Begin from right side at one shoulder seam and pick up approx. 86 to 98 stitches (including stitches from thread) around the neck with circular needle size 3 mm, cast on 3 stitches at the end of needle. Move the 3 stitches on to left needle so that the last stitch cast on on needle becomes the outermost stitch on left needle. Now work an i-cord in these stitches from right side, as follows: Knit 2, knit next stitch twisted together with the first/next stitch picked up around the neck edge. Move the 3 stitches from right needle back on to left needle (in the order they have). Continue like this along the entire neck edge on back piece until there are no stitches left to work. Cast off the remaining stitches. Sew the last 3 stitches together with the 3 stitches cast on at the beginning of neck edge. Fasten off. |
||||||||||||||||
Diagram explanations |
||||||||||||||||
|
||||||||||||||||
|
||||||||||||||||
|
||||||||||||||||
Have you finished this pattern?Tag your pictures with #dropspattern #timetounwindsweater or submit them to the #dropsfan gallery. Do you need help with this pattern?You'll find 32 tutorial videos, a Comments/Questions area and more by visiting the pattern on garnstudio.com. © 1982-2025 DROPS Design A/S. We reserve all rights. This document, including all its sub-sections, has copyrights. Read more about what you can do with our patterns at the bottom of each pattern on our site. |
||||||||||||||||


With over 40 years in knitting and crochet design, DROPS Design offers one of the most extensive collections of free patterns on the internet - translated to 17 languages. As of today we count 314 catalogues and 11820 patterns translated into English (UK/cm). 11820
We work hard to bring you the best knitting and crochet have to offer, inspiration and advice as well as great quality yarns at incredible prices! Would you like to use our patterns for other than personal use? You can read what you are allowed to do in the Copyright text at the bottom of all our patterns. Happy crafting!
Post a comment to pattern DROPS 231-37
We would love to hear what you have to say about this pattern!
If you want to leave a question, please make sure you select the correct category in the form below, to speed up the answering process. Required fields are marked *.