
Popular categories
Looking for a yarn?


Comments / Questions (35)
![]() Mieke wrote:
Mieke wrote:
Als ik de foto zie en het patroon lees dan komt dit niet overeen m.i. er staat de telpatronen laten alle naalden in het patroon aan de goede kant zien. Volgens de foto heb ik nu de verkeerde kant als voorkant.
01.01.2022 - 13:49
![]() Loredana Daviddi wrote:
Loredana Daviddi wrote:
Buongiorno, non capisco le diminuzioni per lo scollo. C'è un video a riguardo? Grazie
30.11.2021 - 12:23DROPS Design answered:
Buonasera Loredana, quale parte della spiegazione delle diminuzioni non le è chiara? Buon lavoro!
07.12.2021 - 21:51
![]() FRANCE BOUCHARD wrote:
FRANCE BOUCHARD wrote:
Bonjour, j'essaie de réaliser ce patron mais lorsque je commence le diagramme A.1 je me retrouve à faire mon tricot en mailles jersey est-ce normal ou s'il y a quelque chose que je ne comprend pas. J'ai commencé sur l'endroit et recommencé sur l'envers mais le résultat reste le même. Merci de m'éclairer SVP.
19.11.2021 - 20:49DROPS Design answered:
Bonjour Mme Bouchard, le diagramme A.1 se tricote ainsi: 1 maille jersey (= la 1ère m de A.1, à tricoter à l'endroit sur l'endroit et à l'envers sur l'envers) et 1 maille point mousse (à tricoter toujours à l'endroit), autrement dit, vous obtenez ainsi des côtes 1 m end, 1 m point mousse (vu sur l'endroit) - peut-être que la dernière photo du motif zoomé pourra vous aider à bien visualiser ce qu'il rend. Le 1er rang se tricote sur l'endroit. Bon tricot!
22.11.2021 - 07:31
![]() Avelien wrote:
Avelien wrote:
Voor voorpand moet ik tot 31 cm breien. Dan voor maat M moet ik het werk verdelen in linker en rechter voorpand. Vervolgens minderen voor de hals. Verderop staat dat bij 38 cm het werk in linker en rechterpand moet worden verdeeld. Dit begrijp ik niet. Dat heb ik toch al na ca. 31 cm gedaan.
17.11.2021 - 12:56DROPS Design answered:
Dag Avelien,
Vanaf een hoogte van 31 steken heb je ribbesteken over de buitenste steken gebreid, dat is dus bij de armsgaten en niet midden voor. Pas vanaf een hoogte van 39 cm verdeel je het werk voor het rechter en linker voorpand.
23.11.2021 - 12:57
![]() Cinzia wrote:
Cinzia wrote:
Grazie , ho risolto sono riuscita a eseguire il punto
14.11.2021 - 09:45
![]() Cinzia wrote:
Cinzia wrote:
Buona sera ho difficoltà con il grafico A2 al secondo gito dopo due maglie insieme c’e il simbolo maglia rovescio ma se la precedente delle due maglie insieme era rovescio poi le due insieme saranno 1dritto ed 1 rovescio come è possibile che ci sia di nuovo un rovescio? Sbaglio io o c’è qualche errore nel grafico? La cosa si ripropone nel 4 giro poi nel 6 e nell ottavo? Oppure semplicemente si deve lavorare di nuovo rovescio sulla fila dove sotto sono dritto? Grazie mille
14.11.2021 - 00:55DROPS Design answered:
Buonasera Cinzia, deve lavorare le maglie come riportato nella legenda. Buon lavoro!
16.11.2021 - 22:23
![]() Sylvie wrote:
Sylvie wrote:
Bonjour combien de laine faut il ajouter pour faire des manches en plus pour une taille M svp
28.10.2021 - 14:21DROPS Design answered:
Bonjour Sylvie, en tout 300 g DROPS Sky et 125 DROPS Kid-Silk. Bon tricot!
29.10.2021 - 09:44
![]() Sylvie wrote:
Sylvie wrote:
Bonjour si je veux ajouter des manches combien de laine dois je acheter en plus svp?
28.10.2021 - 08:58DROPS Design answered:
Bonjour Sylvie. Quelle est votre taille?
28.10.2021 - 13:58
![]() Loredana Daviddi wrote:
Loredana Daviddi wrote:
Posso sostituire i due filati utilizzati con Melody? Grazie Loredana
15.10.2021 - 11:54DROPS Design answered:
Buonasera Loredana, per questo tipo di assistenza può rivolgersi al suo rivenditore DROPS di fiducia. Buon lavoro!
19.10.2021 - 23:24
![]() Agata wrote:
Agata wrote:
What size wearing model?
15.10.2021 - 08:52DROPS Design answered:
Dear Agatha, the modell is wearing size M. The exact measurements can be found on the schematic drawing at the bottom of the pattern. We suggest that you take a piece that fits the intended wearer and compare the measurements. Happy Stitching!
15.10.2021 - 08:58
|
||||||||||||||||
Ash Mint Slipover#ashmintslipover |
||||||||||||||||
 |
 |
|||||||||||||||
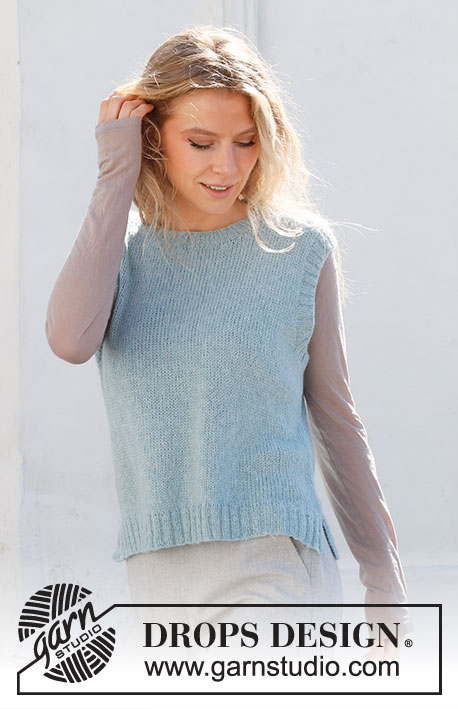
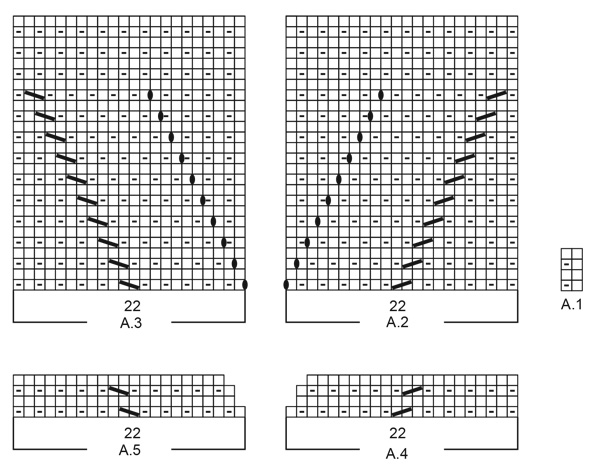
Knitted vest / slipover in DROPS Sky and DROPS Kid-Silk. Piece is knitted with V-neck pattern, vents in the sides, textured pattern and displacements. Size XS – XXL.
DROPS 227-31 |
||||||||||||||||
|
---------------------------------------------------------- EXPLANATION FOR THE PATTERN: ---------------------------------------------------------- GARTER STITCH (back and forth): Knit all rows. 1 ridge vertically = knit 2 rows. PATTERN: See diagrams A.1 to A.5. Diagrams show all rows in pattern seen from the right side. DECREASE TIP: All decreases are done from the right side! Work 6 stitches in garter stitch, slip 1 stitch knitwise, knit 1, pass slipped stitch over stitch worked(= 1 stitch decreased), work until 8 stitches remain, knit 2 together(= 1 stitch decreased), work 6 stitches in garter stitch. ---------------------------------------------------------- START THE PIECE HERE: ---------------------------------------------------------- VEST – SHORT OVERVIEW OF THE PIECE: Work back piece and front piece back and forth on circular needle. Then assemble the vest by sewing it together on the shoulders and down the side seams. Finish with a neck edge in round on a circular needle. BACK PIECE: Cast on 73-77-85-89-97-105 stitches on circular needle size 4.5 mm with 1 strand of each colour (= 2 strands). Purl 1 row from wrong side. Then work rib as follows: 6 stitches in GARTER STITCH - read explanation above - * knit 1/purl 1 *, repeat from *-* until 7 stitches remain, knit 1 and 6 stitches in garter stitch. Continue rib back and forth like this for 4 cm. Switch to circular needle size 5.5 mm. Now work pattern as follows: 6 stitches in garter stitch, work A.1 (= 2 stitches) until 7 stitches remain, work first stitch in A.1, 6 stitches in garter stitch. REMEMBER THE KNITTING TENSION! Continue back and forth like this until piece measures 29-30-31-32-33-34 cm. Now work in garter stitch over the outermost 8-8-10-10-10-10 stitches in each side. When 2 ridges have been worked over these stitches, cast off 2-2-4-4-4-4 stitches for armholes at the beginning of the next 2 rows = 69-73-77-81-89-97 stitches. In sizes XS, S, M and L skip next section and continue to work from ALL SIZES – read explanation below. In sizes XL and XXL work as explained below. SIZE XL AND XXL: Now decrease 1 stitch inside 6 stitches in garter stitch in each side- read DECREASE TIP. Decrease like this on every row from right side 4-6 times in total = 81-85 stitches. ALL SIZES: Continue back and forth with A.1 and 6 stitches in garter stitch in each side. When piece measures 56-58-60-62-64-66 cm, cast off the middle 19-19-19-23-23-23 stitches for neck and finish each shoulder separately. Then cast off 1 stitch on next row from the neck = 24-26-28-28-28-30 stitches remain for shoulder. When piece measures 58-60-62-64-66-68 cm, cast off with knit over knit and garter stitch over garter stitch. Work the other shoulder the same way. FRONT PIECE: Cast on 73-77-85-89-97-105 stitches on circular needle size 4.5 mm with 1 strand of each colour (= 2 strands). Purl 1 row from wrong side. Then work rib as follows: 6 stitches in garter stitch, * knit 1, purl 1 *, work from *-* until 7 stitches remain, knit 1, 6 stitches in garter stitch. Continue back and forth like this for 4 cm. Switch to circular needle size 5.5 mm. Now work pattern as follows: 6 stitches in garter stitch, work A.1 (= 2 stitches) until 7 stitches remain, work first stitch in A.1, 6 stitches in garter stitch. Continue back and forth like this. When piece measures 9-9-10-10-11-11 cm, work pattern as follows: Work 6 stitches in garter stitch, A.1 as before over the next 5-7-11-13-17-21 stitches, A.2 over the next 22 stitches, A.1 as before over the next 7 stitches (the middle of these 7 stitches is middle stitch on front piece = a knit stitch), A.3 over the next 22 stitches, A.1 as before over the next 5-7-11-13-17-21 stitches, 6 stitches in garter stitch. Continue back and forth like this until piece measures 29-30-31-32-33-34 cm. Now work in garter stitch over the outermost 8-8-10-10-10-10 stitches in each side. When 2 ridges have been worked over these stitches, cast off 2-2-4-4-4-4 stitches for armholes at the beginning of the next 2 rows = 69-73-77-81-89-97 stitches. OVERVIEW OF NEXT SECTION: Then work as explained below in the next sections - choose section for your size. SIZE XS, S, M and L: Divide the piece for right and left front piece, at the same time work pattern and decrease for V-neck as explained below. PATTERN AND DECREASE FOR V-NECK: Continue to work with 6 stitches in garter stitch towards the side and pattern as before over the remaining stitches. When A.2 and A.3 have been worked vertically 2 times in total, work A.4 over A.2 and A.5 over A.3 (continue the remaining stitches as before). Decrease in A.4 and A.5 is decrease for V-neck. When A.4 and A.5 have been worked vertically, continue decrease the same way until 10-10-10-12 stitches have been decreased in total (on each front piece). DIVISION FOR RIGHT AND LEFT FRONT PIECE: When piece measures 37-38-39-40 cm, divide the piece for right and left front piece by slipping middle stitch and the stitches for the other side of front piece on a thread (middle stitch = 1 knit stitch). Then work each shoulder separately with pattern and decrease as explained above (divide the piece before all decreases in pattern are done). When all decreases for V-neck are done, 24-26-28-28 stitches remain for shoulder. Continue to work until piece measures 58-60-62-64 cm. Cast off with knit over knit and purl over purl. Work the other shoulder the same way. SIZE XL AND XXL: Decrease stitches for armhole, at the same time divide the piece for right and left front piece, and work pattern and decrease for V-neck as explained below. DECREASE FOR ARMHOLES: Now decrease 1 stitch inside 6 stitches in garter stitch in each side the same way as on back piece - remember DECREASE TIP. Decrease like this on every row from right side 4-6 times in total = 81-85 stitches. PATTERN AND DECREASE FOR V-NECK: After last decrease for armhole continue to work with 6 stitches in garter stitch towards the side and pattern as before over the remaining stitches. When A.2 and A.3 have been worked vertically 2 times in total, work A.4 over A.2 and A.5 over A.3 (continue the remaining stitches as before). Decrease in A.4 and A.5 is decrease for V-neck. When A.4 and A.5 have been worked vertically, continue decrease the same way until 12-12 stitches have been decreased in total (on each front piece). DIVISION FOR RIGHT AND LEFT FRONT PIECE: When piece measures 41-42 cm, divide the piece for right and left front piece by slipping middle stitch and the stitches for the other side of front piece on a thread (middle stitch = 1 knit stitch). Then work each shoulder separately with pattern and decrease as explained above (divide the piece before all decreases are done). When all decreases for V-neck are done, 28-30 stitches remain for shoulder. Work until piece measures 66-68 cm. Cast off with knit over knit and purl over purl. Work the other shoulder the same way. ASSEMBLY: Sew shoulder seams inside cast-off edges. Sew side seam in outermost loop of edge stitches from armhole and down until approx. 17 cm remain (= vent). Repeat in the other side. NECK EDGE: Begin at one shoulder seam and pick up from right side approx. 106 to 130 stitches inside 1 edge stitch in garter stitch around the neck on a short circular needle size 4.5 mm with 1 strand in each quality (= 2 strands). Work rib in the round (= knit 1/purl 1) - but adjust so that middle stitch at the front is knitted and that rib fits the entire round. Insert 1 marker in middle stitch at the front. AT THE SAME TIME on every round decrease 2 stitches mid front as follows: Work until 1 stitch remains before stitch with marker, slip the next 2 stitches knitwise, knit 1, pass the 2 slipped stitches over stitch worked (= 2 stitches decreased). When decreasing like this the knit stitch in the middle of V-neck will follow as a straight line mid front. Decrease like this every round until neck edge measures approx. 3 cm in knitting direction. Cast off stitches with knit over knit and purl over purl. |
||||||||||||||||
Diagram explanations |
||||||||||||||||
|
||||||||||||||||
|
||||||||||||||||

|
||||||||||||||||
Have you finished this pattern?Tag your pictures with #dropspattern #ashmintslipover or submit them to the #dropsfan gallery. Do you need help with this pattern?You'll find 23 tutorial videos, a Comments/Questions area and more by visiting the pattern on garnstudio.com. © 1982-2025 DROPS Design A/S. We reserve all rights. This document, including all its sub-sections, has copyrights. Read more about what you can do with our patterns at the bottom of each pattern on our site. |
||||||||||||||||


With over 40 years in knitting and crochet design, DROPS Design offers one of the most extensive collections of free patterns on the internet - translated to 17 languages. As of today we count 314 catalogues and 11820 patterns translated into English (UK/cm). 11820
We work hard to bring you the best knitting and crochet have to offer, inspiration and advice as well as great quality yarns at incredible prices! Would you like to use our patterns for other than personal use? You can read what you are allowed to do in the Copyright text at the bottom of all our patterns. Happy crafting!
Post a comment to pattern DROPS 227-31
We would love to hear what you have to say about this pattern!
If you want to leave a question, please make sure you select the correct category in the form below, to speed up the answering process. Required fields are marked *.