
Popular categories
Looking for a yarn?


Comments / Questions (34)
![]() Kirsten G wrote:
Kirsten G wrote:
Verstehe ich die Strickschrift so richtig? HR: 1 re 1 li RR: 2 li
06.11.2022 - 07:12DROPS Design answered:
Liebe Kirsten, sollten Sie dieses Muster in Reihen stricken, dann würde es stimmen, aber hier wird A.1 in Runden gestrickt, so werden die Maschen bei der 2. Reihe rechts gestrickt - so haben Sie ein Rippenmuster mit (1 Masche glatt rechts, 1 Masche kraus rechts). Viel Spaß beim stricken!
07.11.2022 - 10:21
![]() Elena wrote:
Elena wrote:
Buongiorno, facendo le diminuzioni per le maniche mi sono accorta che lasciando la maglia col segnapunti nel mezzo delle due diminuzioni poi il motivo A1 non torna più e devo invertire (su quelle tre maglie) la lavorazione dritto-rovescio. E' corretto? (spero si sia capito cosa intendo)
10.10.2022 - 08:09
![]() Ilovedogs wrote:
Ilovedogs wrote:
Non riesco a capire come mettere i segnapunti dopo aver lavorato il collo: \"mettere i segnapunti dopo 35 maglie (centro davanti), poi il segnapunti dopo la prima maglia del giro.\" E la seconda metà del davanti dovè? O devo mettere due segnapunti di colore diverso nello stesso punto? Scusatemi, è la prima volta che provo fare la spalla a sella ed ho qualche difficoltà.
18.06.2022 - 20:16DROPS Design answered:
Buongiorno Ilovedogs, deve mettere un segnapunti dopo 35 maglie e altri 4 segnapunti (di colore diverso) come indicato nel paragrafo "Sprone". Buon lavoro!
19.06.2022 - 15:22
![]() Ilovedogs wrote:
Ilovedogs wrote:
Non riesco a capire come mettere i segnapunti dopo aver lavorato il collo: \"mettere i segnapunti dopo 35 maglie (centro davanti), poi il segnapunti dopo la prima maglia del giro.\" E la seconda metà del davanti dovè? O devo mettere due segnapunti di colore diverso nello stesso punto? Scusatemi, è la prima volta che provo fare la spalla a sella ed ho qualche difficoltà.
18.06.2022 - 20:15DROPS Design answered:
Buongiorno Ilovedogs, deve mettere un segnapunti dopo 35 maglie e altri 4 segnapunti (di colore diverso) come indicato nel paragrafo "Sprone". Buon lavoro!
19.06.2022 - 15:22
![]() Birgit Eklund Pedersen wrote:
Birgit Eklund Pedersen wrote:
Str 9/10 - inden dette afsnit har jeg 224+8=232 “Der tages nu ud på forstykket, bagstykket og på begge ærmer, og de nye masker strikkes løbende ind i A.1. Tag ud således på hver 2.omgang totalt 5-5-7-4-4-3 gange = 228-240-252-256-268-280 masker”. Hvis jeg derefter skal tage ud 4 gange , er det så ikke 4x8 m der tages ud? Resultatet skal så give 264 og ikke 256 (måske glemt at lægge de tidligere 8 til bærestykket - altså 224+8??) Håber I kan hjælpe Vh birgit
16.05.2022 - 23:03DROPS Design answered:
Hej Birgit, du har 224 masker, tager 8 masker ud ialt 4 gange = 256 masker. God fornøjelse!
17.05.2022 - 09:03
![]() Birgit Eklund Pedersen wrote:
Birgit Eklund Pedersen wrote:
Hej, jeg forstår ikke at 1. mærke = højre skulder bagpå? Vi har jo sat midten af forstykket 32-38 masker til højre herfor, når tøjet er på. Jeg ser 1. mærke som VENSTRE skulder bagpå?? Er der noget jeg overser?\r\nVh birgit
08.05.2022 - 10:02DROPS Design answered:
Hei Birgit. Oppskriften er riktig slik den er skrevet. Tell fra starten på omgangen (og mot venstre/strikkeretningen), sett 1 merke etter de første 32-33-35-37-37-38 maskene (= ca midt foran). Sett 4 nye masker (uavhengig av merke foran), sett 1 merke før første maske på omgangen, tell x-antall masker (se i oppskriften for maskeantallet i den str. du strikker), sett 2. merke. Nå har du 2 merker til høyre skulder og 1 merke midt foran. mvh DROPS Design
09.05.2022 - 11:53
![]() Patricia C Scinta wrote:
Patricia C Scinta wrote:
I must be missing something. I printed this pattern but I can't find the diagram or chart for the pattern. Am I correct?
02.05.2022 - 19:46DROPS Design answered:
Dear Mrs C Scinta, the diagram for the pattern is a small diagram worked over 2 sts and 4 rows and you will find it next to measurement chart, under sleeve. Happy knitting!
03.05.2022 - 09:03
![]() Barbara wrote:
Barbara wrote:
Ok, ich habe das Diagramm gefunden, Sie haben in einer Frage schon auf französisch geantwortet, habe ich übersehen. ( Direkt neben der Schnittzeichnung) Danke.
12.04.2022 - 12:08
![]() Barbara wrote:
Barbara wrote:
Guten Tag, wo finde ich \"A1\" in dieser Anleitung? Danke
12.04.2022 - 12:02
![]() Ruth wrote:
Ruth wrote:
Ik maak maat 3/4 jaar, maar het gat voor de nek (78 st met 3 mm) is niet groot genoeg voor een kinderhoofdje. Hoe los ik dat op?
01.01.2022 - 08:15DROPS Design answered:
Dag Ruth,
De steken moeten zeer losjes worden opgezet, zodat het hoofd er door past. Bij het opzetten van steken zou je een dikkere naald of twee naalden kunnen gebruiken. Voordat je begint te breien trek je er 1 naald uit. Zelf zet ik altijd met 2 naalden op.
06.01.2022 - 10:07
|
|||||||||||||||||||
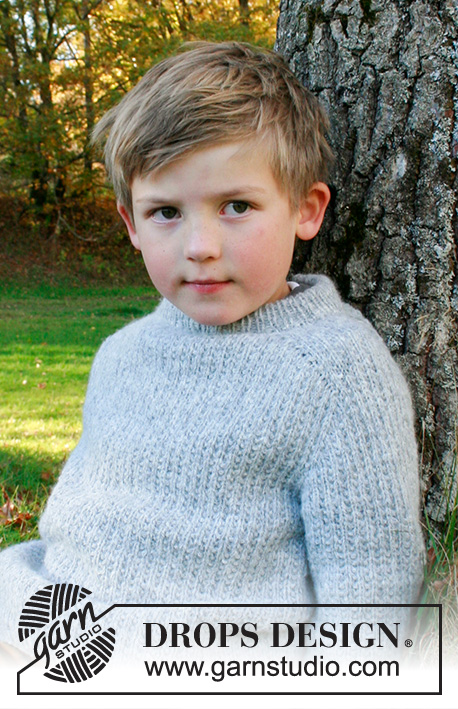
Weekend Games Jumper#weekendgamesjumper |
|||||||||||||||||||
 |
 |
||||||||||||||||||
Knitted jumper for children in DROPS Sky. The piece is worked top down with double neck, textured pattern and saddle shoulders. Sizes 3 – 14 years.
DROPS Children 40-20 |
|||||||||||||||||||
|
------------------------------------------------------- EXPLANATIONS FOR THE PATTERN: ------------------------------------------------------- PATTERN: See diagram A.1. INCREASE TIP-1 (evenly spaced): To work out how to increase evenly, count the total number of stitches on the needle (e.g. 78 stitches) and divide by the number of increases to be made (e.g. 18) = 4.3. In this example, increase by making 1 yarn over after approx. each 4th stitch. On the next round work the yarn overs twisted to avoid holes. INCREASE TIP-2 (for saddle shoulders, sleeves and yoke): BEFORE MARKER: The new stitch twists to the right. Use the left needle to pick up the strand between 2 stitches from the previous round, pick up the back strand and knit in the front loop. AFTER MARKER: The new stitch twists to the left. Use the left needle to pick up the strand between 2 stitches from the previous round, pick up the front strand and knit in the back loop. DECREASE TIP (for sleeves): Start 2 stitches before the marker thread, knit 2 together, work the marker-stitch as before, slip 1 stitch as if to knit, knit 1 and pass the slipped stitch over the knitted stitch (2 stitches decreased). CASTING-OFF TIP: To avoid the cast-off edge being tight you can cast off with a larger size needle. If the edge is still tight, make 1 yarn over after approx. each 6th stitch at the same time as casting off; the yarn overs are cast off as normal stitches. ------------------------------------------------------- START THE PIECE HERE: ------------------------------------------------------- JUMPER – SHORT OVERVIEW OF THE PIECE: The neck and yoke are worked in the round with circular needle, from the right shoulder and top down. Stitches are increased for the saddle shoulders, then for the sleeves and finally for the yoke. The yoke is divided for the body and sleeves and the body continued in the round. The sleeves are worked in the round with double pointed needles, top down. DOUBLE NECK: Cast on 78-80-82-84-86-88 stitches with short circular needle size 3 mm and Sky. Knit 1 round. Work rib in the round (knit 1, purl 1) for 7 cm. When the rib is finished, knit 1 round where you increase 18-20-22-24-22-24 stitches evenly spaced – read INCREASE TIP-1 = 96-100-104-108-108-112 stitches. Knit 1 round (yarn overs knitted twisted). Now work the yoke as described below. YOKE: Change to circular needle size 4 mm. Insert 1 marker after the first 32-33-35-37-37-38 stitches on the round = mid-front. The yoke is measured from this marker! In addition insert 4 other markers, without working the stitches, as follows – each marker is inserted between 2 stitches, is used when increasing for the saddle shoulders and should have a different colour to the marker on the neck. Marker 1: Insert the marker before the first stitch on the round = back of right shoulder. Marker 2: Count 15-15-17-19-19-19 stitches from marker 1 (= shoulder), insert the marker before the next stitch. Marker 3: Count 33-35-35-35-35-37 stitches from marker 2 (= front piece), insert the marker before the next stitch. Marker 4: Count 15-15-17-19-19-19 stitches from marker 3 (= shoulder), insert the marker before the next stitch. There are 33-35-35-35-35-37 stitches left on the round after marker 4 (= back piece). Allow these 4 markers to follow your work onwards. SADDLE-SHOULDER INCREASES: Read the whole section before continuing! Work A.1 in the round. AT THE SAME TIME, on the first round, increase 4 stitches for the shoulders as follows: Increase BEFORE markers 1 and 3 and AFTER markers 2 and 4 – read INCREASE TIP-2. You are only increasing on the front and back pieces, the number of shoulder stitches remains the same. Increase like this EVERY round a total of 12-14-16-20-22-26 times = 144-156-168-188-196-216 stitches – the increased stitches are worked into A.1. REMEMBER THE KNITTING TENSION! After the last increase the piece measures approx. 4-5-6-7-8-9 cm from the marker mid-front. Now increase for the sleeves as follows. SLEEVE INCREASES: Continue A.1 in the round. AT THE SAME TIME on the next round increase 4 stitches for the sleeves as follows: Increase AFTER markers 1 and 3 and BEFORE markers 2 and 4. You increase only on the sleeves and the number of stitches on the front and back pieces remains the same. The new stitches are worked into A.1. Increase like this every 2nd round a total of 11-11-7-9-10-10 times = 188-200-196-224-236-256 stitches. The piece measures approx. 12-13-11-13-15-16 cm from the marker mid-front. Now increase for the yoke as described below. YOKE INCREASES: Move each marker so they are inserted in the outermost stitch on each side of the front and back pieces. There are 37-37-31-37-39-39 stitches between the marker-stitches on each sleeve. On the next round increase 8 stitches, by increasing both before and after all 4 marker-stitches – remember INCREASE TIP-2. You are now increasing on the front/back pieces and on the sleeves; the increased stitches are worked into A.1. Increase like this every 2nd round a total of 5-5-7-4-4-3 times = 228-240-252-256-268-280 stitches. When all the increases are finished, the piece measures approx. 15-16-16-16-18-18 cm from the marker mid-front. Continue working, without further increases, until the piece measures 15-16-16-17-18-19 cm from the marker mid-front – finish the last round when there are 0-1-3-3-3-5 stitches left on the round. Now divide the yoke for the body and sleeves as follows: Place the first 47-49-51-51-53-55 stitches on 1 thread for the sleeve, cast on 5-5-5-7-7-7 new stitches (= in side under sleeve), work the next 67-71-75-77-81-85 stitches as before (= front piece), place the next 47-49-51-51-53-55 stitches on 1 thread for the sleeve, cast on 5-5-5-7-7-7 new stitches (= in side under sleeve), work the last 67-71-75-77-81-85 stitches (= back piece). Cut the strand. The body and sleeves are finished separately. THE PIECE IS NOW MEASURED FROM HERE. BODY: = 144-152-160-168-176-184 stitches. Start on the one side of the piece, in the middle of the 5-5-5-7-7-7 stitches cast on under the sleeve and continue A.1 in the round until the piece measures 15-18-21-24-25-26 cm from the division. There is approx. 3 cm left to finished length; try the jumper on and work to desired length. Change to circular needle size 3 mm and work rib (knit 1, purl 1) for 3 cm - make sure the rib fits neatly over A.1, with knit over knit and purl over garter stitch. Cast off with knit over knit and purl over purl – read CASTING-OFF TIP! The jumper measures approx. 36-40-44-48-50-52 cm from the shoulder down. SLEEVES: Place the 47-49-51-51-53-55 stitches from the thread on the one side of the piece on double pointed needles size 4 mm and knit up 1 stitch in each of the 5-5-5-7-7-7 stitches cast on under the sleeve = 52-54-56-58-60-62 stitches. Insert a marker thread in the middle of the 5-5-5-7-7-7 new stitches under the sleeve. Start at the marker thread and work A.1 in the round – make sure the pattern continues the pattern on the yoke. When the sleeve measures 3 cm from the division, decrease 2 stitches mid-under the sleeve – read DECREASE TIP. Decrease like this every 2½-2½-3½-3½-4-4 cm a total of 7-8-8-9-9-10 times = 38-38-40-40-42-42 stitches. Continue working without further decreases until the sleeve measures 21-25-30-34-38-42 cm from the division. There is approx. 3 cm left to finished length; try the jumper on and work to desired length. Change to double pointed needles size 3 mm and work rib (knit 1, purl 1) for 3 cm, making sure the rib matches neatly over A.1. Cast off with knit over knit and purl over purl – remember CASTING-OFF TIP! The sleeve measures approx. 24-28-33-37-41-45 cm from the division. Work the other sleeve in the same way. ASSEMBLY: Fold the neck double to the wrong side and sew down. To avoid the neck being tight and rolling outwards, it is important the seam is elastic. |
|||||||||||||||||||
Diagram explanations |
|||||||||||||||||||
|
|||||||||||||||||||

|
|||||||||||||||||||

|
|||||||||||||||||||
Have you finished this pattern?Tag your pictures with #dropspattern #weekendgamesjumper or submit them to the #dropsfan gallery. Do you need help with this pattern?You'll find 31 tutorial videos, a Comments/Questions area and more by visiting the pattern on garnstudio.com. © 1982-2025 DROPS Design A/S. We reserve all rights. This document, including all its sub-sections, has copyrights. Read more about what you can do with our patterns at the bottom of each pattern on our site. |
|||||||||||||||||||


With over 40 years in knitting and crochet design, DROPS Design offers one of the most extensive collections of free patterns on the internet - translated to 17 languages. As of today we count 314 catalogues and 11820 patterns translated into English (UK/cm). 11820
We work hard to bring you the best knitting and crochet have to offer, inspiration and advice as well as great quality yarns at incredible prices! Would you like to use our patterns for other than personal use? You can read what you are allowed to do in the Copyright text at the bottom of all our patterns. Happy crafting!
Post a comment to pattern DROPS Children 40-20
We would love to hear what you have to say about this pattern!
If you want to leave a question, please make sure you select the correct category in the form below, to speed up the answering process. Required fields are marked *.