
Popular categories
Looking for a yarn?


Comments / Questions (42)
![]() Ammy wrote:
Ammy wrote:
Takk for svaret. Jeg vet hvor A1 står, men jeg skjønner det ikke helt….? En omgang rett mellom hver mønsteromgang, den er grei. Hvor mange omganger er mønsteret på? Jeg må nok ha det inn med teskje….🥴
21.12.2021 - 09:44DROPS Design answered:
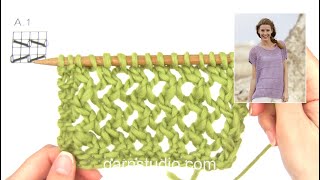
Hei Ammy. Diagrammet består av 4 omganger som gjentar seg gjennom hele genseren. Så når du har strikket 4 omganger, gjentar du disse 4 omgangene i høyden. mvh DROPS Design
21.12.2021 - 13:27
![]() Ammy wrote:
Ammy wrote:
Jeg klarer ikke å forstå mønster A1, Skal det være en omgang rettstrikk mellom hver omgang m/f.eks = mellom 2 masker lages…. = 2 rett sammen …. = 1 maske løs av ….. Jeg forstår heller ikke hva som menes med tegningen A.1
20.12.2021 - 23:53DROPS Design answered:
Hei Ammy, Det er en omgang rett mellom hver omgang med mønster og du øker til raglan på disse rette omgangene. Raglanlinje er 2 rette masker. Du øker 1 maske på hver side av hver raglanlinje (4 linjer og 8 masker økt på omgangen). Diagrammet A.1 finner du i bunnen av oppskriften, til høyre for målskissen. Håper dette hjelper og god fornøyelse!
21.12.2021 - 07:33
![]() Lena Bogren Legell wrote:
Lena Bogren Legell wrote:
Jag förstår inte hur jag ska sticka mönstret. Väldigt otydlig beskrivning. A1 är bara 2 symboler som jag inte har en aning om vad de betyder. sen står det andra förklaringar som jag inte förstår vad jag ska göra med.
20.12.2021 - 18:37DROPS Design answered:
Hei Lena. For å skjønne diagrammet må du lese diagramforklaringen rett over målskissen. Diagram A.1 består kun av 2 masker som gjentar seg. 1. omgang strikkes slik: 2 masker rett sammen, 1 kast. Strikke dette hele omgangen. 2.omgang strikkes slik: masker og kast strikkes rett. 3.omgang strikkes slik: 1 kast, ta 1 maske løs av pinnen som om den skulle strikkes rett, strikk 1 rett, løft den løse masken over masken som ble strikket. Strikke dette hele omgangen. 4.omgang strikkes slik: masker og kast strikkes rett. MEN husk forklaringen i oppskriften der det står at det strikkes 1 maske rett på hver side av de 4 merkene du har satt + at på 2. omgang starter økningene til RAGLAN. mvh DROPS Design
21.12.2021 - 13:06
![]() HILARY RUTHERFORD wrote:
HILARY RUTHERFORD wrote:
There is no pattern diagram A1 with the pattern please can I have it ASAP. Many thanks
02.09.2021 - 11:18DROPS Design answered:
Dear Mrs Rutherford, you will find diagram A.1 next to the measurement chart, below sleeve, it's a small diagram worked over 2 sts and 4 rows. Happy knitting!
02.09.2021 - 12:50
![]() Renate wrote:
Renate wrote:
Ich kann das Diagramm a mit der Musteranleitung nicht finden ... Vielen Dank im Voraus und viele Grüße Renate Linden
03.06.2021 - 21:56DROPS Design answered:
Liebe Renate, das Diagram finden Sie neben der Maßskizze, es ist ein kleines Diagram über 2 Maschen und 4 Reihen gestrickt. Viel Spaß beim stricken!
04.06.2021 - 07:07
![]() Aud-Elly Da Silva wrote:
Aud-Elly Da Silva wrote:
Jeg har planer om å strikke jumperen « Cooling Creek». Jeg har gått gjennom mønstret, men jeg finner ikke diagram A1.
06.05.2021 - 08:08DROPS Design answered:
Hej. Du finner det längst ner på oppskriften , till höger om måleskissen. Mvh DROPS Design
06.05.2021 - 09:31
![]() Wiebke wrote:
Wiebke wrote:
Zu Drops 222-27 \r\nHallo, \r\nIch vermisse bei dieser Anleitung das Diagramm. Die Erklärung des Diagramms ist vorhanden aber es fehlt das Diagramm selbst\r\nLG\r\nWiebke
02.05.2021 - 15:44DROPS Design answered:
Liebe Frau Wiebke, Diagram A.1 finden Sie neben der Maßskizze, unter der Ärmel, es ist ein ganz kleines Diagram, über 2 Maschen und 4 Reihen. Viel Spaß beim stricken!
03.05.2021 - 09:51
![]() Mette Kronberg wrote:
Mette Kronberg wrote:
Strikker Cooling Creek. Klarer ikke få til ragland pent mot mønsteret. Skal masken som legges ut strikkes på neste runde før j starter med mønsteret?
22.04.2021 - 22:21DROPS Design answered:
Hei Mette, Du øker til raglan på begge sider av all merketrådene. De nye maskene er strikket i glattstrikk til du har økt not masker til å strikke en hel rapport til med A.1. God fornøyelse!
23.04.2021 - 08:19
![]() Jana wrote:
Jana wrote:
Hallo, ich habe jetzt schon 8 versch. Modelle in 8 versch. Farben aus Brushed Alpaca Silk nachgearbeitet und das 9. habe ich gerade angefangen, weil ich diese Wolle liebe! Aber ich vermisse in der Farbpalette ein sattes Gelb ( wie bei Melody ) und ein leuchtendes Hellblau! Wäre dies eine Überlegung wert? Danke für die wunderschönen Modelle! Viele Grüße und einen schönen Abend noch Jana
10.04.2021 - 23:50DROPS Design answered:
Liebe Jana, danke für Ihre Vorschläge - vergessen Sie nicht, Ihre Fotos mit uns für di Gallerie zu teilen! Hier lesen Sie mehr. Viel Spaß beim stricken!
12.04.2021 - 09:27
![]() Erica Van Der Meulen wrote:
Erica Van Der Meulen wrote:
Hettelpatroon staat niet bij de beschrijving. Kunt u die mij toe sturen.
10.04.2021 - 05:41DROPS Design answered:
Dag Erica,
Het is een klein telpatroontje en staat 'verstopt' onder de maattekening. onder de mouw. :)
11.04.2021 - 13:31
|
|||||||||||||
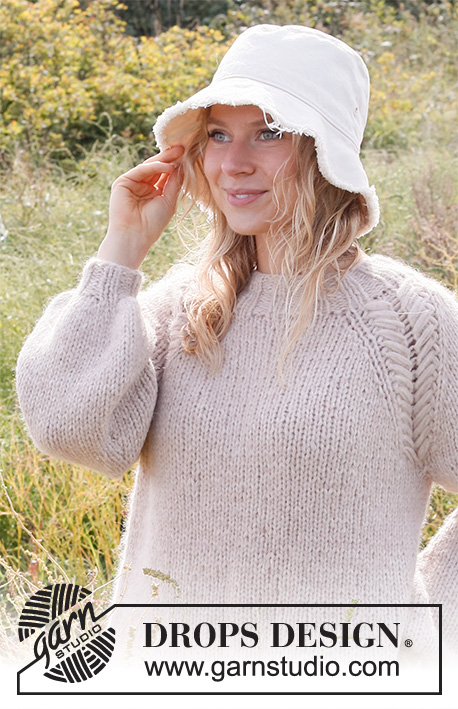
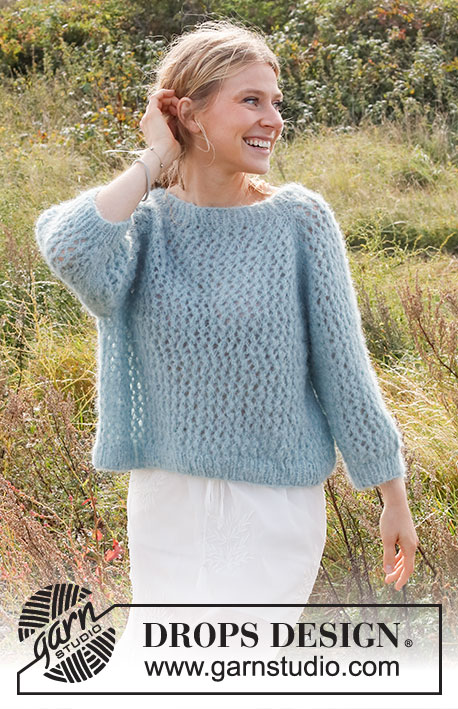
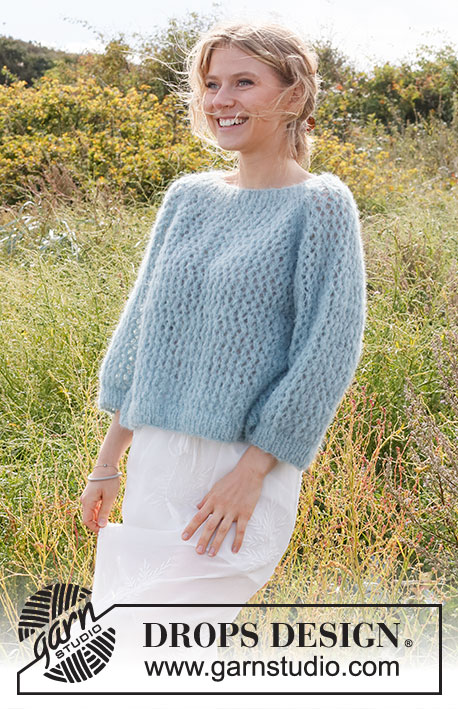
Cooling Creek#coolingcreeksweater |
|||||||||||||
 |
 |
||||||||||||
Knitted jumper in 2 strands DROPS Brushed Alpaca Silk or 1 strand DROPS Melody. The piece is worked top down with raglan, lace pattern and ¾-length sleeves. Sizes S - XXXL.
DROPS 222-27 |
|||||||||||||
|
------------------------------------------------------- EXPLANATIONS FOR THE PATTERN: ------------------------------------------------------- PATTERN: See diagram A.1. INCREASE/DECREASE TIP (evenly spaced): To work out how to increase/decrease evenly, count the total number of stitches on needle (e.g. 76 stitches), and divide by the number of increases/decreases to be made (e.g. 16) = 4.8. In this example, increase by making 1 yarn over after approx. each 5th stitch. On the next round work the yarn overs twisted to avoid holes. When decreasing, knit together approx. each 4th and 5th stitch. RAGLAN: Increase 1 stitch on each side of the marker thread as follows: Work until there is 1 stitch left before the marker thread, make 1 yarn over, knit 2 (marker thread sits between these 2 stitches), 1 yarn over. On the next round knit the yarn overs twisted to avoid holes. Then work the new stitches in stocking stitch until there are enough stitches to work another complete width of A.1. DECREASE TIP (for sleeves): Decrease 1 stitch on either side of the marker thread as follows: Work until there are 3 stitches left before the marker thread, knit 2 together, knit 2 (marker thread sits between these 2 stitches), slip 1 stitch as if to knit, knit 1 and pass the slipped stitch over the knitted stitch. CASTING-OFF TIP: To avoid the cast-off edge being tight you can cast off with a larger size needle. If the edge is still tight, make 1 yarn over after approx. each 6th stitch at the same time as casting off; the yarn overs are cast off as normal stitches. ------------------------------------------------------- START THE PIECE HERE: ------------------------------------------------------- JUMPER – SHORT OVERVIEW OF THE PIECE: The neck and yoke are worked in the round with circular needle, top down from the transition between back piece and right sleeve. The yoke is divided for body and sleeves and the body continued in the round with circular needle. The sleeves are worked in the round with short circular needle/double pointed needles. NECK: Cast on 68-72-76-80-82-88 stitches with short circular needle size 4.5 mm and 2 strands Brushed Alpaca Silk or 1 strand Melody. Knit 1 round. Then work rib (knit 1, purl 1) in the round for 4 cm. Knit 1 round where you increase 0-0-16-24-26-28 stitches evenly spaced – read INCREASE/DECREASE TIP = 68-72-92-104-108-116 stitches. Knit 1 round (yarn overs knitted twisted). Change to circular needle size 5.5 mm. Insert a marker here; the yoke is measured from this marker! YOKE: Now insert 4 other markers, without working the stitches. These markers should be a different colour from the marker on the neck: Insert a marker at the beginning of the round (= in transition between back piece and right sleeve), skip 12-12-16-16-16-16 stitches, insert a marker here (in transition between right sleeve and front piece), skip 22-24-30-36-38-42 stitches, insert a marker here (in transition between front piece and left sleeve), skip 12-12-16-16-16-16 stitches, insert a marker here (in transition between left sleeve and back piece), there are 22-24-30-36-38-42 stitches left after the last marker. Work A.1 on the whole round, with 1 knitted stitch on either side of all 4 markers (= 2 knitted stitches in each transition between body and sleeves). AT THE SAME TIME on the 2nd round (i.e. a knitted round) start to increase to RAGLAN – read description above. Increase like this every 2nd round a total of 16-18-18-18-20-24 times = 196-216-236-248-268-308 stitches. Continue working until the piece measures 20-22-24-26-28-30 cm from the marker on the neck. Now divide for the body and sleeves on the next round as follows: Place the first 44-48-52-52-56-64 stitches on a thread, cast on 8 stitches (= in side under the sleeve), work the next 54-60-66-72-78-90 stitches (= front piece), place the next 44-48-52-52-56-64 stitches on a thread, cast on 8 stitches (= in side under the sleeve), work the next 54-60-66-72-78-90 stitches (= back piece). Body and sleeves are finished separately. THE PIECE IS NOW MEASURED FROM HERE. BODY: = 124-136-148-160-172-196 stitches. Continue in the round with A.1. The pattern should match the pattern on the yoke. When the piece measures 22-22-21-21-21-21 cm from the division (adjusting so you finish after a knitted round), knit 1 round where you increase 18-20-22-24-26-30 stitches evenly spaced = 142-156-170-184-198-226 stitches. Change to circular needle size 4.5 mm and work rib (knit 1, purl 1) for 4 cm. Cast off with knit over knit and purl over purl – read CASTING-OFF TIP. The jumper measures approx. 50-52-54-56-58-60 cm from the shoulder down. SLEEVES: Place the 44-48-52-52-56-64 stitches from the thread on the one side of the piece on short circular needle/double pointed needles size 5.5 mm and knit up 1 stitch in each of the 8 stitches cast on under the sleeve = 52-56-60-60-64-72 stitches. Insert a marker thread in the middle of the 8 new stitches (= mid under sleeve). Start the round here and work pattern as follows: Knit 1, A.1 as before over the next 50-54-58-58-62-70 stitches, knit 1. Continue this pattern in the round. When the sleeve measures 2 cm, decrease 1 stitch on each side of the marker thread – read DECREASE TIP. Decrease like this every 2-2-2-1½-1½-1 cm a total of 4-4-4-4-4-6 times = 44-48-52-52-56-60 stitches. Continue working until the sleeve measures 25-23-21-20-18-16 cm from the division. Try the jumper on and work to desired length; there is 4 cm left to finished length. Knit 1 round, where you decrease 6-8-10-8-10-12 stitches evenly spaced = 38-40-42-44-46-48 stitches. Change to double pointed needles size 4.5 mm and work rib (knit 1, purl 1) for 4 cm. Cast off with knit over knit and purl over purl – remember CASTING-OFF TIP. The sleeve measures approx. 29-27-25-24-22-20 cm from the division. Work the other sleeve in the same way . |
|||||||||||||
Diagram explanations |
|||||||||||||
|
|||||||||||||

|
|||||||||||||
Have you finished this pattern?Tag your pictures with #dropspattern #coolingcreeksweater or submit them to the #dropsfan gallery. Do you need help with this pattern?You'll find 27 tutorial videos, a Comments/Questions area and more by visiting the pattern on garnstudio.com. © 1982-2025 DROPS Design A/S. We reserve all rights. This document, including all its sub-sections, has copyrights. Read more about what you can do with our patterns at the bottom of each pattern on our site. |
|||||||||||||


With over 40 years in knitting and crochet design, DROPS Design offers one of the most extensive collections of free patterns on the internet - translated to 17 languages. As of today we count 314 catalogues and 11820 patterns translated into English (UK/cm). 11820
We work hard to bring you the best knitting and crochet have to offer, inspiration and advice as well as great quality yarns at incredible prices! Would you like to use our patterns for other than personal use? You can read what you are allowed to do in the Copyright text at the bottom of all our patterns. Happy crafting!
Post a comment to pattern DROPS 222-27
We would love to hear what you have to say about this pattern!
If you want to leave a question, please make sure you select the correct category in the form below, to speed up the answering process. Required fields are marked *.