
Populära kategorier
Letar du efter ett garn?


Kommentarer / Frågor (9)
![]() Akuliina skrev:
Akuliina skrev:
I thank you for your answer, but things still don't add up. My work now has 8 or 9 chain spaces per side, and if I work the "arrow" row here, A2 and A3 only take up three of them, leaving me way too far from the middle of the shawl where A4 should sit. So how do I fill the chain spaces in between? I'm assuming I'm supposed to repeat A3 more than once here, to fill up the space, but is it so?
09.05.2024 - 18:59DROPS Design svarede:
Dear Akuliina, starting with the row with an arrow repeat the diagrams just as before: start with A.2 at the beg of row, the repeat A.3 until you reach the middle stitch in shawl, then work the row with an arrow over this stitch (a total of 5 ch-spaces); then repeat A.3 to the end of the row ending with A.5 when 1 st-group + 1 ch-space remain. Happy crocheting!
10.05.2024 - 08:50
![]() Akuliina skrev:
Akuliina skrev:
I\'m asking the same as everyone else - how to continue after first completing A2-A5. I started following the chart exactly as before, but this way I wasn\'t anywhere near the middle of the shawl when it was time to start A4. Please explain in _detail_ where I should increase and how to keep the charts working. Do I need to repeat A3 more than once each side?
07.05.2024 - 13:27DROPS Design svarede:
Dear Akuliina, just repeat the diagrams as before, following the last 4 rows, ie work A.2, repeat A.3, work A.4 in the middle (just as before), work A.3 and finish with A.5, see from WS, work A.5, repeat A.3, work A.4, repeat A.3 and finish with A.2. When the 4 rows are done, repeat from first to 4 again and continue like this until finished measurements. Happy crocheting!
07.05.2024 - 15:47
![]() Emma Hessfelt skrev:
Emma Hessfelt skrev:
Let me try to rephrase my question: After I have completed all diagrams once, what is it that I am supposed to repeat? Am I supposed to repeat the complete diagrams again or is it just the LAST row from each diagram that I should repeat?
09.04.2023 - 06:53DROPS Design svarede:
Dear Emma, you should repeat ALL FOUR rows of the chart (excluding the very start), not just the last row. Happy crochetting!
09.04.2023 - 12:47
![]() Emma Hessfelt skrev:
Emma Hessfelt skrev:
Thank you for answering my question, but I still don't understand. Can you explain in detail exactly where in the diagrams A2, A4 and A5 I can find the increase and how the increase works?
09.04.2023 - 06:11DROPS Design svarede:
Dear Emma, the increases are done at the start of A.2, at the end of A.5 and near the central stitch in A.4. You have more increases in these charts because you will increase the amount of chain spaces in them. Happy crochetting!
09.04.2023 - 12:53
![]() Emma Hessfelt skrev:
Emma Hessfelt skrev:
Please help! I don't understand how to continue after completing A2-A5. Your instructions says to repeat the last 4 rows in each diagram (which means doing the same thing all over again). But this doesn't add up. Each diagram just has 4 rows! There needs to be an increase for each row if it's going to work. Can you please explain in another way?
08.04.2023 - 19:28DROPS Design svarede:
Dear Emma, yes, you need to work exactly as before. Remember that A.2, A.4 and A.5 include increases in their charts, so you will be increasing as you work, just as before. Happy crochetting!
08.04.2023 - 23:01
![]() Paz Juan Gutiérrez skrev:
Paz Juan Gutiérrez skrev:
"Después de completar los diagramas A.2 - A.5 en vertical, repetir la 4 últimas filas de cada diagrama con los aumentos a cada lado del centro del chal como antes." No entiendo cómo seguir. Porque si repito de nuevo los patrones A2 a A5 no sé dónde van los aumentos.
31.05.2019 - 18:00DROPS Design svarede:
Hola Paz. Los aumentos siguen en los mismos sitios ( a cada esquina y en el centro). Solo que no repetimos los diagramas enteros, sino que solo las 4 últimas filas de cada diagrama. El resto se trabaja como antes.
13.06.2019 - 23:21
![]() Liana skrev:
Liana skrev:
Buoongiorno, sto lavorando questo modello e mi sono bloccata in questo punto: "Dopo aver lavorato i diagrammi da A.2 a A.5 una volta in verticale, ripetere le ultime 4 righe di ogni diagramma per continuare ad aumentare da ciascun lato e al centro dello scialle come prima". che vuol dire? gli aumenti li devo continuare a fare sin dalla prima riga delle 4 da ripetere o no? non capisco bene come continuare gli aumenti.
09.04.2019 - 11:50DROPS Design svarede:
Buongiorno Liana, deve semplicemente continuare a lavorare sulle ultime 4 righe dei diagrammi, gli aumenti sono già inclusi in quelle righe. Buon lavoro!
09.04.2019 - 15:14
![]() Michelle skrev:
Michelle skrev:
Merci à Drops d'avoir l'audace d'introduire parmi ses modèles de très jolies mamies aux cheveux blancs !
18.02.2018 - 10:58
![]() Mary skrev:
Mary skrev:
Hooray for an elegant white haired model!
08.12.2016 - 18:20
|
|||||||||||||||||||||||||||||||
Christmas Charm |
|||||||||||||||||||||||||||||||
 |
 |
||||||||||||||||||||||||||||||
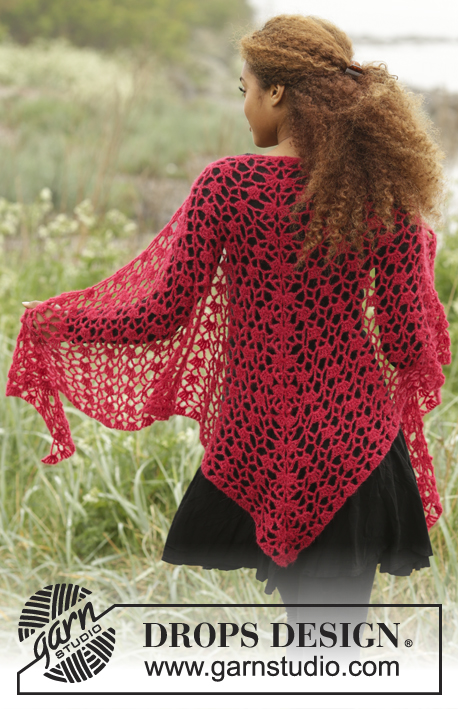
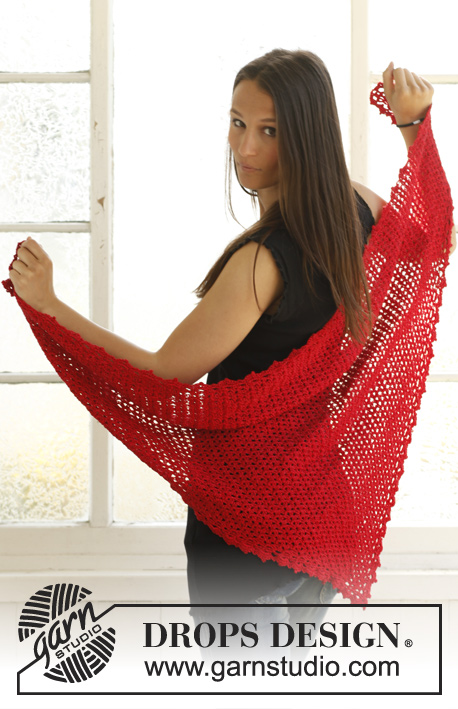
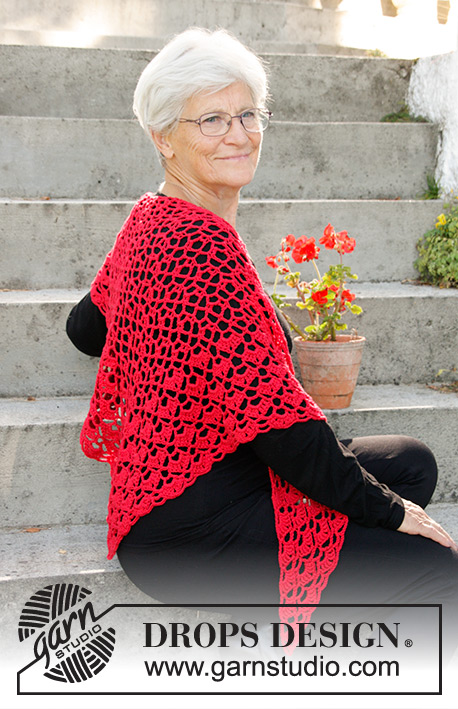
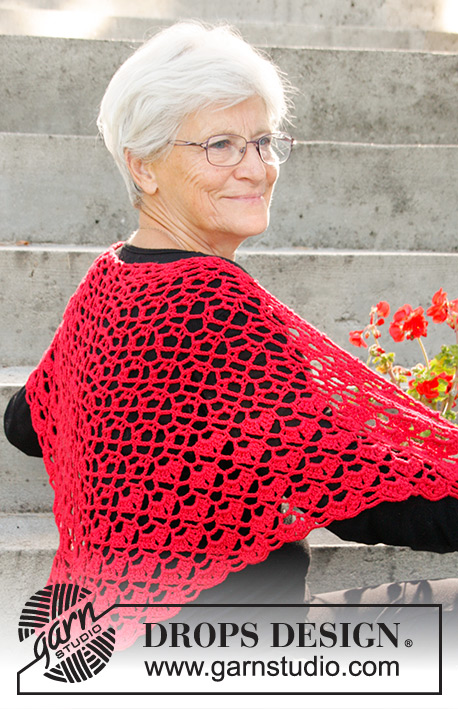
Virkad sjal till jul med hålmönster och solfjädrar i DROPS Cotton Merino.
DROPS Extra 0-1333 |
|||||||||||||||||||||||||||||||
|
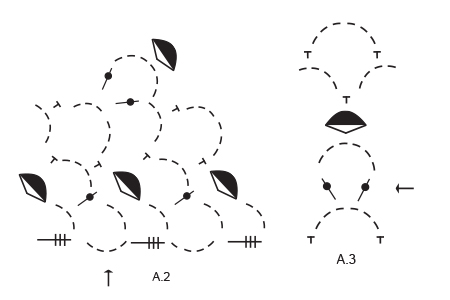
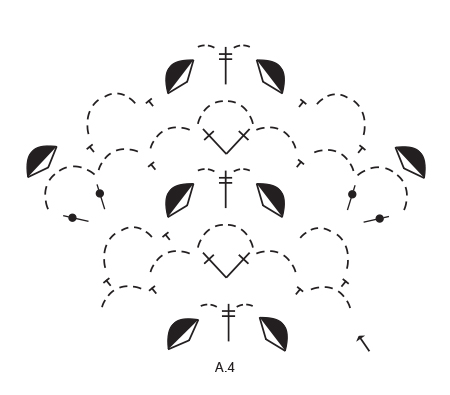
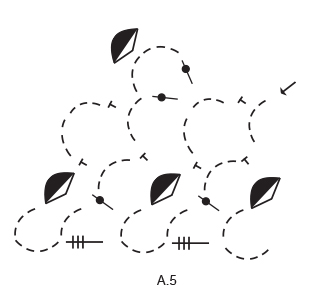
MÖNSTER: Se diag A.1 till A.5. ---------------------------------------------------------- SJAL: Arb virkas fram och tillbaka från mitt bak i nacken och ner. Börja med Cotton Merino och nål 4,5 och virka mönster efter diag A.1. KONTROLLERA VIRKFASTHETEN! När hela A.1 är färdigvirkat fortsätts det med mönster från v med pil (= v 2) så här: Virka A.2 (ökning i sidan), A.3, A.4 (= ökning mitt på), A.3, A.5 (= ökning i sidan). När diag A.2 till A.5 färdigvirkade på höjden upprepas de sista 4 v i varje diag så att ökningen i varje sida och mitt på sjalen fortsätter som förut. När arb mäter ca 40 cm mätt längs ökningen mitt på sjalen – Anpassa så att det avslutas med v 1 eller 3 – virkas det vidare som förut, men nu ersätts symbolen för (1 dst + 6 lm + 1 dst) med (3 dst + 2 lm + 3 dst). Fortsätt så till sjalen mäter totalt 65 cm mätt längs mitten av sjalen – anpassa så att sista v som virkas är som v 2 eller 4 i diag A.2 till A.5. Klipp av och fäst trådarna. Lägg sjalen i ljummet vatten till den är genomvåt. Pressa försiktigt ut vattnet från sjalen – den får inte vridas, sedan rullas sjalen in i en handduk och kläms för att få bort mer vatten - sjalen kommer nu bara att vara lite fuktig. Lägg sjalen på en matta eller en madrass – drag försiktigt ut den i rätt mått – se mått överst i beskrivningen! Låt den torka. |
|||||||||||||||||||||||||||||||
Diagram förklaring |
|||||||||||||||||||||||||||||||
|
|||||||||||||||||||||||||||||||
 |
|||||||||||||||||||||||||||||||
 |
|||||||||||||||||||||||||||||||
 |
|||||||||||||||||||||||||||||||
 |
|||||||||||||||||||||||||||||||
Har du gjort detta mönster?Tagga då dina bilder med #dropspattern eller skicka in de till #dropsfan galleriet. Behöver du hjälp med mönstret?Du hittar 8 instruktionsvideoer, kommentarer/frågor och mer i mönstret på www.garnstudio.com © 1982-2026 DROPS Design A/S. Alla rättigheter är reserverade. Detta dokument med tillhörande underdokument har copyright. Läs mer om vad du kan göra med våra mönster längst ner på vår hemsida. |
|||||||||||||||||||||||||||||||


Med över 40 år i stick- och virkbranschen erbjuder DROPS Design en av de mest omfattande samlingarna av gratis mönster på internet - översatt till 17 språk. Per idag har vi 324 kataloger och 12290 mönster på och alla är översatta till Svenska.
Vi arbetar hårt för att kunna erbjuda det bästa inom stickning och virkning, inspiration och goda råd, men också kvalitetsgarn till fantastiska priser! Vill du använda våra mönster till annat än personligt användande? Du kan läsa om vilka regler som gäller i texten Copyright längst ner på sidan på alla våra mönster. Lycka till!
Kommentera mönster DROPS Extra 0-1333
Vi vill gärna ha din åsikt om denna modell!
Om du har en fråga kring den, kom ihåg att välja rätt kategori i menyn under, så får du snabbare svar! Obligatoriska fält är markerade med *.