
Populära kategorier
Letar du efter ett garn?


Kommentarer / Frågor (68)
![]() Amy skrev:
Amy skrev:
To whom it may concern: I was wondering when I am knitting the 12 stitches do I knit both ends of the row in garter stitch or just the last stitch of the row. Thank you in advance for your help Amy
31.10.2015 - 16:27DROPS Design svarede:
Dear Amy, when you are working the 12 sts for mid upper part, work the 1st and last st in garter st. See also the video in previous answer. Happy knitting!
31.10.2015 - 18:20
![]() Amy skrev:
Amy skrev:
To whom it may concern: The problem I am having is I have the 10 stitches on my needle for the top portion of the slipper but when I reach the 7 cm am I suppose to increase on those 10 stitches to reach the number 61 stitches that I need or do I start increasing after after the 7 cm. It says to pick up 12 stitches after I reach the 7 cm on either side of the edge stitch. That is where I am having the problem. Thank you again for your help
29.10.2015 - 04:56DROPS Design svarede:
Dear Amy, after you have worked the 7 cm over the mid sts, and 10 sts left, pick up 12 sts along both side of the upper foot (along right side of the middle part + along left side of the middle part) + slip sts from thread back on needle = you have a total of 61 sts on needle and your work looks like as in video, time code 5:18 approx. Happy knitting!
29.10.2015 - 09:32
![]() Amy skrev:
Amy skrev:
To whom it may concern: I am still confused as to how many rows I need because there is no explanation for when I go to start the pattern 2 portion of the slipper part and how many increases I need to reach the required amount of sts as well. I tried to watch the video but it was hard to follow when the sped up the knitting part. Thank you again for your help Amy
28.10.2015 - 16:04DROPS Design svarede:
Dear Amy, wijth pattern 2 portion of the slipper part, do you mean the edge around leg? Work first 4 ridges in garter st (= 8 K rows) but on the 8th K row increase 6 sts evenly - see here how to increase evenly. Then work following A.1 until 35-38 cm, work 4 ridges (8 K rows), but on the 1st of these 8 rows, decrease 6 sts evenly. Happy knitting!
28.10.2015 - 18:26
![]() Amy skrev:
Amy skrev:
Amy 25.10.2015 kl. 00:38: To whom it may concern: I am currently working on the slipper boot pattern and am wondering how I am suppose to do the heel of the slipper when it doesn't say how many rows to do it just say to work back and forth on the needles. If you could let me know it would be appreciated Thank you in advance for your help
25.10.2015 - 15:33
![]() Amy skrev:
Amy skrev:
To whom it may concern: I am currently working on the slipper boot pattern and am wondering how I am suppose to do the heel of the slipper when it doesn't say how many rows to do it just say to work back and forth on the needles. If you could let me know it would be appreciated Thank you in advance for your help
25.10.2015 - 00:38
![]() Yvonne skrev:
Yvonne skrev:
Kan ik de slof ook op 2 pennen breien ?
10.06.2015 - 23:26DROPS Design svarede:
Hoi Yvonne. Nee, enkele delen van deze slof worden in de rondte gebreid.
11.06.2015 - 13:44
![]() Trudy skrev:
Trudy skrev:
I guess I did not make myself clear. I understand about putting the stitches back on the needles, although I am not sure if we are using three now or four. If we are using four - then I need to know how many stitches are put onto the fourth needle which would be the heal area of the boot.
12.04.2015 - 17:54DROPS Design svarede:
Dear Trudy, distribute the sts on 4 needle or as in the video, making sure the markers are on the correct places. Happy knitting!
13.04.2015 - 09:32
![]() Elaine Langille skrev:
Elaine Langille skrev:
I don't understand "knit over knit" and "purl over purl" I watched the video, but still didn't know how to do it
11.02.2015 - 03:56DROPS Design svarede:
Dear Mrs Langille, you work pattern 2 over the 12 sts as follows from RS: 1 edge st in garter st, *K2,P2* over the next 10 sts and finish with 1 edge st in garter st. On next row from WS work 1 edge st in garter st, *P2/K2* over the next 2 sts, 1 edge st in garter st. Happy knitting!
11.02.2015 - 09:14
![]() M Damen skrev:
M Damen skrev:
Een opmerking niet over de sloffen maar over de gebruikte taal. gecontroleerd is met 1 L niet met 2. Deze fout staat al enkele jaren bij ieder patroon.
04.01.2015 - 20:21Dianne Perrin skrev:
Drops 158-47 pattern no an-025 I do not understand the directions for A.1 which is the first row and which x box is a p from rs and which x box is k from ws and which blank box is k from rs and which blank box is p from ws
16.12.2014 - 07:15DROPS Design svarede:
Dear Mrs Perrin, please click here to read more about diagrams. Row 1 = K5, (P2, K2) repeat (to) a total of 5 times, K3. Row2= K3, (P2, K2) repeat (to) a total of 5 times, P2, K3. Happy knitting!
16.12.2014 - 09:58
|
|||||||
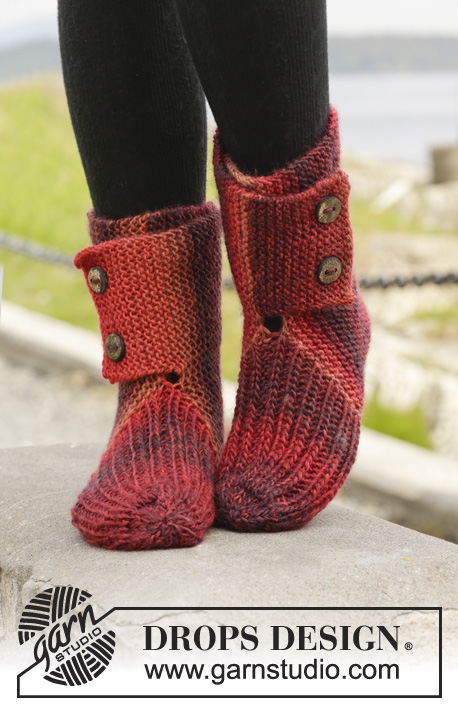
One Step Ahead#onestepaheadslippers |
|||||||
 |
 |
||||||
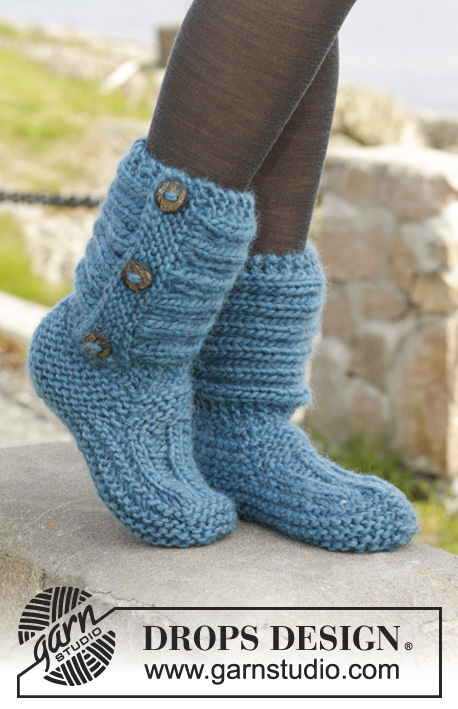
Stickade DROPS tofflor i ”Andes” med rätstickning och resår. Stl. 35-42
DROPS 158-47 |
|||||||
|
RÄTST (runt på strumpst): *1 v rätt och 1 v avigt*, upprepa *-*. RÄTST (fram och tillbaka på st): Maskorna stickas räta på alla varv. MÖNSTER: Se diag A.1. MÖNSTER 2: VARV 1 (= rätsidan): * 2 rm, 2 am *, upprepa *-* tills det återstår 2 m, 2 rm. VARV 2 (= avigsidan): rm över rm och am över am. Upprepa v 2 ---------------------------------------------------------- TOFFEL: Det stickas först en kant längst ner på skaftet, sedan stickas foten. Sedan stickas ett löst skaft på tvären. SKAFTET: Lägg upp 37-37-39 m på strumpst 6 med Andes. Sticka RÄTST runt – se förkl ovan - tills arb mäter ca 4 cm, avsluta efter 1 v am. KONTROLLERA STICKFASTHETEN! FOTEN: Arb stickas nu fram och tillbaka. Nu behålls de första 10 m på st, de resterande 27-27-29 m sätts på 1 tråd. Nu stickas det ett överstycke efter MÖNSTER 2 – se förkl ovan, över de 10 m – SAMTIDIGT i slutet på de nästa 2 v läggs det upp 1 ny kantm (Kantm stickas i RÄTST - se förkl ovan) = 12 m. När överstycket mäter 7-8½-10 cm maskas 1 kantm i varje sida av = 10 m. Sedan sätts m från tråden tillbaka på st och det stickas upp 12-14-16 m på varje sida av överstycket (innanför 1 kantm) = 61-65-71 m. HÄRIFRÅN MÄTS NU ARB! Sätt 1 markör mitt emellan de 10 m på överstycket (= mitt fram på tån) och 1 markör i m bak på hälen, det är 30-32-35 m mellan markörerna i varje sida. Arb stickas nu runt i rätst. När arb mäter 2 cm stickas 2 m räta tills på varje sida av varje markör på vartannat v (= 4 m mindre per v). Fortsätt minskn tills arb mäter 5-5-6 cm. Maska av de resterande m. Sy sömmen under foten i de yttersta maskbågarna så att sömmen inte blir tjock. LÖST SKAFT STICKAT PÅ TVÄREN: Arb stickas fram och tillbaka. Lägg upp 22 m på st 6 med Andes. Sticka 8 v rätst SAMTIDIGT på sista v ökas det 6 m jämnt fördelat = 28 m. Sticka efter diag A.1 (= 28 m) tills arb mäter ca 35-36-38 cm. Sticka 8 v rätst SAMTIDIGT på 1:a v minskas det 6 m jämnt fördelat = 22 m. Maska av. Lägg avmaskningskanten över uppläggningskanten, och sy 3 prydnadsknappar genom rätst på skaftet. MONTERING: Sy det lösa skaftet som är stickat på tvären till uppläggningskanten på skaftet (dvs uppläggningskanten till skaftet i början av beskrivningen). Sy det lösa skaftet så att knapparna är placerade på toffelns yttersida med öppningen vänd bakåt mot hälen – sy från avigsidan så att sömmen inte syns. Sticka en toffel till på samma sätt, se till att skaftets öppning kommer i motsatt sida. |
|||||||
Diagram förklaring |
|||||||
|
|||||||
 |
|||||||
Har du gjort detta mönster?Tagga då dina bilder med #dropspattern #onestepaheadslippers eller skicka in de till #dropsfan galleriet. Behöver du hjälp med mönstret?Du hittar 18 instruktionsvideoer, kommentarer/frågor och mer i mönstret på www.garnstudio.com © 1982-2026 DROPS Design A/S. Alla rättigheter är reserverade. Detta dokument med tillhörande underdokument har copyright. Läs mer om vad du kan göra med våra mönster längst ner på vår hemsida. |
|||||||


Med över 40 år i stick- och virkbranschen erbjuder DROPS Design en av de mest omfattande samlingarna av gratis mönster på internet - översatt till 17 språk. Per idag har vi 325 kataloger och 12298 mönster på och alla är översatta till Svenska.
Vi arbetar hårt för att kunna erbjuda det bästa inom stickning och virkning, inspiration och goda råd, men också kvalitetsgarn till fantastiska priser! Vill du använda våra mönster till annat än personligt användande? Du kan läsa om vilka regler som gäller i texten Copyright längst ner på sidan på alla våra mönster. Lycka till!
Kommentera mönster DROPS 158-47
Vi vill gärna ha din åsikt om denna modell!
Om du har en fråga kring den, kom ihåg att välja rätt kategori i menyn under, så får du snabbare svar! Obligatoriska fält är markerade med *.