
Looking for a yarn?


Comments / Questions (97)
![]() Josefina wrote:
Josefina wrote:
Hej, har DROPS Fabel Print 674 Ljung utgått? Jag lyckas inte hitta den online någonstans. Den här koftan ser så fin ut på bilden så jag hade gärna velat virka den med originalfärgerna.
18.05.2025 - 14:42DROPS Design answered:
Hei Josefina. Farge 674 er dessverre utgått fra vårt sortiment. mvh DROPS Design
19.05.2025 - 14:29
![]() Barbara Cooper wrote:
Barbara Cooper wrote:
Hi there. Please can you help me. At the end of the body when you need to skip 8 SC twice (under the arms) do you cut the yarn? Otherwise this will make a loop of work. I hope I am making sense. This is a lovely pattern. Thank you from South Africa xx
19.09.2024 - 19:23DROPS Design answered:
Dear Mrs Cooper, you will have to cut the yarn (or maybe replace these 8 sc with each 1 slip stitch to avoid cutting the yarn). Happy crocheting!
20.09.2024 - 08:34
![]() Christine wrote:
Christine wrote:
Danke, jetzt ist alles glasklar und wir haben uns verstanden ! Ist ja manchmal auch nicht so einfach, das Problem genau zu erfassen. Ich habe schon einige Modelle ( mit ihrer Wolle, immer Baumwollgarn ) nachgearbeitet und finde es ganz toll, daß man bei Unklarheiten nachfragen kann eine schnelle Antwort bekommt. Vielen Dank und einen schönenTag !
18.10.2023 - 12:05
![]() Christine wrote:
Christine wrote:
Danke für die Antwort. So richtig schlau bin ich allerdings nicht daraus geworden. Es geht beim Raglan doch ausschließlich um Ab- und nicht um Zunahmen, oder ? Wenn ich es also richtig verstanden habe, kommt zwischen die letzte Raglanabnahme, die eine Stäbchenreihe ist und der allerletzten Stäbchenreihe mit den entsprechenden Abnahmen, eine Reihe mit festen Maschen. Viele Grüße !
16.10.2023 - 22:45DROPS Design answered:
Liebe Christine, Sie sind ja recht, sorry. So die letzte Reihe vom Rumpfteil war mit Stäbchen, die 1. Reihe der Passe ist mit fM, dann häkeln Sie 2 Reihen (= 1 mit Stb + 1 mit fM) dann beginnen die Raglanabnahmen, so bei der 4. Reihe der Passe, die Abanahmen werden in jeder Reihe gehäkelt. Wenn Ihre letzte Abnahmereihe eine Hin-Reihe ist, häkeln Sie noch 1 Rückreihe mit fM, dan die Reihe mit Stäbchen und Abnahmen regelmäßig verteilt. Habe ich dieses Mal richtig verstanden?
17.10.2023 - 09:56
![]() Christine wrote:
Christine wrote:
Hallo, ich habe noch eine Frage zu den Raglanabnahmen : Wenn ich dabei mit einer Stäbchen-Reihe beginne ( im Text : nach 2 R im Muster ) ist die letzte Reihe der Abnahmen dann ebenfalls eine Stäbchen-Reihe. Danach folgt im Text eine weitere Reihe mit Stäbchen und letzten Abnahmen. Ist das wirklich so gedacht ? Im Musterverlauf kämen ja eigentlich nach den Stäbchen feste Maschen. Freundliche Grüße !
15.10.2023 - 15:19DROPS Design answered:
Liebe Christine, häkeln Sie immer 1 Reihe mit Stäbchen, 1 Reihe mit festen Maschen, und nehmen Sie für den Raglan bei den Reihen mit Stäbchen; die Verteilung entsteht auch bei einer Reihe mit Stäbchen, so nach der letzten Zunahmenreihe häkeln Sie wenigstens noch 1 Reihe (= mit festen Maschen). Viel Spaß beim häkeln!
16.10.2023 - 09:43
![]() Christine wrote:
Christine wrote:
Danke für die schnelle Antwort ! Ich habe auch schon selbst ausprobiert und bin genau auf diese Lösung gekommen. Ich freue mich, daß mein Ergebnis nun bestätigt ist.. Viele Grüße !
25.09.2023 - 12:11
![]() Christine wrote:
Christine wrote:
Für den Halsausschnitt sollen jeweils die beiden ersten und letzten Maschen zusammengehäkelt werden. Für das Ende der Reihe ist das plausibel. Wie soll das jedoch für den Anfang der Reihe umgesetzt werden ? Die erste Masche wird doch aus Luftmaschen gebidet. Wie sollen diese denn mit der zweiten Masche zusammengehäkelt werden ? Freundliche Grüße !
23.09.2023 - 23:22DROPS Design answered:
Liebe Christine, am Anfang der Reihe häkeln Sie z.B. nur 2 Luftmaschen dann das nächste Stäbchen wie üblich = 1 Abnahme; am Ende der nächsten Reihe häkeln Sie in das Stäbchen und nicht in die 2. Luftmasche vom Anfang der vorrigen Reihe. Viel Spaß beim häkeln!
25.09.2023 - 10:43
![]() Paola wrote:
Paola wrote:
Buongiorno! Molto carino questo capo, ma prima di cominciare a farlo ho bisogno di due chiarimenti: 1. E' tutto lavorato a righe alterne, una con il filato in tinta unita e una con quello misto? 2. Volevo farlo del colore di quello della foto, ma non trovo il colore n. 674, erika: è fuori produzione? Grazie!
14.03.2021 - 12:13DROPS Design answered:
Buonasera Paola, deve lavorare come indicato nel paragrafo MOTIVO, a righe alternate. Purtroppo il colore 674 è fuori produzione. Buon lavoro!
14.03.2021 - 19:41
![]() Gilda wrote:
Gilda wrote:
Salve, nel corpo del maglioncino dove dice di lavorare 59 ma un davanti saltare 8 mb, per la misura S, continuare per il dietro e, poi saltare altre 8 mb, e terminare l altro davanti. La domanda è, il filo deve essere staccato? I davanti no sono legati al dietro? Grazie per l aiuto che vorrete darmi. GILDA
20.01.2020 - 14:13DROPS Design answered:
Buongiorno Gilda. Sì, taglia il filo. Le 9 maglie che vengono saltate sono gli scalfi, è il punto in cui verranno inserite successivamente le maniche, quindi il davanti e il dietro devono essere separati. Buon lavoro!
21.01.2020 - 12:45
![]() Nunzia wrote:
Nunzia wrote:
Salve, si può avere il modello con taglia XS? Per me la taglia s è troppo grande. Grazie
28.08.2019 - 22:10
|
|
Mosa#mosacardigan |
|
|
|
|
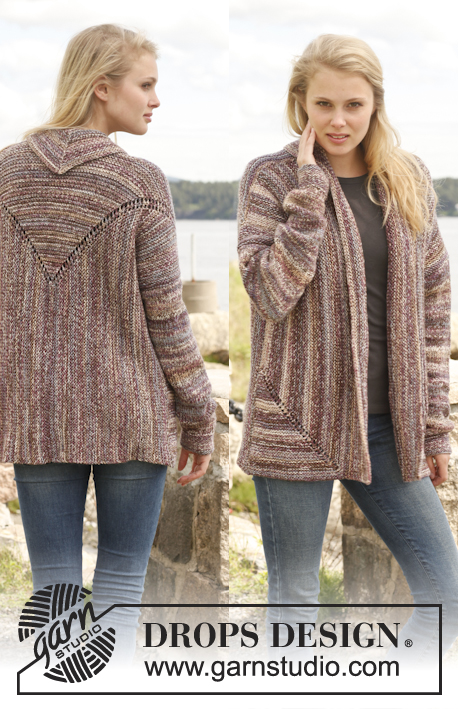
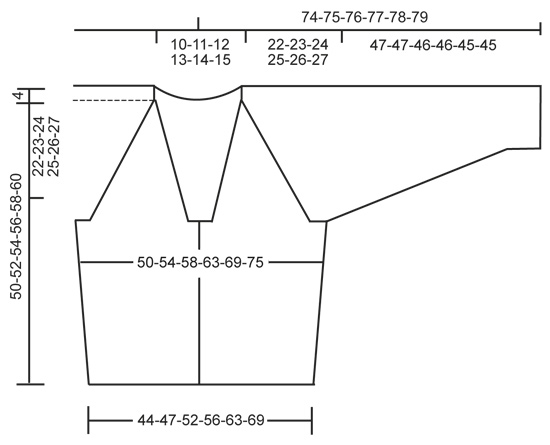
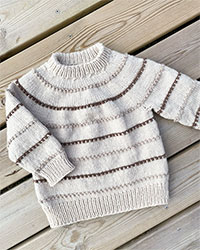
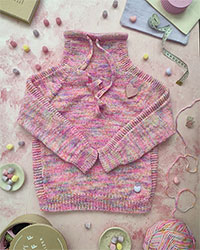
Crochet wide DROPS jacket with raglan in ”Fabel”. Size: S - XXXL.
DROPS 151-37 |
|
|
CROCHET INFO: On every sc row replace first sc with 1 ch. On every dc row replace first dc with 3 ch. PATTERN: ROW 1: 1 dc with heather in every sc. ROW 2: 1 sc with purple in every dc. Repeat rows 1 and 2. To avoid cutting the yarn between every row work as follows: Work 1st row with dc from RS with heather, leave the yarn. Work 2nd row from RS with sc with purple, leave the yarn. Work 3rd row from WS with dc with yarn from 1st row (heather). Work 4th row from WS with sc with yarn from 2nd row (purple). INCREASE TIP: Work 2 dc/sc in a dc/sc. DECREASE TIP (applies to raglan): Work until 1 sc/dc remains before marker, skip 2 sc/dc (marker is in the middle of these sts) = 8 dec sts per row. DECREASE TIP 2: Crochet 1 dc/sc tog as follows: Work 1 dc/sc but wait with last pull through (= 2 sts on hook), then work next dc/sc but on last pull through, pull thread through all sts on hook = 1 dc/sc dec. ---------------------------------------------------------- BODY: Read US/UK above! Ch 236-255-278-301-334-367 with purple on hook size 3.5 mm/E. Continue with 1 sc in 2nd ch from hook, 1 sc in each of the next 3-1-3-5-3-1 ch, * skip 1 ch, 1 sc in each of the next 6 ch *, repeat from *-* the entire row = 202-218-238-258-286-314 sc. READ CROCHET INFO! Then work PATTERN until finished measurements - see explanation above. REMEMBER THE CROCHET GAUGE! Insert 1 marker 53-57-62-67-74-81 sts in from each side (back piece = 96-104-114-124-138-152 sts). When piece measures 5 cm / 2", inc 1 dc/sc on each side of markers (= 4 inc) - READ INCREASE TIP. Repeat inc every 3-3½-3½-3½-4-4 cm / 1⅛"-1¼"-1¼"-1¼"-1½"-1½" 6 more times (= 7 inc in total) = 230-246-266-286-314-342 sts. When piece measures 28-29-30-31-32-33 cm / 11"-11⅜"-11¾"-12¼"-12½"-13", work next row as follows - make sure that this is a row worked from RS with dc: Work 1 dc in each of the first 56-60-65-70-77-84 sc (right front piece), skip 8 sc, work 1 dc in each of the next 102-110-120-130-144-158 sc, skip 8 sc, work 1 dc in each of the last 56-60-65-70-77-84 sc = 214-230-250-270-298-326 dc. Put piece aside. SLEEVE: Work back and forth and sew tog afterwards. Ch 59-61-66-68-70-73 with purple on hook size 3.5 mm/E. Continue with 1 sc in 2nd ch from hook, 1 sc in each of the next 1-3-1-3-5-1 ch, * skip 1 ch, 1 sc in each of the next 6 ch *, repeat from *-* the entire row = 50-52-56-58-60-62 sc. READ CROCHET INFO! Then work PATTERN until finished measurements - see explanation above. REMEMBER THE CROCHET GAUGE! AT THE SAME TIME when piece measures 7 cm / 2¾", inc 1 st in each side on a row with dc, repeat inc on every row with dc 26-27-27-28-29-30 more times (= 27-28-28-29-30-31 times in total) = 104-108-112-116-120-124 sts. When piece measures 47-47-46-46-45-45 cm / 18½"-18½"-18"-18"-17¾"-17¾" (shorter measurements in the larger sizes because of wider shoulder), work next row as follows - make sure that this is a row worked with dc: Work sl sts over the first 4 sc, work 1 dc in every sc until 4 sc remain = 96-100-104-108-112-116 dc, cut the yarns. RAGLAN: Now work the parts tog as follows: Work 1 sc in every dc from left front piece, 1 sc in every dc from sleeve, 1 sc in every dc from back piece, 1 sc in every dc from sleeve, 1 sc in every dc from right front piece = 406-430-458-486-522-558 sc. Work 2 more rows with pattern, then beg dec for raglan. Insert 1 marker in all transitions between sleeves and body piece = 4 markers. Dec for raglan on every row 39-41-43-45-47-49 times in total – read DECREASE TIP! AT THE SAME TIME as dec for raglan begins, do not work over the first and last 5 dc/sc on row, and also AT THE SAME TIME beg dec for neck. Dec for neck by working the first 2 and the last 2 sts on row tog – READ DECREASE TIP 2, dec for neck every 3rd row 12-14-11-7-0-0 times, then every other row 0-0-6-13-23-20 times and then every row 0-0-0-0-2-10 times (= 12-14-17-20-25-30 dec in total). After all dec for raglan and neck are done, 60-64-70-76-86-96 dc/sc remain on row. Work 1 row with dc while dec 2-4-8-12-20-27 dc evenly - SEE DECREASE TIP 2 = 58-60-62-64-66-69 dc. ASSEMBLY: Sew sleeve seams. Sew the opening under the sleeves. Sew on buttons on left front piece, top button 1 cm / ½" before dec for neck beg, bottom button approx. 8 cm / 3" from bottom edge. Button between 2 dc on right front piece. NECK EDGE: Work approx. 164 to 200 sc with heather around the entire neck opening. Work 3 rows with sc. Fasten off. Finally work a row around the entire opening on jacket with purple as follows – beg at the bottom on right band, work up around the neck and down along left band: * 1 sc, ch 1, skip approx. ½ cm / ¼" *, repeat from *-* and finish with 1 sc at the bottom of left band. Fasten off. |
|
|
|
Have you finished this pattern?Tag your pictures with #dropspattern #mosacardigan or submit them to the #dropsfan gallery. Do you need help with this pattern?You'll find 7 tutorial videos, a Comments/Questions area and more by visiting the pattern on garnstudio.com. © 1982-2025 DROPS Design A/S. We reserve all rights. This document, including all its sub-sections, has copyrights. Read more about what you can do with our patterns at the bottom of each pattern on our site. |
With over 40 years in knitting and crochet design, DROPS Design offers one of the most extensive collections of free patterns on the internet - translated to 17 languages. As of today we count 314 catalogs and 11822 patterns - 11812 of which are translated into English (US/in).
We work hard to bring you the best knitting and crochet have to offer, inspiration and advice as well as great quality yarns at incredible prices! Would you like to use our patterns for other than personal use? You can read what you are allowed to do in the Copyright text at the bottom of all our patterns. Happy crafting!
Post a comment to pattern DROPS 151-37
We would love to hear what you have to say about this pattern!
If you want to leave a question, please make sure you select the correct category in the form below, to speed up the answering process. Required fields are marked *.