
Popular categories
Looking for a yarn?


|
||||||||||||||||
Dragon's Play |
||||||||||||||||
 |
 |
|||||||||||||||
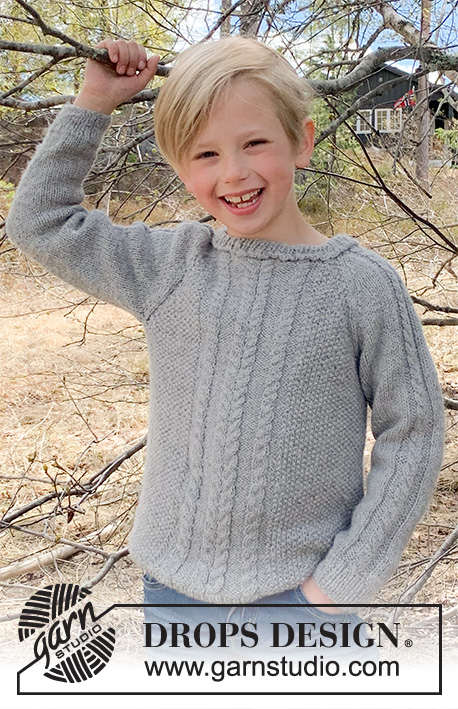
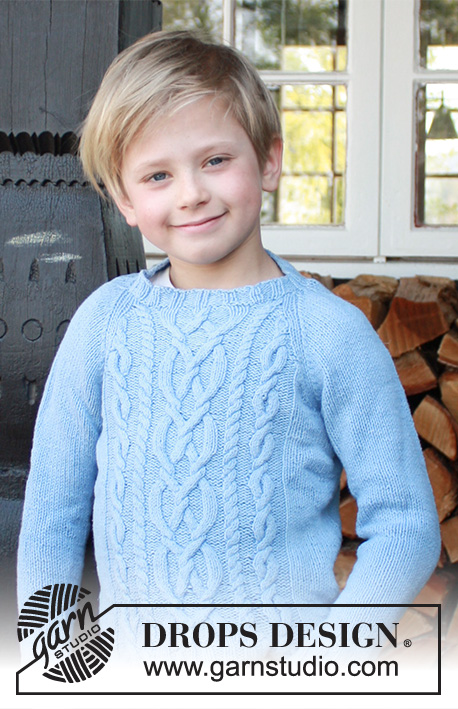
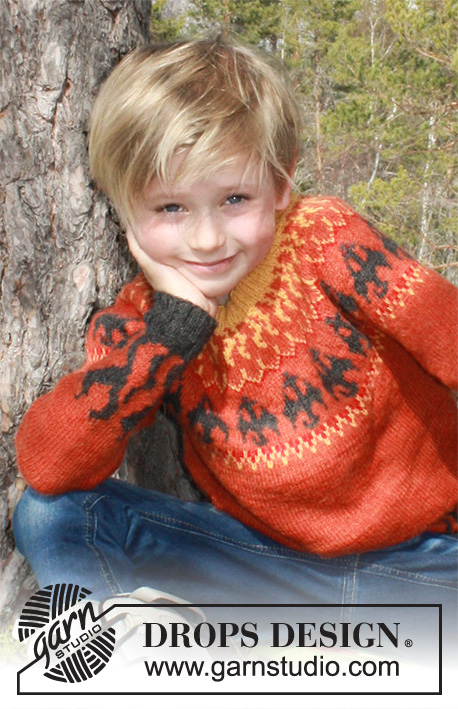
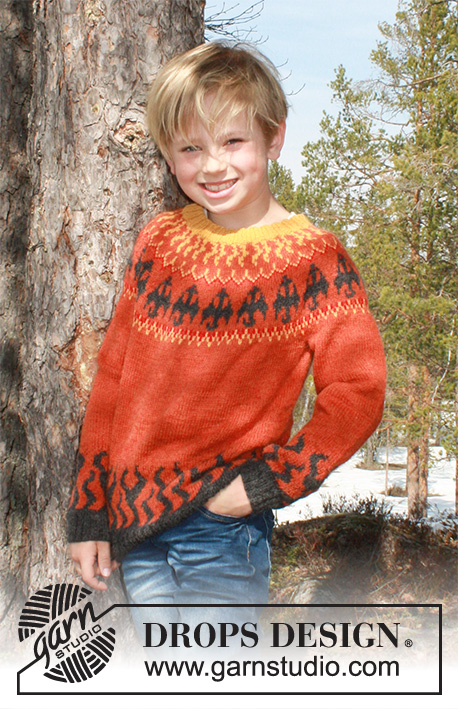
Knitted sweater with dragons and flames for kids in DROPS Alpaca. Size 3 - 12 years
DROPS Children 37-11 |
||||||||||||||||
|
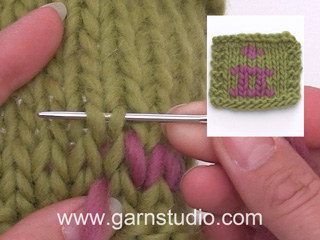
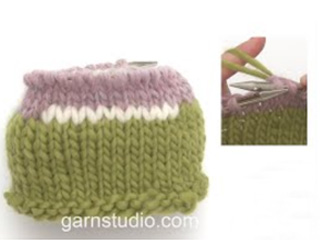
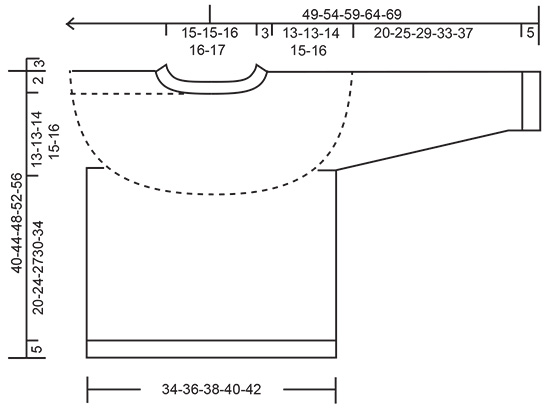
---------------------------------------------------------- EXPLANATION FOR THE PATTERN: ---------------------------------------------------------- PATTERN: See diagrams A.1, A.2 and A.3. Choose diagram for your size. INCREASE/DECREASE TIP (evenly): To calculate how to increase/decrease evenly, use the total number of stitches on row (e.g. 164 stitches) , and divide stitches by number of increases/decreases to be done (e.g. 6) = 27.3. In this example increase by making 1 yarn over after approx. every 27th stitch. On next round work yarn overs twisted to avoid holes. To decrease in this example knit alternately approx. every 26th and 27th stitch together. INCREASE TIP (applies to sleeves): Increase 1 stitch on each side of marker thread as follows: Make 1 yarn over on each side of 2 stitches (marker is between these stitches = mid under sleeve). On next round knit yarn over twisted to avoid holes. ---------------------------------------------------------- START THE PIECE HERE: ---------------------------------------------------------- SWEATER - SHORT OVERVIEW OF THE PIECE: Work piece in the round on circular needle up to armhole, work sleeves in the round on double pointed needles up to armhole (switch to a shorter circular needle when needed). Then slip sleeves on to same circular needle as body, work yoke in the round. Work neck in the round on double pointed needles or a short circular needle. BODY: Cast on 164-172-184-192-200 stitches on circular needle size 2.5 mm = US 1,5 with dark grey. Knit 1 round. Then work rib with knit 2/purl 2 for 5 cm = 2". Switch to circular needle size 3 mm = US 2,5, and knit 1 round while increasing 6-4-3-0-4 stitches evenly– read INCREASE/DECREASE TIP in explanation above = 170-176-187-192-204 stitches. Insert 1 marker thread at beginning of round and 1 marker thread after 85-88-93-96-102 stitches (use marker threads when binding off for armholes). Now continue in stockinette stitch according to diagram A.1 or A.2 in the different sizes as follows: SIZE: 3/4 – 7/8 – 11/12 year: Work diagram A.1 in the round (= 10-11-12 repetitions). When diagram has been worked, work in stockinette stitch with rust. SIZE: 5/6 – 9/10 years: Work diagram A.2 in the round (= 11-12 repetitions). When diagram has been worked, work in stockinette stitch with rust. ALL SIZES: Work until piece measures 25-29-32-35-39 cm = 9¾"-10⅜"-12½"-13¾"-15¼" ( or try the garment on and work to desired length). On next round bind off 6-6-8-8-8 stitches in each side(i.e. bind off 3-3-4-4-4 stitches on each side of each marker thread). There are now 79-82-85-88-94 stitches on front piece and 79-82-86-88-94 stitches on back piece. Put piece aside and work the sleeves. SLEEVE: Cast on 44-48-48-52-56 stitches on double pointed needle size 2.5 mm = US 1,5 with dark grey. Work rib in round with knit 2 and purl 2 for 5 cm = 2". Switch to double pointed needles size 3 mm = US 2,5, knit 1 round while increase/decrease evenly on round to 48-48-51-51-51 stitches. Insert 1 marker thread at beginning of round (used when increasing stitches). READ ALL OF THE FOLLOWING SECTION BEFORE CONTINUING! Work in stockinette stitch according to diagram A.1 or A.2, AT THE SAME TIME increase on each side of marker thread (work the increased stitches in rust - when there are long jumps in the pattern, make sure not to tighten the strands). SIZE 3/4 - 5/6 years: Work diagram A.2 (= 3-3 repetitions). When diagram has been worked, continue with rust. SIZE 7/8 – 9/10 – 11/12 years: Work diagram A.1 (= 3-3-3 repetitions). When diagram has been worked, continue with rust. ALL SIZES: When sleeve measures 7 cm = 2¾", increase 1 stitch on each side of marker thread - read INCREASE TIP in explanation above. Repeat increase every 4-4-5-5½-4½ cm = 1½"-1½"-2"-2⅛"-1⅝" 5-6-6-6-8 times in total = 58-60-63-63-67 stitches. When sleeve measures 25-30-34-38-42 cm = 9¾"-11¾"-13⅜"-15"-16½" in total, bind off the middle 6-6-8-8-8 stitches under sleeve (i.e. bind off 3-3-4-4-4 stitches on each side of marker thread) = 52-54-55-55-59 stitches. Put piece aside and knit another sleeve the same way. YOKE: Slip sleeves on to same circular needle as body - in each side stitches were bind off on body = 262-272-281-286-306 stitches. Work 1 round in stockinette stitch with rust and increase/decrease evenly on round so that there are 256-272-272-288-304 stitches on needle. Work 0-0-0-0-4 rounds in stockinette stitch with rust. Now work in the round according to diagram A.3, choose diagram for your size (= 16-17-17-18-19 repetitions). When diagram has been worked, there are 96-102-102-108-114 stitches on round and piece measures approx. 13-13-14-15-16 cm = 5⅛"-5⅛"-5½"-6"-6¼" from where piece were placed together. Work 1 round in stockinette stitch with goldenrod and decrease 8-10-6-12-14 stitches evenly on round = 88-92-96-96-100 stitches. Switch to double pointed needles or a short circular needle 2.5 mm = US 1,5 and continue with goldenrod. Work rib with knit 2 and purl 2 until piece measures 3 cm = 1⅛". Bind off stitches with knit over knit and purl over purl. Piece measures approx. 40-44-48-52-56 cm = 15¾"-17¼"-19"-20½"-22" from shoulder and down. ASSEMBLY: Sew the openings under the sleeves tog. Use duplicate stitches and red to make eyes on the dragons if you want. |
||||||||||||||||
Diagram explanations |
||||||||||||||||
|
||||||||||||||||

|
||||||||||||||||

|
||||||||||||||||
|
||||||||||||||||
|
Have you made this or any other of our designs? Tag your pictures in social media with #dropsdesign so we can see them! Do you need help with this pattern?You'll find tutorial videos, a Comments/Questions area and more by visiting the pattern on garnstudio.com. © 1982-2024 DROPS Design A/S. We reserve all rights. This document, including all its sub-sections, has copyrights. Read more about what you can do with our patterns at the bottom of each pattern on our site. |
||||||||||||||||


With over 40 years in knitting and crochet design, DROPS Design offers one of the most extensive collections of free patterns on the internet - translated to 17 languages. As of today we count 304 catalogs and 11422 patterns - 11417 of which are translated into English (US/in).
We work hard to bring you the best knitting and crochet have to offer, inspiration and advice as well as great quality yarns at incredible prices! Would you like to use our patterns for other than personal use? You can read what you are allowed to do in the Copyright text at the bottom of all our patterns. Happy crafting!
Comments / Questions (9)
Hei der er en feil i diagrammet på dragen. På biledet ses der, om man forstørre biledet, at den har røde øyne. Dette kommer ikke frem i diagrammet. Og da mister dragen sin effekt. Stor jobb at måtte brodere på efter endt job
23.08.2023 - 16:16Ik ben de trui in maat 122/128 aan het breien. Bij de mouwen moet ik totaal elke 6 cm 6x meerderen. De eerste keer na 7 cm. Dan kom ik uit op 37 cm. Maar, ik moet bij 34 cm minderen voor het armsgaten. Zie ik iets over het hoofd?
23.02.2022 - 15:55DROPS Design answered:
Dag Marion,
Zo te zien zit er een foutje in en moet het meerderen 6 keer om de 5 cm gedaan worden in plaats van om de 6 cm. Ik zal het doorgeven aan de ontwerpafdeling ter controle. Hopelijk kun je eerst zo verder.
26.02.2022 - 14:00Hej, Frågorna gäller ärmar för storlek 7/8 år: Fråga1: Ska man ignorera de ökade maskorna vid efterföljande varv i diagram A1? Fråga 2: För storlek 7/8 år - Är siffrorna "Upprepa ökningen med 4-4-6-5½-4½ cm mellanrum" omkastade tro - kanske ska vara 4-4-4,5-5-5-6 istället?
11.09.2021 - 15:00DROPS Design answered:
Hej Inger. De ökade maskorna stickar du i orange och du stickar mönstret på ärmen vidare som tidigare (räknar inte med de ökade maskorna). Det ser ut som det blivit något fel vid antal cm mellan ökningar i de större storlekarna. Öka med 5 cm mellanrum i din storlek så blir det lagom. Vi ska se över detta och göra en rättelse, tack för info! Mvh DROPS Design
14.09.2021 - 09:07Hallo bin frau König stricke den Kinderpullover 37-11 komme mit der passe nicht zurecht .Habe die Ärmel angebracht wie beschrieben in der Anleitung habe 304 Maschen auf der Nadel wenn das Diagramm zu ende ist soll ich noch 114 Maschen auf der Nadel haben ,wie komme ich dahin von 304 Maschen ? Muss dazu sagen stricke einen Pullover das erste mal in runden . Liebe Grüße Frau König
03.08.2021 - 17:56DROPS Design answered:
Liebe Frau König, wenn sie A.3 stricken, ist A.3 am Anfang 16 Maschen und A.3 wird 19 Mal wiederholt (= 19 x 16 M = 304). Im Diagram sollen Sie wie gezeigt abnehmen - siehe letztes Symbol im Diagram und wenn A.3 fertig ist, sind es nur noch 6 Maschen übrig in jedem A.3 (= 19 Rapporter x 6 Maschen = 114 Maschen). Viel Spaß beim stricken!
04.08.2021 - 07:19Oranssikirjava lanka 2925 oli väriltään paljon tummempaa kuin kuvan paidassa. Ja koska tätä lankaa tulee paljon, lopputulos on aivan eri näköinen. Drops Alpaca lanka on ohutta, mutta ihan pehmeää ja hyvän tuntuista.
21.07.2021 - 05:36Kann man diesen Pullover auch in Drops Lima oder Karisma stricken?
05.03.2021 - 13:38DROPS Design answered:
Liebe Tonia, Lima und Karisma gehören beide zur Garngruppe B, dieses Modell wird mit DROPS Alpaca = Garngruppe A gestrickt - benutzen Sie unseren Garnumrechner um die unterschiedlichen Möglichkeiten zu sehen. Viel Spaß beim stricken!
05.03.2021 - 14:50Ik mis een groot gedeelte van de teltekening, alleen de vlammen zijn beschikbaar
09.01.2021 - 09:05DROPS Design answered:
Dag Annet,
Als het goed is staan alle telpatronen erop: A.1, A.2 en A.3. (Misschien dat de site tijdelijk niet goed laadde bij jou?)
09.01.2021 - 09:15Quisiera saber cómo puedo comprar la lana de este jerseis y las ajugas corespondientes
29.11.2020 - 19:23DROPS Design answered:
Hola Maria. Las lanas y las agujas las puedes comprar en las tiendas especializadas de DROPS. Aquí tienes la lista completa: https://www.garnstudio.com/findastore.php?id=23&cid=23
30.11.2020 - 22:50This is a very hot jumper!
16.10.2020 - 23:35