DROPS Air
DROPS Air
65% Alpaca, 28% Polyamide, 7% Wool
from 6.45 $ /50g
Get the yarn to make this pattern from 38.70$.

The yarn cost is calculated from the pattern’s smallest size and the yarn’s cheapest product type. Looking for an even better price? You might find it on the DROPS Deals!

DROPS Super Sale

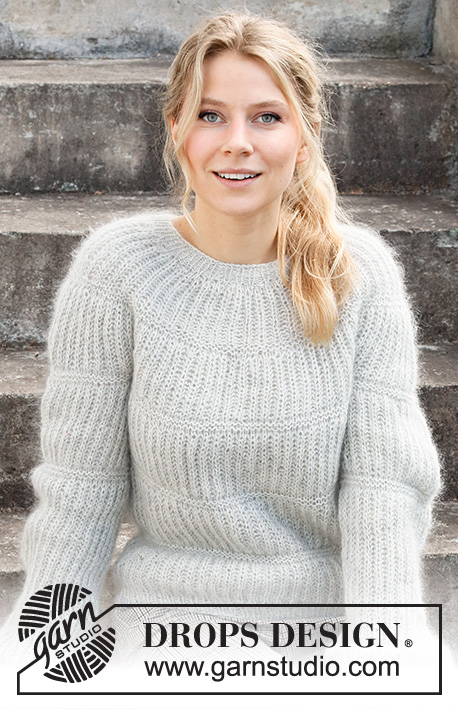
Dublin Winter Sweater

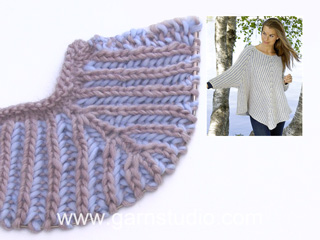
Knitted sweater with round yoke in DROPS Air. The piece is worked top down with English rib and A-shape. Sizes XS - XXL.

DROPS 215-12
DROPS Design: Pattern no ai-297
Yarn group C or A + A
-------------------------------------------------------

SIZES:
XS - S - M - L - XL – XXL

Finished measurements:
Chest measurements: 96-110-116-124-136-144 cm = 37¾"-43⅜"-45¾"-48¾"-53½"-56½"
Full length: 56-58-60-62-64-66 cm = 22"-22¾"-23⅝"-24⅜"-25¼"-26"

All measurements in charts are in cm.

MATERIALS:
DROPS AIR from Garnstudio (belongs to yarn group C)
300-300-350-400-400-450 g color 30, sage green

KNITTING GAUGE:
12 stitches in width and 26 rows in height with English rib = 10 x 10 cm = 4" x 4".
15 stitches in width and 19 rows in height with stockinette stitch = 10 x 10 cm = 4" x 4".

NEEDLES:
DROPS CIRCULAR NEEDLE SIZE 6 MM = US 10: Length 40 cm = 16" and 80 cm = 32" for English rib.
DROPS CIRCULAR NEEDLE SIZE 4 MM = US 6: Length 40 cm = 16" and 80 cm = 32" for rib.
Needle size is only a guide. If you get too many stitches on 10 cm = 4", change to a larger needle size. If you get too few stitches on 10 cm = 4", change to a smaller needle size.

-------------------------------------------------------

Alternative Yarn – See how to change yarns here
Yarn Groups A to F – Use the same pattern and change the yarn here
Yarn usage using an alternative yarn – Use our yarn converter here

-------------------------------------------------------

DROPS Air
DROPS Air
65% Alpaca, 28% Polyamide, 7% Wool
from 6.45 $ /50g
Get the yarn to make this pattern from 38.70$.

The yarn cost is calculated from the pattern’s smallest size and the yarn’s cheapest product type. Looking for an even better price? You might find it on the DROPS Deals!

Pattern instructions

NOTE: This pattern is written in American English. All measurements in charts are in cm. For conversion from inches to cm - click here. There are different terms for crocheting in American and British English. If this pattern includes crochet, click for "crochet terms" here. For this pattern in British English, please click here.
-------------------------------------------------------

EXPLANATIONS FOR THE PATTERN:

-------------------------------------------------------

RIB (in the round):
ROUND 1: * Make 1 yarn over, slip 1 stitch as if to purl, purl 2 *, work from *-* to end of round.
ROUND 2: * Knit together the yarn over and slipped stitch, purl 2 *, work from *-* to end of round.
Repeat rounds 1 and 2.

ENGLISH RIB (in the round):
ROUND 1: * Knit together the yarn over and slipped stitch, make 1 yarn over, slip 1 stitch as if to purl, *, repeat from *-* to end of round.
ROUND 2: * 1 yarn over, slip 1 stitch as if to purl, purl together the yarn over and slipped stitch *, repeat from *-* to end of round.
Repeat rounds 1 and 2.

INCREASE TIP (for increases in English rib stitch):
All increases are worked on a round where the yarn overs and knitted stitches are knitted together (i.e. Round 1 in English rib).
Increase 4 stitches in the English rib stitch as follows:
Knit together the yarn over and knitted stitch, but do not slip them from the needle, make 1 yarn over the right needle, knit together the yarn over and knitted stitch again, move the marker to this stitch (= mid-stitch), make 1 yarn over the right needle, knit together the yarn over and knitted stitch again (= 3 stitches and 2 yarn overs), slip the stitches from the left needle.
On the next round work the increased stitches as follows:
* Make 1 yarn over, slip 1 stitch as if to purl, purl 1 *, work from *-* a total of 2 times, make 1 yarn over, slip 1 stitch as if to purl (= 3 knitted stitches and 2 purled stitches).
The marker sits in the middle stitch of the increased stitches (in a knitted stitch).

DECREASE TIP (mid under sleeve):
All decreases are worked on a round where the yarn overs and knitted stitches are knitted together (i.e. Round 1 in English rib).
Start mid under the sleeve (i.e. before the marker-stitch) and decrease 4 stitches on the round as follows:
Work the first 2 stitches in English rib as before, slip the next stitch + its yarn over as if to knit, knit together the next 2 stitches + and their yarn overs and pass the slipped stitch + and its yarn-over over the knitted together stitches. Work until there are 4 stitches left before the marker stitch (= mid-stitch under the sleeve), knit together the next 3 stitches + and their yarn overs (= 2 stitches decreased), work the last stitch on the round.

BINDING-OFF TIP:
To avoid the bind-off edge being tight you can bind off with a larger size needle. If the edge is still tight, make 1 yarn over after approx. each 3rd stitch at the same time as binding off; the yarn overs are bind off as normal stitches.

-------------------------------------------------------

START THE PIECE HERE:

-------------------------------------------------------

SWEATER – SHORT OVERVIEW OF THE PIECE:
The neck and yoke are worked in the round with circular needle, top down. On yoke, increase in 6 stitches marked with markers. The yoke is divided for body and sleeves and the body continued in the round with circular needle. The sleeves are worked in the round with short circular needle, top down.

NECK:
Cast on 78-78-84-90-90-96 stitches with circular needle size 4 mm = US 6 and Air.
Knit 1 round.
Then work RIB – read description above, for 12 cm = 4¾"; finish after round 2.
The next round is worked as follows: * Make 1 yarn over, slip 1 stitch as if to purl, purl 2 together *, work from *-* to end of round = 52-52-56-60-60-64 stitches.
Change to circular needle size 6 mm = US 10.
Insert 1 marker thread at the beginning of the round; the yoke is measured from this marker thread.

YOKE:
Insert 6 markers in the piece as described below (without working the stitches). All markers are in knitted stitches and are used when increasing on the yoke.
Count 8-8-8-10-10-10 stitches, insert marker 1 in the next stitch (= back right sleeve), count 5-5-7-5-5-7 stitches, insert marker 2 in the next stitch (= raglan-line in front), count 7-7-7-9-9-9 stitches, insert marker 3 in the next stitch (= mid-front), count 7-7-7-9-9-9 stitches, insert marker 4 in the next stitch (= raglan-line in front), count 5-5-7-5-5-7 stitches, insert marker 5 in the next stitch (= back left sleeve), count 11-11-11-13-13-13 stitches, insert marker 6 in the next stitch (= mid-back), there are 3 stitches left on the round.
Work ENGLISH RIB in the round – read description above.
REMEMBER THE KNITTING GAUGE!
When you have worked 2-2-6-2-6-2 rounds of English rib, increase stitches on the next round as follows:
Increase 4 stitches in all 6 marker-stitches - read INCREASE TIP (= 24 stitches increased on the round).
Increase like this every 12th-10th-10th-10th-8th-10th round (every 6th-5th-5th-5th-4th-5th round of visible English rib stitches) a total of 5-6-6-7-8-8 times at markers 1, 2, 4 and 5 and a total of 4-5-6-6-7-8 times at markers 3 and 6 = 164-188-200-220-244-256 stitches on the needle.
If the knitting gauge is correct in height, the piece measures approx. 20-20-22-24-24-28 cm = 8"-8"-8¾"-9½"-9½"-11" from the marker on the neck.
Increases at markers 3 and 6 continue two more times on the piece (i.e. a total of 6-7-8-8-9-10 increases mid-front and mid-back); if the piece is shorter than 20-20-22-24-24-28 cm = 8"-8"-8¾"-9½"-9½"-11", some of these increases might be on the yoke. The number of stitches when dividing the yoke for body and sleeves will then not be the same as described below. The extra stitches will be on the front and back pieces.
(Markers 1 and 5 also have further increases after the division, but these are described under SLEEVE.)

Continue working until the piece measures 22-22-24-25-27-29 cm = 8¾"-8¾"-9½"-9¾"-10⅝"-11⅜" from the marker on the neck.
On the next round divide for the body and sleeves as follows:
Work the first 14-16-16-18-20-20 stitches as before, place the next 31-35-37-43-47-49 stitches on a thread for the sleeve, cast on 7 stitches under the sleeve, work the next 51-59-63-67-75-79 stitches as before, place the next 31-35-37-43-47-49 stitches on a thread for the sleeve, cast on 7 stitches under the sleeve and work the remaining 37-43-47-49-55-59 stitches as before.

BODY:
= 116-132-140-148-164-172 stitches – this stitch-count is only applicable if you have increased 4-5-6-6-7-8 times at markers 3 and 6 on the yoke. If you have increased more times on the yoke there will be more stitches on the needle now).
Continue in the round with English rib as before and work the last 2 increases at markers 3 and 6 if necessary. The stitches under the sleeve are worked without knitting together stitches and yarn overs on the first round. When all the increases are finished there are 132-148-156-164-180-188 stitches on the body.
Work until the piece measures 26-28-28-29-30-29 cm = 10¼"-11"-11"-11⅜"-11¾"-11⅜" from the division (adjust so the next round is one where stitches and yarn overs are knitted together).
There is approx. 5 cm = 2" left to finished length; try the sweater on and work to desired length.
Change to circular needle size 4 mm = US 6 and work rib as follows:
* Knit the first stitch and yarn over together as before, 1 yarn over (= 1 stitch increased), purl 1 *, work from *-* to end of round = 198-222-234-246-270-282 stitches.
Then work the same rib as on the neck for 5 cm = 2" (yarn overs worked twisted on the first round). Loosely bind off with knit over knit and purl over purl - read BINDING-OFF TIP!
The sweater measures approx. 56-58-60-62-64-66 cm = 22"-22¾"-23⅝"-24⅜"-25¼"-26" from the shoulder down.


SLEEVE:
Place the 31-35-37-43-47-49 stitches from the thread on the one side of the piece on short circular needle size 6 mm = US 10 and knit up 1 stitch in each of the 7 stitches cast on under the sleeve = 38-42-44-50-54-56 stitches. Insert a marker thread in the middle of the 7 stitches under the sleeve (a knitted stitch in the English rib pattern). This stitch will be where you decrease under the sleeve later.
Start the round before the mid-stitch and work as follows:
Continue in the round with English rib as before; the knitted-up stitches under the sleeve are worked without knitting together stitches and yarn overs on the first round.
At the same time increase at marker 1 (or 5 depending on which sleeve you are working) from the yoke and decrease stitches under the sleeve as described below:

INCREASES:
Continue to increase as before at marker 1/5 (= 4 stitches increased on each increase-round). Increase like this every 12th-10th-10th-10th-8th-10th round a total of 4 times. After the first increase there are 42-46-48-54-58-60 stitches (subsequently the number of stitches stays the same as you decrease at the same time as you increase).

DECREASES:
When working increase 2, decrease at the same time under the sleeve – read DECREASE TIP (= 4 stitches decreased on each decrease-round). Decrease like this on every round where you also increase (a total of 3 times).

In other words, at increase 1, you are left with 42-46-48-54-58-60 stitches. Then the number of stitches remains the same on subsequent increase/decrease rounds.

Continue with English rib until the sleeve measures 34-35-34-33-32-30 cm = 13⅜"-13¾"-13⅜"-13"-12½"-11¾" (there are 3 cm = 1⅛" left to finished length).
Now work the next round in rib in the same way as on the body; i.e. the yarn overs and knitted stitches are knitted together, increase 1 stitch after each knitted stitch and purl the purled stitch = 63-69-72-81-87-90 stitches.
Change to circular needle size 4 mm = US 6 and work rib as on the neck (1 English rib stitch, purl 2) for 3 cm = 1⅛".
Loosely bind off with knit over knit and purl over purl - remember BINDING-OFF TIP.
The sleeve measures approx. 37-38-37-36-35-33 cm = 14½"-15"-14½"-14¼"-13¾"-13" from the division.
Work the other sleeve in the same way.

Diagram

All measurements in charts are in cm.

diagram measurements

Each of our patterns has specific tutorial videos to help you.

Do you have a question? See a list of frequently asked questions (FAQ)

Knitting tension is what determines the final measurements of your work, and is usually measured per 10 x 10 cm. It is provided like so: number of stitches in width x number of rows in height - eg: 19 stitches x 26 rows = 10 x 10 cm.

The knitting tension is very individual; some people knit/crochet loosely while others work tightly. You adjust the knitting tension with the needle size, which is why the suggested needle size only serve as a guide! You need to adjust this (up or down) to ensure that YOUR knitting tension matches the knitting tension provided in the pattern. If you work with a different knitting tension than provided you will have a different yarn consumption, and your work will have different measurements than what the pattern suggests.

The knitting tension also determines which yarns can replace each other. As long as you achieve the same knitting tension you can replace one yarn with another.

See DROPS lesson: How to measure your tension/gauge

See DROPS video: How to make a gauge tension swatch

The required amount of yarn is provided in grams, eg: 450 g. To calculate how many balls you’ll need you first need to know how many grams are in 1 ball (25g, 50g or 100g). This information is available if you click on the individual yarn quality on our pages. Divide the amount required with the amount of each ball. For example, if each ball is 50g (the most common amount), the calculation will be as follows: 450 / 50 = 9 balls.

The important thing when changing from one yarn to another is that the knitting/crochet tension remains the same. This is so that the measurements of the finished piece will be the same as on the sketch provided. It is easier to achieve the same knitting tension using yarns from the same yarn group. It is also possible to work with multiple strands of a thinner yarn to achieve the knitting tension of a thicker one. Please try our yarn converter. We recommend you to always work a test swatch.

Please NOTE: when changing yarn the garment might have a different look and feel to the garment in the photo, due to individual properties and qualities of each yarn.

See DROPS lesson: Can I use a different yarn than the one mentioned in the pattern?

All our yarns are categorised into yarn groups (from A to F) according to thickness and knitting tension – group A contains the thinnest yarns and group F the thickest. This makes it easier for you to find alternative yarns to our patterns, should you wish to switch yarn. All yarns within the same group have a similar knitting tension and can easily replace each other. However, different yarn qualities have different structures and properties which will give the finished work a unique look and feel.

Click here for an overview of the yarns in each yarn group

At the top of all our patterns you’ll find a link to our yarn converter, which is a helpful tool should you wish to use a different yarn than suggested. By filling in the yarn quality you wish to replace, the amount (in your size) and number of strands, the converter will present good alternative yarns with the same knitting tension. Additionally it will tell you how much you’ll require in the new qualities and whether you’ll need to work with multiple strands. Most skeins are 50g (some are 25g or 100g).

If the pattern is worked with multiple colours, every colour will have to be converted separately. Similarly, if the pattern is worked with several strands of different yarns (for example 1 strand Alpaca and 1 strand Kid-Silk) you will have to find alternatives for each, individually.

Click here to see our yarn converter

Since different yarns have different qualities and textures we have chosen to keep the original yarn in our patterns. However, you can easily find options among our available qualities by using our yarn converter, or simply pick a yarn from the same yarn group.

It is possible that some retailers still have discontinued yarns in stock, or that someone has a few skeins at home that they would like to find patterns for.

The yarn converter will provide both alternative yarn as well as required amount in the new quality.

If you think it's hard to decide what size to make, it can be a good idea to measure a garment you own already and like the size of. Then you can pick the size by comparing those measures with the ones available in the pattern's size chart.

You'll find the size chart at the bottom of the pattern.

See DROPS lesson: How to read size chart

The needle size provided in the pattern serves only as a guide, the important thing is to follow the knitting tension. And since knitting tension is very individual, you will have to adjust the needle size to ensure that YOUR tension is the same as in the pattern – maybe you’ll have to adjust 1, or even 2 needle sizes, up or down to achieve the correct tension. For this, we recommend that you work test swatches.

Should you work with a different knitting tension than the one provided, the measurements of the finished garment might deviate from the measurement sketch.

See DROPS lesson: How to measure your tension/gauge

See DROPS video: How to make a gauge tension swatch

Working a garment top-down provides more flexibility and room for personal adjustment. For example it is easier to try the garment on while working, as well as making adjustments to length of yoke and shoulder caps.

The instructions are carefully explaining every step, in the correct order. Diagrams are adjusted to the knitting direction and are worked as usual.

The diagram depicts all rows/rounds, and every stitch seen from the right side. It is read from bottom to top, from right to left. 1 square = 1 stitch.

When working back and forth, every other row is worked from the right side and every other row is worked from the wrong side. When working from the wrong side, the diagram will have to be worked reversed: from left to right, knit stitches are purled, purl stitches are knit etc.

When working in the round every round is worked from the right side and the diagram are worked from right to left on all rounds.

See DROPS lesson: How to read knitting diagrams

The diagram depicts all rows/rounds, and every stitch seen from the right side. It is worked from bottom to top, from right to left.

When working back and forth every other row is worked from the right side: from right to left and every other row is worked from the wrong side: from left to right.

When working in the round, every row in the diagram are worked from the right side, from right to left.

When working a circular diagram you start in the middle and work your way outwards, counter clockwise, row by row.

The rows usually start with a given number of chain stitches (equivalent to the height of the following stitch), this will either be depicted in the diagram or explained in the pattern.

See DROPS lesson: How to read crochet diagrams

Instructions for working several diagrams after each other on the same row/round, will often be written like so: “work A.1, A.2, A.3 a total of 0-0-2-3-4 times". This means you work A.1 once, then A.2 is worked once, and A.3 is repeated (in width) the number of times provided for your size – in this case like so: S = 0 times, M = 0 times, L=2 times, XL= 3 times and XXL = 4 times.

The diagrams are worked as usual: begin with the first row in A.1, then work the first row in A.2 etc.

See DROPS lesson: How to read knitting diagrams

See DROPS lesson: How to read crochet diagrams

The total width of the garment (from wrist-to-wrist) will be larger in the larger sizes, despite the actual sleeves being shorter. The larger sizes have longer sleeve caps and wider shoulders, so there will be a good fit in all sizes.

The measurement sketch/schematic drawing provides information regarding the full length of the garment. If it’s a jumper or a jacket the length is measured from the highest point on the shoulder (usually closest to the neckline), and straight down to the bottom of the garment. It is NOT measured from the tip of shoulder. Similarly, the length of yoke is measured from the highest point on the shoulder and down to where yoke is split into body and sleeves.

See DROPS lesson: How to read a schematic drawing

Diagrams are often repeated on the round or in height. 1 repeat is the diagram the way it appears in the pattern. If it says to work 5 repeats of A.1 in the round, then you work A.1 a total of 5 times after/next to each other in the round. If it says to work 2 repeats of A.1 vertically/in height you work the entire diagram once, then begin again at the start and work the entire diagram one more time.

Chain stitches are slightly narrower than other stitches and to avoid working the cast-on edge too tight, we simply chain more stitches to begin with. The stitch count will be adjusted on the following row to fit the pattern and measurement sketch.

The rib edge is more elastic and will contract slightly compared to, for example, stocking stitch. By increasing before the rib edge, you avoid a visible difference in width between the rib edge and the rest of the body.

It’s very easy to cast off too tightly, and by making yarn overs while casting off (and simultaneously casting these off) you avoid a too tight cast off edge.

See DROPS video: How to bind off with yarn overs (yo)

To achieve an even increase (or decrease) you can increase on, for example: every 3rd and 4th row alternately, like so: work 2 rows and increase on the 3rd row, work 3 rows and increase on the 4th. Repeat this until the increase is complete.

See DROPS lesson: Increase or decrease 1 st on every 3rd and 4th row alternately

Should you prefer to work in the round instead of back and forth, you may of course adjust the pattern. You’ll need to add steeks mid-front (usually 5 stitches), and follow the instructions. When you would normally turn and work from the wrong side, simply work across the steek and continue in the round. At the end you’ll cut the piece open, pick up stitches to work bands, and cover the cut edges.

See DROPS video: How to knit steeks and cut open

Should you prefer to work back and forth instead of in the round, you may of course adjust the pattern so you work the pieces separately and then assemble them at the end. Divide the stitches for the body in 2, add 1 edge stitch in each side (for sewing) and work the front and back pieces separately.

See DROPS lesson: Can I adapt a pattern for circular needles into straight needles?

Pattern repeats can vary slightly in the different sizes, in order to get the correct proportions. If you’re not working the exact same size as the garment in the photo, yours might deviate slightly. This has been carefully developed and adjusted so that the complete impression of the garment is the same in all sizes.

Make sure to follow instructions and diagrams for your size!

If you have found a pattern you like which is available in women’s size it’s not very difficult to convert it to men’s size. The biggest difference will be the length of sleeves and body. Start working on the women size that you think would fit across the chest. The additional length will be worked right before you cast off for the armhole/sleeve cap. If the pattern is worked top-down you can add the length right after the armhole or before the first decrease on sleeve.

Regarding additional yarn amount, this will depend on how much length you add, but it is better with a skein too many than too few.

All yarns will have excess fibres (from production) that might come off as lint or shedding. Brushed yarns (ie hairier yarns) have more of these loose, excess fibres, causing more shedding.

Shedding also depends on what is worn under or over the garment, and whether this pulls at the yarn fibres. It’s therefore not possible to guarantee that there will be no shedding

Below are some tips on how to get the best result when working with hairier yarns:

1. When the garment is finished (before you wash it) shake it vigorously so the looser hairs come off. NOTE: do NOT use a lint roller, brush or any method that pulls at the yarn.

2. Place the garment in a plastic bag and put it in your freezer - the temperature will cause the fibres to become less attached to each other, and excess fibres will come off easier.

3. Leave in the freezer for a few hours before taking it out and shaking it again.

4. Wash the garment according to the instructions on the yarn label.

Pilling is a natural process that happens to even the most exclusive of fibers. It's a natural sign of wear and tear that is hard to avoid, and that is most visible in high friction areas of your garment like a sweater's arms and cuffs.

You can make your garment look as new by removing the pilling, using a fabric comb or a pill/lint remover.

Still can't find the answer you need? Then scroll down and leave your question so one of our experts can try to help you. This will be done normally within 5 to 10 working days.
In the meantime, you can read the questions and answers that others have left to this pattern or join the DROPS Workshop on Facebook to get help from fellow knitters/crocheters!

You might also like...

Post a comment to pattern DROPS 215-12

We would love to hear what you have to say about this pattern!

If you want to leave a question, please make sure you select the correct category in the form below, to speed up the answering process. Required fields are marked *.

Comments / Questions (77)

country flag Shanthi wrote:

Thanks for the reply drops.. just to clarify......in RIB and English rib, the Make 1 yarn over is never counted as a stitch ? Stitches on every alternate row keeps decreasing and increasing ?

17.10.2021 - 19:37

DROPS Design answered:

Dear Shanthi, please see answer above.

17.10.2021 - 19:51

country flag Shanthi wrote:

Hi drops !! One more question. How do you get 52 stitches while working ‘ make 1yarn over, slip 1 stitch as if to purl, purl 2 tog ‘ on 78 stitches ? Can you explain ? Thank you in advance. 😊

17.10.2021 - 07:20

DROPS Design answered:

Dear Shanthi, the yarn over doesn't count as a stitch, it's a part of the English rib, and is later on worked with their respective slipped stitch. Therefore, you decrease 1/3 of the initial stitches (when purl 2 tog), obtaining 52 stitches. Happy knitting!

17.10.2021 - 19:22

country flag Shanthi wrote:

Hi. Can you send me a video on how to increase 4 stitches in an English rib stitch ? Awaiting your reply. Thank you in advance !! Shanthi.

12.10.2021 - 16:30

DROPS Design answered:

Dear Shanthi, all the relevant videos for this pattern are linked just below the pattern. Se the one with the title "How to increase in English rib by making several stitches in 1 stitch". Happy stitching!

13.10.2021 - 00:24

country flag Ella wrote:

Hoi, Dit begrijp ik volledig. Maar in uitleg staat ook dat de meerderingen op 3 en 6 gaan ook gewoon door. Totaal 8 keer. Vanaf welk punt gaan ze door? Ik moet toch elke 10de naald meerderen? De 7de keer van 3 en 6 vallen dan samen met de 7de keer op 1,2,4 en 5. Groeten Ella

02.10.2021 - 17:51

country flag Ella wrote:

Hoi. Vraag voor maat L. In totaal 7 keer op markeerdraden 1, 2, 4 en 5 en in totaal 6 keer op markeerdraden 3 en 6 = 220 steken op de naald. Maar markeerdraden 3 en 6 gaan nog twee keer door, dus totaal 8 keer. Als ik bij de 7 keer 24 steken toevoeg op markeerdraden 1, 2, 3, 4, 5 en 6 dan kom ik niet op 220 maar op 228 steken. Of moet ik hier 3 en 6 niet meerderen? Maar ik moet toch iedere 10e naald (iedere 5e naald van zichtbare Engelse patentsteek) meerderen.

30.09.2021 - 19:58

DROPS Design answered:

Dag Ella,

Voordat je begint met meerderen heb je 60 steken op de naald. Voor maat L meerder je In totaal 6 keer op alle 6 markeerdraden, dus 6 x 24 = 144 en daarna nog 1 keer alleen op markeerdraden 1,2,4 en 5, dus 1 x 16 = 16, waarmee je op een totaal aantal steken komt van 220.

02.10.2021 - 12:44

country flag Samanta wrote:

Buonasera. Ho provato a lavorare le coste iniziali come descritto ma non ho il risultato come in foto.e non ho trovato un video relativo. Ma non dovrei fare semplici coste 1/1? Grazie

14.09.2021 - 21:49

DROPS Design answered:

Buonasera Samanta, le coste non sono semplici, ma lavorate seguendo quanto riportato nel paragrafo "COSTE" all'inizio delle spiegazioni. Buon lavoro!

14.09.2021 - 21:58

country flag Antonella wrote:

Dopo i primi 12 cm. del collo, se faccio una gettata, una maglia passata e due maglie insieme non ottengo nessuna diminuzione. forse non devo fare la maglia gettata?

04.07.2021 - 23:17

DROPS Design answered:

Buonasera Antonella, i gettati non si contano nel conteggio delle maglie. Buon lavoro!

05.07.2021 - 19:34

country flag Francisca Lyon wrote:

No entiendo como para la talla M pasa en el cuello de tener 84 pts a 56 pts. Cuando se disminuye??

14.04.2021 - 22:43

DROPS Design answered:

Hola Francisca. En la última vuelta del cuello cuando trabajan como sigue: Hacer 1 hebra, deslizar 1 punto como de revés, 2 puntos juntos de revés, se disminuyen 28 puntos.

25.04.2021 - 20:44

country flag Gerd Flygind wrote:

Jeg strikker Dublin Winter Sweather, Drops 215/12. jeg har lagt opp 96 masker som det står, men når jeg skal begynne med merkene er det kun 64 masker som angis i mønsteret. På omgangen.

25.03.2021 - 21:12

DROPS Design answered:

Hei Gerd, Etter du er ferdig med halsen skal du strikke en omgang hvor du feller 32 masker, før du bytter til pinne 6 (se oppskriften). God fornøyelse!

26.03.2021 - 07:55

country flag MICHELE wrote:

1 HILO DE FLORA + 1 HILO DE KID SILK a que grosor de lana corresponde ?

22.03.2021 - 12:55