DROPS Nepal
DROPS Nepal
65% Wool, 35% Alpaca
from 2.60 € /50g
Get the yarn to make this pattern from 28.60€.

The yarn cost is calculated from the pattern’s smallest size and the yarn’s cheapest product type. Looking for an even better price? You might find it on the DROPS Deals!

DROPS SS24

Rain Dance

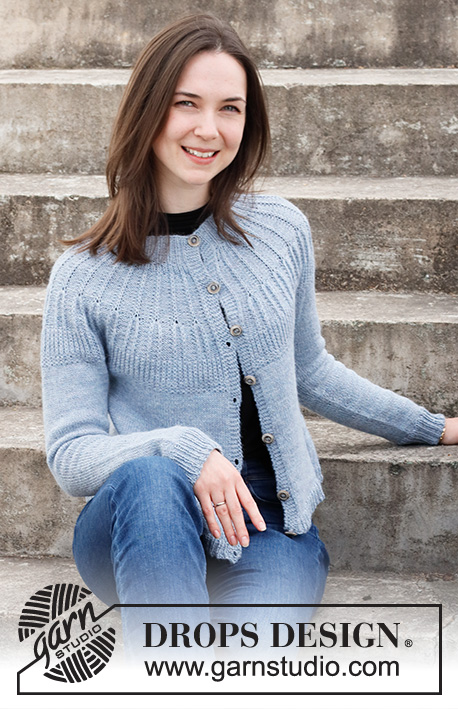
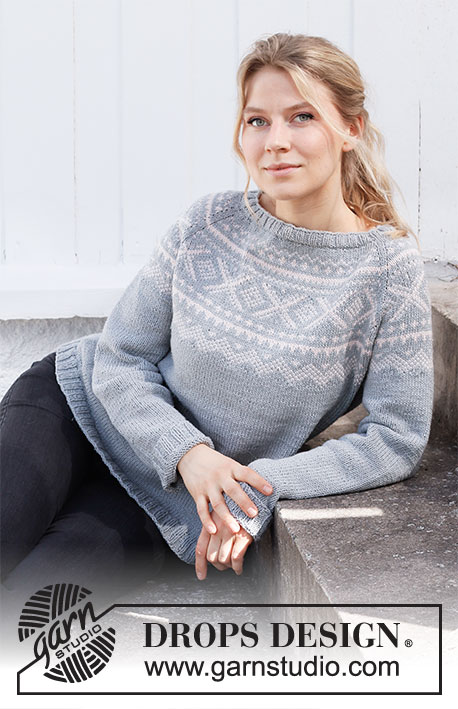
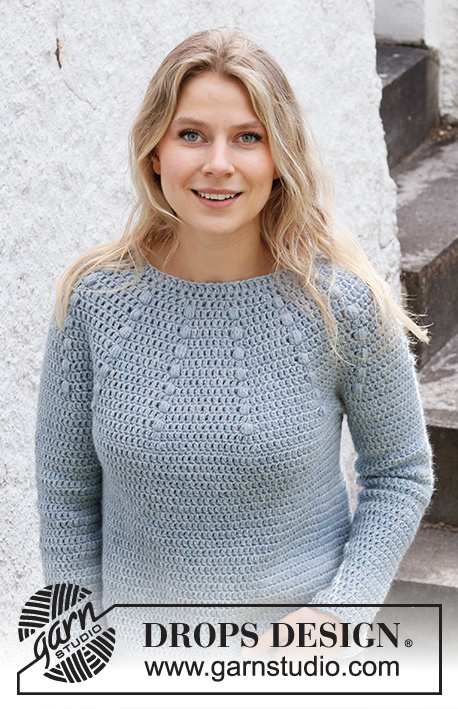
Crocheted jumper in DROPS Nepal. Piece is knitted top down with round yoke and puff stitches. Size: S - XXXL

DROPS 216-17
DROPS design: Pattern ne-336
Yarn group C or A + A
-------------------------------------------------------

SIZE:
S - M - L - XL - XXL - XXXL

MATERIALS:
DROPS NEPAL from Garnstudio (belongs to yarn group C)
550-600-700-750-800-900 g colour no 8907, fog

CROCHET TENSION:
13 treble crochets in width and 8 rows vertically = 10 x 10 cm.

CROCHET HOOK:
DROPS CROCHET HOOK SIZE 5.5 mm
Hook size is only a suggestion! If you have too many stitches on 10 cm switch to larger hook. If you have too few stitches on 10 cm switch to smaller hook.

-------------------------------------------------------

Alternative Yarn – See how to change yarns here
Yarn Groups A to F – Use the same pattern and change the yarn here
Yarn usage using an alternative yarn – Use our yarn converter here

-------------------------------------------------------

DROPS Nepal
DROPS Nepal
65% Wool, 35% Alpaca
from 2.60 € /50g
Get the yarn to make this pattern from 28.60€.

The yarn cost is calculated from the pattern’s smallest size and the yarn’s cheapest product type. Looking for an even better price? You might find it on the DROPS Deals!

Pattern instructions

-------------------------------------------------------

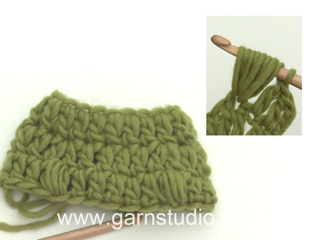
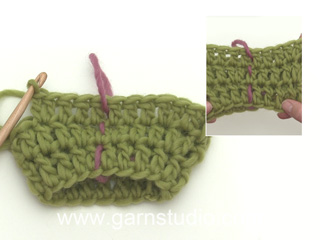
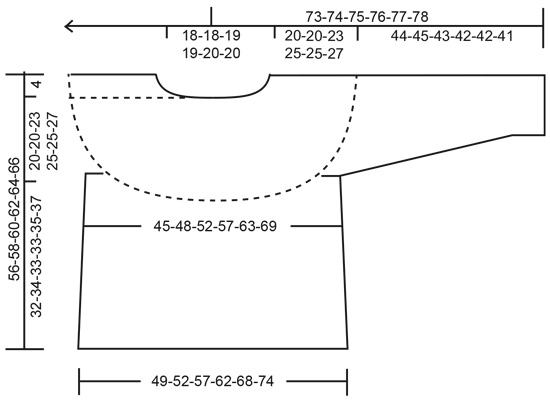
EXPLANATION FOR THE PATTERN:

-------------------------------------------------------

PATTERN: 
See diagram A.1.

CROCHET TIP:
Replace first treble crochet an the beginning of round with 3 chain stitches. Finish round with 1 slip stitch in 3rd chain stitch from beginning of round.

CHAIN STITCH:
If you work at the end of crochet hook the chain stitch will often be too tight
1 chain stitch should be just as long as 1 treble crochet is wide.

PUFF STITCH:
* Make 1 yarn over, insert hook in treble crochet from last row, get the yarn and pull yarn through and make it 2 cm long *, repeat from *-* 4 times in total = 9 loops on hook, make a yarn over and pull yarn through all 9 loops.

INCREASE TIP (applies to sides of body):
Increase 1 stitch by working 2 stitches in same stitch.
Increase on each side of marker as follows:
Work until 4 stitches remain before marker thread, increase 1 stitch in next stitch, work 6 stitches (marker thread is in the middle of these 6 stitches), increase 1 stitch in next stitch (= 2 stitches increased at the marker thread and 4 stitches increased in total on row).

DECREASE TIP (applies to sleeves):
Decrease 1 treble crochet on each side of marker thread as follows: Work until 3 stitches remain before marker thread, work 2 TREBLE CROCHETS TOGETHER - read explanation below, work 1 treble crochet in each of the next 2 treble crochets (marker thread is in the of these stitches), work 2 treble crochets together.

WORK 2 TREBLE CROCHETS TOGETHER:
* Make 1 yarn over, insert hook in next stitch, get yarn, make 1 yarn over and pull yarn through the first 2 loops on hook *, repeat from *-* 2 times in total, make 1 yarn over and pull yarn through all 3 loops on hook (= 1 stitch decreased).

-------------------------------------------------------

START THE PIECE HERE:

-------------------------------------------------------

JUMPER - SHORT OVERVIEW OF THE PIECE:
Work yoke in the round from mid back, top down. Now divide yoke for body and sleeves. Work body in the round, top down. Work sleeves in the round, top down.

YOKE:
Work 60-65-70-70-75-80 CHAIN STITCHES - read explanation above, on hook size 5.5 mm with 1 strand Nepal and form a ring with 1 slip stitch in first chain stitch. Work 1 treble crochet in every chain stitch – READ CROCHET TIP = 60-65-70-70-75-80 treble crochets.

Work next round as follows:
Work A.1 over all stitches (= work 12-13-14-14-15-16 repetitions of A.1 in width. First round has already been worked, begin on second round). Work and increase after A.1. REMEMBER THE CROCHET TENSION!
When A.1 has been worked vertically, work the last 2 rounds in A.1 2-2-3-4-4-4 more times (work 1 treble crochet more before every increase for every time rounds are worked) = 168-182-210-224-240-256 treble crochets. Now work 1 treble crochet in every treble crochet until piece measures 20-20-23-25-25-27 cm. On last round increase 8-6-2-8-8-4 treble crochets evenly = 176-188-212-232-248-260 treble crochets.

Now divide yoke for body and sleeves, i.e. work next round as follows:
Work 1 treble crochet in each of the first 26-28-31-34-37-40 treble crochets (= half back piece), work 6-6-6-6-8-10 loose chain stitches (= in the side under sleeve), skip the next 36-38-44-48-50-50 treble crochets (= sleeve), work 1 treble crochet in each of the next 52-56-62-68-74-80 treble crochets (= front piece), work 6-6-6-6-8-10 loose chain stitches (= in the side under sleeve), skip the next 36-38-44-48-50-50 treble crochets (= sleeve), and work 1 treble crochet in each of the remaining 26-28-31-34-37-40 treble crochets (= half back piece). Finish body and sleeves separately. NOW MEASURE THE PIECE FROM HERE!

BODY:
= 116-124-136-148-164-180 stitches (including the 6-6-6-6-8-10 chain stitches under each sleeve = 58-62-68-74-82-90 stitches on back piece and 58-62-68-74-82-90 stitches on front piece). Insert 1 marker thread in each side, in the middle of the new stitches that were cast on. Move marker threads upwards when working. Use them later when increasing in the sides. Continue in the round with 1 treble crochet in every treble crochet. When body measures 8 cm from division, increase 2 stitches in each side - read INCREASE TIP. Increase like this every 9 cm 3 times in total in each side = 128-136-148-160-176-192 stitches. Work until body measures 32-34-33-33-35-37 cm from division. Fasten off. Jumper measures approx. 56-58-60-62-64-66 cm from shoulder and down.

SLEEVE:
Work sleeve in the round from mid under sleeve.
Begin in the middle of the 6-6-6-6-8-10 treble crochet under sleeve, and work 1 treble crochet in each of the 3-3-3-3-4-5 treble crochets from the middle and out, work 1 treble crochet in each of the 36-38-44-48-50-50 treble crochets that were skipped, and finish with 1 treble crochet in each of the last 3-3-3-3-4-5 treble crochet mid under sleeve = 42-44-50-54-58-60 treble crochets. Insert 1 marker thread mid under sleeve, use it when decreasing under sleeve later. Continue in the round with 1 treble crochet in every treble crochet. When piece measures 3 cm from division, decrease 2 treble crochets mid under sleeve - read DECREASE TIP. Decrease like this every 8-8-6-4½-3½-3½ cm 5-5-7-8-9-9 times in total in each side = 32-34-36-38-40-42 treble crochets. Continue until piece measures 44-45-43-42-42-41 cm, cut and fasten off. NOTE! Shorter measurements in the larger sizes because of wider neck and longer yoke. Work the other sleeve the same way.

NECK EDGE:
Work 1 round with treble crochets around the neck line on jumper, work 1 treble crochet around every chain stitch from chain stitch ring. Cut and fasten the yarn.

This pattern has been corrected.

Updated online: 27.11.2020
Correction: Diagram A.1 updated.

Diagram

symbols = 1 treble crochet in stitch below
symbols = 1 puff stitch - see explanation in text
symbols = 1 chain stitch
symbols = 1 treble crochet around chain stitch below
diagram
diagram
Do you have a question? See a list of frequently asked questions (FAQ)

Knitting tension is what determines the final measurements of your work, and is usually measured per 10 x 10 cm. It is provided like so: number of stitches in width x number of rows in height - eg: 19 stitches x 26 rows = 10 x 10 cm.

The knitting tension is very individual; some people knit/crochet loosely while others work tightly. You adjust the knitting tension with the needle size, which is why the suggested needle size is only meant as a guide! You need to adjust this (up or down) to ensure that YOUR knitting tension matches the knitting tension provided in the pattern. If you work with a different knitting tension than provided you will have a different yarn consumption, and your work will have different measurements than what the pattern suggests.

The knitting tension also determines which yarns can replace each other. As long as you achieve the same knitting tension you can replace one yarn with another.

See DROPS lesson: How to measure your tension/gauge

See DROPS video: How to make a gauge tension swatch

The required amount of yarn is provided in grams, eg: 450 g. To calculate how many balls you’ll need you first need to know how many grams are in 1 ball (25g, 50g or 100g). This information is available if you click on the individual yarn quality on our pages. Divide the amount required with the amount of each ball. For example, if each ball is 50g (the most common amount), the calculation will be as follows: 450 / 50 = 9 balls.

The important thing when changing from one yarn to another is that the knitting/crochet tension remains the same. This is so that the measurements of the finished piece will be the same as on the sketch provided. It is easier to achieve the same knitting tension using yarns from the same yarn group. It is also possible to work with multiple strands of a thinner yarn to achieve the knitting tension of a thicker one. Please try our yarn converter. We recommend you to always work a test swatch.

Please NOTE: when changing yarn the garment might have a different look and feel to the garment in the photo, due to individual properties and qualities of each yarn.

See DROPS lesson: Can I use a different yarn than the one mentioned in the pattern?

All our yarns are categorised into yarn groups (from A to F) according to thickness and knitting tension – group A contains the thinnest yarns and group F the thickest. This makes it easier for you to find alternative yarns to our patterns, should you wish to switch yarn. All yarns within the same group have a similar knitting tension and can easily replace each other. However, different yarn qualities have different structures and properties which will give the finished work a unique look and feel.

Click here for an overview of the yarns in each yarn group

At the top of all our patterns you’ll find a link to our yarn calculator, which is a helpful tool should you wish to use a different yarn than suggested. By filling in the yarn quality you wish to replace, the amount (in your size) and number of strands, the calculator will present good alternative yarns with the same knitting tension. Additionally it will tell you how much you’ll require in the new qualities and whether you’ll need to work with multiple strands. Most skeins are 50g (some are 25g or 100g).

If the pattern is worked with multiple colours, every colour will have to be calculated separately. Similarly, if the pattern is worked with several strands of different yarns (for example 1 strand Alpaca and 1 strand Kid-Silk) you will have to find alternatives for each, individually.

Click here to see our yarn calculator

Since different yarns have different qualities and textures we have chosen to keep the original yarn in our patterns. However, you can easily find options among our available qualities by using our yarn calculator, or simply pick a yarn from the same yarn group.

It is possible that some retailers still have discontinued yarns in stock, or that someone has a few skeins at home that they would like to find patterns for.

The yarn calculator will provide both alternative yarn as well as required amount in the new quality.

If you think it's hard to decide what size to make, it can be a good idea to measure a garment you own already and like the size of. Then you can pick the size by comparing those measures with the ones available in the pattern's size chart.

You'll find the size chart at the bottom of the pattern.

See DROPS lesson: How to read size chart

The needle size provided in the pattern serves only as a guide, the important thing is to follow the knitting tension. And since knitting tension is very individual, you will have to adjust the needle size to ensure that YOUR tension is the same as in the pattern – maybe you’ll have to adjust 1, or even 2 needle sizes, up or down to achieve the correct tension. For this, we recommend that you work test swatches.

Should you work with a different knitting tension than the one provided, the measurements of the finished garment might deviate from the measurement sketch.

See DROPS lesson: How to measure your tension/gauge

See DROPS video: How to make a tension/gauge swatch

Working a garment top-down provides more flexibility and room for personal adjustment. For example it is easier to try the garment on while working, as well as making adjustments to length of yoke and shoulder caps.

The instructions are carefully explaining every step, in the correct order. Diagrams are adjusted to the knitting direction and are worked as usual.

The diagram depicts all rows/rounds, and every stitch seen from the right side. It is read from bottom to top, from right to left. 1 square = 1 stitch.

When working back and forth, every other row is worked from the right side and every other row is worked from the wrong side. When working from the wrong side, the diagram will have to be worked reversed: from left to right, knit stitches are purled, purl stitches are knit etc.

When working in the round every round is worked from the right side and the diagram are worked from right to left on all rounds.

See DROPS lesson: How to read knitting diagrams

The diagram depicts all rows/rounds, and every stitch seen from the right side. It is worked from bottom to top, from right to left.

When working back and forth every other row is worked from the right side: from right to left and every other row is worked from the wrong side: from left to right.

When working in the round, every row in the diagram are worked from the right side, from right to left.

When working a circular diagram you start in the middle and work your way outwards, counter clockwise, row by row.

The rows usually start with a given number of chain stitches (equivalent to the height of the following stitch), this will either be depicted in the diagram or explained in the pattern.

See DROPS lesson: How to read crochet diagrams

Instructions for working several diagrams after each other on the same row/round, will often be written like so: “work A.1, A.2, A.3 a total of 0-0-2-3-4 times". This means you work A.1 once, then A.2 is worked once, and A.3 is repeated (in width) the number of times provided for your size – in this case like so: S = 0 times, M = 0 times, L=2 times, XL= 3 times and XXL = 4 times.

The diagrams are worked as usual: begin with the first row in A.1, then work the first row in A.2 etc.

See DROPS lesson: How to read knitting diagrams

See DROPS lesson: How to read crochet diagrams

The total width of the garment (from wrist-to-wrist) will be larger in the larger sizes, despite the actual sleeves being shorter. The larger sizes have longer sleeve caps and wider shoulders, so there will be a good fit in all sizes.

The measurement sketch/schematic drawing provides information regarding the full length of the garment. If it’s a jumper or a jacket the length is measured from the highest point on the shoulder closest to the neckline, and straight down to the bottom of the garment. It is NOT measured from the tip of shoulder. Similarly, the length of yoke is measured from the highest point on the shoulder and down to where yoke is split into body and sleeves.

On a jacket measures are never taken along bands, unless specifically stated. Always measure inside band stitches when measuring the length.

See DROPS lesson: How to read a schematic drawing

Diagrams are often repeated on the round or in height. 1 repeat is the diagram the way it appears in the pattern. If it says to work 5 repeats of A.1 in the round, then you work A.1 a total of 5 times after/next to each other in the round. If it says to work 2 repeats of A.1 vertically/in height you work the entire diagram once, then begin again at the start and work the entire diagram one more time.

Chain stitches are slightly narrower than other stitches and to avoid working the cast-on edge too tight, we simply chain more stitches to begin with. The stitch count will be adjusted on the following row to fit the pattern and measurement sketch.

The rib edge is more elastic and will contract slightly compared to, for example, stocking stitch. By increasing before the rib edge, you avoid a visible difference in width between the rib edge and the rest of the body.

It’s very easy to cast off too tightly, and by making yarn overs while casting off (and simultaneously casting these off) you avoid a too tight cast off edge.

See DROPS video: How to bind off with yarn overs (yo)

To achieve an even increase (or decrease) you can increase on, for example: every 3rd and 4th row alternately, like so: work 2 rows and increase on the 3rd row, work 3 rows and increase on the 4th. Repeat this until the increase is complete.

See DROPS lesson: Increase or decrease 1 st on every 3rd and 4th row alternately

Should you prefer to work in the round instead of back and forth, you may of course adjust the pattern. You’ll need to add steeks mid-front (usually 5 stitches), and follow the instructions. When you would normally turn and work from the wrong side, simply work across the steek and continue in the round. At the end you’ll cut the piece open, pick up stitches to work bands, and cover the cut edges.

See DROPS video: How to knit steeks and cut open

Should you prefer to work back and forth instead of in the round, you may of course adjust the pattern so you work the pieces separately and then assemble them at the end. Divide the stitches for the body in 2, add 1 edge stitch in each side (for sewing) and work the front and back pieces separately.

See DROPS lesson: Can I adapt a pattern for circular needles into straight needles?

Pattern repeats can vary slightly in the different sizes, in order to get the correct proportions. If you’re not working the exact same size as the garment in the photo, yours might deviate slightly. This has been carefully developed and adjusted so that the complete impression of the garment is the same in all sizes.

Make sure to follow instructions and diagrams for your size!

If you have found a pattern you like which is available in women’s size it’s not very difficult to convert it to men’s size. The biggest difference will be the length of sleeves and body. Start working on the women size that you think would fit across the chest. The additional length will be worked right before you cast off for the armhole/sleeve cap. If the pattern is worked top-down you can add the length right after the armhole or before the first decrease on sleeve.

Regarding additional yarn amount, this will depend on how much length you add, but it is better with a skein too many than too few.

All yarns will have excess fibres (from production) that might come off as lint or shedding. Brushed yarns (ie hairier yarns) have more of these loose, excess fibres, causing more shedding.

Shedding also depends on what is worn under or over the garment, and whether this pulls at the yarn fibres. It’s therefore not possible to guarantee that there will be no shedding

Below are some tips on how to get the best result when working with hairier yarns:

1. When the garment is finished (before you wash it) shake it vigorously so the looser hairs come off. NOTE: do NOT use a lint roller, brush or any method that pulls at the yarn.

2. Place the garment in a plastic bag and put it in your freezer - the temperature will cause the fibres to become less attached to each other, and excess fibres will come off easier.

3. Leave in the freezer for a few hours before taking it out and shaking it again.

4. Wash the garment according to the instructions on the yarn label.

Pilling is a natural process that happens to even the most exclusive of fibers. It's a natural sign of wear and tear that is hard to avoid, and that is most visible in high friction areas of your garment like a sweater's arms and cuffs.

You can make your garment look as new by removing the pilling, using a fabric comb or a pill/lint remover.

Still can't find the answer you need? Then scroll down and leave your question so one of our experts can try to help you. This will be done normally within 5 to 10 working days.
In the meantime, you can read the questions and answers that others have left to this pattern or join the DROPS Workshop on Facebook to get help from fellow knitters/crocheters!

You might also like...

Post a comment to pattern DROPS 216-17

We would love to hear what you have to say about this pattern!

If you want to leave a question, please make sure you select the correct category in the form below, to speed up the answering process. Required fields are marked *.

Comments / Questions (23)

country flag Ara wrote:

Buenos días, me quiero hacer un cardigan con esta lana, pone q es fieltrable, que tratamiento de limpieza requiera para q no se fieltre la lana al lavarla? Gracias

12.02.2024 - 09:32

DROPS Design answered:

Hola Ara, puedes leer información sobre cómo tratar esta lana es la página de DROPS Nepal, en la sección CUIDADO DE LOS HILOS: https://www.garnstudio.com/yarn.php?show=drops-nepal&cid=23. En principio lavar a mano a 30ºC o con programa delicado para lana en la lavadora si dispone de él. Quitar el agua de la prenda sin exprimirla (comprimir con una toalla o hacer un centrifugado muy suave) y dejar secar cuando ya no tenga agua, en horizontal.

18.02.2024 - 19:56

country flag Violeta Di Gennaro wrote:

Muchísimas gracias por contestar!Estoy encaminada con el tejido!!!Es un modelo sencillo, pero me cuestan algunas cuestiones. Espero luego arrancar con otros modelos. Me encantan todos. Saludos desde Argentina

15.01.2024 - 15:28

country flag Violeta Di Gennaro wrote:

Hola! Consulta. Cuando dice tejer dos puntos altos arededor de la cadena abajo, es simplemente tejer dos puntos en el punto cadena de la hilera anterorior? Me confunde la palabra "alrededor"...No se si significa otra forma de tejer el punto. Muchas gracias

13.01.2024 - 00:06

DROPS Design answered:

Hola Violeta, no se trabaja dentro del punto de cadeneta, sino que cogiendo ambos bucles de la cadeneta; esto hace que parezca que trabajas alrededor de la cadeneta. Puedes ver el siguiente video para más información: https://www.garnstudio.com/video.php?id=690&lang=es

14.01.2024 - 19:39

country flag Gunna Mineka wrote:

Jeg skal til at hækle de sidste 2 rækker fra diagrammet 4 gange til. Den sidste række I diagrammet afviger meget fra resten. Kan ikke se hvordan jeg skulle kunne hækle næstsidste række over den og få pufmasken det rigtige sted, da udtagningen i sidste række sidder et andet sted end i de andre rækker hvor den sidder i luftmasken over pufmasken. Umiddelbart vil jeg sige at der er en fejl i sidste række I diagrammet???

19.09.2023 - 16:50

DROPS Design answered:

Hei Gunna. Vi skal hjelpe deg så godt vi kan, men hvilken str. hekler du etter og hva er maskeantallet ditt når A.1 er heklet 1 gang i høyden? mvh DROPS Design

09.10.2023 - 13:02

country flag Julia Nicolaisen wrote:

Hei! Jeg har kommet til bol. Heklet et par tre rader og har prøvd genser på. Den er for trang under armene, altså for små åpningene for mine armer. Hva bør jeg gjøre for å få armhulene litt mer vid? Mvh, Julia

13.07.2022 - 21:31

DROPS Design answered:

Hej Julia, du kan hækle et par rækker mere hvor du tager ud. Og du kan hækle flere luftmasker under hvert ærme. God fornøjelse!

02.08.2022 - 14:22

country flag Sharon wrote:

In size Large, American English version, Yoke section, instructions say: "On last round increase 2 double crochets evenly = 212 double crochets." Does this mean to place one increase on each side of yoke where each underarm will be? Thanks!

13.02.2022 - 17:27

DROPS Design answered:

Dear Sharon, when you increase evenly, you may increase in any place along the row, as long as they are not increased close by; the location is not completely relevant. Happy crocheting!

13.02.2022 - 19:39

country flag Maria wrote:

Do the double symbols on alternate rows indicate an increase stitch. If so, I end up with seven treble crochets before each puff stitch in row five and not six as shown in the diagram. Is this correct?

05.01.2022 - 12:54

DROPS Design answered:

Dear Maria, correct, at the end of 2nd row in A.1 you work 2 treble crochets in the last stitch, at the end of 4th row, you finish with 2 treble crochets around the chain stitch. On row 5, crochet *1 treble in each of the first 6, skip 1 stitch and crochet the puff stitch in the next treble, 1 chain*, repeat from *-*. And continue that way on every row with a puff stitch, ie first skip the first of both treble crochets on previous round, then crochet 1 puff stitch in the 2nd of these both treble crochets. Happy crocheting!

05.01.2022 - 17:19

country flag Anna Nowak wrote:

Podzieliłam robótke na przód/plecy i rękawy w ktorym momencie dodać pierwszy raz słupki?

11.10.2021 - 20:04

DROPS Design answered:

Witaj Aniu, gdy długość tyłu i przodu od podziału robótki wynosi 8 cm, dodać 2 oczka/słupki z każdej strony - patrz DODAWANIE OCZEK (boki swetra). Dodawać tak samo w sumie 3 razy z każdej strony co 9 cm. Pozdrawiamy!

11.10.2021 - 21:14

country flag Anna Nowak wrote:

Chciałam zapytać schemat A1 robimy ma okrągło? Bufki mają być też na plecach?

27.09.2021 - 09:16

DROPS Design answered:

Witaj Aniu, w tym wzorze karczek jest taki sam na przodzie i tyle, bufki znajdują się również na tyle. Pozdrawiamy!

27.09.2021 - 10:00

country flag Sandra wrote:

Bonjour, Je ne comprends pas la phrase entre parenthèses après les rangs A1 : on aura 1 bride de plus avant chaque augmentation , à chaque fois que l'on crochète ces tours. Est-ce qu'on fait une augmentation en plus de la double bride prévue au rang d'augmentation ? Merci pour votre réponse

31.08.2021 - 11:29

DROPS Design answered:

Bonjour Sandra, lorsque vous répétez les 2 derniers tours de A.1, continuez comme avant, autrement dit, continuez à augmenter comme vous le faisiez dans le diagramme. Bon crochet!

31.08.2021 - 12:02