
Popular categories
Looking for a yarn?


Comments / Questions (10)
![]() Judith Brink wrote:
Judith Brink wrote:
Hi, I don't understand what "Yarn over and stitch knitted together" means (in diagram explanations). I can't find a video for it. Are there holes created in the pattern? In the picture it does not look like there are holes. Please help. Thank you. Regards Judith
02.08.2024 - 21:04DROPS Design answered:
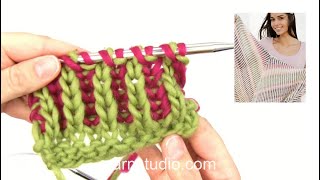
Dear Judith, no, there are no holes in the pattern, but the yarn over and the stitch knitted together as in a Fisherman's/English rib. See our tutorial about how to knit th eenglsih rib (with two colors) HERE. Happy Knitting!
04.08.2024 - 18:36
![]() Pierangels wrote:
Pierangels wrote:
Scusate la domanda, è da poco che utilizzo i ferri circolari... Per fare le maniche consigliate l'utilizzo di ferri a doppia punta. Ci sarebbero problemi se utilizzassi i ferri circolari? Grazie
26.01.2023 - 15:36DROPS Design answered:
Buonasera Pierangela, per le maniche può utilizzare i minicircolari o i circolari con cavo da 80 cm e la tecnica del magic loop. Buon lavoro!
28.01.2023 - 23:05
![]() Francoise Riviere wrote:
Francoise Riviere wrote:
Bonjour, au debut de l'empiecement avant les rayures, on fait des augmentations puis au rand suivant sur l'envers tricoter les mailles comme elles se presentent. Et pour les jetés on doit les tricoter torses envers ou endroit ? Merci
09.09.2021 - 15:35DROPS Design answered:
Bonjour Mme Rivière, au rang suivant, vous tricotez les mailles comme elles se présentent, les jetés vont se tricoter torse à l'endroit, car vous avez augmenté dans les sections jersey envers (= tricotées à l'endroit sur l'envers). Bon tricot!
09.09.2021 - 17:19
![]() Riviere Francoise wrote:
Riviere Francoise wrote:
Bonjour, ma taille à la poitrine fait 46 cm, hors la mesure M est 44 et L 49. Quelle solution ai-je pour l'adapter. Pour la longeur et le tour bassin c'est plutot la taille entre S qui me correspond. J'ai tres souvent ce probleme pour tous les modeles. Merci de me conseiller
07.09.2021 - 08:52DROPS Design answered:
Bonjour Mme Rivière, mesurez un vêtement similaire que vous aimez et dont vous aimez la taille pour pouvoir trouver la taille idéale, autrement dit, si vous le voulez plus ajusté, choisissez la taille plus serrée (M ici par ex) ou bien choisissez la taille L pour un vêtement légèrement plus ample. Retrouvez ici d'autres infos sur les schémas. Votre magasin saura vous aider de façon plus personnalisée - même par mail ou téléphone, n'hésitez pas à lui demander conseil. Bon tricot!
07.09.2021 - 09:10
![]() Ulrike Cichy wrote:
Ulrike Cichy wrote:
Hallo, ich bin diese Jacke gerade am stricken in XL ! Ich habe zwischen Blende und Raglanlinie jeweils 61 Ma , Ärmel 93, Rücken, 121 Was mache ich bei der Abteilung von Rumpf und Ärmel mit den Raglanlinien ?? LG Ulrike
05.03.2021 - 21:00DROPS Design answered:
Liebe Frau Cichy, bei einer Rückreihe in Delight sollen Sie die Maschen so für Rumpfteil/Ärmel verteilen: 1 M kraus rechts, A.1a wie zuvor stricken, die nächste 61 M stricken (= Vorderteil), die nächsten 93 M stilllegen (= Ärmel), 7 Maschen unter den Arm anschlagen, die nächsten 121 M stricken (=Rückenteil), die nächsten 93 M stilllegen (=Ärmel), 7 Maschen unter den Arm anschlagen und die letzten Maschen wie zuvor stricken (= 61 M, A.1a und 1 M krausrechts). Diese Lektion zeigt ab Bild 9, wie man die Arbeit (Topdown stricken) verteilt. Viel Spaß beim stricken!
08.03.2021 - 07:22
![]() Heike Mitteregger wrote:
Heike Mitteregger wrote:
Liebes Drops-Team! Mir gefällt diese Stricktechnik (in einem Stück, ohne Naht) und die farblich absetzten Ränder und Raglanzunahmen. Kann ich diese Anleitung (in entsprechend großer Größe) auch für eine Herrenjacke nehmen? Oder unterscheidet sich ein Damenschnitt sehr von einem Herrenschnitt? Danke für eure tollen Anleitungen. Hab dadurch nach 40 Jahren wieder mit dem Stricken anfangen können!! Schöne Grüße aus Bayern, Heike
31.07.2020 - 09:31DROPS Design answered:
Liebe Heike, hier finden Sie einige Tipps um eine Anleitung in eine Herregröße umzurechnen. Gerne wird Ihnen Ihr DROPS auch telefonisch oder per Mail weiterhelfen. Viel Spaß beim stricken!
31.07.2020 - 11:18
![]() Jenny wrote:
Jenny wrote:
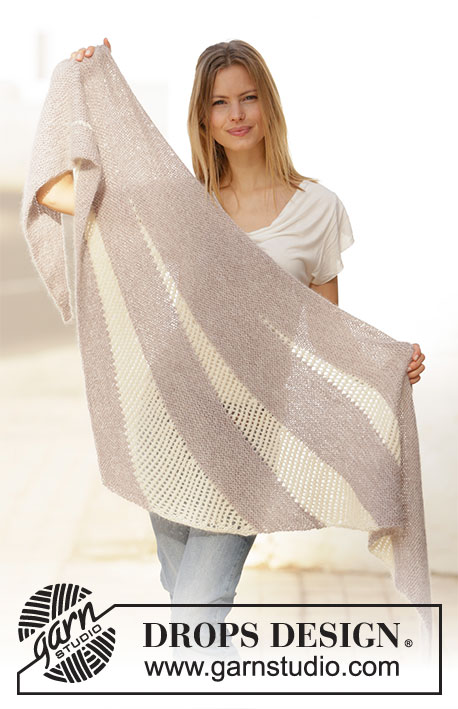
Jättesnygg och roligt med ränder på både längden och höjden. 😊 Men det står överst i beskrivningen att alla varv stickas räta, sen när man läser längre ner verkar det som att den stickas i slätstickning, men med den släta sidan in. Vilket är det?
12.07.2020 - 17:32
![]() Bente wrote:
Bente wrote:
Kan jeg strikke denne i dobbel Baby Merino?
12.06.2020 - 17:12DROPS Design answered:
Hei Bente. Nei, ikke med dobbelt tråd. Men du kan strikke den med 1 tråd Baby Merino. Du vil ikke få den farge sjateringen Delight gir, men strikker du med 2 forskjellige farger i Baby Merino, vil du få en 2-stripete jakke som helt sikkert blir like flott. God Fornøyelse!
15.06.2020 - 10:45
![]() Anne- Christine wrote:
Anne- Christine wrote:
Bonjour, Pour les rayures, est-ce du jersey envers ? Je ne comprends pas très bien. Merci.
12.03.2020 - 15:45DROPS Design answered:
Bonjour Anne-Christine, tout à fait, mais on va tricoter 2 rangs sur l'endroit (1 de chaque couleur) puis 2 rangs sur l'envers (1 de chaque couleur), autrement dit 1 rang env sur l'end en Alpaca, 1 rang env sur l'end en Delight, 1 rang end sur l'env en Alpaca, 1 rang end sur l'env en Deligth (pour les manches, ça sera tout simplement 1 tour de chaque car elles se tricotent en rond). Bon tricot!
13.03.2020 - 08:02
![]() Julie wrote:
Julie wrote:
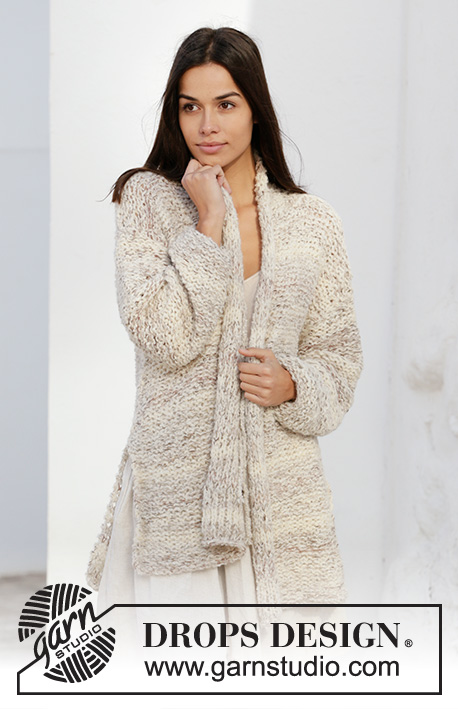
Love the detail at the sleeves
22.02.2020 - 15:17
|
|||||||||||||||||||||||||||||||||||||
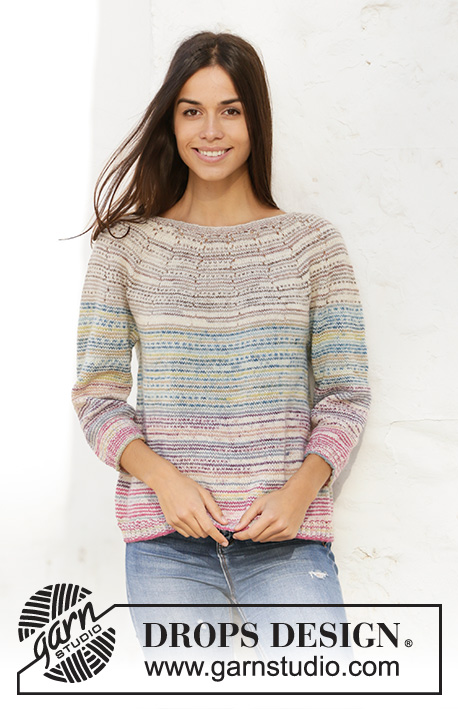
Sand Tickles Jacket#sandticklesjacket |
|||||||||||||||||||||||||||||||||||||
 |
 |
||||||||||||||||||||||||||||||||||||
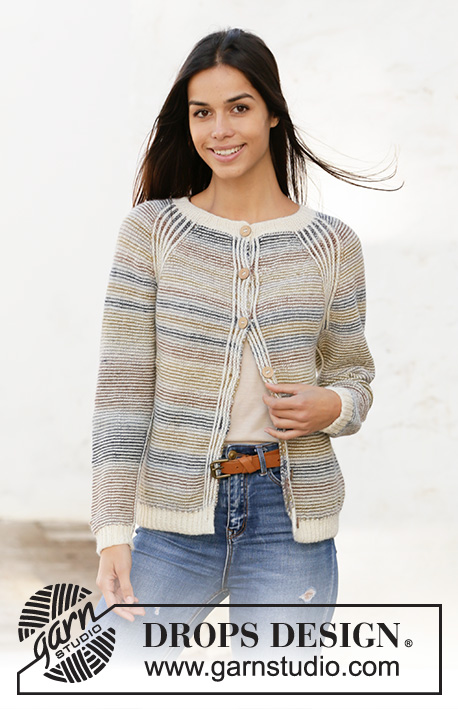
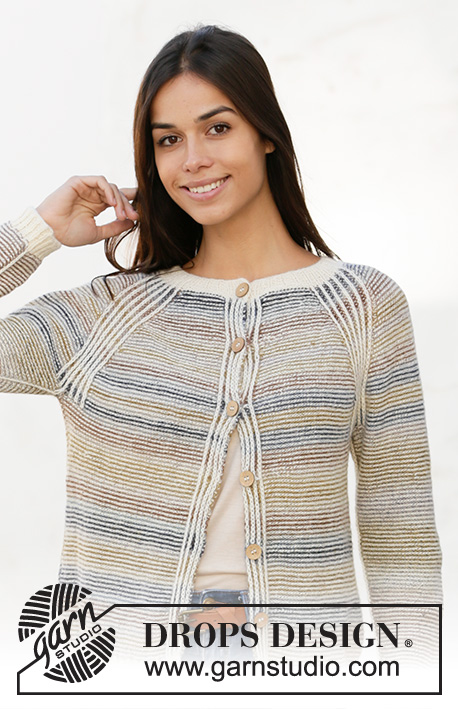
Knitted jacket with raglan in DROPS Delight and DROPS Alpaca. The piece is worked top down with stripes and English rib. Sizes S - XXXL.
DROPS 210-24 |
|||||||||||||||||||||||||||||||||||||
|
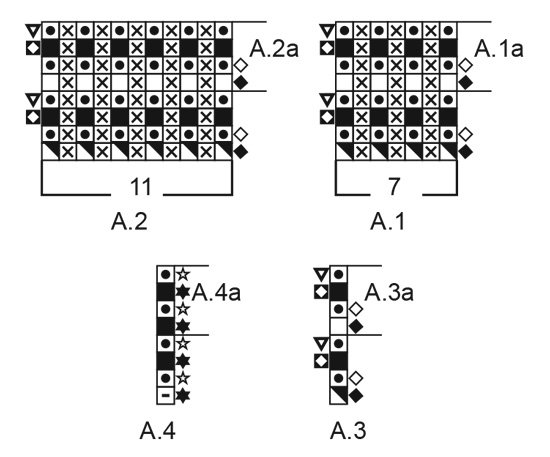
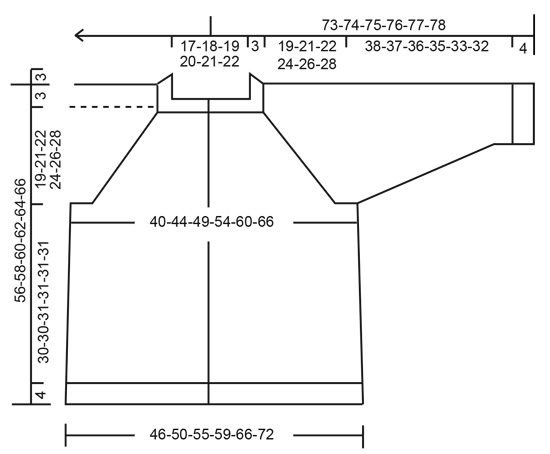
------------------------------------------------------- EXPLANATIONS FOR THE PATTERN: ------------------------------------------------------- RIDGE/GARTER STITCH (worked back and forth): Knit all rows. 1 ridge in height = Knit 2 rows. PATTERN: See diagrams A.1 to A.4. Diagram A.1 is worked on the band stitches, A.2 on the raglan-line, A.3 on the sides of the body and A.4 mid under the sleeves. The diagrams show all rows in the pattern seen from the right side. STRIPES (back and forth): The raglan-lines and bands are worked in English rib according to diagrams A.1 to A.4. The other stitches are purled from the right side and knitted from the wrong side. To get the 2-coloured effect, work stripes with alternately 1 row of Alpaca and 1 row of Delight as follows: * Work 1 row from the right side with Alpaca, push the stitches back on the circular needle so the next row is also worked from the right side. Then work 1 row from the right side with Delight. Work 1 row from the wrong side with Alpaca, push the stitches back on the circular needle so the next row is also worked from the wrong side. Then work 1 row from the wrong side with Delight *, work from *-*. When working in the round on the sleeves, work * 1 round with Delight then 1 round with Alpaca *, work from *-*. INCREASE TIP-1 (for raglan-increases): Increase on each row worked with Alpaca; i.e. every 2nd row. Increase both from the right and wrong side. Increase by making 1 yarn over on each side of A.2 (= 8 stitches increased). The yarn overs are worked twisted on the next row. The new stitches are purled from the right side and knitted from the wrong side. INCREASE TIP-2 (for sides of body): All increases are worked on a row worked with Alpaca from the right side. Work until there is 1 stitch left before A.3, make 1 yarn over, purl 1, A,3, purl 1, make 1 yarn over (= a total of 4 stitches increased), On the next row work the yarn overs twisted to avoid holes. The new stitches are purled from the right side and knitted from the wrong side. DECREASE TIP (for sleeves): Decrease 1 stitch on each side A.4 as follows: Work until there are 3 stitches left before A.4, knit 2 together, knit 1, A.4, knit 1, slip 1 stitch as if to knit, knit 1 and pass the slipped stitch over the knitted stitch. CASTING-OFF TIP: To avoid the cast-off edge being tight you can cast off with a larger size needle. If the edge is still tight, make 1 yarn over after approx. each 4th stitch at the same time as casting off and the yarn overs are cast off as normal stitches. BUTTONHOLES: Work buttonholes on the right band (when the garment is worn). Work from the right side when there are 5 stitches left on the row as follows: Make 1 yarn over, knit 2 together and knit the last stitches. The first buttonhole is worked when the rib on the neck measures 1½-2 cm. Then work the other 6-6-6-7-7-7 buttonholes with approx. 8½-9-9-8-8½-8½ cm between each one. ------------------------------------------------------- START THE PIECE HERE: ------------------------------------------------------- JACKET – SHORT OVERVIEW OF THE PIECE: The neck and yoke are worked back and forth with circular needle from mid front and top down. The yoke is divided for body and sleeves and the body continued back and forth. The sleeves are worked in the round with double pointed needles, top down. NECK: Cast on 118-133-139-145-151-157 stitches (including 8 band stitches on each side towards mid front) with circular needle size 2.5 mm and Alpaca. Purl 1 row (= wrong side). The next row is worked from the right side as follows: Left front piece: Work 1 stitch GARTER STITCH – read description above, * knit 1, purl 1 *, work from *-* over 6 stitches, knit 1 (= band), * purl 2, knit 1 *, work from *-* over 9-12-12-15-15-18 stitches, purl 2. Raglan-line: * Knit 1, purl 1 *, work from *-* over 10 stitches, knit 1. Sleeve: * Purl 2, knit 1 *, work from *-* over 6-6-9-6-9-6 stitches, purl 2. Raglan-line: * knit 1, purl 1 *, work from *-* over 10 stitches, knit 1. Back piece: * Purl 2. knit 1 *, work from *-* over 18-27-27-33-33-39 stitches, purl 2. Raglan-line: * Knit 1, purl 1 *, work from *-* over 10 stitches, knit 1. Sleeve: * Purl 2, knit 1 *, work from *-* over 6-6-9-6-9-6 stitches, purl 2. Raglan-line: * Knit 1, purl 1 *, work from *-* over 10 stitches, knit 1. Right front piece: Purl 2, * knit 1, purl 2 *, work from *-* over 9-12-12-15-15-18 stitches, * knit 1, purl 1 *, work from *-* over 6 stitches, knit 1 and 1 stitch in garter stitch. Work BUTTONHOLE – read description above! Continue like this for 3 cm. Change to circular needle size 3 mm. Insert 1 marker after the band, on the row mid front; the yoke is measured from this marker! YOKE: On the next row from the right side work and increase evenly spaced as follows: Left front piece: Work 1 stitch in garter stitch, A.1 (= 7 stitches = band), purl 11-14-14-17-17-20 and increase 1-1-2-2-3-3 stitches. Sleeve: Work A.2 (= 11 stitches = raglan-line), purl 8-8-11-8-11-8 and increase 2 stitches, A.2 over 11 stitches (= raglan-line). Back piece: Purl 20-29-29-35-35-41 and increase 2-2-4-4-6-6 stitches. Sleeve: Work A.2 over 11 stitches (= raglan-line), purl 8-8-11-8-11-8 and increase 2 stitches, A.2 over 11 stitches (= raglan-line). Right front piece: Purl 11-14-14-17-17-20 and increase 1-1-2-2-3-3 stitches, A.1 over 7 stitches and 1 stitch in garter stitch. = 126-141-151-157-167-173 stitches. Work 1 row from the wrong side with knit over knit, purl over purl and garter stitch over garter stitch. Now continue with STRIPES – read description above. REMEMBER THE KNITTING TENSION! On row 3 in A.2 start to increase to raglan as follows: Increase 1 stitch on each side of all A.2-sections every 2nd row a total of 26-28-32-36-40-44 times – read INCREASE TIP-1 = 334-365-407-445-487-525 stitches. When A.1 and A.2 have been worked 1 time in height, repeat A.1a and A.2a in height. When the piece measures 19-21-22-24-26-28 cm from the marker, adjust so the next row is worked with Delight from the wrong side, divide the piece for body and sleeves as follows: Work 1 stitch in garter stitch, A.1a as before, knit 45-50-55-61-68-76, place the next 69-75-85-93-99-103 stitches on a thread for sleeve and cast on 7 stitches under the sleeve, knit 90-99-111-121-137-151, place the next 69-75-85-93-99-103 stitches on a thread for sleeve and cast on 7 stitches under the sleeve, knit 45-50-55-61-68-76, work A.1a as before and work 1 stitch in garter stitch. BODY: = 210-229-251-273-303-333 stitches. Continue with stripes, purl from the right side, knit from the wrong side and English rib as follows: The next row is worked from the right side and with Alpaca: Work 1 stitch in garter stitch, A.1a as before, purl 48-53-58-64-71-79, A.3 (1 stitch = mid under sleeve), purl 96-105-117-127-143-157, A.3 over the next stitch (= mid under sleeve), purl 48-53-58-64-71-79, A.1a as before and 1 stitch in garter stitch. When A.3 has been worked 1 time in height, repeat A.3a in height. When the piece measures 5 cm from the division increase 1 stitch on each side of each A.3 – read INCREASE TIP-2. Increase like this every 3 cm a total of 7 times = 238-257-279-301-331-361 stitches. When the piece measures 30-30-31-31-31-31 cm from where the body was divided from the sleeves, adjust so the next row is worked with Delight from the wrong side, increase evenly as follows: Work 1 stitch in garter stitch, A.1a as before, knit 55-60-65-71-78-86 and increase 1-2-0-0-2-0 stitches, A.3a as before, knit 110-119-131-141-157-171 and increase 0-0-0-2-1-2 stitches, A.3a as before, knit 55-60-65-71-78-86 stitches and increase 1-2-0-0-2-0 stitches, A.1a as before and finish with 1 stitch in garter stitch = 240-261-279-303-336-363 stitches. Change to circular needle 2.5 mm and finish the piece with Alpaca as follows: Work 1 stitch in garter stitch, * knit 1, purl 1 *, work from *-* over 6 stitches, knit 1, * purl 2, knit 1 *, work from *-* until there are 10 stitches left, purl 2, * knit 1, purl 1 *, work from *-* over 6 stitches, knit 1 and finish with 1 stitch in garter stitch. (i.e. A.3a is knitted onwards). Work this rib for 4 cm. Cast off with knit from the right side – read CASTING-OFF TIP. SLEEVE: Place the 69-75-85-93-99-103 stitches from the thread on the one side of the piece on double pointed needles size 3 mm and knit up 1 stitch in each of the 7 stitches cast on under the sleeve = 76-82-92-100-106-110 stitches. Turn the piece so you are knitting from the wrong side and work in the round. Work A.4 over the mid-stitch mid under sleeve; the remaining stitches are knitted from the wrong side in stripes. When A.4 has been worked 1 time in height, repeat A.4a in height. When the piece measures 3 cm, decrease 1 stitch on each side of A.4a – read DECREASE TIP! Decrease like this every 2½-2½-1½-1½-1-1 cm a total of 12-13-17-20-22-23 times = 52-56-58-60-62-64 stitches. When the piece measures 38-37-36-35-33-32 cm from the division change to double pointed needles size 2.5 mm and knit 1 round where you increase 2-1-2-0-1-2 stitches = 54-57-60-60-63-66 stitches. Now finish the sleeve with Alpaca. Work rib in the round (= knit 2 / purl 1), adjust so the English rib stitch mid under sleeve is purled (still working from the wrong side). Cast off with purl from the wrong side when the rib measures 4 cm. Work the other sleeve in the same way. ASSEMBLY: Sew buttons onto the left band. |
|||||||||||||||||||||||||||||||||||||
Diagram explanations |
|||||||||||||||||||||||||||||||||||||
|
|||||||||||||||||||||||||||||||||||||
|
|||||||||||||||||||||||||||||||||||||
|
|||||||||||||||||||||||||||||||||||||
Have you finished this pattern?Tag your pictures with #dropspattern #sandticklesjacket or submit them to the #dropsfan gallery. Do you need help with this pattern?You'll find 23 tutorial videos, a Comments/Questions area and more by visiting the pattern on garnstudio.com. © 1982-2025 DROPS Design A/S. We reserve all rights. This document, including all its sub-sections, has copyrights. Read more about what you can do with our patterns at the bottom of each pattern on our site. |
|||||||||||||||||||||||||||||||||||||


With over 40 years in knitting and crochet design, DROPS Design offers one of the most extensive collections of free patterns on the internet - translated to 17 languages. As of today we count 314 catalogues and 11822 patterns translated into English (UK/cm). 11822
We work hard to bring you the best knitting and crochet have to offer, inspiration and advice as well as great quality yarns at incredible prices! Would you like to use our patterns for other than personal use? You can read what you are allowed to do in the Copyright text at the bottom of all our patterns. Happy crafting!
Post a comment to pattern DROPS 210-24
We would love to hear what you have to say about this pattern!
If you want to leave a question, please make sure you select the correct category in the form below, to speed up the answering process. Required fields are marked *.