
Popular categories
Looking for a yarn?


|
||||||||||
Idun |
||||||||||
 |
 |
|||||||||
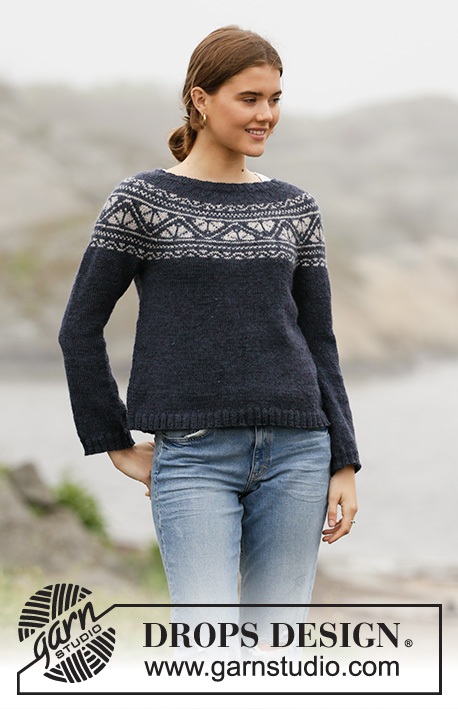
Knitted sweater in DROPS Karisma. The piece is worked top down with round yoke and Nordic pattern on the yoke. Sizes S - XXXL.
DROPS 206-4 |
||||||||||
|
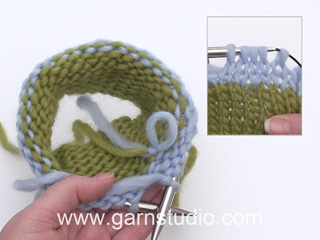
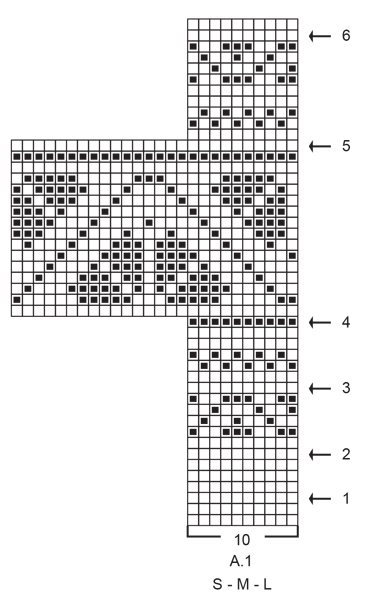
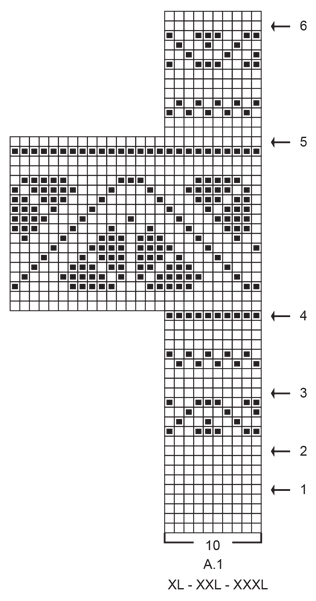
------------------------------------------------------- EXPLANATIONS FOR THE PATTERN: ------------------------------------------------------- INCREASE TIP-1 (evenly spaced): To work out how to increase evenly, count the total number of stitches on the needle (e.g. 92 stitches) and divide by the number of increases to be made (e.g. 30) = 3.1. In this example, increase by making 1 yarn over after each 3rd stitch (approx.). On the next round knit the yarn overs twisted to avoid holes. ELEVATION (back of neck): To make the sweater slightly higher at the back of the neck, you can work an elevation as described here. Skip this section if you do not want an elevation. Insert 1 marker at the beginning of the round = mid back. Start from the right side with petrol cerise and knit 13-14-15-15-16-17 stitches, turn, tighten strand and purl 26-28-30-30-32-34 stitches back. Turn, tighten strand and knit 39-42-45-45-48-51 stitches, turn, tighten strand and purl 52-56-60-60-64-68 stitches back. Turn, tighten strand and knit 65-70-75-75-80-85 stitches, turn, tighten strand and purl 78-84-90-90-96-102 stitches, turn, tighten the strand and knit to mid back. Then work YOKE as described in the text. PATTERN: See diagram A.1. Choose diagram for your size. The whole pattern is worked in stockinette stitch. KNITTING TIP: To avoid the knitting gauge becoming tighter when working pattern, it is important that the strands at the back are not tight. You can use a larger size needle when working pattern if this is a problem. INCREASE TIP-2 (for sides of body and mid under sleeves): Work until there are 2 stitches left before the marker thread, make 1 yarn over, knit 4 (marker thread sits in the middle of these 4 stitches), make 1 yarn over (= 2 stitches increased at the marker thread). On the next round knit the yarn overs twisted to avoid holes. Then work the new stitches in stockinette stitch. DECREASE TIP (for mid under sleeves): Work until there are 3 stitches left before the marker thread, knit 2 together, knit 2 (marker thread sits between these 2 stitches), slip 1 stitch as if to knit, knit 1 and pass the slipped stitch over the knitted stitch (= 2 stitches decreased). BINDING OFF TIP: To avoid the bind-off edge being tight you can bind off with a larger size needle or make 1 yarn over after approx. each 8th stitch at the same time as binding off (yarn overs bind off as normal stitches). ------------------------------------------------------- START THE PIECE HERE: ------------------------------------------------------- SWEATER – SHORT OVERVIEW OF THE PIECE: The neck and yoke are worked in the round with circular needle, top down. Then the yoke is divided for body and sleeves and the body continued in the round with circular needle. The sleeves are worked in the round with short circular needle/double pointed needles, top down. NECK: Cast on 92-96-100-104-108-112 stitches with short circular needle size 3.5 mm = US 4 and petrol cerise. Knit 1 round then work rib in the round (= knit 2 / purl 2) for 3 cm = 1⅛". Knit 1 round where you increase 30-32-34-34-36-38 stitches evenly spaced – read INCREASE TIP-1 = 122-128-134-138-144-150 stitches. Insert 1 marker in the middle of the round (= mid front) – the yoke is measured from this marker. Change to circular needle size 4.5 mm = US 7 and knit 1 round (yarn overs knitted twisted). You can now work an ELEVATION in the back of the neck – read description above. If you do not want an elevation go straight to YOKE. YOKE: Work A.1 in the round (the number of stitches does not fit to begin with as each repeat has 10 stitches, but this does not matter as the first rounds are one-colored). Continue the pattern. Read KNITTING TIP and REMEMBER THE KNITTING GAUGE! AT THE SAME TIME on each round marked with an arrow in A.1, increase stitches evenly spaced as described below – remember INCREASE TIP-1: Arrow-1: Increase 40-44-46-46-48-56 stitches evenly spaced = 162-172-180-184-192-206 stitches. Arrow-2: Increase 28-28-30-36-38-44 stitches evenly spaced = 190-200-210-220-230-250 stitches (there is now room for 19-20-21-22-23-25 repeats of A.1 with 10 stitches). Arrow-3: Increase 22-30-40-48-54-58 stitches evenly spaced = 212-230-250-268-284-308 stitches. Arrow-4: Increase 22-30-36-44-54-56 stitches evenly spaced = 234-260-286-312-338-364 stitches (there is now room for 9-10-11-12-13-14 repeats of A.1 with 26 stitches). Arrow-5: Increase 16-20-24-28-22-26 stitches evenly spaced = 250-280-310-340-360-390 stitches (there is now room for 25-28-31-34-36-39 repeats of A.1 with 10 stitches). Arrow-6: Increase 12-14-8-6-10-12 stitches evenly spaced = 262-294-318-346-370-402 stitches. When A.1 has been completed the piece measures approx. 18-18-18-21-21-21 cm 0 7"-7"-7"-8¼"-8¼"-8¼" from the marker on the neck. Continue with stockinette stitch and petrol cerise until the piece measures 19-21-23-25-27-29 cm = 7½"-8¼"-9"-9¾"-10⅝"-11⅜" from the marker on the neck. Now divide the yoke for body and sleeves by working the next round as follows: Work 38-42-45-50-55-61 stitches in stockinette stitch (= ½ back piece), place the next 54-62-68-72-74-78 stitches on 1 thread for sleeve, cast on 6-6-8-8-10-10 new stitches on the needle (= in side under sleeve), work 77-85-91-101-111-123 stitches in stockinette stitch (= front piece), place the next 54-62-68-72-74-78 stitches on 1 thread for sleeve, cast on 6-6-8-8-10-10 new stitches on the needle (= in side under sleeve) and work the remaining 39-43-46-51-56-62 stitches in stockinette stitch (= ½ back piece). Body and sleeves are finished separately. THE PIECE IS NOW MEASURED FROM HERE! BODY: = 166-182-198-218-242-266 stitches. Insert 1 marker thread on each side of the body in the middle of the 6-6-8-8-10-10 stitches cast on under each sleeve. Allow the threads to follow your work onwards; they are used when increasing in the sides. Start the round at one of the marker threads and work stockinette stitch in the round with petrol cerise. When the piece measures 6 cm = 2⅜" from the division in all sizes increase 1 stitch on each side of both marker threads – read INCREASE TIP-2 (= 4 stitches increased). Increase like this every 6th round a total of 4 times in each side = 182-198-214-234-258-282 stitches. Continue working until the piece measures 29 cm = 11⅜" from the division in all sizes (there is approx. 3 cm = 1⅛" left to finished length; you can try the sweater on and continue working to desired length). Knit 1 round where you increase 50-54-58-66-70-78 stitches evenly spaced = 232-252-272-300-328-360 stitches. This is done to avoid the rib being tight. Change to circular needle size 3.5 mm = US 4 and work rib (= knit 2 / purl 2) for 3 cm = 1⅛". Bind off with knit over knit and purl over purl – read BINDING OFF TIP! The sweater measures approx. 54-56-58-60-62-64 cm = 21¼"-22"-22¾"-23⅝"-24⅜"-25¼" from the shoulder down. SLEEVE: Place the 54-62-68-72-74-78 stitches from the thread on the one side of the piece on double pointed needles/short circular needle size 4.5 mm = US 7 and knit up 1 stitch in each of the 6-6-8-8-10-10 stitches cast on under the sleeve = 60-68-76-80-84-88 stitches. Insert 1 marker thread in the middle of the 6-6-8-8-10-10 stitches under the sleeve and allow the thread to follow your work onwards; it will be used when decreasing mid under sleeve. Start the round at the marker thread and work stockinette stitch in the round with petrol cerise. When the sleeve measures 3-3-3-2-2-2 cm = 1⅛"-1⅛"-1⅛"-¾"-¾"-¾" from the division decrease 2 stitches mid under sleeve – read DECREASE TIP. Decrease like this every 4-1½-1-1-1-1 cm = 1½"-½"-⅜"-⅜"-⅜"-⅜" a total of 3-7-10-11-11-13 times = 54-54-56-58-62-62 stitches. When the sleeve measures 15-15-16-16-16-17 cm = 6"-6"-6¼"-6¼"-6¼"-6¾" from the division increase 2 stitches mid under sleeve – read INCREASE TIP-2. Increase like this every 4-4-3-3-2-2 cm = 1½"-1½"-1⅛"-1⅛"-¾"-¾" a total of 3 times = 60-60-62-64-68-68 stitches. Continue working until the sleeve measures 39-38-36-35-33-32 cm = 15¼"-15"-14¼"-13¾"-13"-12½" from the division (there is approx. 3 cm = 1⅛" left to finished length; you can try the sweater on and continue working to desired length). Knit 1 round where you increase 16-16-18-20-20-20 stitches evenly spaced = 76-76-80-84-88-88 stitches. Change to double pointed needles size 3.5 mm = US 4 and work rib (= knit 2 / purl 2) for 3 cm = 1⅛". Bind off loosely with knit over knit and purl over purl – remember BINDING OFF TIP! The sleeve measures approx. 42-41-39-38-36-35 cm = 16½"-16⅛"-15¼"-15"-14¼"-13¾" from the division. Work the other sleeve in the same way. |
||||||||||
Diagram explanations |
||||||||||
|
||||||||||
|
||||||||||
|
||||||||||

|
||||||||||
|
Have you made this or any other of our designs? Tag your pictures in social media with #dropsdesign so we can see them! Do you need help with this pattern?You'll find tutorial videos, a Comments/Questions area and more by visiting the pattern on garnstudio.com. © 1982-2024 DROPS Design A/S. We reserve all rights. This document, including all its sub-sections, has copyrights. Read more about what you can do with our patterns at the bottom of each pattern on our site. |
||||||||||


With over 40 years in knitting and crochet design, DROPS Design offers one of the most extensive collections of free patterns on the internet - translated to 17 languages. As of today we count 304 catalogs and 11422 patterns - 11417 of which are translated into English (US/in).
We work hard to bring you the best knitting and crochet have to offer, inspiration and advice as well as great quality yarns at incredible prices! Would you like to use our patterns for other than personal use? You can read what you are allowed to do in the Copyright text at the bottom of all our patterns. Happy crafting!
Comments / Questions (41)
Afin que les côtes du bas du pull ne se retournent pas, j'ai finalement totalement renoncé aux augmentations prévues par le modèle juste avant les côtes. Après avoir testé avec un nombre inférieur d'augmentations, par rapport aux indications du modèle, le résultat n'étant toujours pas satisfaisant, je les ai donc totalement supprimées.
01.01.2020 - 19:16Bonjour je souhaite tricoter ce modèle en coloris N°75pouvez vous m'indiquer un fournisseur chez qui ce coloris est disponible Merci
15.12.2019 - 22:48DROPS Design answered:
Bonjour Nathalie, nous ne connaissons pas les disponibilités de chaque magasin, merci de bien vouloir les contacter directement, même par mail ou téléphone. Bon tricot!
16.12.2019 - 09:07Bonjour. Souci avec ce modèle Idun : Côtes du bas du pull, tricotées avec une aig. 3,5, et selon explications, bord pas trop serré, sans jeté, ne restent pas plates mais se retournent et s'enroulent sur le beau côté du pull. Que faire ? Changer la grosseur de l'aiguille, serrer plus le bord ? Cadeau de Noël, merci de votre réponse rapide. Salutations
09.12.2019 - 11:36DROPS Design answered:
Bonjour Mme Mösching Garin, vous pouvez bloquer le pull, autrement dit l'humidifier (avec un "pshitt" à plantes par ex) - épinglez-le si besoin, et laissez sécher, le bord de devrait plus rouler. Votre magasin DROPS aura peut-être d'autres astuces pour vous, n'hésitez pas à lui demander conseil, même par mail ou téléphone. Bon tricot!
09.12.2019 - 12:06Soy una entusiasta de vuestras lanas, acabo de descubrir este canal y me encanta.Felicidades!!!
13.11.2019 - 11:33Goedemorgen, Voorheen waren er vertaallijsten beschikbaar van de ene taal naar de andere. Waar zijn die gebleven ?
28.10.2019 - 11:07DROPS Design answered:
Dag Afra,
Er zijn bij mijn weten geen vertaallijsten, maar je kunt wel bijvoorbeeld onder de afbeelding bij ieder patroon een andere taal kiezen en dit kan ook op andere pagina's, bijvoorbeeld bij de video's.
30.10.2019 - 11:09Waar zijn de vertaallijsten gebleven ? Die zijn zo handig !
26.10.2019 - 12:54DROPS Design answered:
Dag Afra,
Wat bedoel je met de vertaallijsten? We hebben wel een woordenboek
27.10.2019 - 16:57Ik zou graag een fout in dit patroon willen melden. Bij het gedeelte LIJF staat dat je 4 st moet meerderen iedere 6e nld, in totaal 4x. Dit klopt niet. Je moet 4 st meerderen iedere 6cm, niet iedere 6e nld. Ik heb niet iedere taal gecheckt, maar in het Noors, Zweeds, Deens en Duits staat dat je iedere 6cm moet meerderen. En als je kijkt naar de foto zie je dat dit de juiste instructie is. In beide Engelse versies (UK/US) staat het ook fout. Ik heb iedere 6e nld gemeerderd en moet dit nu uithalen
07.10.2019 - 00:40Me encanta y está super bien explicado! pero tengo una pregunta . Hay que hacer alguna cosa para que en el cambio de pasada quede bien unido el motivo? Hay un punto que me ha quedado un poco desplazado en vertical y me parece que no me he equivocado en ningún punto. Muchas gracias!
18.09.2019 - 01:11DROPS Design answered:
Hola Ana. Puedes ver este vídeo como sugerencia:
17.10.2019 - 20:07Ilovedogs grazie ho capito adesso, certo diventa faticoso sì ma ci voglio provare!
09.09.2019 - 17:56Her er en opskrift hvor man kan lege med farverne. Jeg påtænker at strikke ribben i halsen med rød. Mønsterdelen strikkes efterfølgende i marineblå og Hvid. Resten af kroppen strikkes i rød fra brystet og ned
06.09.2019 - 13:17