DROPS Bomull-Lin
DROPS Bomull-Lin
53% Cotton, 47% Linen
from 2.50 £ /50g
Get the yarn to make this pattern from 7.50£.

The yarn cost is calculated from the pattern’s smallest size and the yarn’s cheapest product type. Looking for an even better price? You might find it on the DROPS Deals!

DROPS SS24

Always Bright

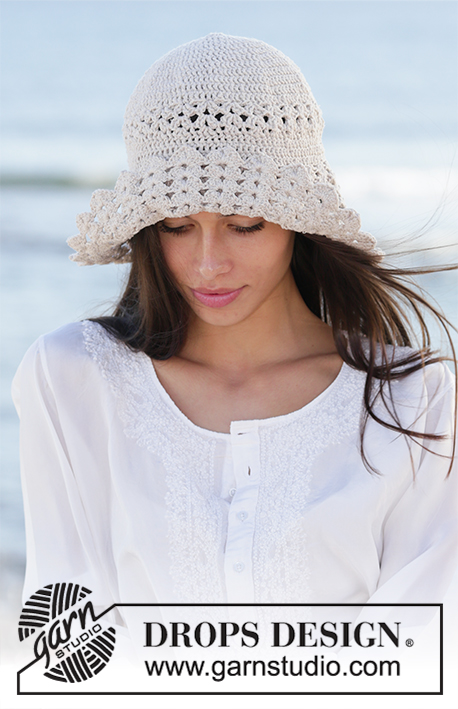
Crocheted hat in DROPS Bomull-Lin or DROPS Paris. Piece is crocheted top down with treble crochets and lace pattern.

DROPS 199-14
DROPS design: Pattern l-149
Yarn group C or A + A
----------------------------------------------------------

SIZE:
One-size
Head circumference: approx. 54/58 cm

MATERIALS:
DROPS BOMULL-LIN from Garnstudio (belongs to yarn group C)
150 g colour 01, white

Or use:
DROPS PARIS from Garnstudio (belongs to yarn group C)
200 g colour 16, white

CROCHET TENSION:
18 treble crochets in width and 10½ rows vertically = 10 x 10 cm.

CROCHET HOOK:
DROPS CROCHET HOOK SIZE 3.5 mm
Hook size is only a suggestion! If you have too many stitches on 10 cm switch to larger hook. If you have too few stitches on 10 cm switch to smaller hook.

ACCESSORIES:
Approx. 1½ metre thin steel wire for edge on brim.

----------------------------------------------------------

-------------------------------------------------------

Alternative Yarn – See how to change yarns here
Yarn Groups A to F – Use the same pattern and change the yarn here
Yarn usage using an alternative yarn – Use our yarn converter here

-------------------------------------------------------

DROPS Bomull-Lin
DROPS Bomull-Lin
53% Cotton, 47% Linen
from 2.50 £ /50g
Get the yarn to make this pattern from 7.50£.

The yarn cost is calculated from the pattern’s smallest size and the yarn’s cheapest product type. Looking for an even better price? You might find it on the DROPS Deals!

Pattern instructions

NOTE: This pattern is written in British English. All measurements in charts are in cm. For conversion from cm to inches - click here. There are different terms for crocheting in British and American English. If this pattern includes crochet, click for "crochet terms" here. For this pattern in American English, please click here.
----------------------------------------------------------

EXPLANATION FOR THE PATTERN:

----------------------------------------------------------

PATTERN: 
See diagrams A.1 to A.4.

CROCHET INFORMATION:
Replace first treble crochet on round with 3 chain stitches. Finish round with 1 slip stitch in third chain stitch from beginning of round. (When A.2 is repeated, work the 3 chain stitches as 1 treble crochet).

DECREASE TIP:
Decrease 1 treble crochet by working the next 2 treble crochets together as follows: Work 1 treble crochet but wait with last pull through (= 2 loops on hook), then work next treble but now pull last yarn over through all 3 loops on hook.

INCREASE TIP:
Increase 1 treble crochet by working 2 treble crochets in same treble crochet.

----------------------------------------------------------

START THE PIECE HERE:

----------------------------------------------------------

HAT - SHORT OVERVIEW OF THE PIECE:
Work in the round top down.

HAT:
Work 4 chain stitches on hook size 3.5 mm with Bomull-Lin or Paris and form a ring with 1 slip stitch in first chain stitch. Read CROCHET INFO!
Work * A.2, A.1 *, work from *-* 6 times in total in width (there are no stitches in A.2 on first round). REMEMBER THE CROCHET TENSION! When A.1 and A.2 have been worked vertically, there are 90 treble crochets on round. Work 1st round in A.3 and repeat this round until piece measures approx. 16 cm from the top and down. Work last round in A.3 (= eyelet row). Then work brim as explained below: 

BRIM:
Work A.4 in the round (= 10 repetitions of 9 stitches). When A.4 has been worked vertically, there are 210 stitches on round. Place a thin steel wire along the edge of brim. Work 1 double crochet in every treble crochet the entire round while AT THE SAME TIME working around steel wire. This is done to make the hat more stiff along the edge. Adjust the length on wire according to desired measurements on brim. Twine the steel wire ends together and hide them in the stitches. Cut and fasten the yarn. 

This pattern has been corrected.

Updated online: 24.06.2019
Correction: Missing symbol added to the symbol definition (= 2 chain stitches)
Updated online: 08.06.2021
No correction, but one line (last line) is added under CROCHET INFORMATION.
Updated online: 07.09.2022
1 slip stitch - the 2 slip stitches in A.1 row 9 are just for the start of the row.

Diagram

symbols = work 4 chain stitches, form a ring with 1 slip stitch in first chain stitch - see black dot on circle, round begins and ends here
symbols = 1 chain stitch
symbols = 1 treble crochet in stitch
symbols = 1 treble crochet around chain stitch/chain space
symbols = 1 slip stitch - the 2 slip stitches in A.1 row 9 are just for the start of the row.
symbols = this round has already been worked, begin on next round!
symbols = 2 chain stitches
symbols = 2 treble crochets in same treble crochet
symbols = work 2 treble crochets together as follows: Work first treble crochet but wait with last pull through, work next treble crochet and on last yarn over pull yarn through all 3 loops on hook (= 1 treble crochet decreased)
diagram
diagram
Do you have a question? See a list of frequently asked questions (FAQ)

Knitting tension is what determines the final measurements of your work, and is usually measured per 10 x 10 cm. It is provided like so: number of stitches in width x number of rows in height - eg: 19 stitches x 26 rows = 10 x 10 cm.

The knitting tension is very individual; some people knit/crochet loosely while others work tightly. You adjust the knitting tension with the needle size, which is why the suggested needle size is only meant as a guide! You need to adjust this (up or down) to ensure that YOUR knitting tension matches the knitting tension provided in the pattern. If you work with a different knitting tension than provided you will have a different yarn consumption, and your work will have different measurements than what the pattern suggests.

The knitting tension also determines which yarns can replace each other. As long as you achieve the same knitting tension you can replace one yarn with another.

See DROPS lesson: How to measure your tension/gauge

See DROPS video: How to make a gauge tension swatch

The required amount of yarn is provided in grams, eg: 450 g. To calculate how many balls you’ll need you first need to know how many grams are in 1 ball (25g, 50g or 100g). This information is available if you click on the individual yarn quality on our pages. Divide the amount required with the amount of each ball. For example, if each ball is 50g (the most common amount), the calculation will be as follows: 450 / 50 = 9 balls.

The important thing when changing from one yarn to another is that the knitting/crochet tension remains the same. This is so that the measurements of the finished piece will be the same as on the sketch provided. It is easier to achieve the same knitting tension using yarns from the same yarn group. It is also possible to work with multiple strands of a thinner yarn to achieve the knitting tension of a thicker one. Please try our yarn converter. We recommend you to always work a test swatch.

Please NOTE: when changing yarn the garment might have a different look and feel to the garment in the photo, due to individual properties and qualities of each yarn.

See DROPS lesson: Can I use a different yarn than the one mentioned in the pattern?

All our yarns are categorised into yarn groups (from A to F) according to thickness and knitting tension – group A contains the thinnest yarns and group F the thickest. This makes it easier for you to find alternative yarns to our patterns, should you wish to switch yarn. All yarns within the same group have a similar knitting tension and can easily replace each other. However, different yarn qualities have different structures and properties which will give the finished work a unique look and feel.

Click here for an overview of the yarns in each yarn group

At the top of all our patterns you’ll find a link to our yarn calculator, which is a helpful tool should you wish to use a different yarn than suggested. By filling in the yarn quality you wish to replace, the amount (in your size) and number of strands, the calculator will present good alternative yarns with the same knitting tension. Additionally it will tell you how much you’ll require in the new qualities and whether you’ll need to work with multiple strands. Most skeins are 50g (some are 25g or 100g).

If the pattern is worked with multiple colours, every colour will have to be calculated separately. Similarly, if the pattern is worked with several strands of different yarns (for example 1 strand Alpaca and 1 strand Kid-Silk) you will have to find alternatives for each, individually.

Click here to see our yarn calculator

Since different yarns have different qualities and textures we have chosen to keep the original yarn in our patterns. However, you can easily find options among our available qualities by using our yarn calculator, or simply pick a yarn from the same yarn group.

It is possible that some retailers still have discontinued yarns in stock, or that someone has a few skeins at home that they would like to find patterns for.

The yarn calculator will provide both alternative yarn as well as required amount in the new quality.

If you think it's hard to decide what size to make, it can be a good idea to measure a garment you own already and like the size of. Then you can pick the size by comparing those measures with the ones available in the pattern's size chart.

You'll find the size chart at the bottom of the pattern.

See DROPS lesson: How to read size chart

The needle size provided in the pattern serves only as a guide, the important thing is to follow the knitting tension. And since knitting tension is very individual, you will have to adjust the needle size to ensure that YOUR tension is the same as in the pattern – maybe you’ll have to adjust 1, or even 2 needle sizes, up or down to achieve the correct tension. For this, we recommend that you work test swatches.

Should you work with a different knitting tension than the one provided, the measurements of the finished garment might deviate from the measurement sketch.

See DROPS lesson: How to measure your tension/gauge

See DROPS video: How to make a tension/gauge swatch

Working a garment top-down provides more flexibility and room for personal adjustment. For example it is easier to try the garment on while working, as well as making adjustments to length of yoke and shoulder caps.

The instructions are carefully explaining every step, in the correct order. Diagrams are adjusted to the knitting direction and are worked as usual.

The diagram depicts all rows/rounds, and every stitch seen from the right side. It is read from bottom to top, from right to left. 1 square = 1 stitch.

When working back and forth, every other row is worked from the right side and every other row is worked from the wrong side. When working from the wrong side, the diagram will have to be worked reversed: from left to right, knit stitches are purled, purl stitches are knit etc.

When working in the round every round is worked from the right side and the diagram are worked from right to left on all rounds.

See DROPS lesson: How to read knitting diagrams

The diagram depicts all rows/rounds, and every stitch seen from the right side. It is worked from bottom to top, from right to left.

When working back and forth every other row is worked from the right side: from right to left and every other row is worked from the wrong side: from left to right.

When working in the round, every row in the diagram are worked from the right side, from right to left.

When working a circular diagram you start in the middle and work your way outwards, counter clockwise, row by row.

The rows usually start with a given number of chain stitches (equivalent to the height of the following stitch), this will either be depicted in the diagram or explained in the pattern.

See DROPS lesson: How to read crochet diagrams

Instructions for working several diagrams after each other on the same row/round, will often be written like so: “work A.1, A.2, A.3 a total of 0-0-2-3-4 times". This means you work A.1 once, then A.2 is worked once, and A.3 is repeated (in width) the number of times provided for your size – in this case like so: S = 0 times, M = 0 times, L=2 times, XL= 3 times and XXL = 4 times.

The diagrams are worked as usual: begin with the first row in A.1, then work the first row in A.2 etc.

See DROPS lesson: How to read knitting diagrams

See DROPS lesson: How to read crochet diagrams

The total width of the garment (from wrist-to-wrist) will be larger in the larger sizes, despite the actual sleeves being shorter. The larger sizes have longer sleeve caps and wider shoulders, so there will be a good fit in all sizes.

The measurement sketch/schematic drawing provides information regarding the full length of the garment. If it’s a jumper or a jacket the length is measured from the highest point on the shoulder closest to the neckline, and straight down to the bottom of the garment. It is NOT measured from the tip of shoulder. Similarly, the length of yoke is measured from the highest point on the shoulder and down to where yoke is split into body and sleeves.

On a jacket measures are never taken along bands, unless specifically stated. Always measure inside band stitches when measuring the length.

See DROPS lesson: How to read a schematic drawing

Diagrams are often repeated on the round or in height. 1 repeat is the diagram the way it appears in the pattern. If it says to work 5 repeats of A.1 in the round, then you work A.1 a total of 5 times after/next to each other in the round. If it says to work 2 repeats of A.1 vertically/in height you work the entire diagram once, then begin again at the start and work the entire diagram one more time.

Chain stitches are slightly narrower than other stitches and to avoid working the cast-on edge too tight, we simply chain more stitches to begin with. The stitch count will be adjusted on the following row to fit the pattern and measurement sketch.

The rib edge is more elastic and will contract slightly compared to, for example, stocking stitch. By increasing before the rib edge, you avoid a visible difference in width between the rib edge and the rest of the body.

It’s very easy to cast off too tightly, and by making yarn overs while casting off (and simultaneously casting these off) you avoid a too tight cast off edge.

See DROPS video: How to bind off with yarn overs (yo)

To achieve an even increase (or decrease) you can increase on, for example: every 3rd and 4th row alternately, like so: work 2 rows and increase on the 3rd row, work 3 rows and increase on the 4th. Repeat this until the increase is complete.

See DROPS lesson: Increase or decrease 1 st on every 3rd and 4th row alternately

Should you prefer to work in the round instead of back and forth, you may of course adjust the pattern. You’ll need to add steeks mid-front (usually 5 stitches), and follow the instructions. When you would normally turn and work from the wrong side, simply work across the steek and continue in the round. At the end you’ll cut the piece open, pick up stitches to work bands, and cover the cut edges.

See DROPS video: How to knit steeks and cut open

Should you prefer to work back and forth instead of in the round, you may of course adjust the pattern so you work the pieces separately and then assemble them at the end. Divide the stitches for the body in 2, add 1 edge stitch in each side (for sewing) and work the front and back pieces separately.

See DROPS lesson: Can I adapt a pattern for circular needles into straight needles?

Pattern repeats can vary slightly in the different sizes, in order to get the correct proportions. If you’re not working the exact same size as the garment in the photo, yours might deviate slightly. This has been carefully developed and adjusted so that the complete impression of the garment is the same in all sizes.

Make sure to follow instructions and diagrams for your size!

If you have found a pattern you like which is available in women’s size it’s not very difficult to convert it to men’s size. The biggest difference will be the length of sleeves and body. Start working on the women size that you think would fit across the chest. The additional length will be worked right before you cast off for the armhole/sleeve cap. If the pattern is worked top-down you can add the length right after the armhole or before the first decrease on sleeve.

Regarding additional yarn amount, this will depend on how much length you add, but it is better with a skein too many than too few.

All yarns will have excess fibres (from production) that might come off as lint or shedding. Brushed yarns (ie hairier yarns) have more of these loose, excess fibres, causing more shedding.

Shedding also depends on what is worn under or over the garment, and whether this pulls at the yarn fibres. It’s therefore not possible to guarantee that there will be no shedding

Below are some tips on how to get the best result when working with hairier yarns:

1. When the garment is finished (before you wash it) shake it vigorously so the looser hairs come off. NOTE: do NOT use a lint roller, brush or any method that pulls at the yarn.

2. Place the garment in a plastic bag and put it in your freezer - the temperature will cause the fibres to become less attached to each other, and excess fibres will come off easier.

3. Leave in the freezer for a few hours before taking it out and shaking it again.

4. Wash the garment according to the instructions on the yarn label.

Pilling is a natural process that happens to even the most exclusive of fibers. It's a natural sign of wear and tear that is hard to avoid, and that is most visible in high friction areas of your garment like a sweater's arms and cuffs.

You can make your garment look as new by removing the pilling, using a fabric comb or a pill/lint remover.

Still can't find the answer you need? Then scroll down and leave your question so one of our experts can try to help you. This will be done normally within 5 to 10 working days.
In the meantime, you can read the questions and answers that others have left to this pattern or join the DROPS Workshop on Facebook to get help from fellow knitters/crocheters!

You might also like...

Post a comment to pattern DROPS 199-14

We would love to hear what you have to say about this pattern!

If you want to leave a question, please make sure you select the correct category in the form below, to speed up the answering process. Required fields are marked *.

Comments / Questions (71)

country flag Selma wrote:

Har nu fået lavet cirklen (5 første rækker) og de første trin af A1 men når jeg skal til at lave de første 2 luftmasker bliver jeg lidt forvirret. Jeg kn godt lave de første og så rækken hen, men når jeg så kommer time enden på rækken efter slutter jeg med 2 luftmasker men skal så også starte næste runde med 2 luftmasker, men for det ikke bliver til 4 luftmasker sammen skal de 2 første hækles på noget, men hvad?

18.07.2020 - 17:25

DROPS Design answered:

Hej Selma, du hækler sidste lm sammen med første maske på omgangen, med 1 kæde maske inden du hækler de 3 nye lm. God fornøjelse!

04.08.2020 - 11:00

country flag Annick wrote:

Bonjour\r\nSimplement pour vous dire merci pour ces modèles qui sont vraiment super... Les diagrammes sont très bien conçus 👌\r\nMerci..

30.06.2020 - 13:55

country flag Litinae wrote:

Bonjour. C'est encore moi pardon de déranger. Je suis au diagramme A1 et A2. J'ai fais mes 5 premiers rangs dans soucis. Par contre à partir du sixième rang je ne comprend pas. Le rang commence par les 3ml qui remplacent une B mais elle est placé sur la seconde B du rang précédant. Donc lorsque l'on enchaîne les digramme pas de soucis on saute la B car il y a les 2 ml mais pour la première fois je fais comment ? Merci à vous.

11.06.2020 - 20:30

DROPS Design answered:

Bonjour Litinae, au début du 6ème rang, vous faites 1 mc dan sla 1ère bride du rang précédent (= le petit v), puis 3 ml, 1 bride dans chacune des 2 brides suivantes etc... le tour se termine par 1 mc dans la 3ème des ml, puis, faites 1 mc dans la bride suivante comme au début du 6ème tour (pour le 7ème tour et idem pour le 8ème tour). Bon crochet!

12.06.2020 - 07:51

country flag Litinae wrote:

Bonjour. Je ne suis pas certaine de lire correctement les diagrammes A1 et A2. Je commence par 3 ML puis 1 B au même endroit et ensuite 2B dans la même B. Juste que ok. Quand j'enchaîne une seconde fois le schéma. Dois-je refaire 3ml puis B puis 2B ? La MC est note uniquement pour finir le tour complet du rang c'est cela ? Ou alors dois-je faire la MC dans la bride numéro 3 puis faire mes 3 ML et enchaîner les B ? Merci à vous.

10.06.2020 - 22:49

DROPS Design answered:

Bonjour Litinae, à partir du 1er tour de A.2, les 3 ml du début du tour remplacent la 1ère bride du tour, ainsi, quand vous crochetez les A.2/A.1 suivant, vous crochetez 1 bride à la place de ces 3 mailles en l'air. - la maille coulée ne se fera qu'à la fin du tour, pour joindre le dernier A.1 au 1er A.2. Bon crochet!

11.06.2020 - 08:36

country flag Sonia wrote:

Salve, cappello stupendo:) Io però ho un problema: mia mamma è una personcina minuta ed ha 53 cm di circonferenza della testa. La misura proposta è troppo grande. Come faccio a ridimensionare il tutto?

12.05.2020 - 14:41

DROPS Design answered:

Buongiorno Sonia, può ricalcolare le maglie aiutandosi con il suo campione, oppure rivolgersi al suo rivenditore DROPS di fiducia: purtroppo in questa sede non possiamo fornirle un aiuto così personalizzato. Buon lavoro!

13.05.2020 - 10:10

country flag Janny wrote:

Wat jammer dat er geen geschreven patroon meer is. Erg complex om uit de diagrammen te komen. Het lukt me met name door de vragen van anderen te lezen + de antwoorden. Gezien de vele vragen zijn er velen met mij die zich op deze manier door het patroon worstelen! Erg jammer!!

04.05.2020 - 19:33

country flag Barbara Stephens wrote:

Can we get this instructions in english

19.04.2020 - 15:10

DROPS Design answered:

Dear Barbara, sure - you can simply choose the language from menu under the main photo. Happy crocheting!

19.04.2020 - 18:18

country flag María José wrote:

Hola Quisiera saber si hay algún tutorial de cómo se empieza esta labor . He visto alguno de otras labores y si me entero pero este patrón se me complica. Pues soy principiante y no me aclaro que hay que hacer después de cerrar la cadeneta . No me aclaro de cuántos pa hay que hacer dentro y como seguir para incluir el A3 en el A2 Gracias

18.03.2020 - 17:12

DROPS Design answered:

Hola Mari José. Tienes varios vídeos bajo el diagrama que te podrían ayudar en la elaboración del patrón. Sobre el empiece: Después de formar un anillo con 4 puntos de cadeneta, trabajar 12 puntos altos dentro del anillo, en la 2ª fila trabajar 2 puntos altos en cada punto alto ( el 1er punto alto se sustituye por 3 puntos de cadeneta) y finalizar la vuelta con 1 punto enano en el 3er punto de cadeneta

18.03.2020 - 18:51

country flag Kerstin wrote:

Diagrammet är förvirrande. Ska A2 delens 1a maska (3lm) på v3 virkas i samma maska? V6 lm, ska det hoppas över 2 lm eller? Har nu försökt olika alternativ. Inget blir rätt. Bra om antal maskor också finns med.

27.02.2020 - 17:54

country flag Linda Larsen wrote:

Hej Drops - tak for svar. Jeg må lige meddele, at min hæklefasthed skam passer! Men der er fejl i opskriften i begyndelsen af hatten. For at få mønstret til at passe, må der være 60 stm når 5. omgang er hæket færdig. Følger man Jeres mønster, er der kun 40 stm når 5. omg er hæklet færdig. Iøvrigt er jeg ellers vældig glad for Jeres opskrifter!!

12.09.2019 - 15:05