DROPS Melody uni colour 71% Alpaca, 25% Wool, 4% Polyamide |
4.25 £ /50g |
Order |
Clicking the ORDER button will redirect you to Wool Warehouse Direct Ltd website
The yarn cost is calculated from the pattern’s smallest size and the yarn’s cheapest product type. Looking for an even better price? You might find it on the DROPS Deals!
-------------------------------------------------------
Alternative Yarn – See how to change yarns here
Yarn Groups A to F – Use the same pattern and change the yarn here
Yarn usage using an alternative yarn – Use our yarn converter here
-------------------------------------------------------
DROPS Melody uni colour 71% Alpaca, 25% Wool, 4% Polyamide 4.25 £ /50g Order |
Clicking the ORDER button will redirect you to Wool Warehouse Direct Ltd website
The yarn cost is calculated from the pattern’s smallest size and the yarn’s cheapest product type. Looking for an even better price? You might find it on the DROPS Deals!
This pattern has been corrected. Click here to see the correction/s.
= knit | |
= between 2 stitches make 1 yarn over, on next round knit yarn over to make hole | |
= knit 2 together | |
= slip 1 stitch knitwise, knit 1, pass slipped stitch over stitch worked | |
= slip 1 stitch knitwise, knit 2 stitches together, pass slipped stitch over stitches worked together |
Each of our patterns has specific tutorial videos to help you.
These step-by-step tutorials might also help you:
Why is the knitting/crochet tension so important?
Knitting tension is what determines the final measurements of your work, and is usually measured per 10 x 10 cm. It is provided like so: number of stitches in width x number of rows in height - eg: 19 stitches x 26 rows = 10 x 10 cm.
The knitting tension is very individual; some people knit/crochet loosely while others work tightly. You adjust the knitting tension with the needle size, which is why the suggested needle size is only meant as a guide! You need to adjust this (up or down) to ensure that YOUR knitting tension matches the knitting tension provided in the pattern. If you work with a different knitting tension than provided you will have a different yarn consumption, and your work will have different measurements than what the pattern suggests.
The knitting tension also determines which yarns can replace each other. As long as you achieve the same knitting tension you can replace one yarn with another.
See DROPS lesson: How to measure your tension/gauge
See DROPS video: How to make a gauge tension swatch
How do I know how many balls of yarn I need?
The required amount of yarn is provided in grams, eg: 450 g. To calculate how many balls you’ll need you first need to know how many grams are in 1 ball (25g, 50g or 100g). This information is available if you click on the individual yarn quality on our pages. Divide the amount required with the amount of each ball. For example, if each ball is 50g (the most common amount), the calculation will be as follows: 450 / 50 = 9 balls.
Can I use a different yarn than what the pattern suggests?
The important thing when changing from one yarn to another is that the knitting/crochet tension remains the same. This is so that the measurements of the finished piece will be the same as on the sketch provided. It is easier to achieve the same knitting tension using yarns from the same yarn group. It is also possible to work with multiple strands of a thinner yarn to achieve the knitting tension of a thicker one. Please try our yarn converter. We recommend you to always work a test swatch.
Please NOTE: when changing yarn the garment might have a different look and feel to the garment in the photo, due to individual properties and qualities of each yarn.
See DROPS lesson: Can I use a different yarn than the one mentioned in the pattern?
What are the yarn groups?
All our yarns are categorised into yarn groups (from A to F) according to thickness and knitting tension – group A contains the thinnest yarns and group F the thickest. This makes it easier for you to find alternative yarns to our patterns, should you wish to switch yarn. All yarns within the same group have a similar knitting tension and can easily replace each other. However, different yarn qualities have different structures and properties which will give the finished work a unique look and feel.
How do I use the yarn calculator?
At the top of all our patterns you’ll find a link to our yarn calculator, which is a helpful tool should you wish to use a different yarn than suggested. By filling in the yarn quality you wish to replace, the amount (in your size) and number of strands, the calculator will present good alternative yarns with the same knitting tension. Additionally it will tell you how much you’ll require in the new qualities and whether you’ll need to work with multiple strands. Most skeins are 50g (some are 25g or 100g).
If the pattern is worked with multiple colours, every colour will have to be calculated separately. Similarly, if the pattern is worked with several strands of different yarns (for example 1 strand Alpaca and 1 strand Kid-Silk) you will have to find alternatives for each, individually.
Why do you show discontinued yarns in the patterns?
Since different yarns have different qualities and textures we have chosen to keep the original yarn in our patterns. However, you can easily find options among our available qualities by using our yarn calculator, or simply pick a yarn from the same yarn group.
It is possible that some retailers still have discontinued yarns in stock, or that someone has a few skeins at home that they would like to find patterns for.
The yarn calculator will provide both alternative yarn as well as required amount in the new quality.
What size should I knit?
If you think it's hard to decide what size to make, it can be a good idea to measure a garment you own already and like the size of. Then you can pick the size by comparing those measures with the ones available in the pattern's size chart.
You'll find the size chart at the bottom of the pattern.
See DROPS lesson: How to read size chart
Why do I get the wrong knitting tension with the suggested needle size?
The needle size provided in the pattern serves only as a guide, the important thing is to follow the knitting tension. And since knitting tension is very individual, you will have to adjust the needle size to ensure that YOUR tension is the same as in the pattern – maybe you’ll have to adjust 1, or even 2 needle sizes, up or down to achieve the correct tension. For this, we recommend that you work test swatches.
Should you work with a different knitting tension than the one provided, the measurements of the finished garment might deviate from the measurement sketch.
See DROPS lesson: How to measure your tension/gauge
See DROPS video: How to make a tension/gauge swatch
Why is the pattern worked top-down?
Working a garment top-down provides more flexibility and room for personal adjustment. For example it is easier to try the garment on while working, as well as making adjustments to length of yoke and shoulder caps.
The instructions are carefully explaining every step, in the correct order. Diagrams are adjusted to the knitting direction and are worked as usual.
How do I work according to a knitting diagram?
The diagram depicts all rows/rounds, and every stitch seen from the right side. It is read from bottom to top, from right to left. 1 square = 1 stitch.
When working back and forth, every other row is worked from the right side and every other row is worked from the wrong side. When working from the wrong side, the diagram will have to be worked reversed: from left to right, knit stitches are purled, purl stitches are knit etc.
When working in the round every round is worked from the right side and the diagram are worked from right to left on all rounds.
See DROPS lesson: How to read knitting diagrams
How do I work according to a crochet diagram?
The diagram depicts all rows/rounds, and every stitch seen from the right side. It is worked from bottom to top, from right to left.
When working back and forth every other row is worked from the right side: from right to left and every other row is worked from the wrong side: from left to right.
When working in the round, every row in the diagram are worked from the right side, from right to left.
When working a circular diagram you start in the middle and work your way outwards, counter clockwise, row by row.
The rows usually start with a given number of chain stitches (equivalent to the height of the following stitch), this will either be depicted in the diagram or explained in the pattern.
See DROPS lesson: How to read crochet diagrams
How do I work several diagrams simultaneously on the same row/round?
Instructions for working several diagrams after each other on the same row/round, will often be written like so: “work A.1, A.2, A.3 a total of 0-0-2-3-4 times". This means you work A.1 once, then A.2 is worked once, and A.3 is repeated (in width) the number of times provided for your size – in this case like so: S = 0 times, M = 0 times, L=2 times, XL= 3 times and XXL = 4 times.
The diagrams are worked as usual: begin with the first row in A.1, then work the first row in A.2 etc.
See DROPS lesson: How to read knitting diagrams
See DROPS lesson: How to read crochet diagrams
Why are the sleeves shorter in larger sizes?
The total width of the garment (from wrist-to-wrist) will be larger in the larger sizes, despite the actual sleeves being shorter. The larger sizes have longer sleeve caps and wider shoulders, so there will be a good fit in all sizes.
Where on the garment is the length measured?
The measurement sketch/schematic drawing provides information regarding the full length of the garment. If it’s a jumper or a jacket the length is measured from the highest point on the shoulder closest to the neckline, and straight down to the bottom of the garment. It is NOT measured from the tip of shoulder. Similarly, the length of yoke is measured from the highest point on the shoulder and down to where yoke is split into body and sleeves.
On a jacket measures are never taken along bands, unless specifically stated. Always measure inside band stitches when measuring the length.
See DROPS lesson: How to read a schematic drawing
What is a repeat?
Diagrams are often repeated on the round or in height. 1 repeat is the diagram the way it appears in the pattern. If it says to work 5 repeats of A.1 in the round, then you work A.1 a total of 5 times after/next to each other in the round. If it says to work 2 repeats of A.1 vertically/in height you work the entire diagram once, then begin again at the start and work the entire diagram one more time.
Why does the piece start with more chain stitches than it’s worked with?
Chain stitches are slightly narrower than other stitches and to avoid working the cast-on edge too tight, we simply chain more stitches to begin with. The stitch count will be adjusted on the following row to fit the pattern and measurement sketch.
Why increase before the rib edge when the piece is worked top-down?
The rib edge is more elastic and will contract slightly compared to, for example, stocking stitch. By increasing before the rib edge, you avoid a visible difference in width between the rib edge and the rest of the body.
Why increase in the cast-off edge?
It’s very easy to cast off too tightly, and by making yarn overs while casting off (and simultaneously casting these off) you avoid a too tight cast off edge.
See DROPS video: How to bind off with yarn overs (yo)
How do I increase/decrease on every 3rd and 4th row/round alternately?
To achieve an even increase (or decrease) you can increase on, for example: every 3rd and 4th row alternately, like so: work 2 rows and increase on the 3rd row, work 3 rows and increase on the 4th. Repeat this until the increase is complete.
See DROPS lesson: Increase or decrease 1 st on every 3rd and 4th row alternately
How can I work a jacket in the round instead of back and forth?
Should you prefer to work in the round instead of back and forth, you may of course adjust the pattern. You’ll need to add steeks mid-front (usually 5 stitches), and follow the instructions. When you would normally turn and work from the wrong side, simply work across the steek and continue in the round. At the end you’ll cut the piece open, pick up stitches to work bands, and cover the cut edges.
See DROPS video: How to knit steeks and cut open
Can I work a jumper back and forth instead of in the round?
Should you prefer to work back and forth instead of in the round, you may of course adjust the pattern so you work the pieces separately and then assemble them at the end. Divide the stitches for the body in 2, add 1 edge stitch in each side (for sewing) and work the front and back pieces separately.
See DROPS lesson: Can I adapt a pattern for circular needles into straight needles?
Why is the pattern slightly different than what I see in the photo?
Pattern repeats can vary slightly in the different sizes, in order to get the correct proportions. If you’re not working the exact same size as the garment in the photo, yours might deviate slightly. This has been carefully developed and adjusted so that the complete impression of the garment is the same in all sizes.
Make sure to follow instructions and diagrams for your size!
How do I make a women’s size garment into a men’s size one?
If you have found a pattern you like which is available in women’s size it’s not very difficult to convert it to men’s size. The biggest difference will be the length of sleeves and body. Start working on the women size that you think would fit across the chest. The additional length will be worked right before you cast off for the armhole/sleeve cap. If the pattern is worked top-down you can add the length right after the armhole or before the first decrease on sleeve.
Regarding additional yarn amount, this will depend on how much length you add, but it is better with a skein too many than too few.
How do I prevent a hairy garment from shedding?
All yarns will have excess fibres (from production) that might come off as lint or shedding. Brushed yarns (ie hairier yarns) have more of these loose, excess fibres, causing more shedding.
Shedding also depends on what is worn under or over the garment, and whether this pulls at the yarn fibres. It’s therefore not possible to guarantee that there will be no shedding
Below are some tips on how to get the best result when working with hairier yarns:
1. When the garment is finished (before you wash it) shake it vigorously so the looser hairs come off. NOTE: do NOT use a lint roller, brush or any method that pulls at the yarn.
2. Place the garment in a plastic bag and put it in your freezer - the temperature will cause the fibres to become less attached to each other, and excess fibres will come off easier.
3. Leave in the freezer for a few hours before taking it out and shaking it again.
4. Wash the garment according to the instructions on the yarn label.
Why does my garment pill?
Pilling is a natural process that happens to even the most exclusive of fibers. It's a natural sign of wear and tear that is hard to avoid, and that is most visible in high friction areas of your garment like a sweater's arms and cuffs.
You can make your garment look as new by removing the pilling, using a fabric comb or a pill/lint remover.
Miss Lemon |
||||||||||||||||
|
|
|||||||||||||||
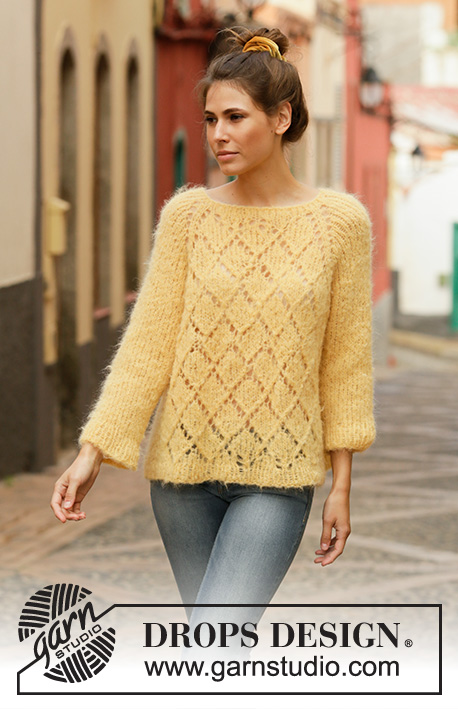
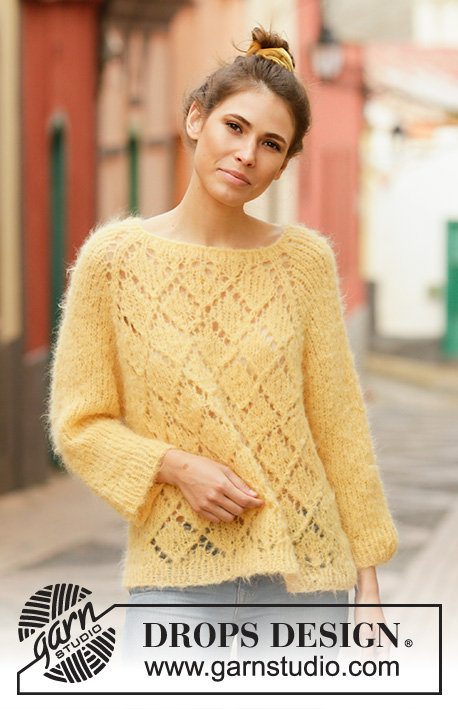
Knitted jumper with raglan in DROPS Melody. Piece is knitted top down with lace pattern. Size XS – XXL.
DROPS 200-28 |
||||||||||||||||
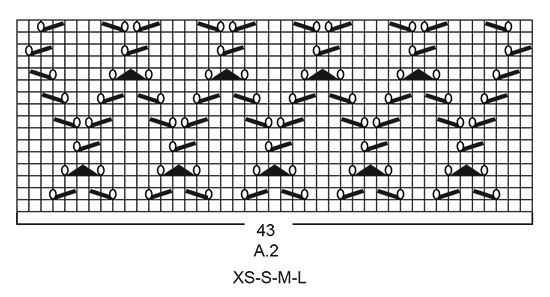
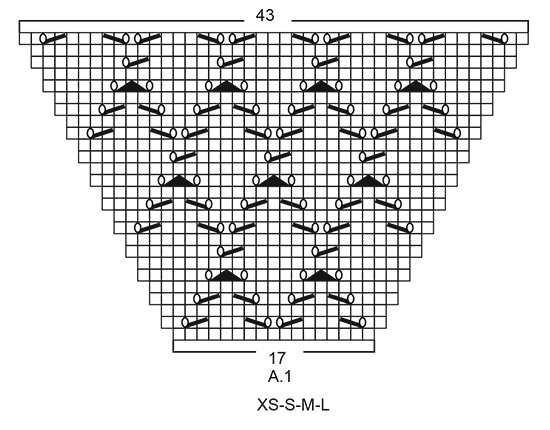
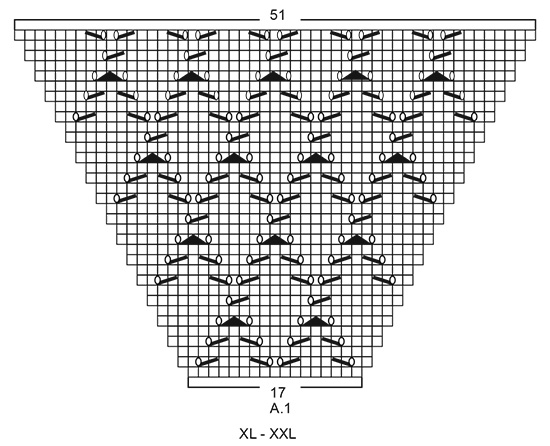
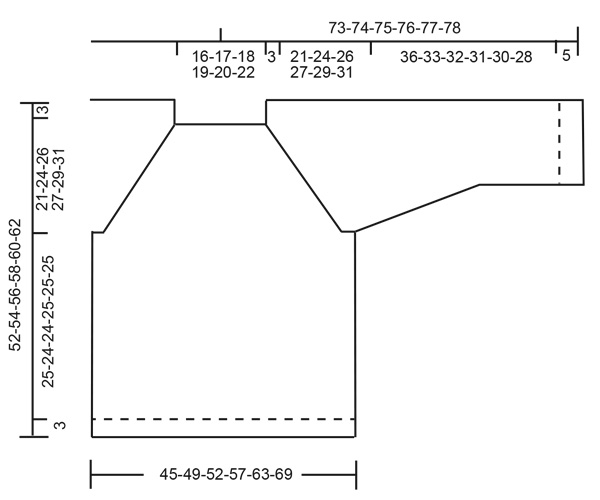
---------------------------------------------------------- EXPLANATION FOR THE PATTERN: ------------------------------------------------------- INCREASE/DECREASE TIP (evenly): To calculate how to increase/decrease evenly, use the total number of stitches on row (e.g. 50 stitches) and divide stitches by number of increases/decreases to be done (e.g. 6) = 8.3. In this example increase by making 1 yarn over after approx. every 8th stitch. On next round work yarn over twisted to avoid hole. To decrease in this example knit approx. every 7th and 8th stitch together. PATTERN: See diagrams A.1 and A.2. Choose diagram for your size. RAGLAN: Increase 1 stitch in each side of 2 knit stitches in every transition between body and sleeves (= 8 stitches increased on round). Increase 1 stitch by making 1 yarn over, on next round knit yarns over to make holes. Then work the new stitches in pattern (in stocking stitch on sleeve, stocking stitch on back piece and in pattern/stocking stitch on front piece). DECREASE TIP (applies to sleeves): Decrease 1 stitch on each side of marker thread as follows: Work until 1 stitch remains before marker thread, knit 3 stitches together = 1 stitch (move the marker thread to before this stitch after every decrease). ------------------------------------------------------- START THE PIECE HERE: ------------------------------------------------------- JUMPER - SHORT OVERVIEW OF THE PIECE: Worked in the round on circular needle, top down. After yoke work body in the round on circular needle. Work sleeves in the round on double pointed needles/a short circular needle. NECK EDGE: Cast on 50-50-52-56-58-60 stitches on circular needle size 7 mm. Work rib = knit 1/purl 1, for 3 cm, then knit 1 round while increasing 6-6-8-4-6-0 stitches evenly - read INCREASE/DECREASE TIP = 56-56-60-60-64-60 stitches. Switch to circular needle size 8 mm. YOKE: Insert 1 marker here - NOW MEASURE PIECE FROM HERE! Now insert 4 marker threads in the piece WITHOUT working - insert markers as follows: Insert 1 marker thread at beginning of round (= in transition between sleeve and back piece), insert 1 marker thread after another 19 stitches (= back piece), insert 1 marker thread after another 9-9-11-11-13-11 stitches (= sleeve), insert 1 marker thread after another 19 stitches (= front piece), 9-9-11-11-13-11 stitches now remain until first marker thread (= sleeve). Work next round as follows: Begin round at first marker thread, i.e. on back piece. Knit 1, make 1 yarn over, work 17 stitches in stocking stitch (= back piece), make 1 yarn over, knit 2 (marker thread is between these 2 stitches), make 1 yarn over, work 7-7-9-9-11-9 stitches in stocking stitch (= sleeve), make 1 yarn over, knit 2 (marker thread is between these 2 stitches), make 1 yarn over, work A.1 (= 17 stitches front piece – choose diagram for your size), make 1 yarn over, knit 2 (marker thread is between these 2 stitches), make 1 yarn over, work 7-7-9-9-11-9 stitches in stocking stitch (= sleeve), make 1 yarn over, knit 1. This was first increase for RAGLAN - read explanation above. Continue A.1 and stocking stitch while increasing every other round 15-17-18-19-20-22 times in total (including first increase explained above). After A.1 work A.2 over the same stitches as for A.1, and work the last increases in stocking stitch on each side of A.2. Repeat diagram A.2 vertically until finished measurements. REMEMBER THE KNITTING TENSION! When all increases for raglan are done the piece should measure approx. 21-24-26-27-29-31 cm from marker at the beginning of yoke. If necessary, work in pattern as before without increasing until finished measurements. After yoke work next round as follows: Work 50-54-57-60-63-68 stitches in stocking stitch (= on back piece), slip the next 37-41-43-43-45-45 stitches on 1 stitch holder for sleeve, cast on 4-4-4-6-8-10 new stitches on needle (= in the side under sleeve), work 4-6-8-10-8-11 stitches in stocking stitch, continue A.2 (= 43-43-43-43-51-51 stitches) and work 4-6-8-10-8-11 stitches in stocking stitch (= front piece), slip the next 37-41-43-43-45-45 stitches on 1 stitch holder for sleeve, cast on 4-4-4-6-8-10 new stitch on needle (= in the side under sleeve), work the last 1-1-2-3-4-5 stitches (= on back piece). Finish body and sleeves separately. NOW MEASURE PIECE FROM HERE! BODY: = 110-118-126-138-150-166 stitches. Insert 1 marker thread in the middle of the 4-4-4-6-8-10 new stitches that were cast on under sleeve in each side. Begin round at one of the marker thread and move the marker threads when working. Continue with stocking stitch and pattern A.2. When piece measures 25-24-24-25-25-25 cm from division (approx. 49-51-53-55-57-59 cm from shoulder), knit 1 round while increasing 16-18-18-20-22-24 stitches evenly = 126-136-144-158-172-190 stitches. Switch to circular needle size 7 mm and work rib = knit 1/purl 1 for 3 cm. Cast off with knit over knit and purl over purl (to avoid a tight cast-off edge use needle size 8 mm). Jumper measures approx. 52-54-56-58-60-62 cm from shoulder. SLEEVE: Slip the 37-41-43-43-45-45 stitches from stitch holder in one side of piece on circular needle/double pointed needles size 8 mm and pick in addition up 1 stitch in each of the 4-4-4-6-8-10 new stitches cast on under sleeve = 41-45-47-49-53-55 stitches. Insert 1 marker thread in the middle of the 4-4-4-6-8-10 stitches and begin round here. Work in stocking stitch. When piece measures 2 cm from division, decrease 2 stitches mid under sleeve - read DECREASE TIP. Decrease like this every 4-3½-2½-2½-2-2 cm 7-8-9-9-11-11 times in total = 27-29-29-31-31-33 stitches. Continue until sleeve measures 36-33-32-31-30-28 cm from division (shorter measurements in the larger sizes because of longer yoke). Knit 1 round while increasing 5 stitches evenly = 32-34-34-36-36-38 stitches. Switch to double pointed needles size 7 mm and work rib = knit 1/purl 1 for 5 cm. Sleeve measures approx. 41-38-37-36-35-33 cm from division. Cast off with knit over knit and purl over purl (to avoid a tight cast-off edge use needle size 8 mm). Work the other sleeve the same way. |
||||||||||||||||
Diagram explanations |
||||||||||||||||
|
||||||||||||||||
Have you made this or any other of our designs? Tag your pictures in social media with #dropsdesign so we can see them! Do you need help with this pattern?You'll find tutorial videos, a Comments/Questions area and more by visiting the pattern on garnstudio.com. © 1982-2024 DROPS Design A/S. We reserve all rights. This document, including all its sub-sections, has copyrights. Read more about what you can do with our patterns at the bottom of each pattern on our site. |
With over 40 years in knitting and crochet design, DROPS Design offers one of the most extensive collections of free patterns on the internet - translated to 17 languages. As of today we count 304 catalogues and 11422 patterns - 11422 of which are translated into English (UK/cm).
We work hard to bring you the best knitting and crochet have to offer, inspiration and advice as well as great quality yarns at incredible prices! Would you like to use our patterns for other than personal use? You can read what you are allowed to do in the Copyright text at the bottom of all our patterns. Happy crafting!
Comments / Questions (26)
Cris wrote:
Adorei o modelo vou tentar fazer
27.02.2020 - 14:36Anne-Britt wrote:
Jeg strikker str XL. Etter å ha strikket første omg med A1 har jeg 21 m på forstykket. Det fremkommer ikke noe sted, men er det kanskje sånn at første og siste maske på hvert stykke ikke telles siden de er en del sv raglan-fellingen? I såfall kommer jeg ut med 19, som stemmer med mønsteret 🙄
14.11.2019 - 21:50DROPS Design answered:
Hei Anne-Britt. Når du har strikket 1. omgang av A.1, samtidig som det det er økt til raglan, skal du ha 19 masker på forstykket + 2 kast. Du har 17 masker midt på (A.1), 1 kast i hver side av disse 17 maskene og 1 maske i hver side mot hver merketråd, = 19+2 kast på forstykket mellom merketrådene. God Fornøyelse!
18.11.2019 - 14:28Pia wrote:
Der er angivet forskellige størrelser for diagrammerne og for strikketøjet. Strikketøjets str. Går fra xs - XXL. Diagrammernes str. Går fra s- xxxl.
29.05.2019 - 10:43DROPS Design answered:
Hei Pia. Takk for beskjed, vi skal få rettet dette snarest. Inndelingen i diagrammene blir XS-S-M-L og XL-XXL. God fornøyelse
29.05.2019 - 14:33Gunn wrote:
Hei! Strikker denne i xxl. Delingen mellom bol/erme er uklar for meg. Skal ikke arbeidet deles ved merkemaskene? Hvordan kan det gå opp at jeg skal starte med 11 masker til ermene, øke 22 ganger og deretter sette av bare 45 masker til ermene? På samme måte som bakstykket starter med 19 masker og etter økningene blir 63 masker. Likevel skal det settes av 68 masker til bole.
19.05.2019 - 11:58DROPS Design answered:
Hei Gunn. Arbeidet deles ikke ved merkene: de ytterste 5 maskene fra hvert erme blir en del av bolen ved inndelingene. Dette er meningen. God fornøyelse
20.05.2019 - 13:13Nathalie wrote:
Est ce que le pareon existe pour le tricoter avec des aiguille droites ?
06.05.2019 - 13:21DROPS Design answered:
Bonjour Nathalie, ce modèle se tricote entièrement en rond, mais vous trouverez ici quelques informations sur l'adaptation d'un modèle sur aiguilles droites. Bon tricot!
06.05.2019 - 15:26Andrea wrote:
Wieso gibt es hier kein xxxl? Für mich ist der zu klein.
05.05.2019 - 13:57DROPS Design answered:
Liebe Andrea, dieses Modell ist nur bis XXL, leider können wir nicht jeder Anleitung nach jeder Anfage anpassen. Gerne können Sie sich von der Maßskizze inspirieren, um das Modell anzupassen. Gerne wird Ihnen Ihr DROPS Laden - auch telefonisch oder per E-Mail- damit weiterh helfen. Viel Spaß beim stricken!
06.05.2019 - 11:41CARON wrote:
Pouvez-vous publier les explications de ce modèle ? Un grand merci.
26.02.2019 - 13:59Diana wrote:
SO nice and niami :) Waiting for pattern.
24.02.2019 - 15:16Tina Marie Harbo wrote:
Hvornår kommer opskriften - glæder mig så meget til at strikke den.
13.02.2019 - 14:00Charlotte Clausen wrote:
Det er bare den perfekte trøje en dejlig sommeraften, lækkert garn og super sød og let model .... helt klart min favorit..glæder mig til at strikke den
08.02.2019 - 13:02